Introduction
When it comes to finding quick solutions or learning how to perform certain tasks on your Windows computer, How To Snippets can be incredibly helpful. These concise, step-by-step instructions, presented in an easy-to-follow format, guide users through various processes and troubleshoot common issues. Whether you’re a beginner or an advanced user, How To Snippets provide a convenient way to get things done efficiently.
Unlike lengthy tutorials or comprehensive user manuals, How To Snippets deliver the essential information in a succinct manner. This saves you time and effort, allowing you to quickly find the solution you need and get back to your work or leisure activities. With a few simple steps, you can capture, save, and use How To Snippets on your Windows computer, making it a valuable tool in your digital arsenal.
In this article, we will explore the concept of How To Snippets, discuss why they are beneficial for Windows users, and provide a step-by-step guide on creating and using How To Snippets on your Windows computer. By the end of this article, you’ll be equipped with the knowledge to seamlessly navigate and leverage How To Snippets to enhance your Windows experience.
What is a How To Snippet?
A How To Snippet is a concise and focused set of instructions that guides users through specific tasks or processes on their Windows computer. It is essentially a step-by-step guide that provides clear, easy-to-follow directions to accomplish a particular goal. How To Snippets are designed to be efficient, enabling users to quickly find the information they need without having to sift through extensive documentation or search the internet for solutions.
These snippets are typically presented in a visually appealing format, often including screenshots or images to visually illustrate the steps. This visual element enhances the clarity of the instructions and allows users to easily follow along. How To Snippets are commonly utilized to troubleshoot common issues, learn new features or functionalities, or perform specific tasks on Windows applications or settings.
Whether you need to set up a new email account, customize your desktop background, or troubleshoot network connectivity, How To Snippets provide you with a concise roadmap to accomplish these tasks. They eliminate the need for users to navigate through complex menus or figure out the correct sequence of steps by themselves. By following a How To Snippet, users can save time and frustration, allowing them to be more productive and confident in their Windows usage.
Furthermore, How To Snippets cater to users of all levels of expertise. Whether you’re a tech-savvy individual or a beginner just getting familiar with Windows, these snippets are designed to be easily understood by anyone. The instructions are written in clear and concise language, avoiding technical jargon or unnecessary complexity. This accessibility ensures that users can benefit from How To Snippets regardless of their skill level or prior knowledge of Windows.
Why use How To Snippets on Windows?
How To Snippets offer numerous benefits that make them a valuable resource for Windows users. Here are a few reasons why you should consider using How To Snippets:
- Efficiency: How To Snippets provide a streamlined approach to finding solutions or learning how to perform tasks on Windows. With their concise and focused instructions, they allow you to quickly accomplish your goals without wasting time on extensive research or trial and error.
- Clarity: How To Snippets are designed to be easily understood by users of all levels of expertise. The instructions are written in clear and straightforward language, avoiding technical jargon. Visual elements like screenshots or images further enhance the clarity, ensuring that you can follow along with ease.
- Troubleshooting: When encountering issues or errors on your Windows computer, How To Snippets can be a lifesaver. They provide step-by-step instructions to troubleshoot common problems, helping you resolve issues quickly and efficiently.
- Learning: How To Snippets are not only for troubleshooting but also for expanding your knowledge of Windows features and functionalities. They can teach you how to use specific applications, configure settings, or perform various tasks, empowering you to make the most out of your Windows experience.
- Accessibility: Unlike lengthy tutorials or user manuals, How To Snippets present the information in a concise format, ensuring that you can access the required instructions at any time. This accessibility is particularly useful when you need to quickly reference a specific process or solution without sifting through extensive documentation.
- Productivity: By utilizing How To Snippets, you can enhance your productivity on Windows. Instead of getting stuck or spending excessive time trying to figure out a task, you can rely on clear, step-by-step instructions to guide you through the process. This saves you time and allows you to focus on other important tasks.
Overall, How To Snippets are a valuable resource for Windows users, offering efficiency, clarity, troubleshooting assistance, and the opportunity to expand your knowledge and productivity. By leveraging these succinct instructions, you can navigate your Windows computer with confidence and accomplish your goals with ease.
Creating How To Snippets on Windows
Creating How To Snippets on your Windows computer is a straightforward process that can be done using the built-in Snipping Tool. With just a few simple steps, you can capture and save screenshots of specific processes or tasks, allowing you to create your own personalized How To Snippets. Here’s a step-by-step guide on how to create How To Snippets on Windows:
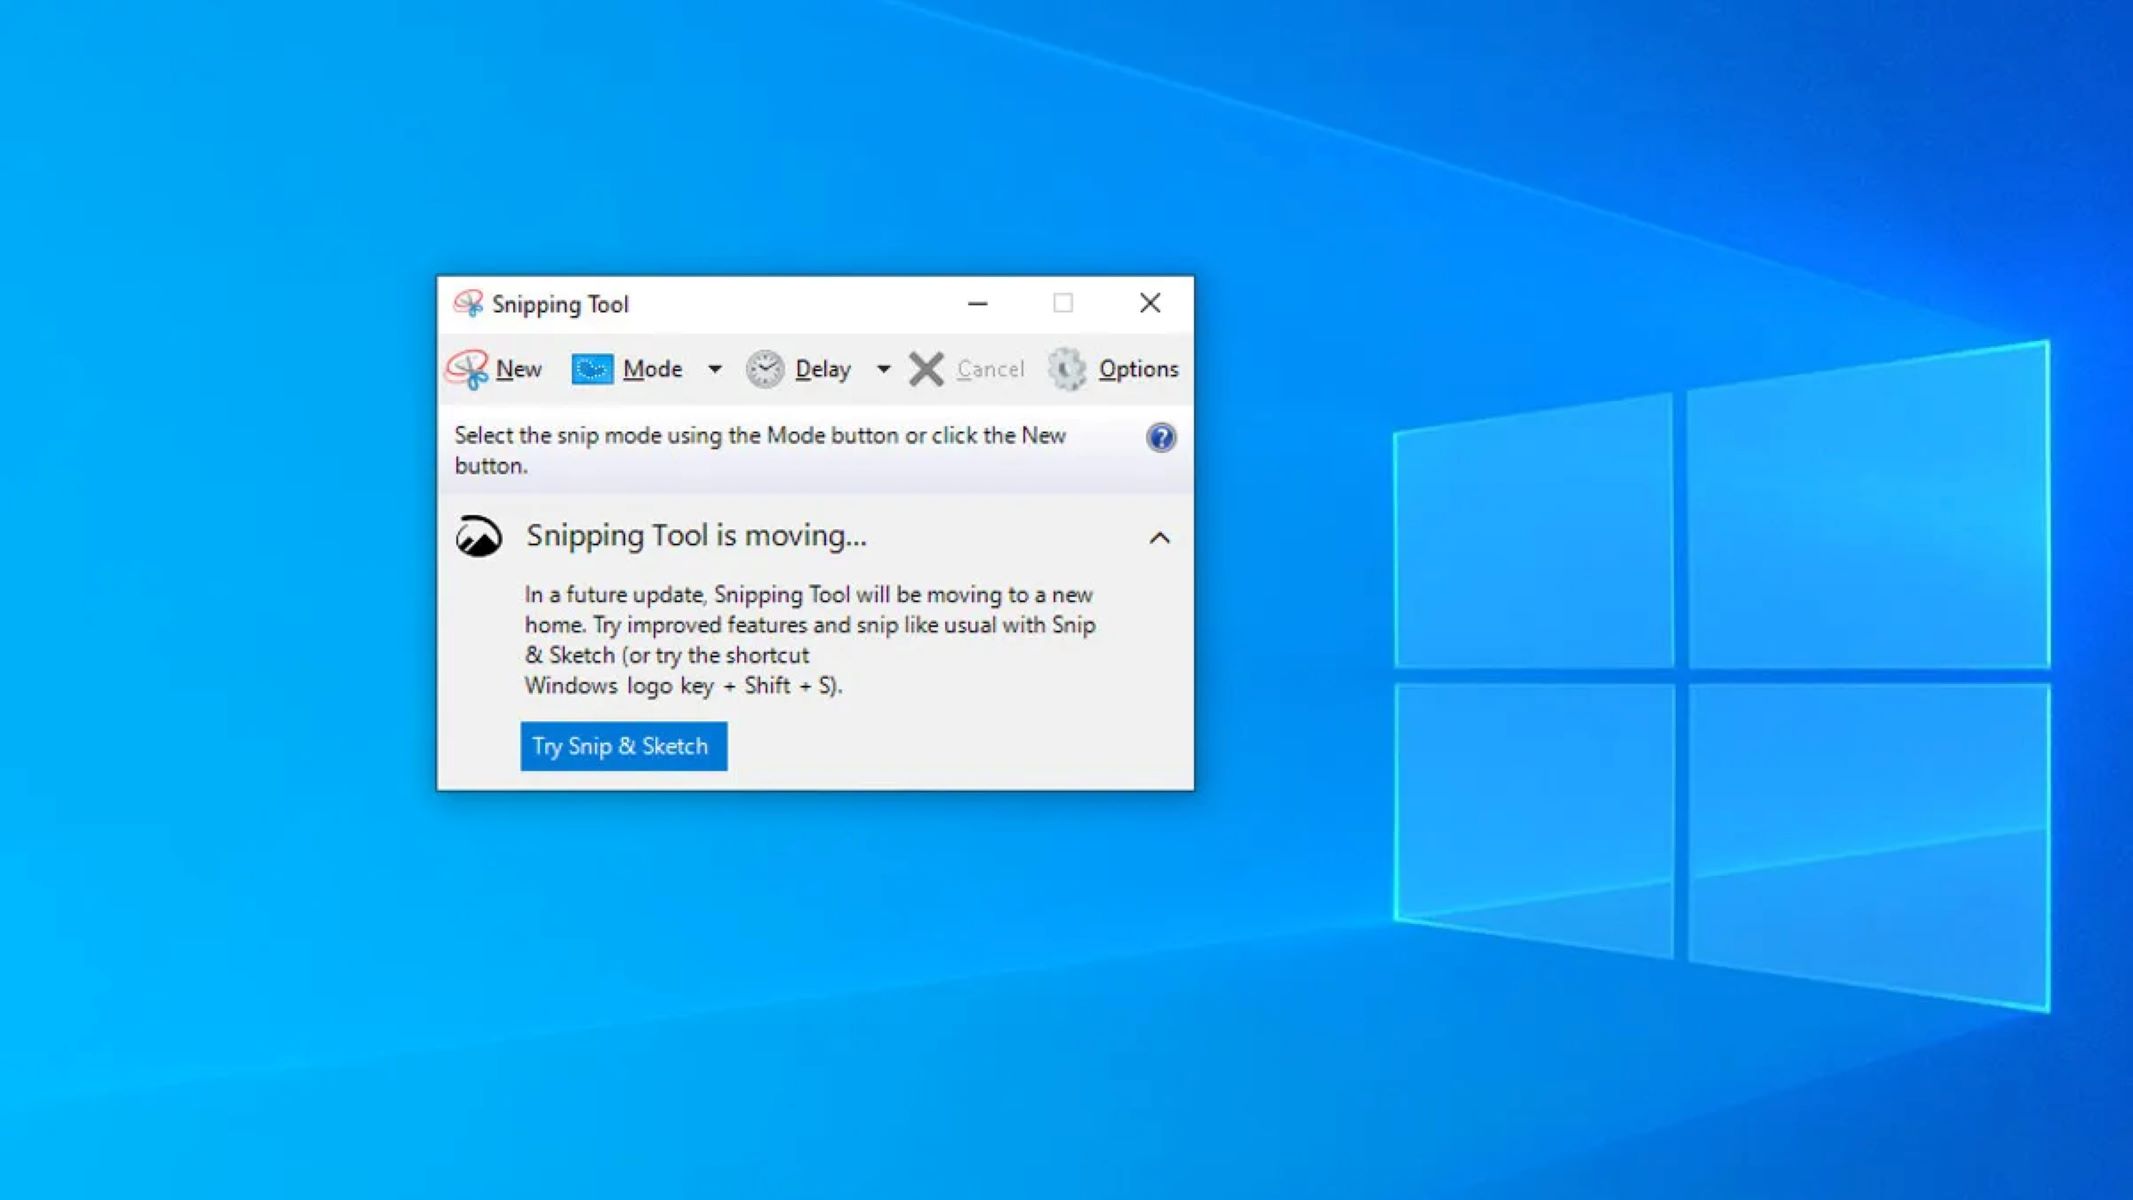
- Step #1: Open the Snipping Tool: To begin, click on the Start menu and search for “Snipping Tool.” Once you find it, click on the Snipping Tool application to open it.
- Step #2: Choose the Snipping Type: In the Snipping Tool window, you’ll have the option to choose the type of snip you want to create. There are four options: Free-form Snip, Rectangular Snip, Window Snip, and Full-screen Snip. Select the type that suits your needs for capturing the specific process or task you want to create a How To Snippet for.
- Step #3: Capture the Snippet: Once you’ve selected the snipping type, your screen will fade, and you’ll be able to select the area you want to capture. Click and drag the cursor to capture the desired portion of the screen. Release the mouse button to complete the capture.
- Step #4: Save the Snippet: After capturing the snip, the Snipping Tool window will open with your captured image. If necessary, use the editing tools to annotate or highlight specific areas of the screenshot. When you’re satisfied with the snip, click on “File” in the menu bar and select “Save As” to save the snip to a desired location on your computer.
By following these steps, you can create your own personalized How To Snippets on your Windows computer. Capture and save screenshots of different processes or tasks to build a library of helpful instructions that cater to your specific needs. You can organize these How To Snippets in designated folders or share them with others who may benefit from your expertise.
Remember to take clear and visually appealing screenshots to ensure the instructions are easily understandable. Adding annotations or highlights can also enhance the clarity and make your How To Snippets more intuitive.
Now that you know how to create How To Snippets on Windows, let’s move on to the next section, where we’ll explore how to use these snippets effectively.
Step #1: Open the Snipping Tool
The first step in creating How To Snippets on your Windows computer is to open the Snipping Tool. This built-in application allows you to capture and save screenshots of specific processes or tasks. To open the Snipping Tool, follow these simple instructions:
- Click on the Start menu located at the bottom left corner of your screen. You can also press the Windows key on your keyboard to open the Start menu.
- In the search bar, type “Snipping Tool” and wait for the search results to appear.
- From the search results, click on the “Snipping Tool” application to open it. Alternatively, you can press the Enter key on your keyboard to open the application directly if it’s the first result.
Once you’ve followed these steps, the Snipping Tool window will open, and you’ll be ready to capture screenshots and create your own How To Snippets.
It’s important to note that the Snipping Tool is available on most Windows versions, including Windows 10, Windows 8, and Windows 7. However, in newer versions of Windows, such as Windows 10, the Snipping Tool is gradually being replaced by the Snip & Sketch tool, which offers more advanced features. If you’re using Windows 10, you can also use the Snip & Sketch tool to create How To Snippets by following similar steps.
Opening the Snipping Tool is the first step in the process of creating How To Snippets on your Windows computer. Now that you have the Snipping Tool open, let’s move on to the next step, where we’ll explore how to choose the snipping type that suits your needs.
Step #2: Choose the Snipping Type
After opening the Snipping Tool on your Windows computer, the next step in creating How To Snippets is to choose the snipping type. The snipping type determines how you want to capture the specific process or task you want to create a How To Snippet for. Windows offers four different snipping types to choose from:
- Free-form Snip: This snipping type allows you to draw an irregular shape around the desired portion of the screen. It gives you the freedom to capture a specific area without being restricted to a rectangular shape. This can be useful when you want to capture any irregularly shaped windows or portions of your screen.
- Rectangular Snip: With this snipping type, you can capture a rectangular area of the screen. Simply click and drag the cursor to create a rectangular shape around the desired portion that you want to capture. This type is ideal for capturing specific windows, menus, or any rectangular areas on your screen.
- Window Snip: The window snip allows you to capture an entire window, including the title bar and all the contents within it. Once you select the window snip option, position the cursor over the window you want to capture, and click on it. The Snipping Tool will automatically capture the entire window and open it in a new snip window for further editing.
- Full-screen Snip: As the name suggests, this snipping type captures the entire screen, including all open windows and the taskbar. It is useful when you want to create a How To Snippet that covers the entire screen or when you need to capture everything that’s currently displayed.
When choosing the snipping type, consider the specific task or process you want to capture and select the one that best suits your needs. Each snipping type offers flexibility and convenience depending on the nature of your How To Snippet creation.
Once you’ve selected the snipping type that suits your needs, you’re ready to capture the snip. In the next step, we will explore how to capture the desired portion of your screen and create the How To Snippet.
Step #3: Capture the Snippet
With the Snipping Tool open and the snipping type selected, you’re now ready to capture the desired portion of your screen and create the How To Snippet. Follow these simple steps to capture the snip:
- Position your cursor at one corner of the area you want to capture.
- Click and hold the left mouse button, then drag the cursor to the opposite corner of the area, creating a selection box or shape around the portion you want to capture. If you’re using a touch-enabled device, such as a touchscreen or a touchpad, you can use your finger or stylus to draw or select the area.
- As you drag the cursor, the Snipping Tool will display a dynamic outline of the selected area. This allows you to adjust the selection as needed to ensure you capture the exact portion you want.
- Once you’re satisfied with the selected area, release the mouse button or lift your finger/stylus to capture the snip.
After capturing the snip, the Snipping Tool window will open with your captured image displayed. Here, you have the option to further edit the snip by using the available annotation tools. These tools allow you to highlight or emphasize specific areas, add text, draw shapes, or use a pen tool to make any additional annotations on the snip.
If you’re satisfied with the captured snip and don’t need to make any edits, you can proceed to saving the snip. In the next step, we will explore how to save the How To Snippet.
Step #4: Save the Snippet
After capturing and potentially editing your How To Snippet using the Snipping Tool, the final step is to save the snip to a desired location on your Windows computer. Follow these simple instructions to save the snip:
- In the Snipping Tool window, ensure you have made any necessary edits or annotations to the snip.
- Click on the “File” option located in the menu bar at the top-left corner of the Snipping Tool window.
- From the drop-down menu, select the “Save As” option. This will open a new window where you can specify the save location and file name for your How To Snippet.
- Browse to the desired location where you want to save the snip. You can choose to save it in a specific folder or on your desktop for easy access.
- Enter a descriptive name for your How To Snippet in the “File name” field. This will make it easier to identify and locate the snip in the future.
- Choose the desired file format for your snip. The Snipping Tool allows you to save the snip as a JPEG, PNG, GIF, or HTML file.
- Click on the “Save” button to save the How To Snippet to the specified location with the chosen file format.
Once you have successfully saved the snip, you can access it anytime at the designated location on your Windows computer. It is recommended to create a dedicated folder or directory to organize and store your How To Snippets, making them easily accessible whenever needed.
By following these four simple steps – opening the Snipping Tool, choosing the snipping type, capturing the snip, and saving it – you can create How To Snippets on your Windows computer. These personalized snippets can be a valuable resource for yourself and others, providing clear instructions on specific processes or tasks.
In the next section, we will explore how to effectively use the How To Snippets you have created on your Windows computer.
Using How To Snippets on Windows
Now that you have created How To Snippets on your Windows computer, it’s time to learn how to effectively use them. Follow these step-by-step instructions to make the most out of your How To Snippets:
- Step #1: Open the Snippet: Locate the saved How To Snippet on your computer. You can access it from the folder where you saved it or from the desktop if you chose to save it there. Double-click on the snip to open it.
- Step #2: Follow the Instructions: Once the How To Snippet is open, carefully read the step-by-step instructions provided. Pay attention to any annotations or highlights that indicate specific areas or actions you need to focus on. The visual elements, such as screenshots or images, will also help in understanding the process or task.
- Step #3: Close the Snippet: After you have completed the task or process described in the How To Snippet, you can close the snip. Simply click on the close button (usually an “X” in the top-right corner of the snip window) or press the “Alt + F4” keys on your keyboard to close the snip.
By following these steps, you can effectively use the How To Snippets you have created to accomplish specific tasks or processes on your Windows computer. Whether you’re troubleshooting an issue, learning a new feature, or performing a task, the clear instructions and visual guidance provided by the How To Snippets will assist you in completing the task efficiently.
Remember to keep your How To Snippets organized and easily accessible for future use. You can create a folder specifically dedicated to storing these snippets, allowing you to access them whenever needed without having to search for them.
Make the most out of your How To Snippets by sharing them with others who may benefit from the instructions. You can easily send them through email, share them on online forums or knowledge-sharing platforms, or even create a library of snippets for your colleagues or friends.
By utilizing the How To Snippets you have created, you can enhance your productivity, troubleshoot issues effectively, and expand your knowledge of Windows features and functionalities.
Step #1: Open the Snippet
The first step in using a How To Snippet on Windows is to open the snip that contains the instructions for the specific task or process you want to follow. Here’s how you can do it:
- Locate the How To Snippet file on your Windows computer. You might have saved it in a specific folder or on your desktop.
- Double-click on the How To Snippet file to open it.
By double-clicking on the How To Snippet file, it will open in its default application, such as a web browser or an image viewer, depending on the file format. This will allow you to access the step-by-step instructions and any visual elements, like screenshots or images, that accompany the process or task you want to perform.
It’s important to note that different How To Snippets might be saved in different file formats, such as HTML, JPEG, PNG, or GIF. Ensure that you have the appropriate software or application installed on your computer to open and view the specific file format of the How To Snippet.
Once you have successfully opened the How To Snippet, you can proceed to the next step and follow the instructions provided to complete the desired task or process on your Windows computer.
Step #2: Follow the Instructions
After opening the How To Snippet on your Windows computer, the next step is to carefully follow the step-by-step instructions provided. Here’s how you can effectively follow the instructions in the How To Snippet:
- Read the instructions: Take the time to read and understand each step of the instructions. Pay attention to any specific details or requirements mentioned.
- Visual cues: If the How To Snippet includes visual elements like screenshots or images, refer to them to better understand the process or task. These visuals can provide a useful reference to ensure you’re on the right track.
- Take it one step at a time: Follow the instructions one step at a time, executing each step as accurately as possible. It’s important to complete each step before moving on to the next to ensure a smooth and successful execution of the task.
- Double-check: As you progress through the steps, double-check your actions to ensure you haven’t missed any crucial details or made any mistakes. Pay attention to any specific settings or options that need to be selected or adjusted.
- Refer back: If you encounter any confusion or uncertainty, refer back to the instructions and visuals provided in the How To Snippet. Take your time to understand the process fully before proceeding.
- Stay organized: Keep track of your progress by ticking off completed steps or making notes as you follow the instructions. This will help you stay organized and avoid missing any important steps.
By following these steps, you can effectively follow the instructions provided in the How To Snippet. Take your time, be attentive, and ensure that you understand and execute each step accurately before moving on to the next.
Remember, the How To Snippet is designed to guide you through the process or task efficiently. Following the instructions carefully will help you accomplish the desired goal on your Windows computer.
Step #3: Close the Snippet
Once you have successfully followed the instructions provided in the How To Snippet and completed the desired task or process on your Windows computer, the final step is to close the snip. Here’s how you can do it:
- Look for the close button: Locate the close button, usually represented as an “X” icon, in the top-right corner of the How To Snippet window.
- Click on the close button: Use your mouse cursor to click on the close button. Alternatively, you can use the keyboard shortcut Alt + F4 to close the snip.
By clicking on the close button or using the Alt + F4 keyboard shortcut, the How To Snippet window will close, returning you to your Windows desktop or the application you were using before.
Closing the snip after completing the task or process is important to tidy up your workspace and remove any unnecessary on-screen clutter. It allows you to focus on the outcomes of the task or process without distractions.
If you still need to refer to the How To Snippet for any reason, you can keep the snip open or minimize it instead of closing it. However, it’s generally recommended to close the snip once you have completed the instructions to keep your desktop or workspace organized.
Now that you have successfully closed the How To Snippet, you can move on to other tasks or processes on your Windows computer with confidence, knowing that you have followed the instructions and accomplished your goal.
Conclusion
How To Snippets are a valuable resource for Windows users, offering concise and easy-to-follow instructions for various tasks and processes. By following the steps outlined in this guide, you can create your own How To Snippets and effectively use them to accomplish specific goals on your Windows computer.
The process of creating How To Snippets involves opening the Snipping Tool, choosing the snipping type, capturing the desired portion of the screen, and saving the snip to a designated location. Once created, you can open the snip, follow the step-by-step instructions provided, and complete the task or process. Finally, you can close the snip to keep your workspace tidy.
Using How To Snippets can significantly enhance your productivity, troubleshooting capabilities, and knowledge of Windows features and functionalities. They provide efficient and clear instructions, helping you save time and avoid frustration when performing specific tasks or troubleshooting issues.
Remember to organize your How To Snippets in dedicated folders for easy access and consider sharing them with others who may benefit from the instructions. By doing so, you contribute to a helpful community of Windows users.
Whether you’re a computer novice or an experienced user, How To Snippets on Windows can simplify your digital journey. Embrace this powerful tool and leverage the step-by-step instructions to navigate your Windows computer with confidence and efficiency.