Introduction
Taking a screenshot is a useful skill to have, especially when you want to capture and share what’s on your computer screen. Whether you’re trying to document an error message for tech support, create a tutorial for a friend, or simply save a memorable moment, knowing how to take a screenshot on Windows 7 is essential.
In this article, we will guide you through various methods to capture screenshots on Windows 7. We’ll cover the classic Print Screen key method, as well as introduce you to the Snipping Tool and other shortcuts that can make the process even easier.
Windows 7, while not the latest version of the operating system, is still widely used, and its screenshot methods are straightforward and practical. So, regardless of whether you’re a Windows 7 enthusiast or someone who has recently upgraded from Windows XP or Vista, this article is for you.
With the methods outlined in this guide, you’ll be able to capture screenshots effortlessly, saving you time and frustration. So, let’s get started and learn how to take a screenshot on Windows 7!
Method 1: Using the Print Screen Key
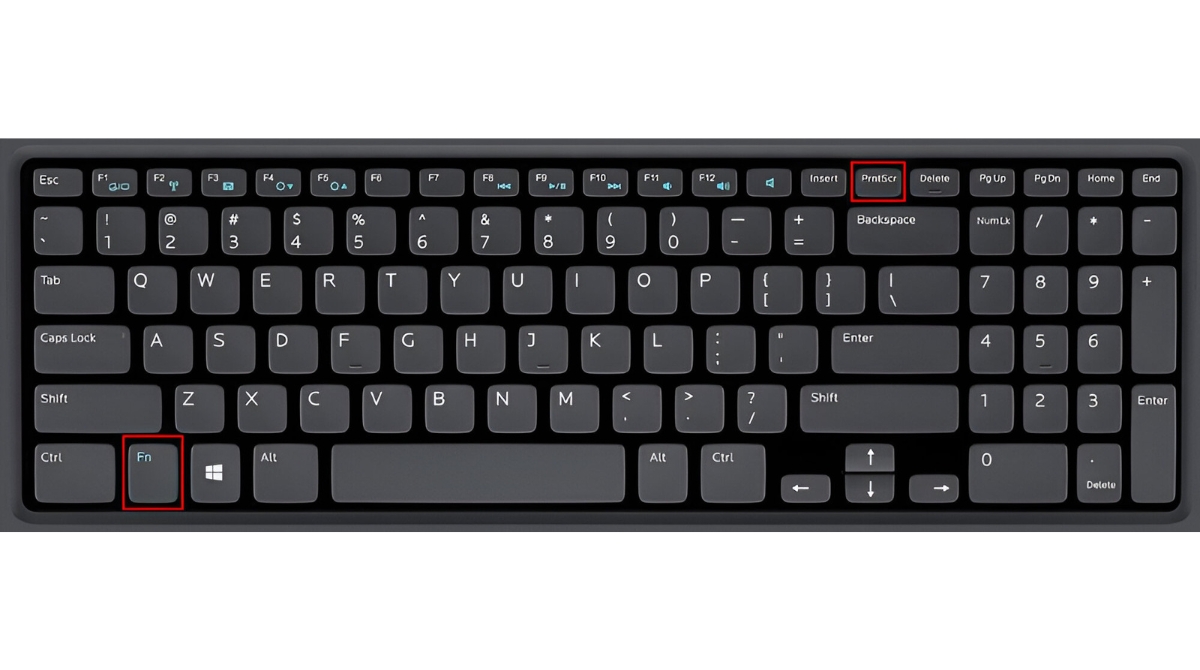
One of the most common and simplest methods to capture a screenshot on Windows 7 is by using the Print Screen (PrtScn) key on your keyboard. This method allows you to capture an image of your entire screen and save it to your clipboard.
Here’s how you can do it:
- Locate the Print Screen (PrtScn) key on your keyboard. It is usually located in the upper right-hand corner, labeled “PrtScn” or “Print Screen.”
- Make sure you have the desired content on your screen that you want to capture. This can be anything from a webpage, an error message, or even your computer desktop.
- Press the Print Screen (PrtScn) key. This will capture an image of your entire screen and save it to your clipboard.
- Open an image editing software, such as Paint, Photoshop, or even Microsoft Word.
- Create a new document or open an existing one.
- Press “Ctrl” + “V” or go to the “Edit” menu and select “Paste” to paste the screenshot from your clipboard onto the document.
- Once pasted, you can edit, crop, or resize the screenshot as needed.
- Save the document to your desired location, and you now have successfully captured a screenshot using the Print Screen key.
Keep in mind that capturing the entire screen using the Print Screen key will include everything, including the taskbar and any open windows. If you only want to capture a specific area of your screen, consider using the Snipping Tool or other methods we will cover later in this article.
Method 2: Using the Snipping Tool
If you prefer more flexibility in choosing what to capture on your screen, the Snipping Tool is a fantastic option. This built-in Windows utility allows you to capture specific areas of your screen, making it perfect for highlighting specific information or cropping out unnecessary elements.
Here’s how you can use the Snipping Tool:
- Click on the “Start” button and type “Snipping Tool” in the search bar. Click on the application when it appears in the search results.
- Once the Snipping Tool opens, click on the “New” button.
- Your screen will dim, and the cursor will turn into a crosshair.
- Click and drag the crosshair to select the desired area of your screen that you want to capture. Release the mouse button to capture the selected area.
- The captured image will appear in the Snipping Tool window.
- At this point, you can annotate, highlight, or make any necessary modifications to the captured image using the available tools in the Snipping Tool.
- When you’re satisfied with the captured screenshot, click on the “File” menu and select “Save As” to save it to your desired location on your computer.
- Choose a file name for your screenshot and select the file type (JPEG, PNG, GIF) from the “Save as type” dropdown menu.
- Click “Save” to save the screenshot.
The Snipping Tool is a powerful tool, especially when you want to capture specific portions of your screen rather than the entire display. Its annotation and editing features also make it ideal for adding text, highlights, and even freehand drawings to your screenshots, giving you the ability to convey information more effectively.
Method 3: Using the Windows Logo Key + PrtScn
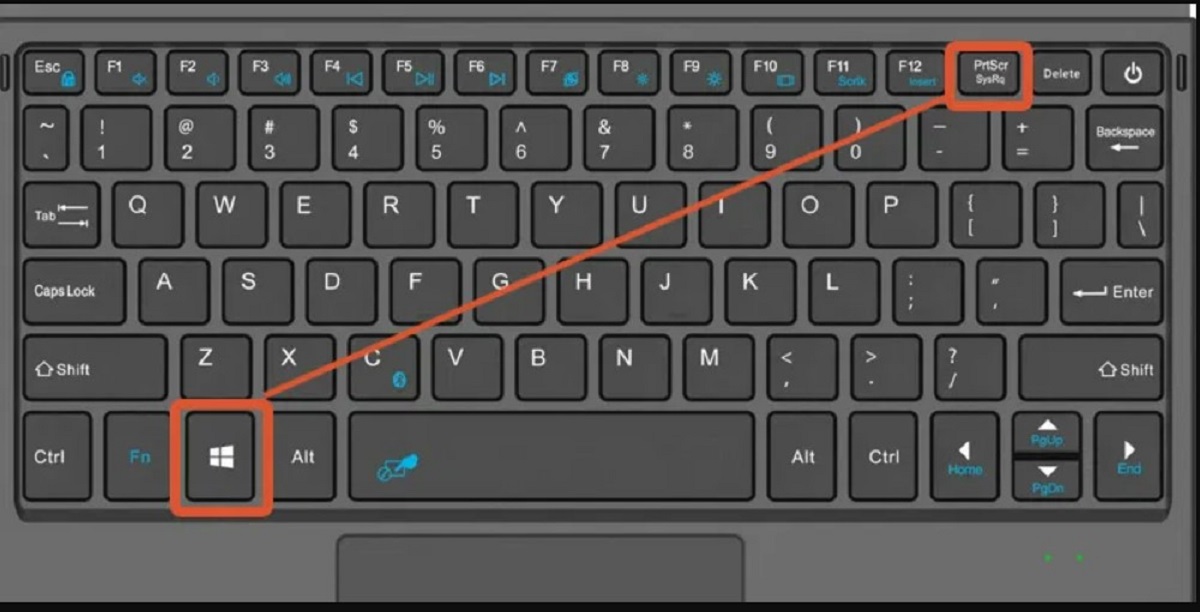
If you’re looking for a quick and convenient way to capture a screenshot on Windows 7, using the Windows Logo key in combination with the Print Screen key (PrtScn) is an excellent option. This method captures the entire screen and automatically saves the screenshot to your designated Screenshots folder.
Here’s how you can use the Windows Logo key + PrtScn method:
- Make sure you have the content on your screen that you want to capture.
- Press the Windows Logo key + PrtScn simultaneously. You will see your screen dim briefly, indicating that the screenshot has been captured.
- Open the File Explorer by clicking on the folder icon on your taskbar or pressing the Windows Logo key + E.
- In the left-hand navigation pane of the File Explorer, navigate to “Pictures” or “Documents” and locate the “Screenshots” folder.
- Open the “Screenshots” folder, and you will find the captured screenshot named with the date and time of the capture.
By default, this method saves your screenshots as PNG files, providing you with good image quality while keeping the file size relatively small. You can easily share or further edit the screenshot from the Screenshots folder.
It’s important to note that the Windows Logo key + PrtScn method captures the entire screen without offering the option to select specific areas. If you require more flexibility in capturing different regions of your screen, you may want to explore the Snipping Tool or other methods mentioned later in this article.
Method 4: Using the Alt Key + PrtScn
If you need to capture a screenshot of just the active window on your Windows 7 computer, using the Alt key in combination with the Print Screen key (PrtScn) is the perfect method. This shortcut allows you to capture the content of the active window and save it to the clipboard for further use.
Here’s how you can use the Alt key + PrtScn method:
- Ensure that the window you want to capture is the active window on your screen.
- Press the Alt key + PrtScn simultaneously. The screen will dim briefly, indicating that the screenshot has been captured.
- Open an image editing software, such as Paint, Photoshop, or even Microsoft Word.
- Create a new document or open an existing one.
- Press “Ctrl” + “V” or go to the “Edit” menu and select “Paste” to paste the screenshot from your clipboard onto the document.
- Once pasted, you can edit, crop, or resize the screenshot as needed within the image editing software.
- Save the document to your desired location, and you have successfully captured a screenshot of the active window using the Alt key + PrtScn combination.
Using this method ensures that you capture the exact content of the active window, without including any other elements on your screen. It is particularly useful when you want to focus on a specific program, window, or dialogue box.
Remember, this method captures the screenshot to your clipboard, so be sure to paste it into an image editing software or document to save and further manipulate the screenshot as needed.
Method 5: Using the Snipping Tool Shortcut
If you frequently use the Snipping Tool to capture screenshots on Windows 7, you might find it more convenient to create a shortcut on your desktop or taskbar. This shortcut allows you to launch the Snipping Tool with a single click, saving you time and effort in accessing the tool.
Here’s how you can create a Snipping Tool shortcut:
- Right-click on an empty space on your desktop or taskbar.
- Select “New” from the context menu that appears.
- Click on “Shortcut” from the sub-menu.
- In the “Create Shortcut” window, enter the following command in the location field:
snippingtool.exe - Click “Next” to proceed.
- Provide a name for the shortcut, such as “Snipping Tool,” and click “Finish” to create the shortcut.
- You will now see the Snipping Tool shortcut on your desktop or taskbar.
- Double-click the shortcut to launch the Snipping Tool instantly.
With the shortcut created, you can now quickly access the Snipping Tool by simply clicking on the shortcut, eliminating the need to search for it in the Start menu or file explorer each time you want to capture a screenshot. It’s a convenient option for frequent screenshot takers or individuals who prefer a streamlined workflow.
Remember to utilize the Snipping Tool’s features, such as capturing specific areas, adding annotations, or saving in different file formats, to enhance your screenshot-taking experience.
Conclusion
Taking screenshots on Windows 7 is a simple yet essential skill that can come in handy in various situations. Whether you need to capture an error message, share important information, or create a tutorial, knowing the different methods available to you will make the process smooth and efficient.
In this article, we covered five methods for capturing screenshots on Windows 7:
- Using the Print Screen Key to capture the entire screen.
- Using the Snipping Tool to capture specific areas.
- Using the Windows Logo Key + PrtScn to capture and save screenshots automatically.
- Using the Alt Key + PrtScn to capture the active window.
- Using the Snipping Tool Shortcut for quick access to the Snipping Tool.
Each method has its advantages, allowing you to choose the most suitable one for your specific needs. Whether you prefer capturing the entire screen, specific regions, or just the active window, Windows 7 provides multiple options to cater to your preferences.
Remember to experiment with different methods and explore any additional features provided by the accompanying tools, such as annotation tools in the Snipping Tool, to enhance your screenshots and convey your message effectively.
Now that you are equipped with the knowledge of these diverse screenshot-taking methods, you can confidently capture and share what’s on your Windows 7 screen with ease and convenience.