Introduction
Taking screenshots on your Windows 10 computer is a useful skill that can come in handy in various situations. Whether you want to capture an error message, save a memorable moment from a video, or simply share something interesting with friends, knowing how to take a screenshot is essential.
In this article, we will explore several different methods for taking screenshots on Windows 10. From using the traditional Print Screen key to utilizing built-in tools like Snipping Tool and Snip & Sketch, we will guide you through each step, ensuring you are well-equipped to capture exactly what you need.
Windows 10 provides a range of options and features tailored to different screenshot requirements. Depending on your preferences or the specific content you want to capture, you can choose the method that best suits your needs. Whether you are a casual user or a power user, you will find a method that works for you.
Taking screenshots is not only useful for personal purposes but can also be beneficial in professional settings. For instance, if you need to present visual information, troubleshoot technical issues, or create tutorials, screenshots can effectively convey your message.
Throughout this article, we will walk you through each method step-by-step, providing clear instructions and visuals to make the process as straightforward as possible. By the end of this guide, you will have a solid understanding of all the screenshot options available on Windows 10 and be able to capture, save, and share screenshots with ease.
Method 1: Using the Print Screen (PrtScn) Key
One of the most straightforward methods to take a screenshot on Windows 10 is by using the Print Screen (PrtScn) key on your keyboard. This method allows you to capture the entire screen and save it as an image.
To use this method, follow these steps:
- Locate the Print Screen (PrtScn) key on your keyboard. It is usually located in the upper-right corner, labeled as “PrtScn” or “Print Screen.”
- Position the content you want to capture on your screen.
- Press the PrtScn key. You won’t see any immediate visual indicator, but the screenshot is now stored in your computer’s clipboard.
- Open an image editing program like Paint, Photoshop, or Microsoft Word.
- Paste the screenshot by pressing Ctrl + V or right-clicking and selecting “Paste.” The screenshot will appear in the program window.
- Once the screenshot is visible, you can edit, crop, save, or print it according to your preference. When saving the image, choose a location on your computer and give it an appropriate filename.
The PrtScn key captures the entire screen, including multiple monitors if you have them. However, keep in mind that it does not capture popup menus or active dropdown menus. It only captures a static image of what is currently displayed on your screen at the moment you press the key.
This method is ideal for quickly capturing the entire screen without any specialized tools. It is commonly used when you want to save a snapshot of your desktop, capture an error message, or document a web page in its entirety.
Remember to save your screenshot promptly after capturing it, as copying new content to the clipboard or taking another screenshot will replace the previous one. With the PrtScn key, you can capture multiple screenshots by pasting them into the editing program before saving.
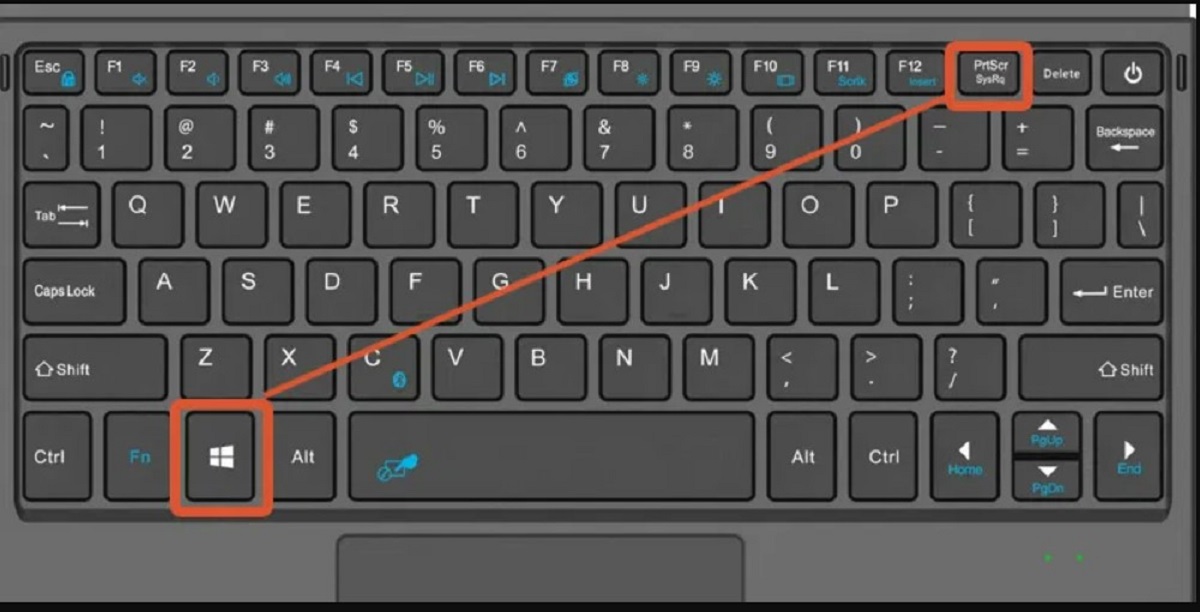
Method 2: Using the Windows + Print Screen (Win + PrtScn) Key Combination
Windows 10 offers a convenient keyboard combination, the Windows + Print Screen (Win + PrtScn) key, to capture your screen and automatically save it as an image. This method eliminates the need to paste the screenshot into an editing program, making it quick and efficient.
To use this method, follow these steps:
- Locate the Windows key (usually located between the Ctrl and Alt keys) and the Print Screen (PrtScn) key on your keyboard.
- Position the content you want to capture on your screen.
- Simultaneously press the Windows key and the Print Screen (PrtScn) key. You may hear a brief sound or see a momentary dimming of your screen, indicating that the screenshot has been taken.
- The screenshot will be automatically saved in the Screenshots folder in your Pictures directory. You can access this folder by going to “File Explorer,” then “Pictures,” and finally “Screenshots.”
- To view, edit, or share the screenshot, navigate to the Screenshots folder and locate the saved image. You can open the screenshot with any image viewer or editing program of your choice.
Using the Windows + Print Screen key combination captures the entire screen and saves it directly to your computer. This method is especially useful when you need to capture the screen quickly without having to use additional software or open an editing program.
Keep in mind that the Windows + Print Screen key combination captures the entire screen, including all active windows and monitors. It does not allow you to capture a specific region or application window.
Using this method, you can easily take multiple screenshots one after another. However, each screenshot will be numbered consecutively, preventing any accidental overwriting of previously captured screenshots.
Whether you want to save important information, capture a memorable moment, or document an issue for troubleshooting purposes, the Windows + Print Screen key combination provides a convenient way to quickly capture and save your screen without any additional steps.
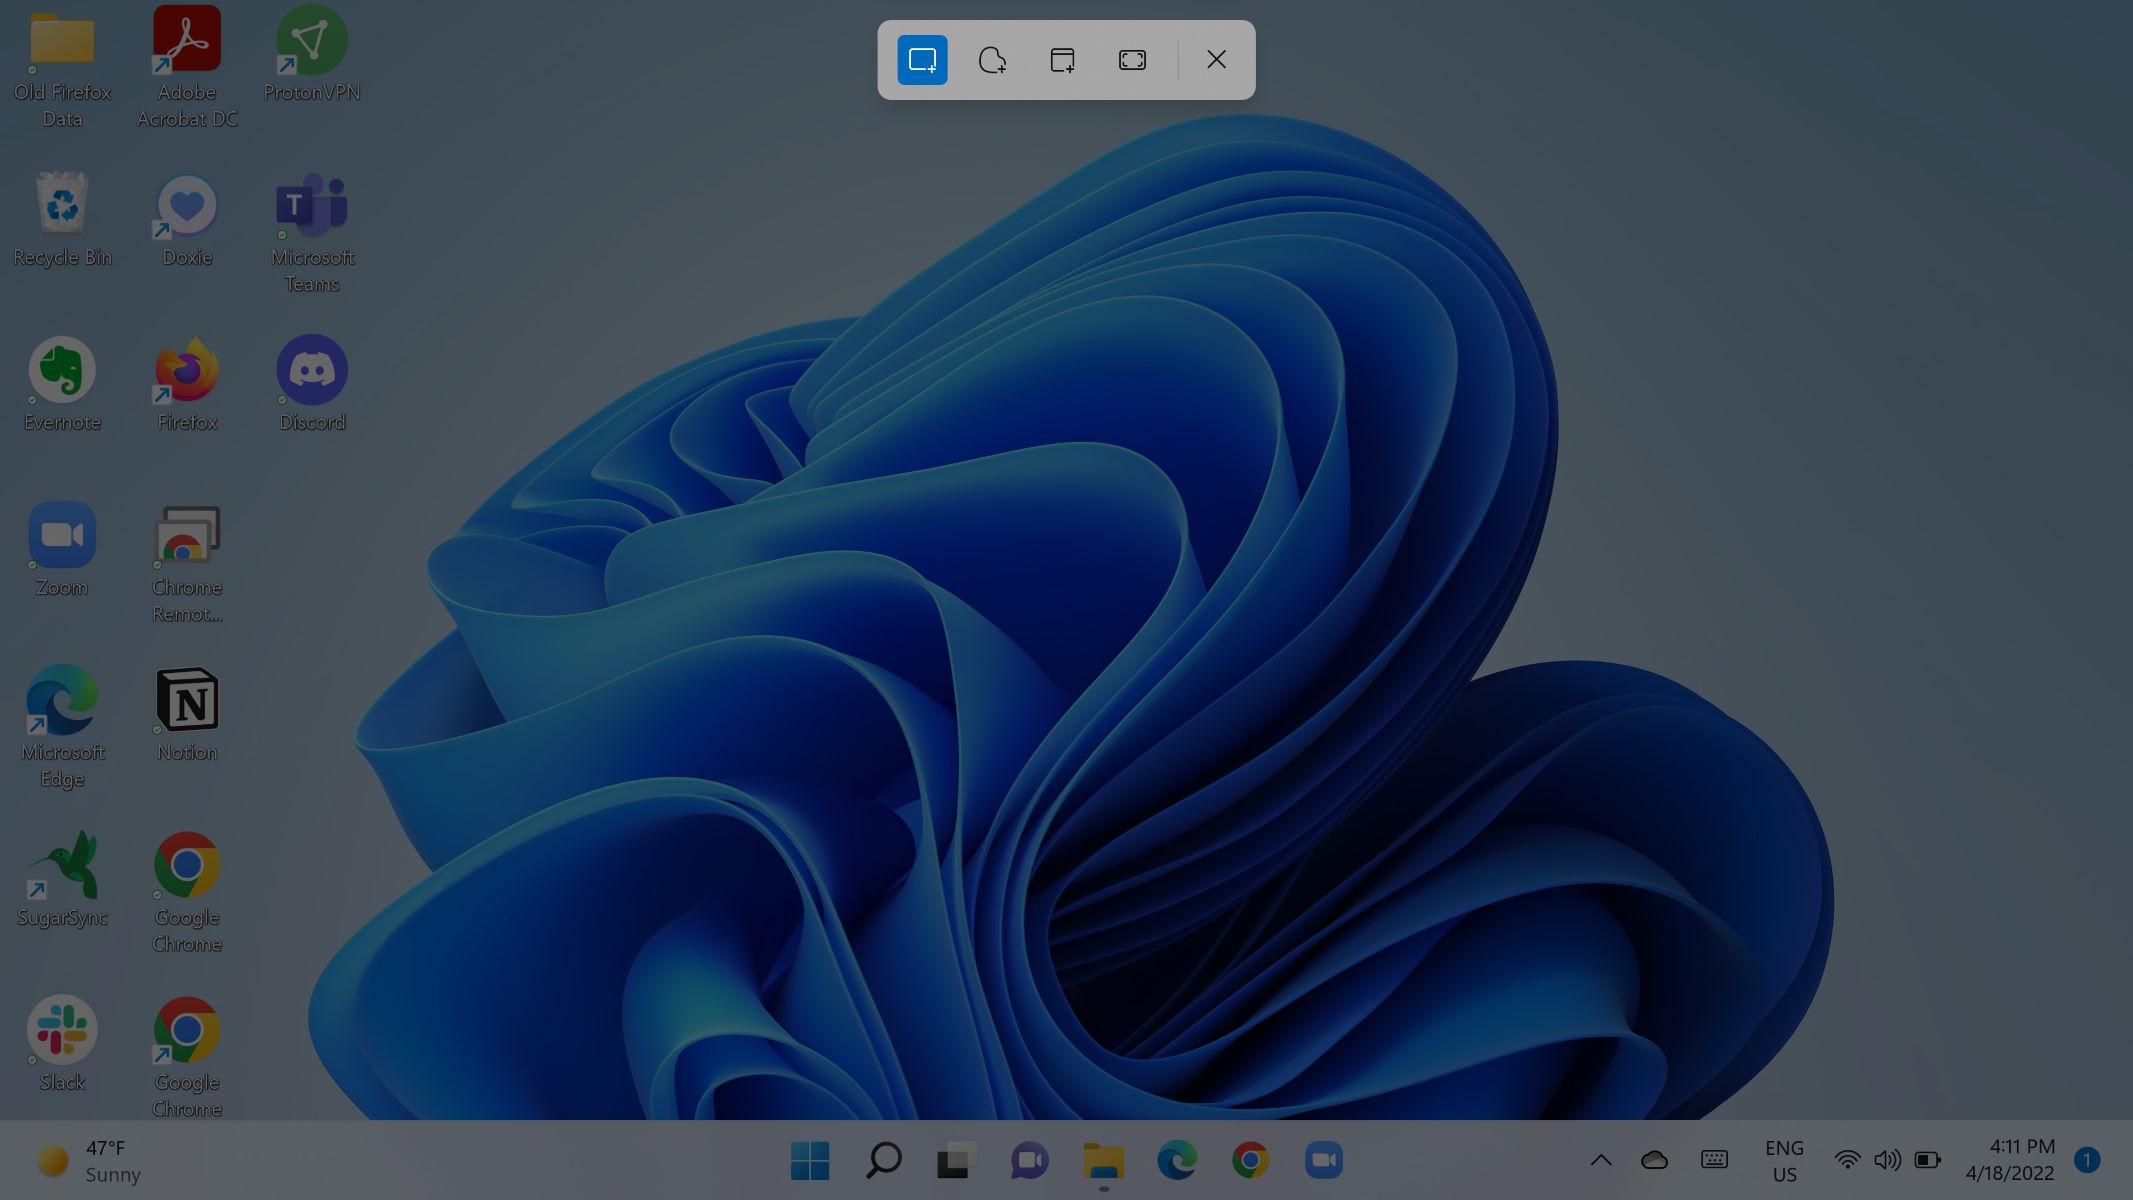
Method 3: Using the Windows + Shift + S Key Combination
Another handy method to take screenshots on Windows 10 is by using the Windows + Shift + S key combination. This method allows you to capture a specific area of your screen and save it as an image without the need for any additional software.
To use this method, follow these steps:
- Position the content you want to capture on your screen.
- Press the Windows key + Shift + S simultaneously. This combination will dim the screen and open the built-in Snip & Sketch tool, allowing you to select the area you want to capture.
- Click and drag the cursor to select the desired region. As you drag the cursor, you will see a gray overlay over the area you are capturing.
- Release the mouse button to capture the selected region.
- The captured screenshot will be copied to your clipboard. To access and use the screenshot, open an image editing program or an application like Paint or Microsoft Word, and paste the screenshot by pressing Ctrl + V or right-clicking and selecting “Paste.”
- Once the screenshot is visible, you can edit, crop, save, or print it according to your needs. Ensure you save the image in a suitable location on your computer, giving it an appropriate filename.
The Windows + Shift + S key combination is perfect for capturing specific regions or parts of your screen. It allows you to customize the area to capture, making it useful for highlighting a particular section of a webpage, capturing an error message, or cropping out unnecessary content.
Unlike other methods, the screenshot captured using this key combination is not automatically saved as an image file. Instead, it is copied to the clipboard, giving you the flexibility to paste it into any application for further editing or sharing.
The Windows + Shift + S key combination provides a quick and efficient way to capture and save screenshots without the need for additional software or complex steps. With a few simple keystrokes, you can capture precise regions and effortlessly incorporate them into your projects or communications.
Method 4: Using the Snipping Tool
If you prefer a more versatile and feature-rich tool for taking screenshots on Windows 10, the built-in Snipping Tool is a great option. The Snipping Tool allows you to capture screenshots of specific areas, windows, or the entire screen and provides annotation and sharing options.
To use the Snipping Tool, follow these steps:
- Open the Start menu and search for “Snipping Tool.” Click on the search result to open the tool.
- Once the Snipping Tool is open, click on “New” to start the screenshot capture process.
- By default, the Snipping Tool will be set to “Rectangular Snip.” Click and drag the cursor to select the desired region to capture.
- Release the mouse button to capture the selected region. The captured screenshot will open in the Snipping Tool window.
- In the Snipping Tool window, you can use various annotation tools like a pen, highlighter, or eraser to annotate or mark up the screenshot.
- To save the screenshot, click on the “Save” icon in the Snipping Tool window. Choose a location on your computer and provide a suitable filename.
- Alternatively, you can click on the “Copy” icon in the Snipping Tool window to copy the screenshot to your clipboard for pasting into other applications.
The Snipping Tool offers different capture modes, including Free-form Snip, Window Snip, and Full-screen Snip, which allow you to capture specific shapes, individual windows, or the entire screen, respectively. You can select your preferred capture mode from the “Mode” dropdown menu in the Snipping Tool.
Additionally, the Snipping Tool allows you to delay the capture by a few seconds. This can be useful when you need to capture menus or dropdowns that disappear quickly. Simply click on the “Delay” dropdown menu and choose the desired delay time before capturing the screenshot.
The Snipping Tool provides a range of options for capturing, annotating, and saving screenshots, making it a versatile tool for different screenshot needs. Whether you want to capture specific regions, mark up screenshots with notes, or save screenshots in various file formats, the Snipping Tool offers a user-friendly interface with essential features.
Method 5: Using the Snip & Sketch Tool
Windows 10 introduced the Snip & Sketch tool, an improved version of the Snipping Tool, which provides enhanced functionality and a more modern interface for capturing and editing screenshots. With Snip & Sketch, you have even more options and flexibility when it comes to capturing and annotating your screenshots.
To use the Snip & Sketch tool, follow these steps:
- Open the Start menu and search for “Snip & Sketch.” Click on the search result to open the tool.
- Once the Snip & Sketch tool opens, click on the “New” button in the upper-left corner of the window.
- By default, the tool is set to “Rectangular Snip.” Click and drag the cursor to select the desired region to capture.
- Release the mouse button to capture the selected region. The captured screenshot will appear in a new Snip & Sketch window.
- In the Snip & Sketch window, you can use various annotation tools like a pen, highlighter, ruler, and eraser to mark up the screenshot.
- To save the screenshot, click on the disk icon in the upper-right corner of the Snip & Sketch window. Choose a location on your computer and provide a suitable filename.
- Alternatively, you can click on the clipboard icon in the Snip & Sketch window to copy the screenshot to your clipboard for pasting into other applications.
In addition to the “Rectangular Snip” mode, the Snip & Sketch tool offers other capture modes such as “Freeform Snip,” “Window Snip,” and “Full-screen Snip,” allowing you to capture different types of screenshots. You can select the desired capture mode by clicking on the “New” button and choosing the desired option from the drop-down menu.
Snip & Sketch also provides a “Delay” feature, where you can set a delay of a few seconds before capturing the screenshot. This is useful when capturing menus or other dynamic elements that disappear quickly after being triggered.
The Snip & Sketch tool streamlines the screenshot capturing and editing process, allowing you to quickly capture specific areas and make necessary annotations. With its user-friendly interface and improved features, it’s an excellent option for users who require more advanced screenshot capabilities.
Method 6: Using the Game Bar
If you’re a gamer or frequently use Windows 10 for gaming, you can take advantage of the built-in Game Bar to capture screenshots. The Game Bar offers an intuitive and efficient way to capture screenshots during gameplay or any other application where it’s enabled.
To use the Game Bar for taking screenshots, follow these steps:
- While in a game or application, press the Windows key + G to open the Game Bar overlay. If prompted, confirm that “Yes, this is a game” to enable the Game Bar features.
- In the Game Bar overlay, click on the camera icon or press the “Win + Alt + PrtScn” keyboard shortcut. This will instantly capture a screenshot of your current screen.
- A notification will appear stating that “Screenshot saved.” Click on the notification to open the screenshot in the default Windows 10 image viewer app.
- In the image viewer app, you can view, edit, save, or share the screenshot as desired.
The Game Bar allows you to capture screenshots of your gaming sessions or application windows without interrupting your gameplay. It’s particularly useful for capturing memorable moments, sharing achievements, or troubleshooting game-related issues.
Apart from capturing screenshots, the Game Bar also offers additional features like recording gameplay, broadcasting live streams, and accessing game-related settings. These features are handy if you want to record gameplay videos or stream your gaming sessions to platforms like Mixer or Twitch.
It’s important to note that the Game Bar might not be available or compatible with all applications. Some older or fullscreen applications may not allow the Game Bar to function properly. However, for most modern games and many other applications, the Game Bar is a convenient and efficient option for capturing screenshots.
Whether you’re an avid gamer or simply enjoy occasional gaming on your Windows 10 device, using the Game Bar to capture screenshots provides a seamless and integrated experience. With just a few keypresses, you can capture and save your favorite gaming moments or any other applications where the Game Bar is enabled.
Conclusion
Taking screenshots on Windows 10 is a simple and valuable skill that can enhance your productivity, troubleshooting efforts, and communication. Whether you need to capture an error message, save important information, create tutorials, or share interesting content with others, knowing how to take screenshots using various methods is essential.
In this article, we explored six different methods for capturing screenshots on Windows 10. From using the Print Screen (PrtScn) key to utilizing advanced tools like the Snipping Tool, Snip & Sketch, and the Game Bar, each method offers its own advantages and features.
The Print Screen key provides a quick and easy way to capture the entire screen, while the Windows + Print Screen key combination automatically saves the screenshot without the need for an editing program. The Windows + Shift + S key combination is perfect for capturing specific areas, and the Snipping Tool and Snip & Sketch offer more advanced screenshot capturing and annotation options.
For gamers, the Game Bar provides an integrated solution for capturing screenshots during gameplay, as well as other gaming-related features like recording and live streaming.
By familiarizing yourself with these different methods and choosing the one that best suits your needs, you can become proficient in capturing, saving, and sharing screenshots on Windows 10. Whether you’re a casual user, a professional, or a gamer, having the ability to take screenshots is an invaluable skill that can greatly enhance your Windows 10 experience.
Remember, the process of taking screenshots on Windows 10 may vary slightly depending on your specific hardware, installed software, and individual preferences. However, the methods outlined in this article should provide a solid foundation for capturing screenshots in most situations.
So the next time you encounter an interesting image, important information, or want to document an issue, use these methods to capture the moment and save it for future reference. Happy screenshotting!