Introduction
When it comes to capturing and sharing information from your computer screen, screenshots are a handy tool. Whether you’re trying to highlight a software issue, share a funny moment from a video, or provide visual instructions, being able to crop your screenshots is crucial. Cropping allows you to focus on the relevant portion of the image and remove any unnecessary distractions.
In this article, we will explore various methods to crop screenshots on Windows. From built-in tools to third-party applications, we will cover everything you need to know to master the art of cropping screenshots.
No matter which method you choose, cropping screenshots can be a time-saving practice. By highlighting specific areas or cropping out irrelevant details, you can communicate your message more effectively and efficiently. Additionally, cropped screenshots are often more visually appealing and better suited for presentations, tutorials, or sharing on social media.
So, whether you’re a seasoned Windows user looking to refine your screenshot skills or a beginner eager to learn, continue reading to discover different ways to crop screenshots on Windows. Let’s dive in!
Step 1: Using the Snipping Tool
The Snipping Tool is a built-in screenshot tool that comes with Windows operating systems. It allows you to capture screenshots in different shapes and sizes and provides basic editing options, including cropping.
Here’s how to crop a screenshot using the Snipping Tool:
- Open the Snipping Tool by searching for it in the Windows search bar.
- Once the Snipping Tool is open, click on “New” to start a new snip.
- Drag the cursor around the area you want to capture. You can choose to capture a rectangular snip, a free-form snip, or a window snip.
- After selecting the desired area, release the mouse button to take the screenshot.
- The screenshot will open in the Snipping Tool editor. To crop the image, click on the “Crop” button in the toolbar.
- Drag the edges of the cropping tool to adjust it according to your needs. You can also move the cropping tool around to reposition it.
- Once you’re satisfied with the cropped area, click on the “Save” button to save the cropped screenshot to your desired location on your computer.
That’s it! You have successfully cropped a screenshot using the Snipping Tool. This simple and straightforward tool is great for quick cropping needs, especially if you prefer using built-in Windows tools.
Keep in mind that the Snipping Tool may not be available in the latest versions of Windows. In such cases, you can use alternative methods mentioned in the following steps to crop your screenshots.
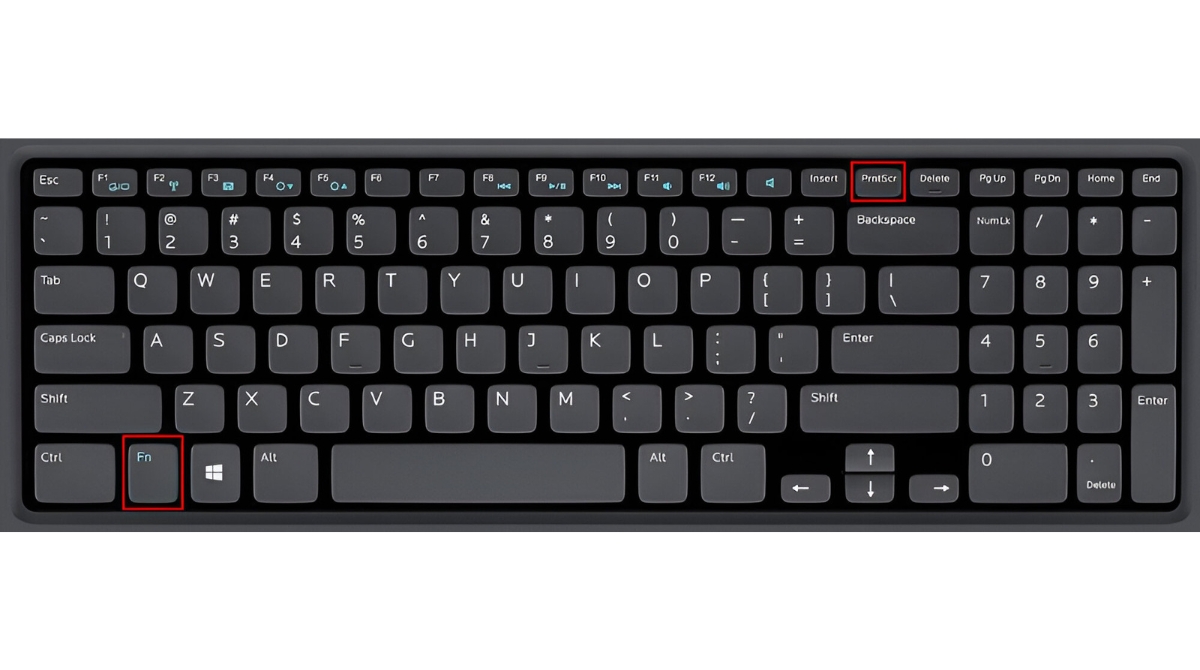
Step 2: Using the Print Screen Key
Another convenient way to capture and crop screenshots on Windows is by using the Print Screen (PrtScn) key on your keyboard. This method allows you to capture the entire screen and then crop the screenshot using image editing software or built-in Windows features.
Follow these steps to crop a screenshot using the Print Screen key:
- Press the Print Screen (PrtScn) key on your keyboard. This will capture a screenshot of the entire screen.
- Open a photo editing software, such as Paint or Adobe Photoshop.
- Click on the “Paste” option in the editing software to paste the screenshot from your clipboard. Alternatively, you can use the “Ctrl + V” keyboard shortcut.
- Use the editing tools in the software to crop the screenshot. You can select the crop tool, adjust the frame, and then apply the crop to trim down the screenshot to the desired area.
- Once you’ve cropped the screenshot, save it to your preferred location on your computer.
By using the Print Screen key, you can easily capture the entire screen and then crop it using image editing software. This method provides more flexibility in terms of cropping options and allows you to make precise adjustments to the screenshot.
Do keep in mind that this method captures the entire screen, so if you only want to capture a specific window or a portion of the screen, you will need to use other methods or crop the screenshot after capturing it.
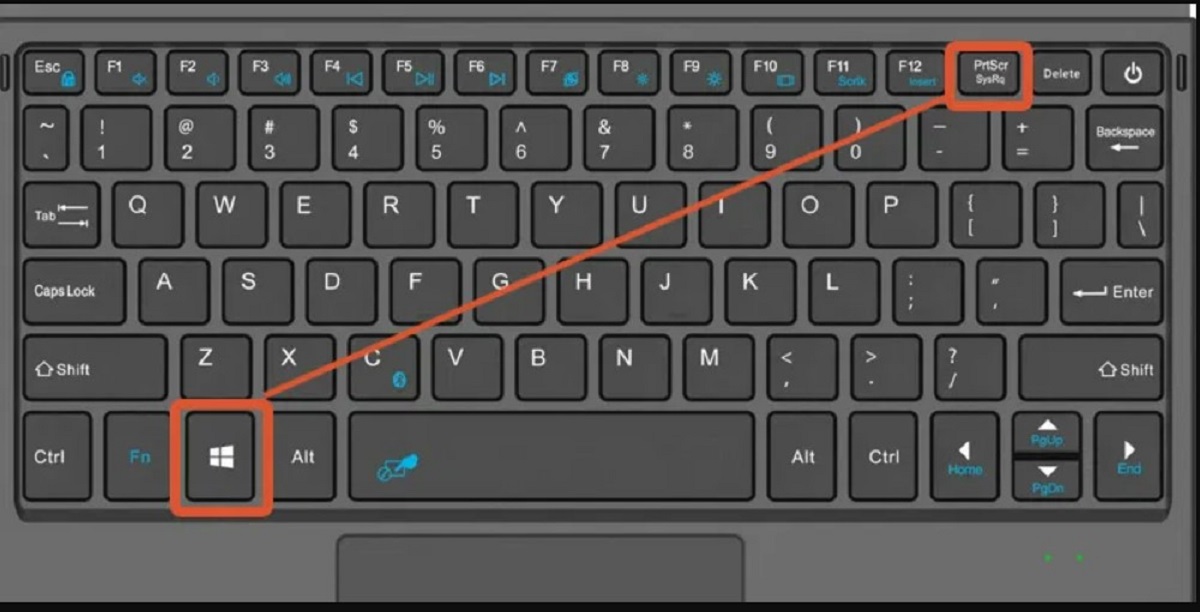
Step 3: Using the Windows Game Bar
If you’re using Windows 10, you have access to the Windows Game Bar, which provides a quick and easy way to capture screenshots and crop them on the fly. While it’s primarily designed for gaming, you can also use the Game Bar to capture screenshots of any application or window.
Follow these steps to crop a screenshot using the Windows Game Bar:
- Open the application or window you want to capture.
- Press the Windows key + G to open the Windows Game Bar.
- In the Game Bar overlay, click on the “Capture” button (camera icon) or use the “Windows key + Alt + PrtScn” keyboard shortcut to capture a screenshot.
- The screenshot will be saved to the “Captures” folder in your Videos library by default.
- To crop the screenshot, open the captured image in an image editing software of your choice. Most image editing software, including the Windows Paint application, allow you to crop images.
- In the image editing software, select the crop tool and drag the cursor to define the area you want to crop.
- Once you’ve selected the desired area, press the “Crop” or “Apply” button to crop and save the image.
The Windows Game Bar provides a convenient way to capture screenshots and quickly crop them without the need for additional software or tools. It’s a useful option for capturing screenshots on the go or during gaming sessions.
Note that the Windows Game Bar may need to be enabled on your system. To check if it’s enabled, go to Settings > Gaming > Game Bar and ensure that the “Record game clips, screenshots, and broadcast using Game Bar” option is turned on.
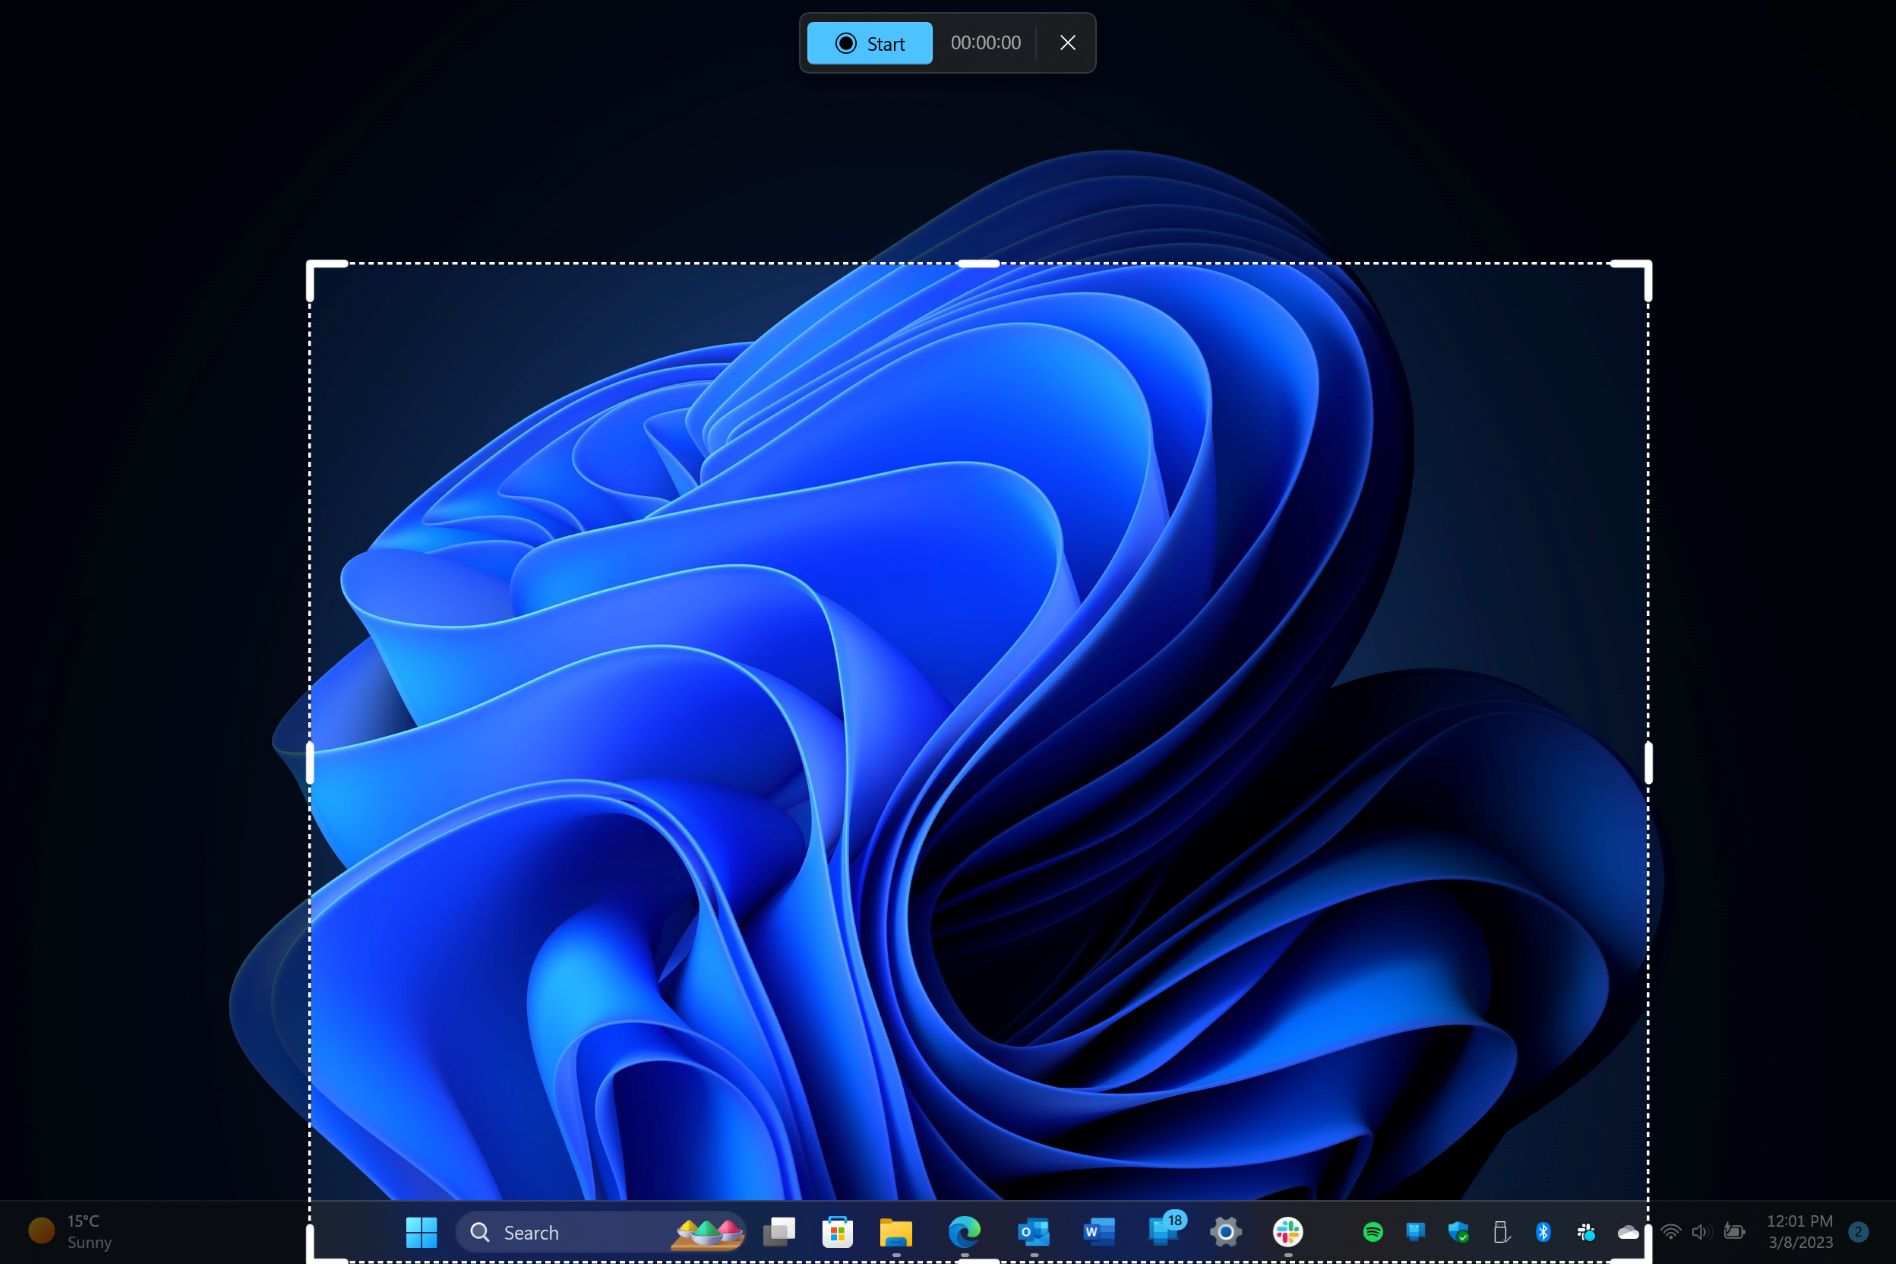
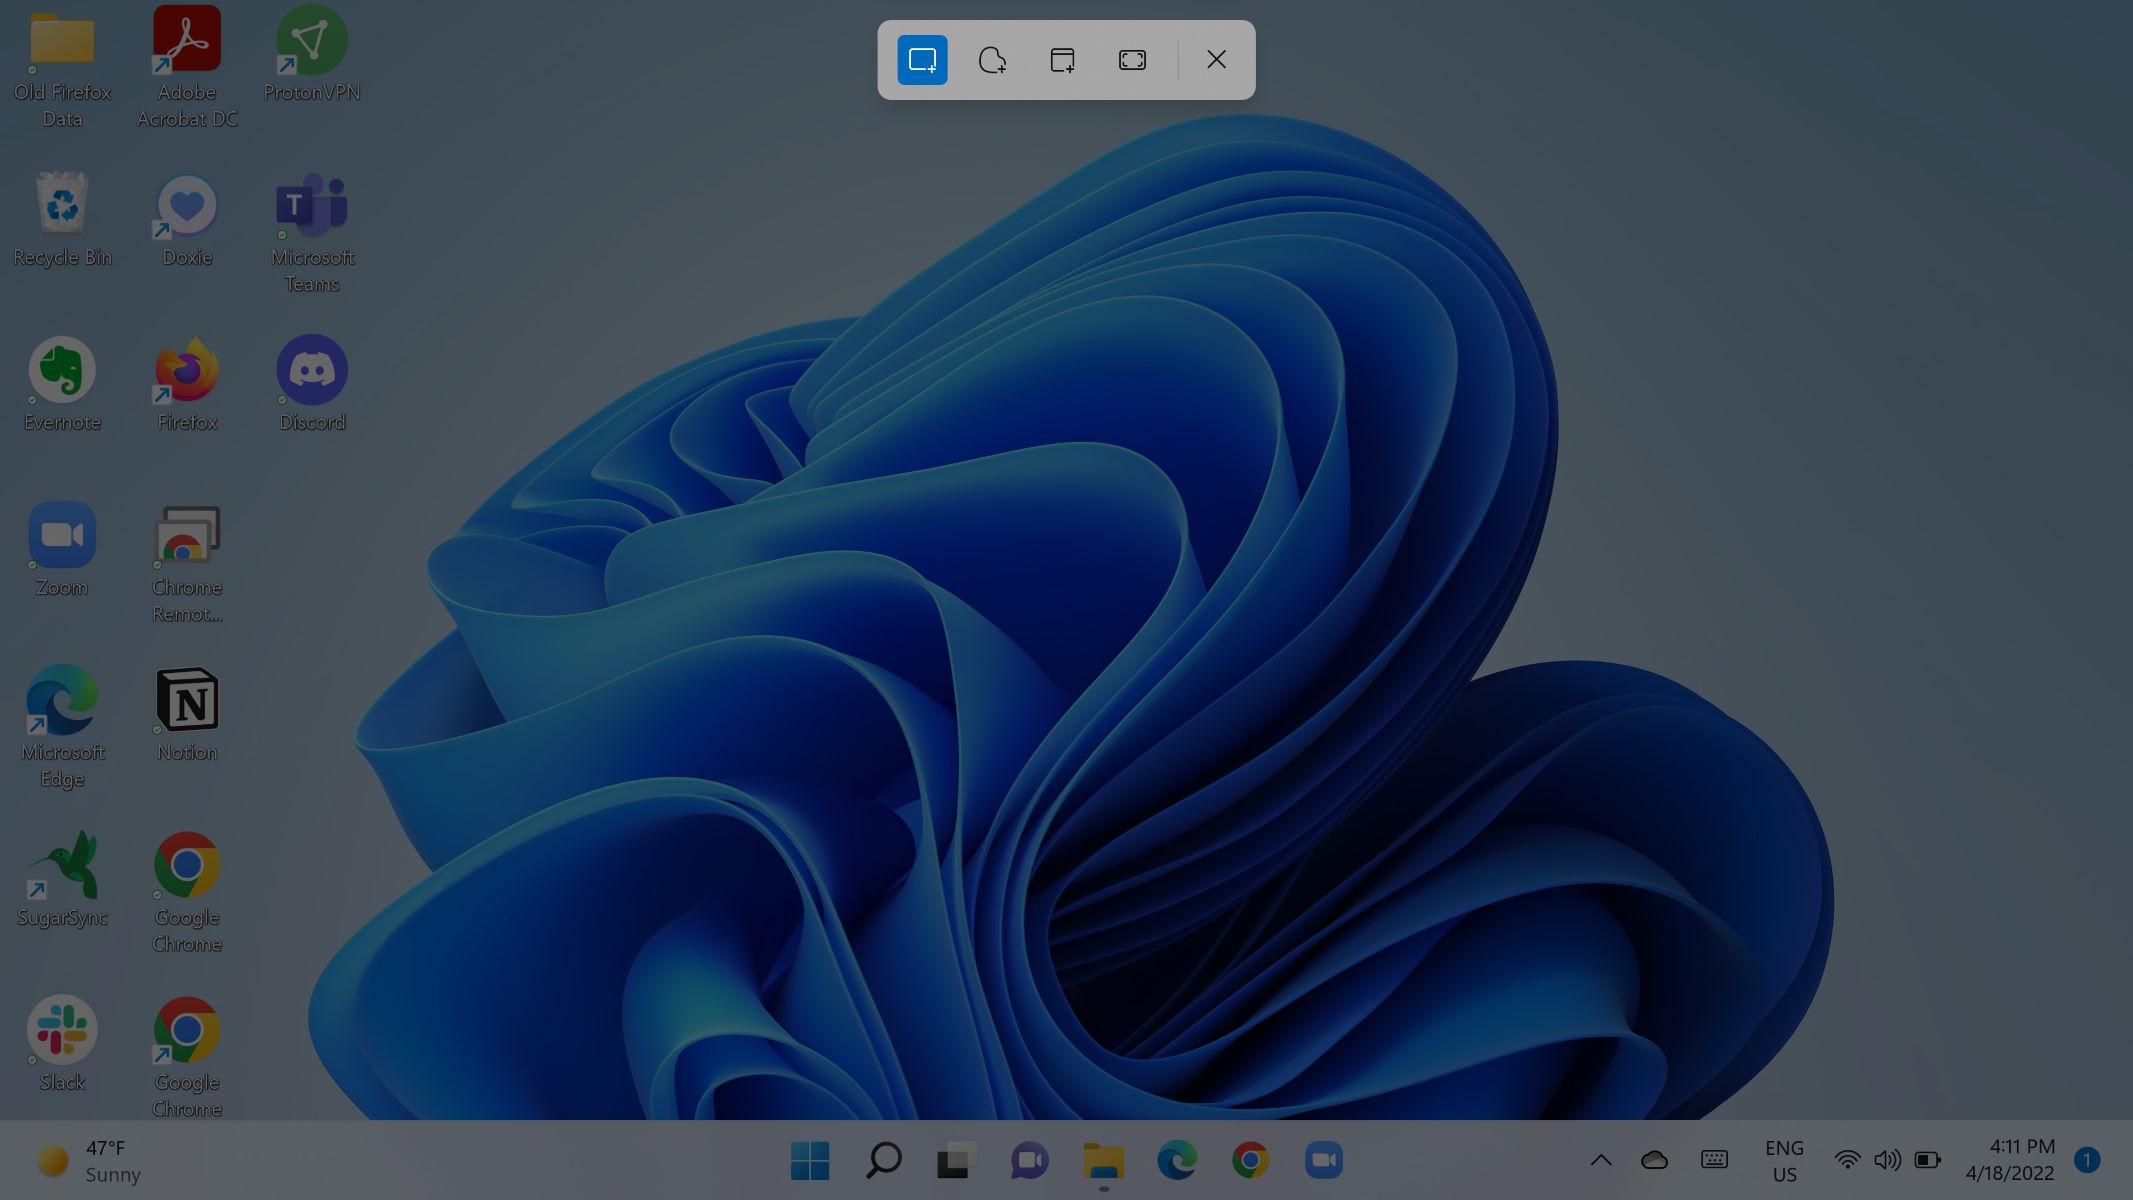
Step 4: Using the Windows Snip & Sketch App
Windows 10 introduced a new built-in screenshot tool called Snip & Sketch, which offers more advanced features for capturing and editing screenshots. With Snip & Sketch, you can easily capture screenshots and crop them within the same application, making it a convenient option for Windows users.
Follow these steps to crop a screenshot using the Windows Snip & Sketch app:
- Open the application or window you want to capture.
- Press the Windows key + Shift + S to open the Snip & Sketch app.
- The screen will dim, and a toolbar will appear at the top of the screen with options to capture different types of screenshots, such as rectangular snip, freeform snip, window snip, or full-screen snip. Select the desired snip shape for your screenshot.
- After selecting the snip shape, click and drag the cursor to capture the area you want to screenshot.
- After releasing the mouse button, the captured screenshot will open in the Snip & Sketch editor.
- To crop the screenshot, click on the “Crop” button in the Snip & Sketch toolbar. This will activate the crop mode.
- Adjust the selection handles around the image to crop the screenshot to your desired area.
- Once you’re satisfied with the cropped area, click on the “Save” button to save the cropped screenshot to your preferred location.
Snip & Sketch provides an intuitive and feature-rich experience for capturing and cropping screenshots. It eliminates the need for additional editing software and offers a seamless workflow for those who frequently capture and crop screenshots on Windows.
Remember that Snip & Sketch is available on Windows 10. If you’re using an older version of Windows, you can use other methods mentioned in previous steps or consider upgrading to Windows 10 for access to this convenient screenshot tool.
Conclusion
Cropping screenshots on Windows is an essential skill for effectively capturing and sharing information from your computer screen. With various built-in tools and applications available, you have several options to choose from depending on your preferences and needs.
In this article, we explored four different methods to crop screenshots on Windows. We learned how to use the Snipping Tool to quickly capture and crop screenshots, how to utilize the Print Screen key to capture the entire screen and later crop it using image editing software, how to leverage the Windows Game Bar for on-the-fly cropping, and how to take advantage of the Windows Snip & Sketch app, which provides advanced screenshot and cropping features.
Mastering the art of cropping screenshots can enhance your ability to convey your message effectively and efficiently. Whether you’re highlighting a specific portion of an image, removing distractions, or focusing on important details, cropping allows you to refine the visual content and make it more visually appealing.
Remember to experiment with different methods and find the one that suits your workflow and preferences. Each method offers its own set of features and benefits, so try them all and see which one fits your needs the best.
So, the next time you need to capture and crop a screenshot on Windows, refer back to this article and follow the step-by-step instructions for the method of your choice. Happy cropping!