Introduction
Welcome to this guide on how to download a picture from Google Slides! Google Slides is a popular online presentation tool that allows you to create and share slideshows with ease. While working on a presentation, you might come across a need to save an image from one of the slides for various purposes such as printing, sharing, or editing. In this article, we will explore different methods that you can use to download a picture from Google Slides.
As Google Slides operates entirely online, it doesn’t provide a direct “Download Image” option like traditional desktop applications. However, fear not! There are several workarounds that you can use to achieve the same result. In the following sections, we will outline various methods you can employ, depending on your specific needs. Whether you want to save the picture as a file, capture a screenshot and crop it, or export the entire slide as an image or PDF, we’ve got you covered!
Before we jump into the details, it’s important to note that the methods discussed here are applicable to accessing Google Slides via a web browser, both on desktop and mobile devices. Various operating systems and web browsers may have slight variations in the interface, but the core functionality remains the same.
Now, without further ado, let’s dive into the different methods you can use to download a picture from Google Slides!
Method 1: Downloading a Picture as a File
If you want to quickly download a picture from Google Slides and save it as a separate file, this method is the way to go. Follow these steps to accomplish this:
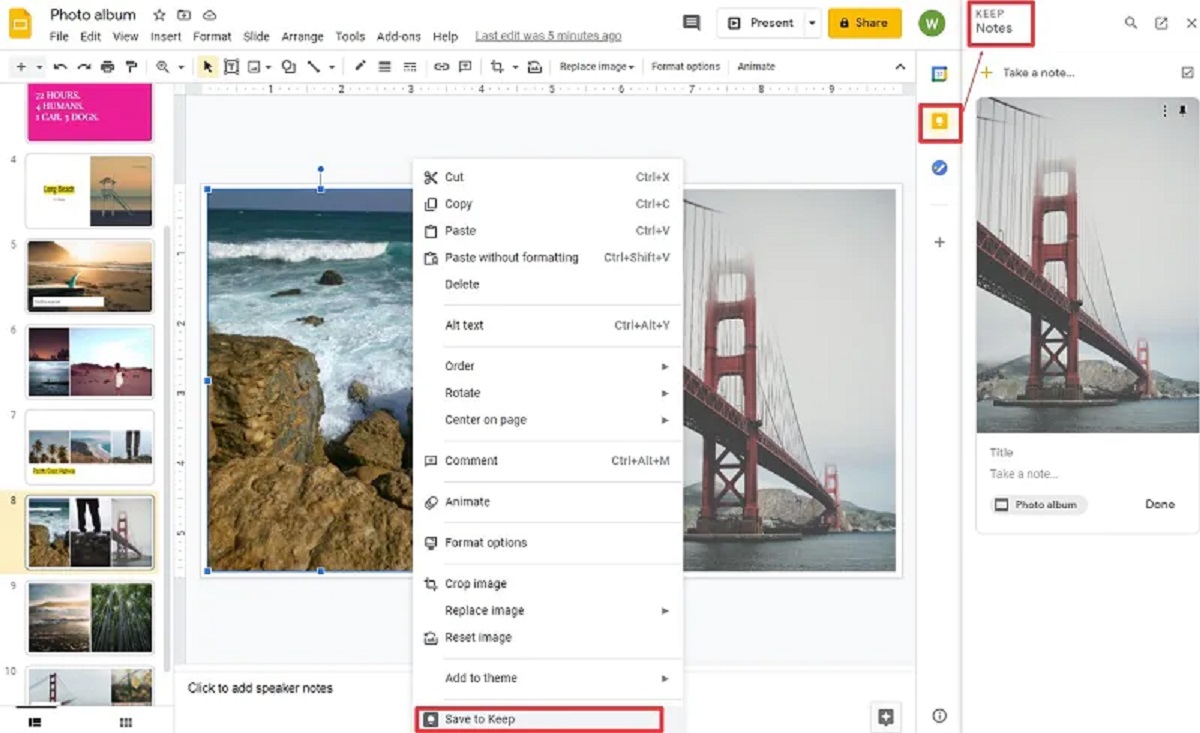
- Open the Google Slides presentation that contains the picture you want to download.
- Navigate to the slide that contains the picture.
- Click on the picture to select it.
- Right-click on the picture to open the context menu.
- In the context menu, select “Save image as” or “Save picture as,” depending on your browser.
- A file explorer window will open, allowing you to choose the location on your computer where you want to save the picture.
- Give the picture a descriptive name, select the desired file format (such as JPEG or PNG), and click “Save.”
And there you have it! The picture from Google Slides is now saved as a separate file on your computer. You can access it anytime and use it for various purposes like printing, editing, or sharing.
Keep in mind that the picture will be downloaded in the resolution and quality originally used in the Google Slides presentation. If you need a higher resolution version of the picture, you might want to consider other methods discussed in this article.
Now that you know how to download a picture from Google Slides as a separate file, let’s move on to the next method: taking a screenshot and cropping.
Method 2: Taking a Screenshot and Cropping
If you’re unable to directly download a picture from Google Slides or prefer a more flexible approach, you can take a screenshot of the slide containing the picture and then crop it to isolate the desired image. Follow these steps to accomplish this:
- Open the Google Slides presentation and navigate to the slide containing the picture you want to extract.
- Ensure that the picture is visible on your screen.
- On your keyboard, locate the “Print Screen” or “PrtScn” button. Press it to capture a screenshot of the entire screen.
- Open an image editing program or software on your computer. Popular options include Microsoft Paint, Adobe Photoshop, or Apple Preview.
- Paste the screenshot into the image editing program by pressing “Ctrl + V” or selecting ‘Paste’ from the ‘Edit’ menu.
- Crop the screenshot to remove any unnecessary parts of the image, focusing only on the picture you want to extract.
- Save the cropped image as a separate file on your computer, choosing the desired file format (e.g., JPEG or PNG) and providing a descriptive name.
By taking a screenshot and cropping it, you have successfully extracted the picture from Google Slides in a customized way. This method allows you to capture the picture precisely as it appears on your screen and gives you greater control over the final image.
It is important to note that the quality of the screenshot depends on several factors, including your screen resolution and the zoom level of the Google Slides presentation. To achieve the best results, ensure that your screen resolution is set to an optimal level and zoom in on the slide to capture the picture at its highest quality.
Now that you know how to capture and crop a screenshot of a picture in Google Slides, let’s explore the next method: exporting the slide as an image.
Method 3: Exporting the Slide as an Image
If you prefer to download the entire slide as an image, rather than just extracting a specific picture, you can use the export feature in Google Slides. This method allows you to save the slide as an image file, which can be useful if you want to preserve the slide’s layout, formatting, and other elements. Follow these steps to export a slide as an image:
- Open the Google Slides presentation and navigate to the slide you want to export as an image.
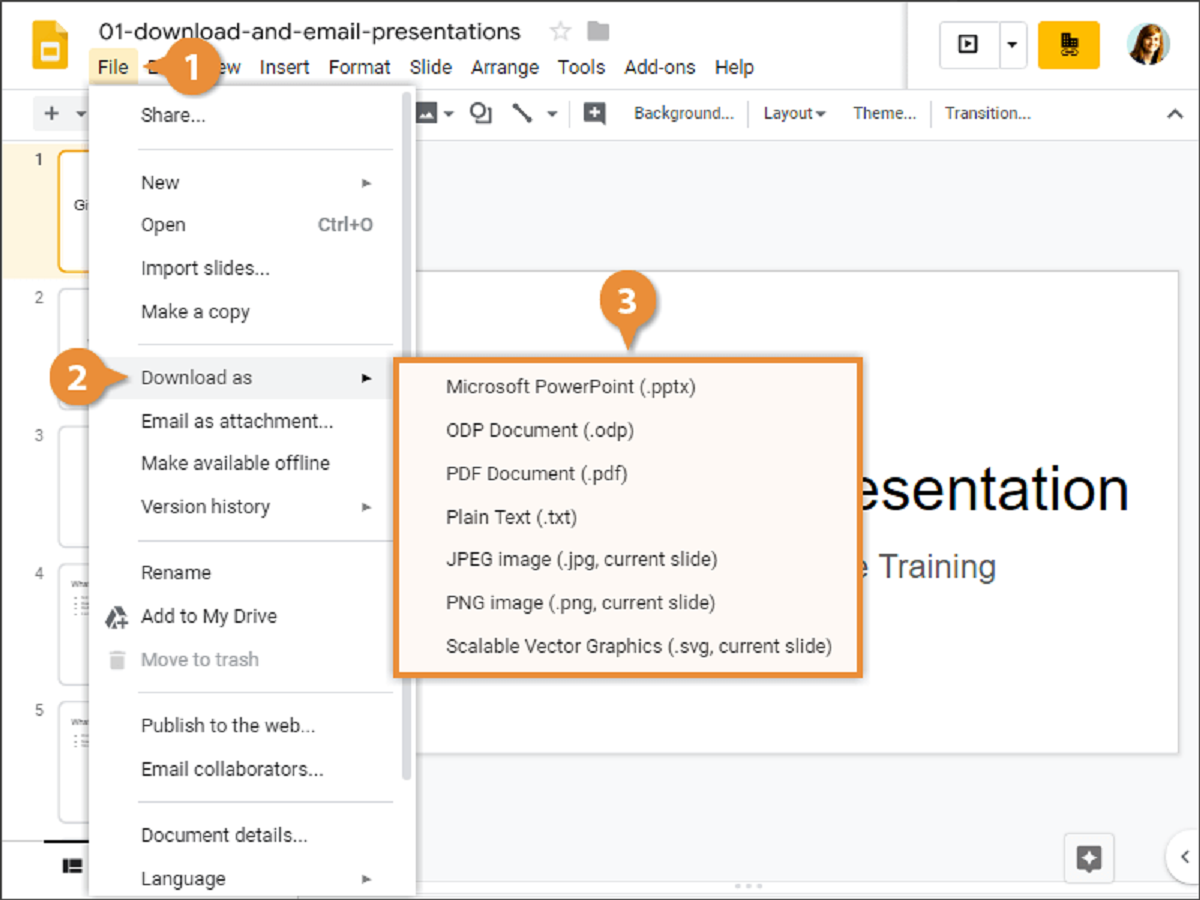
- Click on the “File” menu in the top-left corner of the screen.
- In the dropdown menu, hover over the “Download” option.
- In the submenu, select the “PNG image” or “JPEG image” format, depending on your preference.
- The slide will be converted into an image file and automatically downloaded to your computer.
- Open the downloaded file to access the exported slide image.
By exporting the slide as an image, you have the advantage of saving the entire slide with all its content, including text, shapes, and other visual elements. However, keep in mind that this method will not allow you to edit individual elements in the exported image. If you need to make any modifications to specific parts of the slide, consider other methods discussed earlier.
It’s worth noting that the exported image will have the same dimensions as the slide in Google Slides. If you require a different size or aspect ratio for the image, you can manually resize it using image editing software like Adobe Photoshop or online tools.
Now that you know how to export a slide from Google Slides as an image, let’s move on to the next method: saving the slide as a PDF.
Method 4: Saving the Slide as a PDF
If you want to save the entire slide, including all its elements, as a high-quality, portable document format (PDF), this method is for you. By saving the slide as a PDF, you can easily share it, print it, or view it on various devices without any loss of formatting. Follow these steps to save a slide as a PDF:
- Open the Google Slides presentation and navigate to the slide you want to save as a PDF.
- Click on the “File” menu in the top-left corner of the screen.
- In the dropdown menu, hover over the “Download” option.
- In the submenu, select the “PDF document” format.
- The slide will be converted into a PDF file and automatically downloaded to your computer.
- Open the downloaded PDF file using a compatible PDF reader, such as Adobe Acrobat Reader or a web browser.
By saving the slide as a PDF, you ensure that the content, layout, and formatting of the slide remain intact, regardless of the device or operating system used to view it. This can be advantageous when sharing the slide with others, as it eliminates potential compatibility issues.
Additionally, PDF files are generally smaller in size compared to image files, making them easier to store and share. If you need to print the slide, the PDF format ensures that the printed version maintains the original quality and resolution of the slide.
Keep in mind that while the PDF format preserves the overall appearance of the slide, it restricts the ability to modify individual elements within the file. If you require editable content, consider using other methods discussed earlier.
Now that you know how to save a slide from Google Slides as a PDF, let’s move on to the next method: copying and pasting the picture.
Method 5: Copying and Pasting the Picture
If you prefer a quick and straightforward method to download a picture from Google Slides without saving it as a separate file, you can copy and paste the picture into an image editing program or document. This method allows you to retain the picture’s original quality and dimensions while providing the flexibility to paste it into various applications. Follow these steps to copy and paste a picture from Google Slides:
- Open the Google Slides presentation and navigate to the slide containing the picture you want to copy.
- Select the picture by clicking on it.
- Right-click on the picture and choose the “Copy” option. Alternatively, you can use the keyboard shortcut “Ctrl + C” (Windows) or “Command + C” (Mac).
- Open an image editing program or document where you want to paste the picture. This could be software like Microsoft Paint, Adobe Photoshop, or even a Word or Google Docs document.
- Right-click in the image editing program or document and choose the “Paste” option. You can also use the keyboard shortcut “Ctrl + V” (Windows) or “Command + V” (Mac).
- The picture from Google Slides will be pasted into the image editing program or document.
- Save the image file or document to retain the copied picture.
By copying and pasting the picture, you can quickly transfer it to another application or document without downloading or saving it separately. This method is convenient when you need to add the picture to a specific project or incorporate it into a presentation or document.
However, it’s important to note that the picture may lose some quality or resolution due to the limitations of the destination application or document formatting. To maintain the best quality, ensure that the application or document supports image paste functions without significant reduction in clarity or sharpness.
Now that you know how to copy and paste a picture from Google Slides, let’s summarize the methods discussed in this article.
Conclusion
Downloading a picture from Google Slides may not be as straightforward as it is in traditional desktop applications, but with the methods outlined in this guide, you can easily save and use images from your presentations. Whether you choose to download a picture as a file, take a screenshot and crop it, export the slide as an image or PDF, or simply copy and paste the picture, each method has its advantages and can be tailored to your specific needs.
The first method allows you to quickly download a picture as a separate file, preserving its original resolution and quality. The second method, capturing a screenshot and cropping it, provides more flexibility and control over the extracted image. Exporting the slide as an image is useful when you want to save the entire slide with all its content intact. Saving the slide as a PDF ensures compatibility and preservation of the slide’s layout, making it easy to share or print. Lastly, copying and pasting the picture is a convenient method when you need to quickly transfer the image to another application or document.
Remember to consider your specific requirements when choosing a method, such as the desired file format, image quality, and compatibility with other software or devices. Experiment with these methods to find the one that suits you best, and don’t hesitate to combine different approaches for different scenarios.
Now that you have a variety of methods at your disposal, you can confidently download pictures from Google Slides and use them for various purposes. Whether you’re creating presentations, sharing images with others, or enhancing your projects, these techniques will enable you to effectively utilize the visual content from Google Slides.