Introduction
Welcome to this guide on how to download Google Slides with audio to PowerPoint! Google Slides is a popular tool for creating stunning presentations, but sometimes you may want to convert them to PowerPoint format for various reasons. One common challenge you might face is preserving the audio in your Google Slides presentation when downloading it as a PowerPoint file. However, with a few simple steps, you can successfully download your Google Slides presentation with audio and enjoy seamless playback on PowerPoint.
Whether you’re a student, teacher, or working professional, knowing how to convert a presentation from one format to another can be extremely useful. By converting your Google Slides to PowerPoint, you can ensure compatibility with different devices, operating systems, and presentation software, making it easier to share your work with others. This guide will walk you through the step-by-step process, enabling you to download your Google Slides presentation with audio to PowerPoint effortlessly.
Before we dive into the steps, it’s important to note that downloading Google Slides with audio to PowerPoint requires an internet connection and access to both Google Slides and PowerPoint applications. Additionally, the process outlined in this guide is applicable for desktop versions of Google Slides and PowerPoint.
Now that we have a brief overview, let’s delve into the specific steps you need to follow to successfully download Google Slides with audio to PowerPoint. Whether you’re a beginner or an experienced user, this guide will provide you with the necessary instructions to make the conversion process a smooth one. Let’s get started!
Step 1: Open the Google Slides presentation
The first step in downloading Google Slides with audio to PowerPoint is to open the Google Slides presentation that you want to convert. To do this, follow the steps below:
- Go to the Google Slides website (slides.google.com) and sign in to your Google account if you haven’t already.
- In the Google Slides dashboard, you will see a list of your presentations. Locate the presentation you want to download and click on it to open it.
- The presentation will open in a new tab, displaying the slides and any audio or media files that may be present.
Opening the Google Slides presentation is the first crucial step in the conversion process. It allows you to access the content and audio within the presentation, which can then be downloaded and preserved in the PowerPoint format.
It’s worth mentioning that before proceeding to the next steps, you should ensure that your Google Slides presentation is properly organized, contains the desired audio recordings, and is ready for download. Take the time to review each slide and audio element to ensure they are in the correct order and functioning as intended. This will help avoid any issues during the conversion process.
Once you have successfully opened your Google Slides presentation, you are ready to move on to the next step and start the process of downloading the presentation with audio to PowerPoint.
Step 2: Go to “File” and select “Download”
After opening your Google Slides presentation, the next step is to navigate to the “File” menu and select the “Download” option. This will allow you to choose the desired file format for download. Follow the steps below to complete this step:
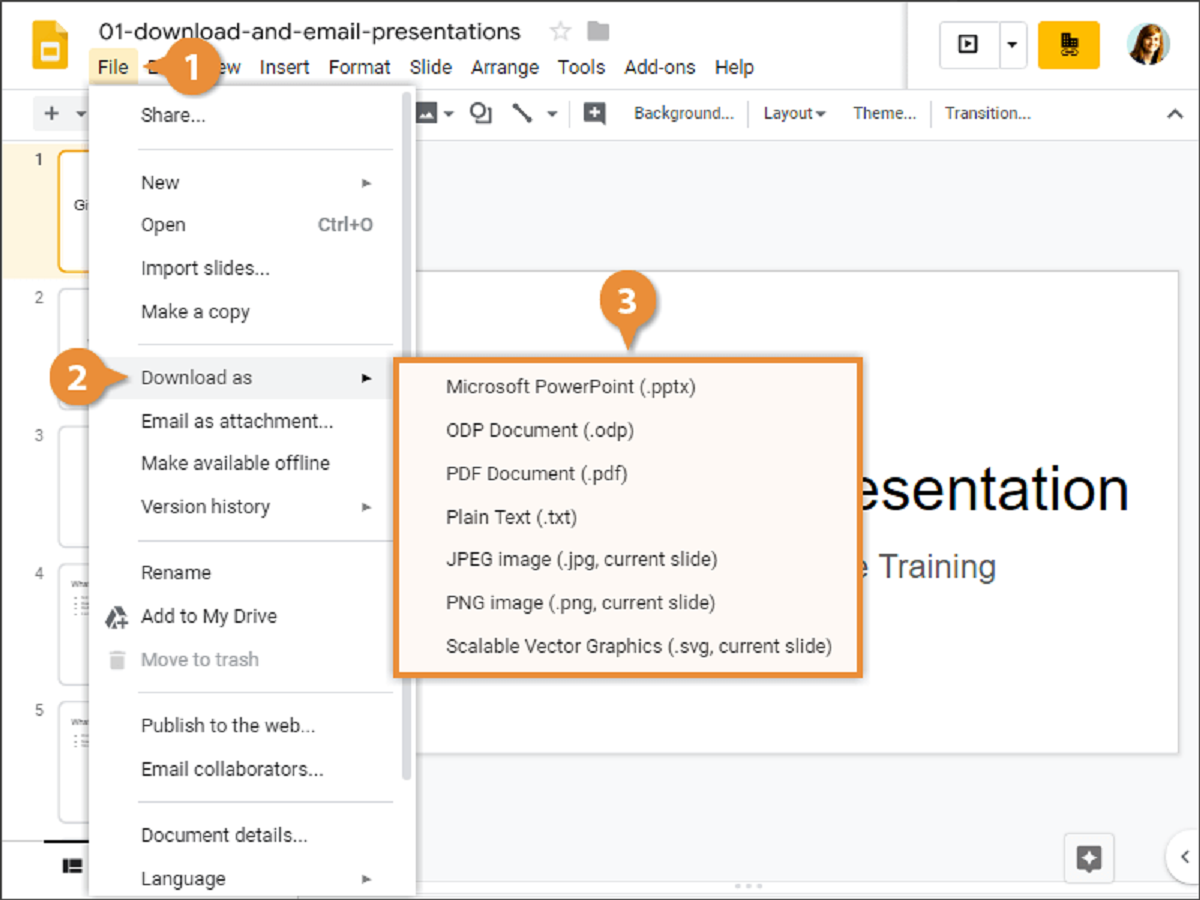
- In the top menu bar of the Google Slides interface, locate the “File” tab and click on it.
- A dropdown menu will appear with several options. Scroll down and find the “Download” option.
- When you hover over the “Download” option, another submenu will appear with various file format options.
- Select the file format that you want to download your Google Slides presentation as. In this case, choose the “PowerPoint” format.
By choosing the “PowerPoint” format, you ensure that the downloaded file will be compatible with Microsoft PowerPoint software. This is important if you plan to present or share your presentation with others who primarily use PowerPoint.
It’s important to note that depending on your browser settings, the downloaded file may automatically save to a default location or prompt you to choose a save location on your computer. Pay attention to these prompts and ensure that your presentation is saved in a location where you can easily access it later.
Now that you have successfully selected the “Download” option and chosen the “PowerPoint” format, you are ready to move on to the next step – actually downloading the Google Slides presentation with audio to your computer.
Step 3: Choose the PowerPoint (.pptx) format
Once you have selected the “Download” option from the “File” menu, the next step is to choose the PowerPoint (.pptx) format for your Google Slides presentation. Following these simple steps will guide you through the process:
- After selecting the “Download” option, a submenu will appear with various file format options.
- Locate and click on the “PowerPoint” format in the submenu.
- The Google Slides presentation will start to convert into the PowerPoint format, generating a downloadable file.
- Depending on the size and complexity of your presentation, this conversion process may take a few moments.
Choosing the PowerPoint (.pptx) format is crucial as it ensures compatibility with Microsoft PowerPoint software. PowerPoint (.pptx) files are widely used and support various multimedia elements, including audio, making it ideal for preserving the audio in your Google Slides presentation.
It’s worth noting that by selecting the PowerPoint format, any transitions, animations, and formatting styles used in your Google Slides presentation will also be preserved in the downloaded PowerPoint file. This allows for a seamless transition from Google Slides to PowerPoint without losing any visual or audio elements.
Once the conversion process is complete, the PowerPoint file will be ready for download and saved to your computer. At this point, you’re just a few steps away from being able to play the audio in PowerPoint and fully enjoy your converted presentation.
With the PowerPoint (.pptx) format successfully selected, let’s move on to the next step – downloading the converted Google Slides presentation and opening it in PowerPoint.
Step 4: Click “Download” to save the file to your computer
After choosing the PowerPoint format for your Google Slides presentation, the next step is to click the “Download” button to save the file to your computer. Follow these steps to complete this process:
- Locate and click the “Download” button, which will be displayed after you have chosen the PowerPoint format.
- Depending on your browser settings, you may see a notification or prompt asking you to confirm the download. Click “Save” or “OK” to proceed.
- Choose a location on your computer where you want to save the downloaded PowerPoint file.
- Click “Save,” and the file will start downloading to the chosen location on your computer.
- The download time will vary depending on the size of your presentation and the speed of your internet connection. Be patient and wait for the download to complete.
- Once the download is finished, you will have successfully saved the Google Slides presentation with audio as a PowerPoint file on your computer.
It’s important to remember the location where you saved the file, as you will need to access it in the next steps to open it in PowerPoint and play the audio. You may want to save the file in a location that is easily accessible and organized to avoid any confusion later on.
By clicking “Download,” you have completed an essential step in the process of downloading your Google Slides presentation with audio to PowerPoint. Now, let’s move on to the next step and learn how to open the downloaded PowerPoint file.
Step 5: Open the downloaded PowerPoint (.pptx) file
Now that you have successfully downloaded the PowerPoint file of your Google Slides presentation with audio, the next step is to open the downloaded file using Microsoft PowerPoint. Follow these steps to accomplish this:
- Locate the downloaded PowerPoint (.pptx) file on your computer. It is usually saved in the default Downloads folder or the location you specified during the download.
- Double-click on the PowerPoint file to open it. This will launch the Microsoft PowerPoint software.
- The PowerPoint file will open, displaying your Google Slides presentation with all the slide content, formatting, and audio intact.
Opening the downloaded PowerPoint file allows you to access the converted Google Slides presentation and all its associated audio files. You can now manipulate and present the content using the features provided by Microsoft PowerPoint.
It’s important to note that you will need to have Microsoft PowerPoint installed on your computer to open and edit the downloaded file. If you don’t have PowerPoint installed, you can use alternative presentation software that supports the PowerPoint (.pptx) format.
By successfully opening the downloaded PowerPoint file, you’re one step closer to being able to play and control the audio in your Google Slides presentation. In the next step, we will explore how to enable editing and play audio in PowerPoint.
Step 6: Enable editing and play audio in PowerPoint
After opening the downloaded PowerPoint file, the next step is to enable editing and play the audio in your Google Slides presentation. Follow these steps to accomplish this:
- When the PowerPoint file is open, you will see a ribbon at the top of the screen with various tabs. Click on the “File” tab in the ribbon to access the options menu.
- In the options menu, look for the “Enable Editing” button. Click on it to enable editing mode for the presentation.
- Once editing mode is enabled, you can navigate through the slides using the arrow keys, mouse scroll wheel, or by clicking on the slide thumbnails on the left side of the screen.
- To play the audio, click on the slide that contains the audio file.
- If the audio file is embedded in the slide, it will play automatically when you reach that slide. If it is linked to an external audio file, you may need to click on a play button or an audio icon on the slide to initiate playback.
- Adjust the volume and control the playback of the audio using the options provided in the PowerPoint interface.
Enabling editing allows you to interact with the presentation, play the audio, and make any necessary changes or adjustments. By following these steps, you can fully enjoy the audio elements in your Google Slides presentation within the PowerPoint environment.
It’s important to note that the process of enabling editing and playing audio may vary slightly depending on the version of PowerPoint you are using. However, the general concept and functionality remain the same across different versions.
Now that you have successfully enabled editing and played the audio in PowerPoint, you’re ready to move on to the next step – adjusting audio settings if needed.
Step 7: Adjust audio settings if needed
After enabling editing and playing the audio in your downloaded Google Slides presentation in PowerPoint, it is important to ensure that the audio settings are properly adjusted. By correctly configuring the audio settings, you can optimize the playback experience and make any necessary adjustments. Follow these steps to adjust the audio settings:
- Select the slide that contains the audio file you want to modify.
- Click on the audio object on the slide to select it. You will see a contextual “Audio Tools” tab appear on the ribbon.
- Within the “Audio Tools” tab, locate the “Playback” section. This section will provide options for adjusting the audio settings.
- You can choose whether the audio should play automatically when the slide is displayed or upon clicking on the audio object.
- Adjust the volume slider to increase or decrease the volume of the audio. You can also choose to mute the audio if desired.
- Explore additional options such as starting the audio from a specific point, looping the audio playback, or fading in/out the audio.
- Repeat these steps for each slide that contains audio, making any necessary adjustments to the settings.
By adjusting the audio settings, you can customize the behavior and quality of the audio playback in your presentation. This allows you to create a seamless and engaging experience for your audience.
It’s worth mentioning that the specific audio settings available in PowerPoint may vary depending on the version you are using. However, the general process of accessing and modifying the audio settings remains consistent across different versions.
With the audio settings properly adjusted, you have successfully completed the final step in downloading your Google Slides presentation with audio to PowerPoint. Now you can confidently present and share your converted presentation, complete with seamless audio playback.
Conclusion
Converting your Google Slides presentation with audio to PowerPoint doesn’t have to be a complex task. By following the step-by-step process outlined in this guide, you can successfully download your presentation in PowerPoint format while preserving the audio elements. Let’s recap what we’ve covered:
First, we discussed the importance of being able to convert a presentation from one format to another, particularly when it comes to compatibility and sharing with others. We then explored the initial steps of opening your Google Slides presentation, ensuring it’s well-organized and ready for download.
Next, we delved into the process of selecting the “Download” option from the “File” menu in Google Slides and choosing the PowerPoint (.pptx) format for download. This ensures that your presentation can be opened and viewed in Microsoft PowerPoint or other compatible software.
Once the download is complete, we learned how to open the downloaded PowerPoint file, enabling editing and accessing all the slide content and audio files. We then discussed how to play the audio within PowerPoint, making use of the playback options provided by the software.
Lastly, we explored the importance of adjusting the audio settings to optimize the playback experience. By adjusting the volume, playback options, and other settings, you can enhance the audio quality and ensure a seamless presentation.
With all these steps completed, you’re now equipped with the knowledge and tools to successfully download Google Slides with audio to PowerPoint. You can confidently convert your presentations, preserving the audio elements and delivering impactful presentations that captivate your audience.
Remember to regularly check for updates in Google Slides and PowerPoint as new features and functionalities may be introduced over time. Explore the various options and tools available to enhance your presentation and make the most of your audio assets.
So go ahead, start converting your Google Slides presentations with audio to PowerPoint and unlock a whole new level of presentation versatility and compatibility!