Introduction
When it comes to creating visually appealing and engaging presentations, the right font can make all the difference. While PowerPoint offers a variety of default fonts, sometimes you may want to explore new options to add a unique touch to your slides. The good news is that downloading and using custom fonts in PowerPoint is a straightforward process.
In this article, we will guide you through the step-by-step process of downloading and installing fonts into PowerPoint. Whether you are looking for elegant script fonts, bold display fonts, or quirky handwritten fonts, we’ve got you covered. By the end of this guide, you will have the skills to enhance your presentations with customized typography that reflects your personal style or complements your brand identity.
Before we dive into the details, it’s important to note that the specific steps may vary slightly depending on the version of PowerPoint you are using and the operating system of your computer. However, the overall process remains similar, and we will provide general guidelines that can be easily adapted to your specific setup.
So, if you’re ready to take your PowerPoint presentations to the next level with unique fonts, let’s get started!
Step 1: Choose a Font Download Website
The first step in downloading fonts for use in PowerPoint is to find a reliable font download website. There are numerous websites available that offer a wide range of fonts, both free and paid. When choosing a font download website, consider factors such as the variety and quality of fonts available, ease of use, and licensing terms.
Some popular font download websites include Google Fonts, Font Squirrel, DaFont, and Adobe Fonts. Each of these websites has its own collection of fonts, so you can explore different options to find the style that best suits your presentation.
Google Fonts is a great choice for those looking for free, high-quality fonts. It offers a vast selection of fonts that can be easily integrated into your PowerPoint presentations. Font Squirrel is another popular option that provides a curated collection of fonts, including both free and commercial options.
If you’re looking for more unique or specialized fonts, websites like DaFont offer a wide variety of styles, from handwriting and graffiti fonts to decorative serif and sans-serif fonts. Keep in mind that with these types of websites, it’s important to carefully read the licensing terms to ensure that you can legally use the fonts in your presentations.
For those with a Creative Cloud subscription, Adobe Fonts (formerly Typekit) is an excellent resource. It provides access to thousands of fonts that can be easily synced and used in various applications, including PowerPoint.
Ultimately, the choice of font download website will depend on your specific needs and preferences. Take the time to explore different websites and browse their font collections to find the perfect fonts for your PowerPoint presentations.
Step 2: Browse for Fonts
Once you have chosen a font download website, it’s time to browse through the available fonts and find the ones that best suit your needs. Most font download websites provide an easy-to-use interface that allows you to search and filter fonts based on various criteria such as style, category, popularity, and language support.
Start by exploring different font categories to narrow down your search. Some common categories include serif, sans-serif, script, display, and decorative. Each category has its own unique characteristics, so take the time to browse through different styles and find the ones that resonate with your presentation’s theme or mood.
If you have a specific font in mind or are looking for a particular style, you can also use the search feature on the website to quickly find relevant fonts. Simply enter keywords or the name of the font you’re interested in, and the website will display matching results.
Additionally, many font download websites allow you to preview the fonts before downloading them. This is an excellent opportunity to visualize how the fonts will look in your PowerPoint slides. You can usually test the fonts by typing in a sample text or selecting predefined examples provided by the website.
As you browse for fonts, consider the readability and legibility of the font styles. Keep in mind the purpose of your presentation and ensure that the fonts you choose are easy to read, especially when projected on a screen. Avoid overly decorative or intricate fonts that may distract from the message you want to convey.
Take your time to explore different fonts, experiment with various combinations, and stay open to new possibilities. Remember that fonts play a crucial role in enhancing the visual appeal of your presentation, so choose fonts that positively contribute to the overall design and aesthetics.
Step 3: Select and Download Fonts
After you have browsed through the available fonts and found the ones that best fit your presentation, it’s time to select and download them to your computer. Most font download websites provide a straightforward process for downloading fonts, ensuring a seamless experience for users.
To select a font for download, simply click on the font’s name or the download button associated with it. Some websites may require you to create an account or provide your email address before downloading fonts, while others offer direct download options without any registration process.
When downloading fonts, it’s essential to pay attention to the licensing terms. Some fonts may be free for personal use but require a license for commercial or public use. Make sure to read and understand the licensing terms to ensure that you comply with the font creator’s requirements.
When downloading fonts, you may have the option to choose different file formats. The most common font file formats are TrueType (.ttf) and OpenType (.otf). Both formats are widely supported and compatible with PowerPoint and other design software. Choose the format that works best for your needs, keeping in mind the software you will be using to create your presentations.
Once you’ve selected the fonts and downloaded their files, they are typically saved as compressed files (e.g., ZIP files). Before you can use these fonts in PowerPoint, you need to extract or unzip the downloaded files. Right-click on the compressed file and select “Extract” or use a file extraction tool to extract the font files.
It’s a good practice to create a specific folder on your computer to store all your downloaded fonts. This will make it easier to find and install the fonts when needed. You can create a separate folder within your “Fonts” directory or choose a location that is easily accessible.
With the fonts downloaded and extracted, you are now ready to proceed to the next step and install them on your computer.
Step 4: Unzip the Downloaded Fonts
After downloading fonts from a font download website, the next step is to unzip or extract the font files from the downloaded zip folder. This process allows you to access the individual font files that you can then install on your computer.
To unzip the downloaded fonts, locate the zip folder in your computer’s file explorer or downloads folder. Right-click on the zip folder and select “Extract All” or “Extract Here” from the drop-down menu. Alternatively, you can use a file compression tool such as WinRAR or 7-Zip to extract the font files.
Once you have extracted the font files, you will notice that each font is typically saved as a separate file with a file extension such as .ttf or .otf. These are the actual font files that you will install on your computer to use in PowerPoint.
It’s a good practice to organize the extracted font files in a dedicated folder for easy access. You can create a folder with a descriptive name, such as “Downloaded Fonts,” and place all the font files inside it.
Now that you have successfully unzipped and organized the downloaded font files, you are ready to proceed to the next step: installing the fonts on your computer. Installing the fonts will make them available for use not only in PowerPoint but also in other applications and software installed on your computer.
Bear in mind that the font installation process may vary depending on your operating system (Windows, Mac, or Linux). Therefore, it’s important to refer to the specific instructions for your operating system to ensure a smooth font installation process.
Step 5: Install the Fonts on Your Computer
Now that you have extracted the font files, the next step is to install them on your computer. By installing the fonts, you make them available for use in PowerPoint and other applications installed on your computer.
The process of installing fonts may vary slightly depending on your operating system. Here are the general steps to install fonts on the most common operating systems:
Windows
- Open the folder where you extracted the font files.
- Double-click on the font file you want to install.
- A preview of the font will appear, along with an “Install” button.
- Click on the “Install” button to install the font.
- Repeat the above steps for each font file you want to install.
Alternatively, you can right-click on the font file and select “Install” from the context menu to install the font.
Mac
- Open the folder where you extracted the font files.
- Double-click on the font file you want to install.
- A preview of the font will open in the Font Book application.
- Click on the “Install Font” button to install the font.
- Repeat the above steps for each font file you want to install.
Linux
Installing fonts on Linux can vary depending on the distribution and desktop environment you’re using. However, the general process involves copying the font files to the “~/.fonts” directory in your home folder. You can then refresh the font cache to make the newly installed fonts available for use.
Once the fonts are installed on your computer, you can use them not only in PowerPoint but also in other applications that support custom font usage. The installed fonts will appear in the font list within PowerPoint for you to select and apply to your text.
By installing fonts on your computer, you have now successfully made them accessible for use in PowerPoint. With the fonts ready, you can proceed to the next step of opening PowerPoint and accessing the font options to add and use the downloaded fonts in your presentations.
Step 6: Open PowerPoint and Access the Font Options
With the downloaded fonts installed on your computer, it’s time to open PowerPoint and access the font options. PowerPoint provides a user-friendly interface that allows you to easily apply different fonts to your presentation slides.
Open PowerPoint and create a new presentation or open an existing one. Once you have the presentation open, navigate to the slide where you want to change the font or add new text.
To access the font options, select the text that you want to modify. You can do this by clicking and dragging your cursor over the text or by clicking once on the text box to select it as a whole.
Once the text is selected, navigate to the “Home” tab in the PowerPoint ribbon. In the “Font” section, you will find various options to customize the font, including the font face, size, color, and more.
Click on the drop-down menu next to the font name to view the list of available fonts. The fonts you recently installed will appear in this list, along with the default fonts provided by PowerPoint.
Scroll through the list to find the font you want to use. You can either click on the font name to apply it directly or hover over the font name to see a preview of how it will look in your selected text.
If you want to further customize the font, you can adjust the font size, boldness, italicization, underline, and other formatting options from the “Font” section in the PowerPoint ribbon. Experiment with different combinations of font styles and formatting to find the perfect look for your presentation.
Remember to apply consistent font choices throughout your presentation to maintain visual harmony and cohesiveness. Consistency in font usage contributes to a professional and polished presentation.
By accessing the font options in PowerPoint, you have the flexibility to apply the downloaded fonts to your presentation. Whether it’s the title, headings, or body text, you can select and apply the desired fonts to enhance the visual appeal and overall impact of your slides.
Step 7: Add and Use the Downloaded Fonts in PowerPoint
Now that you have accessed the font options in PowerPoint, it’s time to add and use the downloaded fonts in your presentation. By incorporating these custom fonts, you can enhance the visual impact and uniqueness of your slides.
To add the downloaded fonts to your PowerPoint presentation, follow these steps:
- Open PowerPoint and navigate to the slide where you want to add or modify text.
- Select the text box or click on the slide to create a new text box.
- Type in the desired text for your slide, making sure the text box is selected.
- Go to the “Home” tab in the PowerPoint ribbon and access the font options.
- Click on the drop-down menu next to the font name to view the available fonts.
- Scroll through the list and locate the downloaded font you want to use.
- Click on the font name to apply it to your selected text.
Once applied, you will notice how the newly added font transforms the appearance of your text, giving it a fresh and personalized touch.
As you continue to work on your presentation, you can add the downloaded fonts to other text boxes or slides by following the same process. Experiment with different font combinations and styles to create a visually captivating and cohesive presentation.
Remember that PowerPoint allows you to change the font for individual text boxes or apply the same font to multiple elements in your presentation using the “Apply to All” option in the font menu. This makes it easy to maintain consistency throughout your slides while still having the freedom to customize fonts as needed.
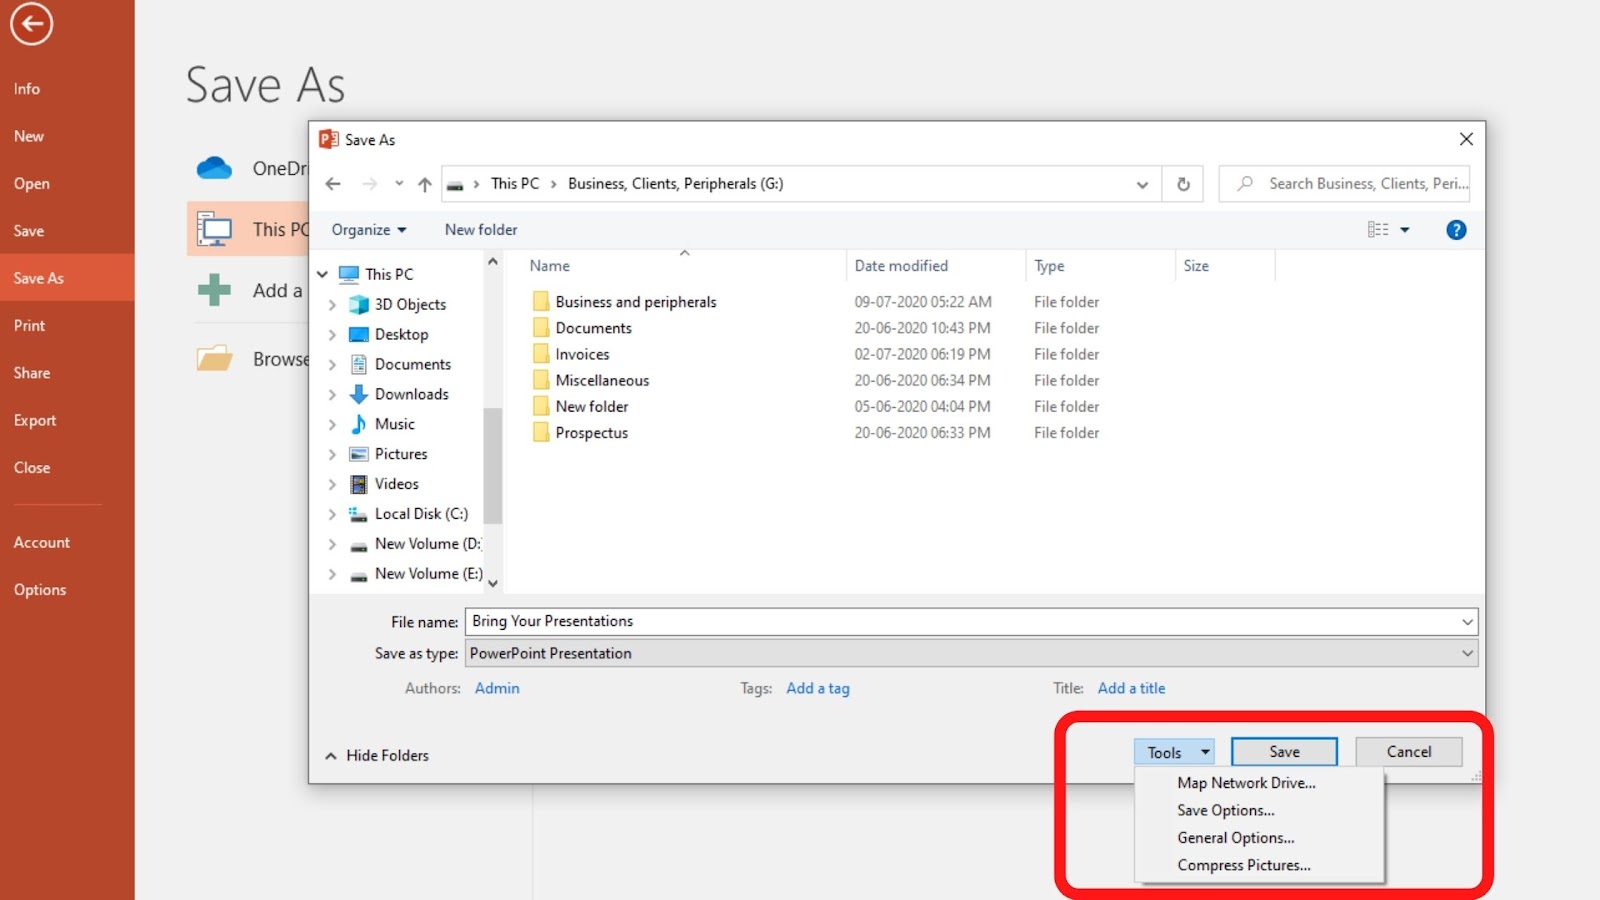
Additionally, if you’re collaborating with others on the presentation or planning to share it, keep in mind that the other users may not have the same fonts installed on their computers. To ensure that your custom fonts are displayed correctly, consider embedding the fonts in your PowerPoint file before sharing or exporting it. This will ensure that the fonts remain intact regardless of the device used to open the presentation.
By adding and using the downloaded fonts in PowerPoint, you have successfully transformed your slides into visually appealing and unique creations. The choice of fonts plays a crucial role in capturing and maintaining the attention of your audience, so select fonts that complement your content and convey the desired tone or message.
Conclusion
Congratulations! You have successfully learned how to download, install, and use custom fonts in PowerPoint to enhance the visual appeal and uniqueness of your presentations. By following the step-by-step guide outlined in this article, you have acquired the skills to elevate your slides with personalized typography that reflects your style or aligns with your brand identity.
Remember the key steps:
- Choose a font download website that suits your needs and preferences.
- Browse through the available fonts to find the ones that best fit your presentation.
- Select and download the fonts, ensuring compliance with licensing terms.
- Unzip or extract the downloaded font files to access them on your computer.
- Install the fonts on your computer to make them available for use in PowerPoint.
- Open PowerPoint and access the font options to apply the downloaded fonts to your text.
- Add and use the downloaded fonts in your presentation, maintaining consistency and visual appeal.
Remember to consider factors such as readability, legibility, and the overall message you want to convey when selecting and using fonts in your PowerPoint presentations. Fonts can have a significant impact on the audience’s perception and understanding of your content, so choose wisely.
Keep in mind that the specific steps may vary depending on your version of PowerPoint and operating system. Therefore, it’s crucial to adapt the guidelines provided in this article to your specific setup.
Now, armed with the knowledge and skills you’ve gained, you can confidently create captivating presentations that stand out and leave a lasting impression on your audience. So go ahead, explore different font styles, experiment with combinations, and unleash your creativity to make your PowerPoint presentations truly remarkable.