Introduction
Windows 11 brings a host of new features and improvements, and one essential skill every user should master is taking screenshots. Whether you want to capture a funny meme, save important information, or demonstrate a technical issue to tech support, knowing how to take a screenshot is crucial. In this guide, we’ll explore various methods to take screenshots in Windows 11 that cater to different preferences and scenarios.
Taking screenshots has always been a handy feature in Windows, and Windows 11 offers even more flexibility and options. From capturing the entire screen to specific windows or regions, and even editing and annotating screenshots, you’ll have complete control over your screenshots.
In this article, we’ll walk you through various techniques to capture screenshots in Windows 11, ranging from using the built-in Snip & Sketch tool and keyboard shortcuts to exploring additional options like the Xbox Game Bar. Whether you’re a casual user or a power user, we’ve got you covered.
So, if you’re ready to become a screenshot-taking pro in Windows 11, let’s dive in and explore the different methods and functionalities that will ensure you never miss an opportunity to capture that perfect screenshot.
Using the Snip & Sketch tool
One of the easiest and most versatile methods to capture screenshots in Windows 11 is by using the Snip & Sketch tool. This built-in tool provides a user-friendly interface and a range of options for capturing screenshots.
To access Snip & Sketch, you can either search for it in the Start menu or use the keyboard shortcut Windows key + Shift + S. Once opened, you’ll see a small toolbar at the top of the screen with options to capture different types of screenshots.
The default option is the rectangular snip, which allows you to draw a rectangle around the area you want to capture. Simply click and drag the mouse to select the desired region. Once you release the mouse button, the captured screenshot will be displayed in a small preview window.
From there, you can use various tools like pen, highlighter, and eraser to annotate or emphasize certain parts of the screenshot. You can also crop, rotate, or copy the screenshot to the clipboard for further use.
If you prefer capturing full-screen screenshots or specific windows, Snip & Sketch offers those options as well. Click on the drop-down arrow next to the New button, and you’ll see options for full-screen snip and window snip. Simply select the desired option and follow the on-screen instructions to capture the screenshot.
One of the advantages of using Snip & Sketch is its ability to capture screenshots of Apps with the ease of taking regular screenshots. When you capture a screenshot of an App, it saves a high-quality image and preserves any transparency present in the App’s background.
Once you’re done editing or annotating the screenshot, you can save it to your preferred location by clicking on the Save button in the Snip & Sketch toolbar. You can also use the Share option to quickly share the screenshot with others through various communication and social media platforms.
The Snip & Sketch tool in Windows 11 offers a seamless and intuitive way to capture and edit screenshots. Whether you want to snip specific regions, full screens, or application windows, this tool provides the flexibility and functionality needed to capture the perfect screenshot with ease.
Using the Print Screen key
Another simple and convenient method to capture screenshots in Windows 11 is by using the Print Screen (PrtScn) key on your keyboard. This traditional method has been around for a long time and is still widely used by many users.
When you press the Print Screen key, it captures a screenshot of the entire screen and copies it to the clipboard. To access the captured screenshot, you need to paste it into a program like Paint, Word, or an image editing software.
To capture a screenshot using the Print Screen key, simply locate the key on your keyboard. It is usually labeled as “PrtScn” or “Print Screen” and can be found in the top-right corner or on the number pad area of the keyboard. Press the key, and without any visible indication, Windows saves the screenshot to the clipboard.
Next, open a program like Paint or Word and press Ctrl + V to paste the screenshot. Once pasted, you can crop, resize, or make any other edits to the screenshot as needed. Finally, save the edited screenshot to your preferred location.
While this method captures the entire screen, it does not provide the flexibility to capture specific windows or regions. It is worth mentioning that pressing the Alt key together with the Print Screen key captures only the active window instead of the entire screen. This can be useful when you want to capture a specific window without any surrounding distractions.
The Print Screen method is straightforward and requires no additional software or tools. It is the ideal method if you prefer a quick and easy way to capture screenshots without any advanced editing features.
It’s worth noting that in some keyboards, you may find additional keys associated with the Print Screen function, such as “Fn + PrtScn.” This combination may be required to activate the Print Screen functionality, so be sure to check your keyboard’s specific instructions if the Print Screen key alone doesn’t work.
Overall, using the Print Screen key is a reliable and accessible method to capture screenshots in Windows 11. It’s a great option for users who prefer a straightforward approach without the need for any additional software or complicated settings.
Taking a screenshot of a specific window
When you want to capture a screenshot of a specific window rather than the entire screen, Windows 11 offers a convenient method to achieve this. This method allows you to isolate the window you want to capture, eliminating any unnecessary distractions.
To take a screenshot of a specific window, first, ensure that the desired window is active and in focus. This means clicking on it to bring it to the front if it’s currently behind other windows. Once the window is selected, use the keyboard shortcut Alt + Print Screen (Alt + PrtScn).
Pressing Alt + Print Screen captures a screenshot of the active window and saves it to the clipboard. Similar to the Print Screen method, you will need to paste the copied screenshot into a program like Paint or Word to access and edit it.
Open your desired program and press Ctrl + V to paste the screenshot. Once pasted, you can crop, resize, or make any necessary edits to the screenshot. Finally, save the edited screenshot to your preferred location.
This method is particularly useful when you want to capture screenshots of specific application windows, error messages, or any other window that requires focused attention. It saves you from the hassle of capturing the entire screen and then cropping out the unwanted areas.
By using the Alt + Print Screen method, you can efficiently capture screenshots of individual windows without any distractions. It’s a time-saving approach that enhances the precision and clarity of your screenshots, making them more effective for sharing and documentation purposes.
Capturing a screen region with Snip & Sketch
In addition to capturing full screens and specific windows, Windows 11 also offers a convenient method to capture screenshots of specific regions on your screen using the Snip & Sketch tool.
To capture a screen region with Snip & Sketch, open the tool either through the Start menu or by using the Windows key + Shift + S keyboard shortcut. Once the Snip & Sketch toolbar appears at the top of the screen, select the “Rectangular Snip” option.
With the “Rectangular Snip” selected, click and drag the cursor to create a rectangle around the region you want to capture. As you drag, you’ll notice that the selected area is highlighted. Release the mouse button to capture the screenshot of the selected region.
After capturing the screenshot, it will appear in a small preview window where you can use various editing tools, including the pen, highlighter, and eraser, to annotate or mark specific areas. These editing tools allow you to emphasize key points or draw attention to specific details within the captured region.
Once you’re done editing the screenshot, you can save it to your preferred location by clicking the Save button in the Snip & Sketch toolbar. You can also use the Share option to quickly share the screenshot with others through various communication or social media platforms.
This method is particularly useful when you only need to capture a specific part of the screen, such as a portion of a webpage, an error message, or an image. It saves you from the hassle of cropping and resizing a full-screen screenshot to focus on the desired region.
With Snip & Sketch’s ability to capture screen regions, you have greater control over the content you want to include in your screenshots. It’s a versatile and efficient method that allows you to precisely capture and share specific areas of your screen with ease.
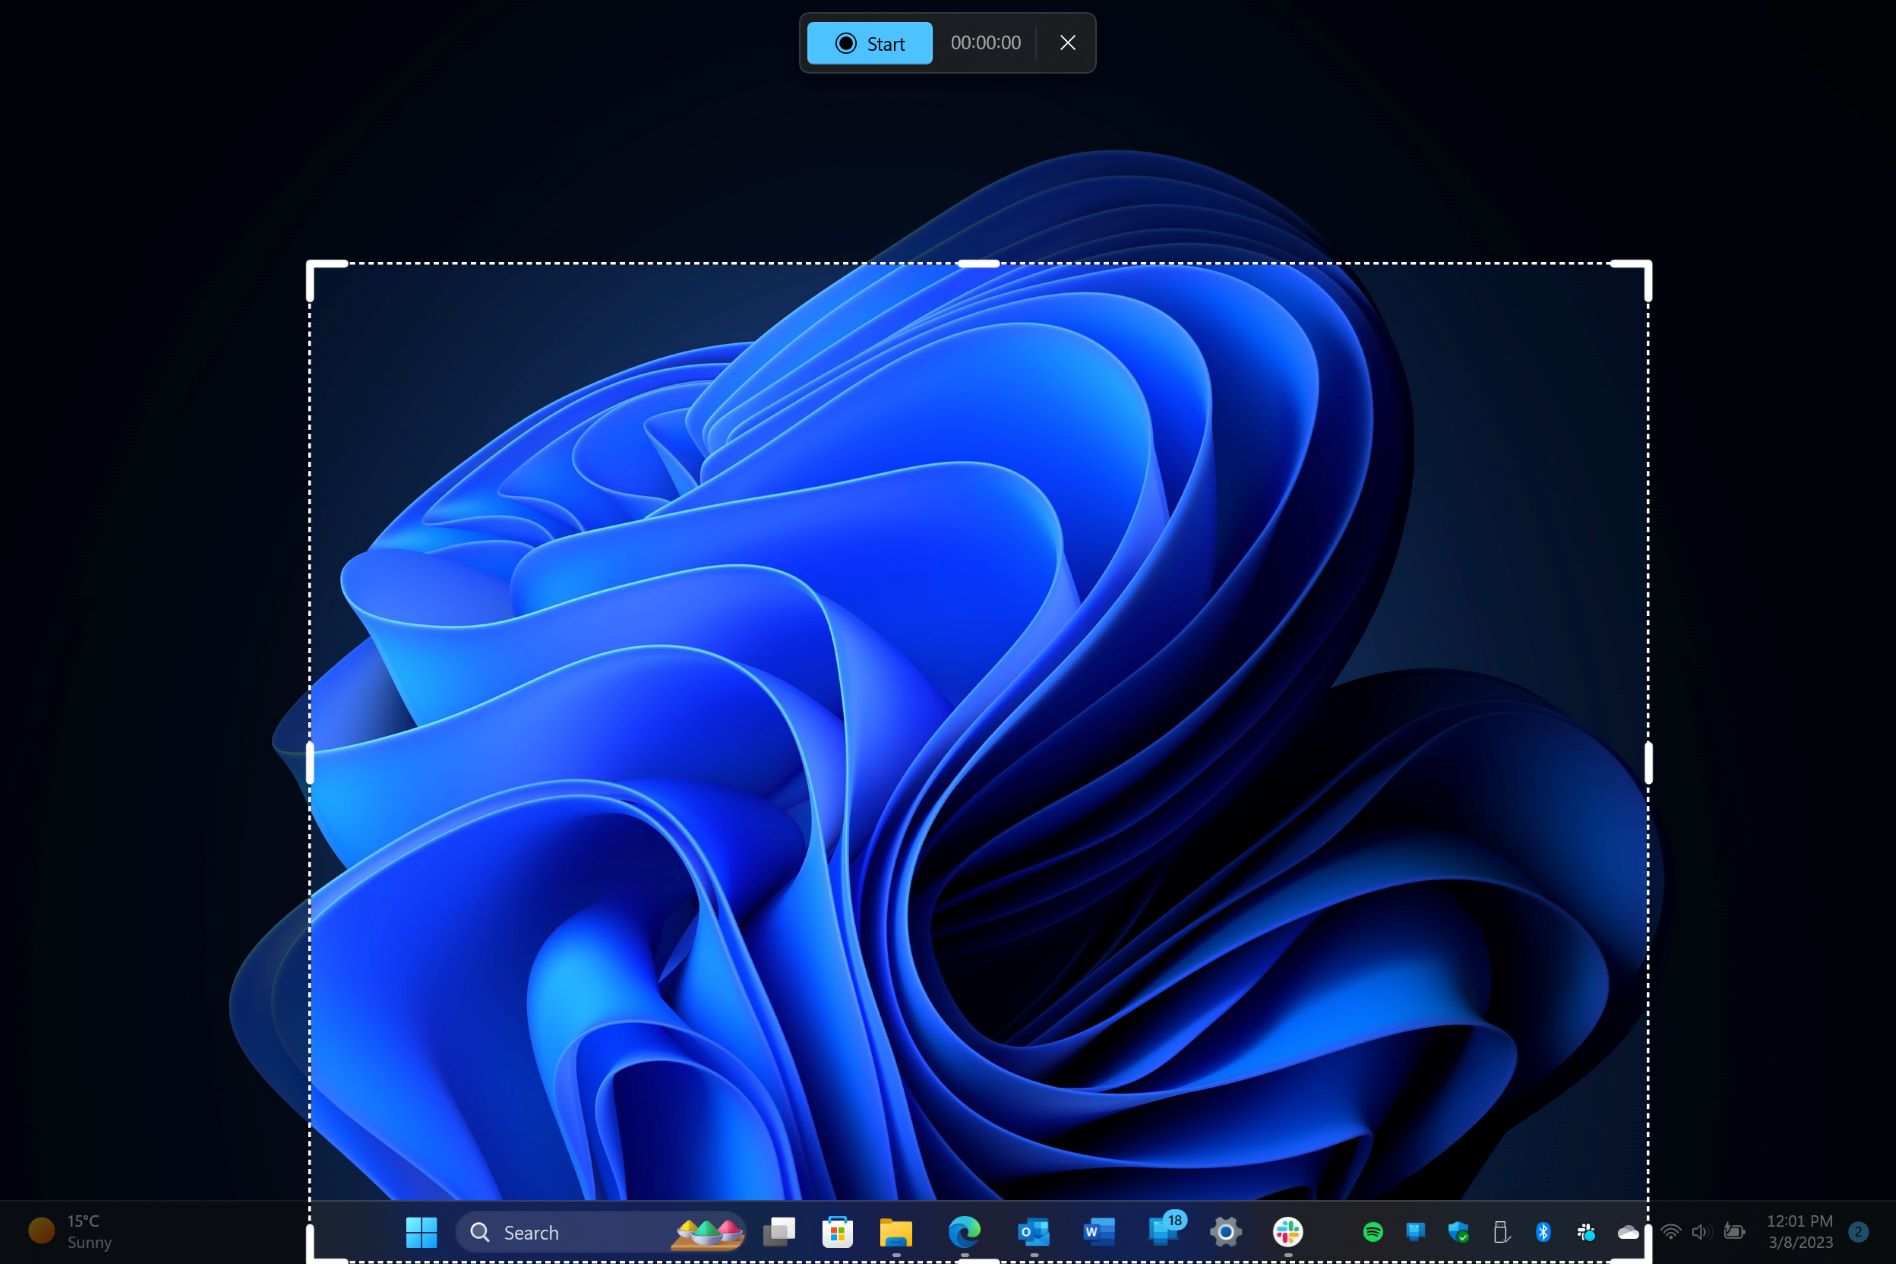
Using the Windows key + Shift + S shortcut
Windows 11 introduces a handy keyboard shortcut that provides quick access to the Snip & Sketch tool for capturing screenshots. By using the Windows key + Shift + S combination, you can easily capture different types of screenshots without opening the Snip & Sketch interface.
To use this shortcut, press the Windows key + Shift + S keys together. When you do this, a semi-transparent overlay will appear on your screen, allowing you to select the desired area to capture. The overlay provides four options: rectangular snip, freeform snip, window snip, and full-screen snip.
To capture a screenshot using this shortcut, click and drag the cursor to select the desired area or choose the appropriate option from the overlay for specific window or full-screen captures. Once you release the mouse button, the screenshot will be automatically copied to the clipboard.
After capturing the screenshot, you can paste it into any program that supports image pasting, such as Paint or Word, to access and edit it. From there, you can make any necessary adjustments, annotations, or save it in your preferred image format.
The Windows key + Shift + S shortcut is incredibly useful when you want a quick and seamless way to capture screenshots without interrupting your workflow. It eliminates the need to open the Snip & Sketch tool separately, saving you time and effort in capturing and accessing your screenshots.
It’s worth noting that using this shortcut only copies the screenshot to the clipboard. You will need to paste it into a program and save it manually. If you prefer saving the screenshot directly to a specific folder, you can adjust the settings of the Snip & Sketch tool to achieve that.
Overall, the Windows key + Shift + S shortcut is a convenient and efficient method for capturing screenshots in Windows 11. It streamlines the capturing process and allows you to effortlessly capture and save screenshots without interrupting your workflow.
Taking a screenshot with the Xbox Game Bar
Windows 11 includes the Xbox Game Bar, a feature-rich tool primarily designed for gamers. However, it also offers a simple and effective way to capture screenshots of any application or game running on your computer.
To take a screenshot with the Xbox Game Bar, start by opening the application or game that you want to capture. Then, press the Windows key + G to open the Xbox Game Bar overlay.
Within the Xbox Game Bar interface, you’ll find various widgets and tools. Look for the “Screenshot” button, which is represented by a camera icon. Click on this button, and it will capture a screenshot of the entire screen.
Unlike some other methods, the Xbox Game Bar captures and saves the screenshot instantly without any further steps. The captured screenshot is saved in the “Captures” folder under your user profile’s “Videos” folder.
If you prefer capturing only a specific window or region, the Xbox Game Bar allows for that as well. Simply press the Windows key + Alt + Print Screen to capture a screenshot of the active window. Alternatively, you can use the Windows key + Alt + G combination to capture the previous few seconds of gameplay as a video clip.
The Xbox Game Bar also offers basic editing options to annotate your screenshots. After capturing a screenshot, you can click on the notification that appears in the lower-right corner of the screen to open the “Game Captures” widget. From there, you can access the editing tools to trim, draw, or add text to your screenshots.
The Xbox Game Bar is a versatile tool for capturing screenshots in Windows 11, particularly if you frequently engage in gaming or use applications that require real-time capture. It provides a quick and straightforward method to capture screenshots without the need for additional software or complex processes.
Remember to clear any notifications that appear in the Xbox Game Bar after capturing your screenshots to avoid cluttering your screen. Additionally, you can customize the capture settings and keyboard shortcuts in the Xbox Game Bar settings to suit your preferences.
Whether you’re a gamer or a regular user, the Xbox Game Bar offers a convenient and efficient method to capture screenshots in Windows 11. It’s a feature-packed tool that allows you to capture, save, and edit screenshots with ease.
Saving screenshots to a specific location
When capturing screenshots in Windows 11, you have the flexibility to save them to a specific location of your choosing. This is especially convenient if you want to organize your screenshots in a separate folder or save them directly to a cloud storage service.
By default, screenshots captured using the built-in tools like Snip & Sketch, Print Screen, or the Xbox Game Bar are automatically saved to specific folders.
For example, when using the Snip & Sketch tool, the captured screenshots are saved in the “Pictures” folder under your user profile. You can access the saved screenshots by navigating to This PC > Pictures > Screenshots.
Similarly, screenshots captured using the Print Screen method are copied to the system clipboard, and you need to paste them into a program like Paint or Word to save them to a specific location.
If you prefer saving screenshots to a different folder or location, you can customize the settings for the Snip & Sketch tool.
To change the save location in Snip & Sketch, follow these steps:
- Open the Snip & Sketch tool.
- Click on the menu icon (three dots) in the top-right corner of the Snip & Sketch window.
- Select “Settings” from the dropdown menu.
- In the Settings window, you can change the save location by clicking the “Save as” dropdown under “Screenshots.”
- Choose your desired folder or create a new one to save your screenshots.
Once you’ve changed the save location, all future screenshots captured using Snip & Sketch will be saved to the specified folder.
It’s important to note that when using the Xbox Game Bar, captured screenshots are saved in the “Captures” folder under your user profile’s “Videos” folder. This location is not customizable through the Xbox Game Bar settings.
Whether it’s organizing screenshots in specific folders, saving them to cloud storage, or customizing the save location in Snip & Sketch, Windows 11 provides various options to ensure your screenshots are saved exactly where you want them.
Take advantage of these customization options to keep your screenshots organized and easily accessible whenever you need them.
Editing and annotating screenshots
Windows 11 offers built-in tools that allow you to edit and annotate your screenshots, giving you the ability to enhance and customize them to meet your specific needs.
When you capture a screenshot using tools like Snip & Sketch or the Xbox Game Bar, you can easily access editing features to make adjustments and add annotations.
The Snip & Sketch tool provides a range of editing options, including the ability to crop, resize, rotate, and even apply basic artistic effects to your screenshots. You can access these tools by clicking on the editing icons that appear in the Snip & Sketch toolbar after capturing a screenshot.
In addition to basic editing, you can use the pen, highlighter, and eraser tools to annotate your screenshots. These tools allow you to draw or write directly on the screenshot, making it easy to emphasize certain areas, add comments, or highlight important details.
If you prefer more advanced editing features, you can open the captured screenshot in an image editing software like Paint, Photoshop, or any other preferred program. These software tools offer a wide range of editing capabilities, including adjusting colors, adding filters, and applying more sophisticated effects to your screenshots.
Whether you’re editing within Snip & Sketch or using external image editing software, these features give you complete control over customizing your screenshots to fit your requirements.
Annotating your screenshots is particularly useful when you want to provide additional context or instructions, label important sections, or draw attention to specific details. It helps ensure that the screenshots effectively convey your message or serve their intended purpose.
Once you’ve made the necessary edits and annotations, you can save the edited screenshot in your preferred image format, such as PNG or JPEG, to preserve the changes and share them with others.
Take advantage of the editing and annotation features available in Windows 11 to enhance and customize your screenshots. Whether it’s basic adjustments or more advanced editing, these tools provide the flexibility and functionality to make your screenshots visually impactful and informative.
Taking screenshots on a touch-enabled device
If you’re using a touch-enabled device like a tablet or a 2-in-1 laptop with a touchscreen, Windows 11 provides convenient methods for capturing screenshots using touch gestures.
To take a screenshot on a touch-enabled device, you can use a combination of hardware buttons or utilize touch gestures specific to Windows 11.
The most common method is by pressing the Windows key + Volume Down button simultaneously. This combination imitates the traditional Print Screen function but is adapted for touch-enabled devices.
Another method is by holding down the Windows key and tapping the Power button. This combination also captures a screenshot of the entire screen and saves it directly to the Pictures > Screenshots folder in your user profile.
If you prefer capturing a specific region on your touch screen, you can use the Snip & Sketch tool or the Windows Ink Workspace.
To use Snip & Sketch, you can open it from the Start menu or use the Windows key + Shift + S keyboard shortcut. Once the Snip & Sketch toolbar appears, select the Rectangular Snip option and use your finger or stylus to draw a rectangle around the area you want to capture.
Alternatively, you can access the Windows Ink Workspace by clicking on the taskbar icon that resembles a pen or by using the Windows key + W keyboard shortcut. From there, you can select the Screen Sketch option to capture a screenshot of the entire screen or ink on top of any opened window or application.
The Snip & Sketch tool and Windows Ink Workspace provide you with the flexibility to capture and annotate screenshots on touch-enabled devices, making it easy to mark up or highlight information using your finger or a stylus.
Once you’ve captured a screenshot on a touch-enabled device, you can then view and edit it using the built-in editing features or transfer it to a program of your choice for further modifications.
Windows 11 recognizes the unique needs of touch-enabled devices and provides intuitive methods for capturing, editing, and annotating screenshots. Make the most of these touch-centric features to efficiently capture and enhance your screenshots on your touch screen device.
Summary and Tips
Taking screenshots in Windows 11 is a simple and essential skill that allows you to capture and share information, troubleshoot issues, or create visual content. In this guide, we explored various methods to capture screenshots, including using the Snip & Sketch tool, the Print Screen key, the Xbox Game Bar, and touch gestures on touch-enabled devices. Here’s a summary of the key points discussed:
- The Snip & Sketch tool provides an easy-to-use interface for capturing and editing screenshots. It offers options to capture full screens, specific windows, or specific regions.
- The Print Screen key captures the entire screen and saves it to the clipboard. You can then paste it into a program for editing and saving.
- The Xbox Game Bar is a feature-rich tool primarily designed for gamers but also offers a quick and convenient way to capture screenshots of any application or game running on your computer.
- You can save screenshots to a specific location by customizing the settings in the Snip & Sketch tool or by manually saving them to a preferred folder.
- Windows 11 provides built-in editing and annotation features, allowing you to enhance and customize your screenshots within Snip & Sketch or using external image editing software.
- On touch-enabled devices, you can use touch gestures or specific hardware buttons to capture screenshots. The Snip & Sketch tool and Windows Ink Workspace are tailored for touch screen interaction.
Remember these tips to make the most out of your screenshot-taking experience in Windows 11:
- Be mindful of where your screenshots are saved and consider customizing the save location to keep them organized.
- Experiment with different methods and find the one that suits your workflow and preferences.
- Use the editing and annotation tools available to add context, highlight important details, and enhance the visual impact of your screenshots.
- If you’re using a touch-enabled device, take advantage of touch gestures and the Windows Ink Workspace to capture and annotate screenshots with your finger or stylus.
With the knowledge and techniques shared in this guide, you’re now equipped to confidently capture, edit, and annotate screenshots in Windows 11. Harness the power of screenshots to communicate effectively, troubleshoot easily, or create visually engaging content.