Introduction
Changing your password is an essential step in maintaining the security of your Windows 10 device and protecting your personal information. Whether you suspect someone may have gained unauthorized access to your account or you simply want to update your password for precautionary reasons, knowing how to change your password in Windows 10 is crucial.
In today’s digital age, where cyber threats are becoming increasingly sophisticated, it is important to stay proactive in safeguarding your sensitive data. One of the easiest and most effective ways to do this is by regularly changing your password. By doing so, you can reduce the risk of unauthorized access and ensure that only you have control over your account.
Additionally, changing your password frequently helps protect you from potential security breaches or data leaks. Many individuals use the same password for multiple accounts, which can be detrimental if one account is compromised. By changing your password regularly, you minimize the chances of someone gaining access to multiple accounts with the same credentials.
Fortunately, Windows 10 provides a straightforward process for changing your password, allowing you to maintain a secure environment for your personal information. In the following sections, we will guide you through the step-by-step process of changing your password in Windows 10, ensuring that your device remains protected and your data stays confidential.
Why Change Your Password?
Changing your password on a regular basis is a critical step in maintaining the security of your Windows 10 device and protecting your sensitive information. Here are a few key reasons why changing your password is important:
- Enhanced Security: By changing your password frequently, you minimize the risk of unauthorized access to your account. Strong, unique passwords make it harder for hackers to guess or crack your password, ensuring that only you have control over your account.
- Protection from Data Breaches: Data breaches are becoming increasingly common, affecting millions of users worldwide. By frequently changing your password, you reduce the impact of these breaches. If your password is leaked in a breach, changing it promptly prevents attackers from gaining unauthorized access to your account.
- Prevent Credential Stuffing Attacks: Many individuals reuse the same password across multiple accounts, making them vulnerable to credential stuffing attacks. Cybercriminals use databases of leaked credentials to gain unauthorized access to various accounts. By changing your password regularly, you minimize the chances of attackers successfully using your credentials on other platforms.
- Terminate Unauthorized Access: If you suspect that someone may have gained unauthorized access to your account, changing your password immediately can help terminate that access. By doing so, you cut off the intruder’s access and regain control over your account.
- Impose Stronger Security Measures: Changing your password regularly prompts you to create strong and unique passwords. This fosters better security habits, encouraging you to use complex combinations of letters, numbers, and special characters.
Overall, changing your password on a regular basis is an essential practice in maintaining the security and integrity of your Windows 10 device. By doing so, you protect your personal information from unauthorized access, reduce the impact of data breaches, and stay one step ahead of cyber attackers.
How to Change Your Password in Windows 10
Changing your password in Windows 10 is a straightforward process that can be done in just a few simple steps. Follow the instructions below to update your password:
-
- Step 1: Open the Settings menu
To begin, click on the Start button in the bottom-left corner of your screen, then click on the gear-shaped icon to open the Settings menu. Alternatively, you can use the keyboard shortcut “Windows key + I” to directly open the Settings menu.
-
- Step 2: Click on “Accounts”
In the Settings menu, you will find various categories. Look for and click on the “Accounts” category to access the account-related settings.
-
- Step 3: Select “Sign-in options”
Within the “Accounts” settings, you will see various options related to signing in. Look for and click on “Sign-in options” in the left pane to view the available sign-in settings.
-
- Step 4: Click on “Password” under “Sign-in options”
Scroll down in the right pane until you find the “Password” section under the “Sign-in options” category. Click on it to access the password settings.
-
- Step 5: Enter your current password
Before proceeding to change your password, you will need to verify your identity by entering your current password in the prompted field. This ensures that only authorized users can modify the account password.
-
- Step 6: Choose a new password
Once you have successfully entered your current password, you can proceed to choose a new password. Take this opportunity to create a strong and unique password using a combination of uppercase and lowercase letters, numbers, and special characters.
-
- Step 7: Confirm your new password
To ensure accuracy, you will need to confirm your new password by retyping it in the provided field. Make sure both entries match before proceeding.
-
- Step 8: Update your password hint (optional)
Optionally, you can update your password hint. This is a clue that can help you remember your password in case you forget it. Keep in mind that the password hint should not be easily guessable.
-
- Step 9: Close the Settings menu
Once you have successfully changed your password and updated the necessary settings, you can close the Settings menu.
Congratulations! You have successfully changed your password in Windows 10. Remember to securely store your new password and update it periodically to maintain the security of your device and accounts.
Step 1: Open the Settings Menu
The first step to changing your password in Windows 10 is to open the Settings menu. The Settings menu is where you can access various system settings and make changes to customize your Windows 10 experience. Here’s how to open the Settings menu:
- Click on the Start button: To begin, click on the Start button located at the bottom-left corner of your screen. The Start button is typically represented by the Windows logo.
- Click on the gear-shaped icon (Settings): Within the Start menu, you will find a gear-shaped icon. This icon represents the Settings app. Click on it to open the Settings menu.
- Use the keyboard shortcut: Alternatively, you can use the keyboard shortcut “Windows key + I” to directly open the Settings menu. Press and hold the Windows key on your keyboard, then press the letter “I”. This will instantly launch the Settings menu.
Once you have successfully opened the Settings menu, you will be able to access a wide range of settings and options to customize your Windows 10 experience. The Settings menu is designed to be user-friendly, organized into different categories for easy navigation.
By opening the Settings menu, you have taken the first step towards changing your password in Windows 10. This is the starting point from which you can access the account-related settings and make the necessary changes to update your password.
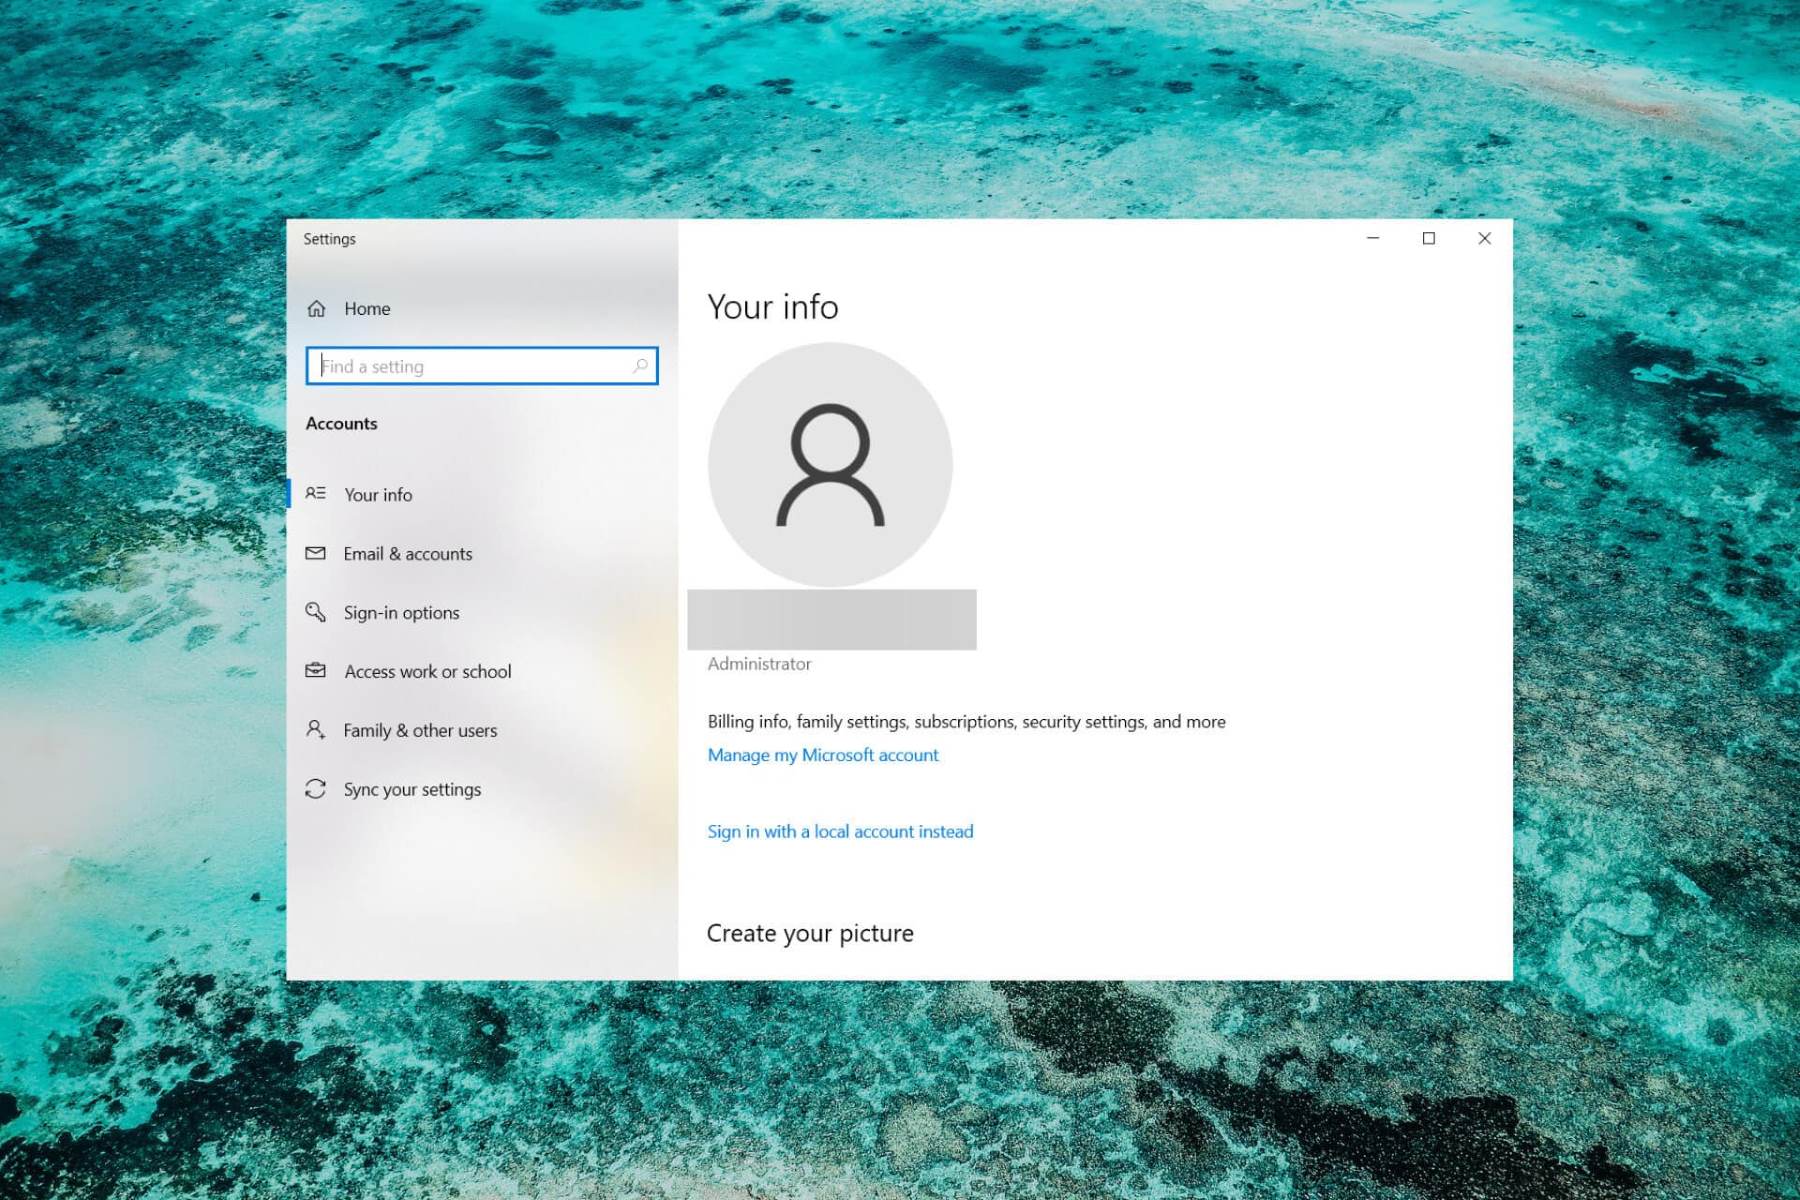
Step 2: Click on “Accounts”
After opening the Settings menu in Windows 10, the next step to change your password is to click on the “Accounts” option. The Accounts settings provide access to various account-related options, including managing user profiles, passwords, and privacy settings. Here’s how to find and select the “Accounts” option:
- Look for the “Accounts” category: Within the Settings menu, you will find different categories listed on the left-hand side. Scroll down the list and look for the category labeled “Accounts”. It is usually represented by an icon with two people.
- Click on “Accounts”: Once you have located the “Accounts” category, click on it to access the account-related settings. The right-hand side of the settings window will now display options related to user accounts and account management.
By clicking on the “Accounts” option, you will be able to manage various aspects of your Windows 10 user accounts, including sign-in options, password changes, and synchronization settings. This step is crucial in the process of changing your password as it allows you to access the necessary settings related to your account.
Windows 10 provides a user-friendly interface for managing accounts, making it easy for you to navigate through the various settings and make the desired changes. Whether you need to change your password, update your account picture, or modify privacy settings, the Accounts section in the Settings menu has got you covered.
Now that you have successfully clicked on “Accounts” within the Settings menu, you are one step closer to changing your password in Windows 10. The next step is to select “Sign-in options” to proceed further in the password change process.
Step 3: Select “Sign-in options”
Once you have clicked on the “Accounts” option in the Windows 10 Settings menu, you will need to select “Sign-in options” to access the settings related to your account’s sign-in methods. This step is essential in the password change process. Here’s how to proceed:
- Within the Accounts settings: After clicking on “Accounts”, you will be redirected to the account-related settings. Here, you will find various options on the right-hand side of the settings window.
- Locate “Sign-in options”: Scroll down in the right pane until you find the “Sign-in options” category. This category allows you to modify the settings related to how you sign in to your Windows 10 account.
- Click on “Sign-in options”: Once you have located the “Sign-in options” category, click on it to access the available sign-in settings.
By selecting “Sign-in options”, you will be able to customize the way you sign in to your Windows 10 account and manage the associated security settings. This includes options such as passwords, PINs, biometric authentication (such as fingerprint or facial recognition), and more.
The “Sign-in options” section provides you with flexibility and control over how you access your account, while also ensuring the security of your device and data. Windows 10 offers a range of sign-in methods, allowing you to choose the one that best suits your needs and preferences.
Now that you have successfully selected “Sign-in options” within the Accounts settings, you are ready to proceed to the next step in changing your password in Windows 10. The following step will guide you through the process of clicking on “Password” under the “Sign-in options” category.
Step 4: Click on “Password” under “Sign-in Options”
After selecting “Sign-in options” in the Windows 10 Accounts settings, the next step to change your password is to click on “Password” under the “Sign-in options” category. This step allows you to access the password settings and make the necessary changes. Follow these instructions to proceed:
- Within the Sign-in options settings: Once you have selected “Sign-in options”, you will be redirected to the sign-in settings section. Here, you will find different options related to signing in to your Windows 10 account.
- Find the “Password” section: While in the sign-in options settings, scroll down until you locate the “Password” section. This section controls the settings related to your account’s password.
- Click on “Password”: Once you have found the “Password” section, click on it to access the password settings. This will allow you to change, update, or modify your existing password.
By clicking on “Password” under the “Sign-in options” category, you gain access to the specific settings related to your Windows 10 account’s password. Here, you will be able to make changes or updates to ensure the security and integrity of your account.
Windows 10 provides a user-friendly interface for managing your account’s password, allowing you to create strong and unique passwords to keep your account secure. This section also provides additional options for configuring password policies and security requirements.
Now that you have successfully clicked on “Password” under the “Sign-in options” category, you are one step closer to changing your password in Windows 10. The next step involves entering your current password to verify your identity and proceed with the password change process.
Step 5: Enter Your Current Password
After clicking on “Password” under the “Sign-in options” category in the Windows 10 settings, the next step in changing your password is to enter your current password. This step is necessary to verify your identity and ensure that only authorized users can make changes to the account password. Follow these steps to proceed:
- Within the Password settings: Once you have clicked on “Password” under the “Sign-in options” category, you will be directed to the password settings section.
- Enter your current password: In the prompted field, enter your current account password. This is the password that you are currently using to sign in to your Windows 10 account.
By entering your current password, you confirm that you are the authorized user of the account and have the rights to make changes to the password. This step ensures the security and integrity of the account by preventing unauthorized access and modifications.
It is crucial to ensure that you enter your current password accurately, as any errors may result in an inability to proceed with the password change process. Take your time to carefully type your password and ensure its correctness before moving on to the next step.
Now that you have successfully entered your current password, you are ready to proceed with the next step in changing your password in Windows 10. This will involve choosing a new password for your account to strengthen the security of your device and protect your personal information.
Step 6: Choose a New Password
Once you have entered your current password in the Windows 10 password settings, the next step in changing your password is to choose a new password. This step allows you to create a strong and unique password to enhance the security of your account. Follow these instructions to proceed:
- Within the Password settings: After entering your current password, you will remain in the password settings section of Windows 10.
- Choose a new password: In the provided field, enter your desired new password. It is recommended to create a strong password by using a combination of uppercase and lowercase letters, numbers, and special characters.
When choosing a new password, consider the following tips to increase its strength:
- Use a combination of characters: Mix uppercase and lowercase letters, numbers, and special characters to create a more complex and secure password.
- Avoid predictable patterns or easily guessable information: Do not use common passwords, such as “password” or “123456”. Avoid using personally identifiable information, like your name, date of birth, or phone number, as these can be easily guessed or obtained.
- Make it unique: Do not reuse passwords across different accounts. Each account should have a unique password to prevent a security breach in one account from affecting all your other accounts.
It’s important to take your time when choosing a new password and ensure that it meets the requirements of a strong password. Remember to avoid easily guessable patterns or information and aim for a unique combination of characters.
Now that you have successfully entered your new password, you are one step closer to finalizing the password change process in Windows 10. The next step involves confirming your new password to ensure its accuracy.
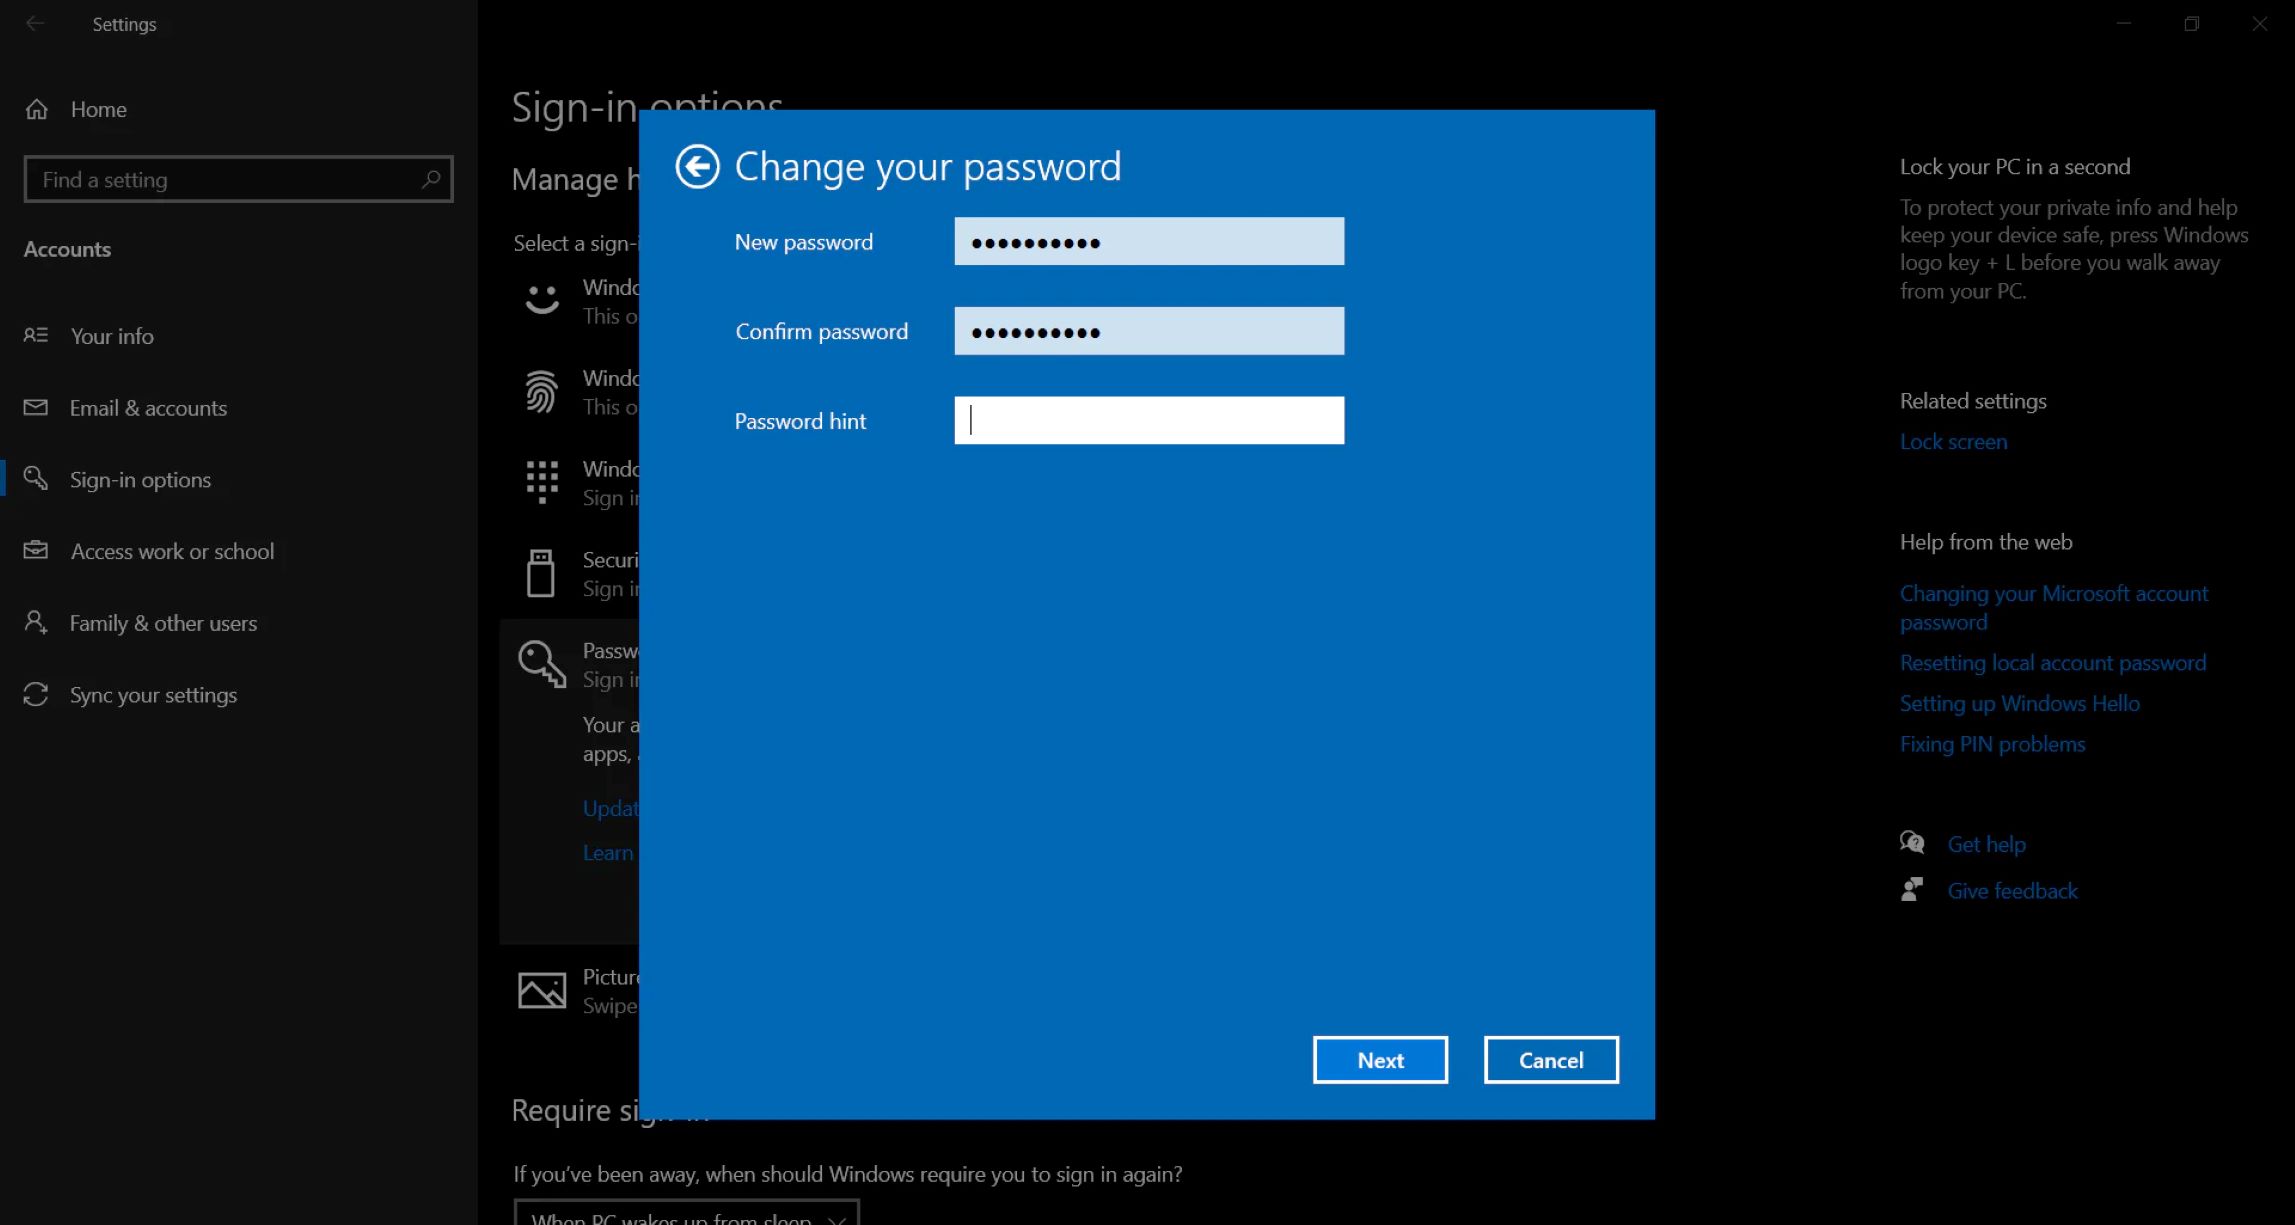
Step 7: Confirm Your New Password
In the process of changing your password in Windows 10, the seventh step is to confirm your new password. This step ensures that you have entered the correct password and helps prevent any typing errors. Follow these steps to proceed:
- Confirm your new password: In the provided field, re-enter your new password exactly as you typed it in the previous step.
By confirming your new password, you double-check that there are no mistakes or discrepancies between the original entry and the confirmation. This step is crucial to ensure that your new password is accurately entered and will function correctly when accessing your Windows 10 account.
Take the time to carefully re-enter your new password, paying attention to every character. Any mismatch or error may result in an inability to log in to your account with the new password.
It is always recommended to cross-verify the accuracy of your new password before proceeding further. By doing so, you can be confident that your new password is properly entered and that it meets the security requirements you desire.
Now that you have successfully confirmed your new password, you are ready to move on to the next step in the password change process. This step involves updating your password hint, providing you with a clue to help remember your password if you ever forget it.
Step 8: Update Your Password Hint (Optional)
In the process of changing your password in Windows 10, step eight is to update your password hint. A password hint is a clue that can assist you in remembering your password if you ever forget it. Although optional, it can be a helpful reminder without compromising the security of your account. Follow the instructions below to update your password hint:
- Within the Password settings: After confirming your new password, you will still be in the password settings section of Windows 10.
- Update your password hint: In the designated field, enter a brief hint or clue that can jog your memory about your password. This should be something that only you would understand and should not explicitly reveal your password.
When updating your password hint, consider the following tips:
- Make it subtle: Your password hint should not be easily understandable by others who may have access to your device. It should be a subtle reminder that only you can comprehend.
- Avoid giving away the actual password: Do not include your password or any exact sequence of characters in the password hint. The purpose of the hint is to jog your memory, not to reveal the password to others.
- Keep it secure: Ensure that your password hint is stored in a secure place, where it cannot be easily accessed by unauthorized individuals.
Updating your password hint is entirely optional, but it can be a useful aid in recalling your password if you ever forget it. Take care to provide a hint that is meaningful to you but not easily discernible by others. This way, you can have an additional reminder without compromising the security of your Windows 10 account.
Now that you have successfully updated your password hint (if desired), you are ready to proceed to the final step in changing your password in Windows 10. This step involves closing the settings menu and finalizing the password change process.
Step 9: Close the Settings Menu
In the final step of changing your password in Windows 10, you need to close the Settings menu. This step ensures that your password changes are saved and that you can resume using your device with the new password. Here’s how to close the Settings menu:
- Review your password changes: Before closing the Settings menu, take a moment to review the changes you have made to ensure everything is as desired. Double-check your new password and password hint (if provided) for accuracy.
- Click on the “X” button: Locate the “X” button in the upper-right corner of the Settings window. Click on it to close the Settings menu.
By closing the Settings menu, you finalize the process of changing your password in Windows 10. Your new password is now in effect, and you will need to use it to log in to your account from this point forward.
It is essential to remember your new password and keep it secure. Avoid sharing it with others and refrain from writing it down in easily accessible places. By maintaining the privacy and security of your password, you can ensure the integrity of your Windows 10 account.
Now that you have successfully closed the Settings menu, congratulations! You have completed the process of changing your password in Windows 10. Take a moment to log in to your account using the new password to verify that it is working as expected.
Conclusion
Changing your password in Windows 10 is an essential aspect of maintaining the security and privacy of your account. By regularly updating your password, you reduce the risk of unauthorized access and protect your personal information from potential security breaches.
In this article, we have provided you with a step-by-step guide on how to change your password in Windows 10. We started by explaining the importance of password changes and the benefits they offer in terms of enhanced security and protection against cyber threats.
We then walked you through the process of changing your password, starting with opening the Settings menu, navigating to the “Accounts” section, and selecting “Sign-in options.” From there, we guided you through the steps of clicking on “Password,” entering your current password, choosing a new password, and confirming it. We also highlighted the optional step of updating your password hint for added convenience.
Finally, we concluded by emphasizing the significance of closing the Settings menu to ensure the changes are saved and your new password becomes active.
Remember to follow best practices when choosing a new password, such as creating a unique and complex combination of characters, avoiding easily guessable information, and regularly updating your password to maintain a secure environment for your Windows 10 account.
By following these steps and keeping your password secure, you can significantly strengthen the protection of your Windows 10 device and safeguard your personal information from potential threats.