Introduction
Welcome to the guide on how to change the Wi-Fi password on Windows 10. Securing your wireless network is essential to protect your privacy and prevent unauthorized access to your internet connection. By regularly changing your Wi-Fi password, you can improve the security of your home or office network.
Changing the Wi-Fi password on Windows 10 is a straightforward process that can be done in a few simple steps. Whether you want to update your password for security reasons or if you have recently reset your router, this guide will walk you through the process.
Before we dive into the steps, it’s important to note that the exact procedure and layout of settings may vary slightly depending on your specific Windows 10 version or the make and model of your router. However, the general process remains the same across most devices.
In this guide, we will cover how to change the Wi-Fi password through the Network and Sharing Center on Windows 10. This method is applicable to most Windows 10 users and is a quick and efficient way to ensure the security of your network.
Without further ado, let’s get started with the step-by-step instructions to change your Wi-Fi password on Windows 10.
Step 1: Open the Network and Sharing Center
The first step in changing your Wi-Fi password on Windows 10 is to open the Network and Sharing Center. This control panel allows you to manage and configure various network settings on your computer.
To access the Network and Sharing Center, follow these steps:
- Click on the Start button on the bottom left corner of the taskbar. This will open the Start menu.
- In the search bar, type Control Panel and click on the corresponding result to open the Control Panel window.
- In the Control Panel window, change the view to Large icons or Small icons for easier navigation.
- Scroll down and locate the Network and Sharing Center option. Click on it to open the Network and Sharing Center.
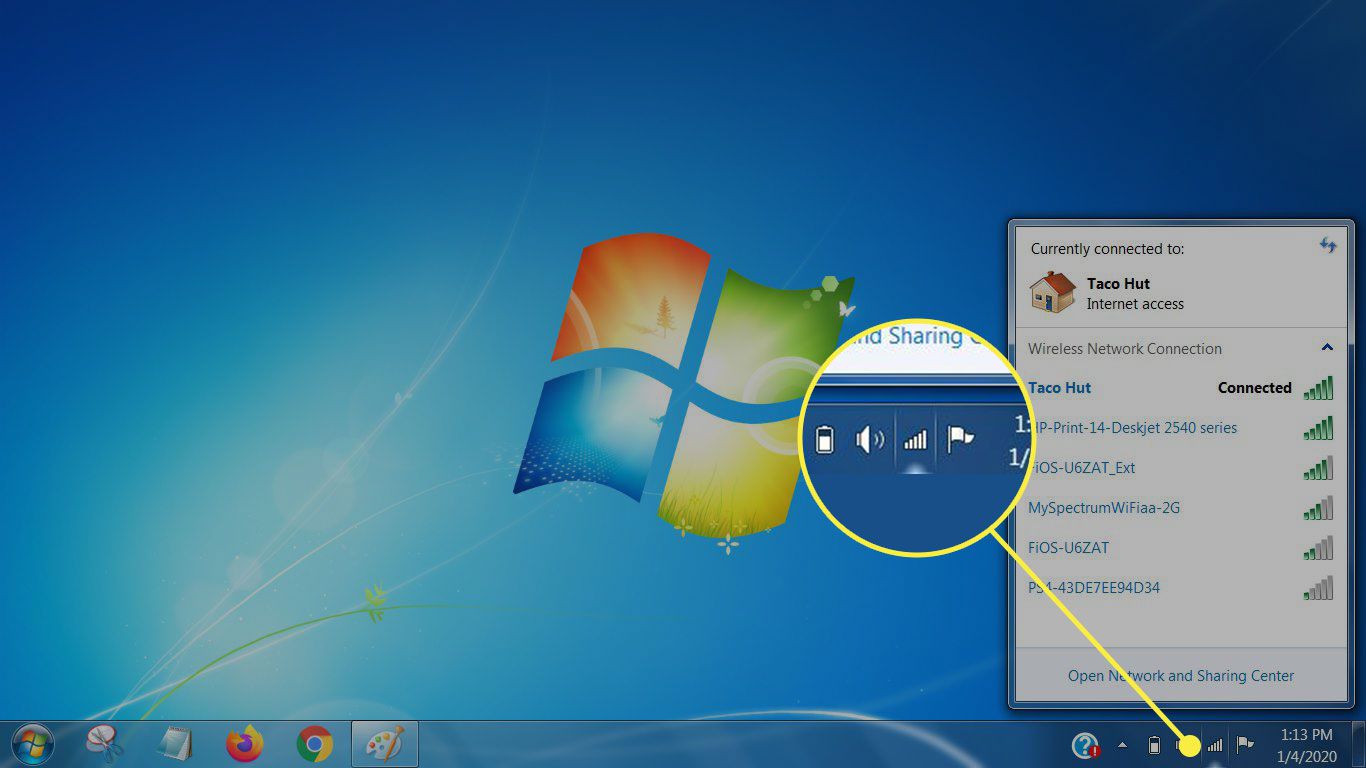
Alternatively, you can also access the Network and Sharing Center by right-clicking on the network icon in the system tray, typically located in the bottom right corner of the screen, and selecting Open Network & Internet settings. From the Settings window, click on Network and Sharing Center under the Related settings section.
Once you have successfully opened the Network and Sharing Center, you are ready to proceed to the next step.
Step 2: Select the Wi-Fi network
After opening the Network and Sharing Center, the next step is to select the Wi-Fi network for which you want to change the password. This step allows you to access the network settings specific to your wireless connection.
Follow these steps to select the Wi-Fi network:
- In the Network and Sharing Center, you will find a section called View your active networks. Under this section, you will see the name of your current Wi-Fi network. Click on the network name to proceed.
- A new window, called Wi-Fi Status, will open. This window displays detailed information about your current network connection and provides access to various settings related to the Wi-Fi network.
- On the Wi-Fi Status window, click on the Wireless Properties button. This will open a new window with additional settings specific to your Wi-Fi network.
Alternatively, you can also open the Wireless Properties window by right-clicking on the network icon in the system tray and selecting Open Network & Internet settings. From the Settings window, click on the Wi-Fi network name under the Wi-Fi section, and then click on the Properties button.
Once you have successfully accessed the Wireless Properties window, you can proceed to the next step of changing your Wi-Fi password on Windows 10.
Step 3: Open the Wi-Fi Status window
After selecting the Wi-Fi network, the next step is to open the Wi-Fi Status window. This window provides you with detailed information about your current network connection and allows you to access various settings related to the Wi-Fi network.
Follow these steps to open the Wi-Fi Status window:
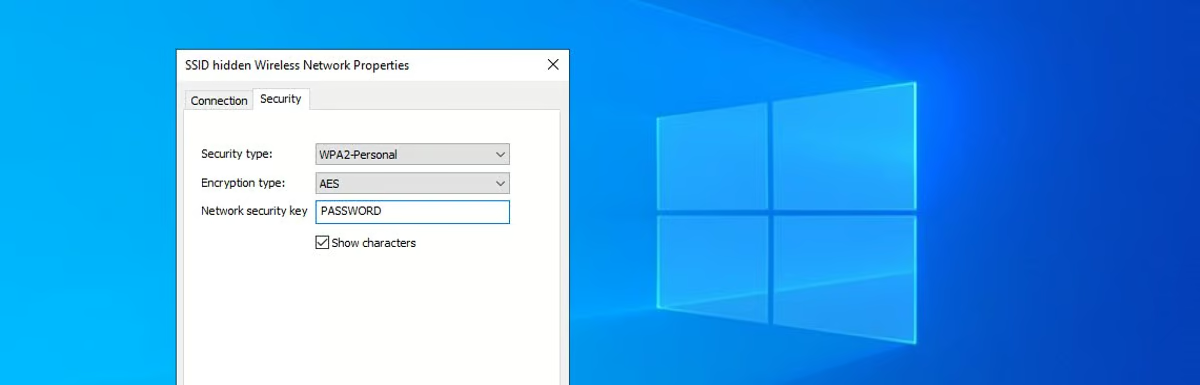
- In the Wireless Properties window, click on the Security tab. This tab contains settings related to the security of your Wi-Fi network.
- Under the Security tab, you will find a section called Network security key. This section displays the current Wi-Fi password, represented by a series of dots or asterisks.
- To change the Wi-Fi password, click on the Show characters checkbox. This action will reveal the hidden password and allow you to make changes.
By clicking on the Show characters checkbox, you will be able to see the current Wi-Fi password in plain text. This step is crucial to ensure you are entering the correct password when updating it in the next step.
Once you have successfully opened the Wi-Fi Status window and revealed the network security key, you can proceed to the next step of changing your Wi-Fi password on Windows 10.
Step 4: Change the Wi-Fi password
Now that you have accessed the Wi-Fi Status window and revealed the current network security key, it’s time to change the Wi-Fi password to enhance the security of your wireless network. Windows 10 provides a simple and straightforward process to update the password.
Follow these steps to change the Wi-Fi password:
- Ensure that the Wi-Fi password is visible in the Network security key section of the Wi-Fi Status window. If not, make sure to check the Show characters checkbox.
- Select the current password and delete it. You can do this by clicking and dragging the cursor over the password or using the backspace/delete key on your keyboard.
- Now, enter your new Wi-Fi password in the Network security key field. Make sure to create a strong and secure password that is not easily guessable. Include a combination of uppercase and lowercase letters, numbers, and special characters.
- Take note of the new Wi-Fi password, or consider using a password manager to securely store it for future reference.
By following these steps, you will successfully change the Wi-Fi password on Windows 10. This ensures that only authorized users have access to your network and helps protect your personal information and internet connection.
Once you have updated the Wi-Fi password, you need to save the changes for them to take effect.
Step 5: Save the new password
After changing the Wi-Fi password on Windows 10, it’s important to save the new password to ensure that the changes are applied and your network remains secure. Saving the new password will allow your device to connect automatically to the Wi-Fi network using the updated credentials.
Follow these steps to save the new password:
- In the Wi-Fi Status window, click on the OK button to close the window and return to the Network and Sharing Center.
- In the Network and Sharing Center, click on the Close button to exit the control panel and return to the desktop.
- Restart your computer to ensure that the new Wi-Fi password is applied and your device connects to the network using the updated credentials.
- When your computer restarts, it will automatically attempt to connect to the Wi-Fi network. Enter the new password you set in the previous steps when prompted.
- If the new password is entered correctly, your computer will connect to the network, and the changes will be successfully saved and applied.
By following these steps, you have successfully changed the Wi-Fi password on Windows 10 and saved the new password. Now, your network will be protected with a stronger password, ensuring the security of your internet connection and your personal data.
Remember to update the Wi-Fi password on each device that connects to your network to maintain consistent security across all devices.
Conclusion
Changing the Wi-Fi password on Windows 10 is a vital step in securing your network and protecting your privacy. By following the step-by-step guide outlined above, you can easily update your Wi-Fi password and improve the overall security of your wireless network.
Remember, regularly changing your Wi-Fi password is crucial to prevent unauthorized access and maintain the safety of your personal data. It is recommended to change your password every few months or whenever you suspect any security breaches.
Throughout this guide, we have covered the process of changing the Wi-Fi password on Windows 10, starting from opening the Network and Sharing Center, selecting the Wi-Fi network, opening the Wi-Fi Status window, changing the password itself, and finally saving the new password.
Ensuring the strength and complexity of your Wi-Fi password is essential. Create a unique password that includes a combination of letters, numbers, and special characters to make it difficult to guess or crack.
Remember to update the Wi-Fi password on all devices that connect to your network, including smartphones, tablets, and smart home devices, to maintain a secure network environment.
By taking these steps to change your Wi-Fi password on Windows 10, you are actively protecting your network against potential threats and safeguarding your personal information.
So go ahead, follow the instructions provided in this guide, and enjoy a more secure and private browsing experience on your Windows 10 device.