Introduction
Welcome to the digital age, where staying connected is more important than ever. With the rise of smart devices and IoT (Internet of Things) gadgets, our homes and workplaces are becoming filled with an increasing number of devices connected to our WiFi networks. While this connectivity offers convenience and efficiency, it’s also important to be aware of the devices that are accessing our WiFi.
Knowing the devices connected to your WiFi network has become an essential aspect of maintaining online security, monitoring network speeds, and identifying any unauthorized access. Whether it’s for personal or professional purposes, being able to check and manage the devices connected to your WiFi is crucial to ensuring a smooth and secure browsing experience.
In this article, we will guide you through the process of checking devices connected to your WiFi network on various platforms, including Windows, Mac, Android, and iOS. You will learn step-by-step instructions on how to identify which devices are connected, helping you keep track of your network usage and identify any suspicious activity.
So, let’s dive into the world of WiFi management and discover the tools and techniques that will empower you to take control of your network. With the insights and knowledge gained, you’ll be able to ensure a stable and secure WiFi connection for all your devices.
Why should you check devices connected to your WiFi?
In today’s interconnected world, where we rely heavily on WiFi for our daily activities, it’s important to be aware of the devices connected to your network. Here are a few reasons why checking devices connected to your WiFi is essential:
1. Security: By regularly monitoring the devices connected to your WiFi, you can identify any unauthorized access or potential security threats. It allows you to detect any unfamiliar devices that may have gained access to your network without your knowledge. This enables you to take immediate action to protect your personal and sensitive information.
2. Bandwidth management: Having numerous devices connected to your WiFi could strain your network’s bandwidth. By keeping an eye on the connected devices, you can identify bandwidth-hogging devices or applications and prioritize their usage. This ensures that all your devices experience optimal speed and performance.
3. Network troubleshooting: Checking the devices connected to your WiFi can be helpful when troubleshooting network connectivity issues. By verifying which devices are connected and which are not, you can narrow down the scope of potential problems and focus on resolving specific device-related issues.
4. Device identification: It’s common to have guests or new devices join your WiFi network temporarily. Checking the connected devices allows you to verify the legitimacy of these devices and ensure that no unwanted devices are lingering on your network. This helps maintain control over your network’s overall security.
5. Network optimization: The ability to view and manage connected devices provides insights into your network usage patterns and helps you optimize your WiFi setup. By understanding how different devices consume bandwidth, you can make informed decisions when investing in network upgrades or adjusting your network settings accordingly.
6. Privacy concerns: Monitoring the devices connected to your WiFi can help protect your privacy. By ensuring that unauthorized devices are not connected, you can prevent potential breaches of privacy and maintain a secure digital environment.
7. Parental control: If you have children or vulnerable users accessing your WiFi network, checking the connected devices allows you to implement effective parental control measures. By monitoring and managing the devices connected, you can ensure a safe and age-appropriate online experience for your children.
By taking the time to check and manage the devices connected to your WiFi network, you can safeguard your network security, optimize network performance, and ensure a seamless browsing experience for all your devices. So, let’s explore the various methods to check devices connected to WiFi on different platforms.
How to check devices connected to WiFi on a Windows computer
If you’re using a Windows computer, there are a few simple steps you can follow to check the devices connected to your WiFi network. Here’s how:
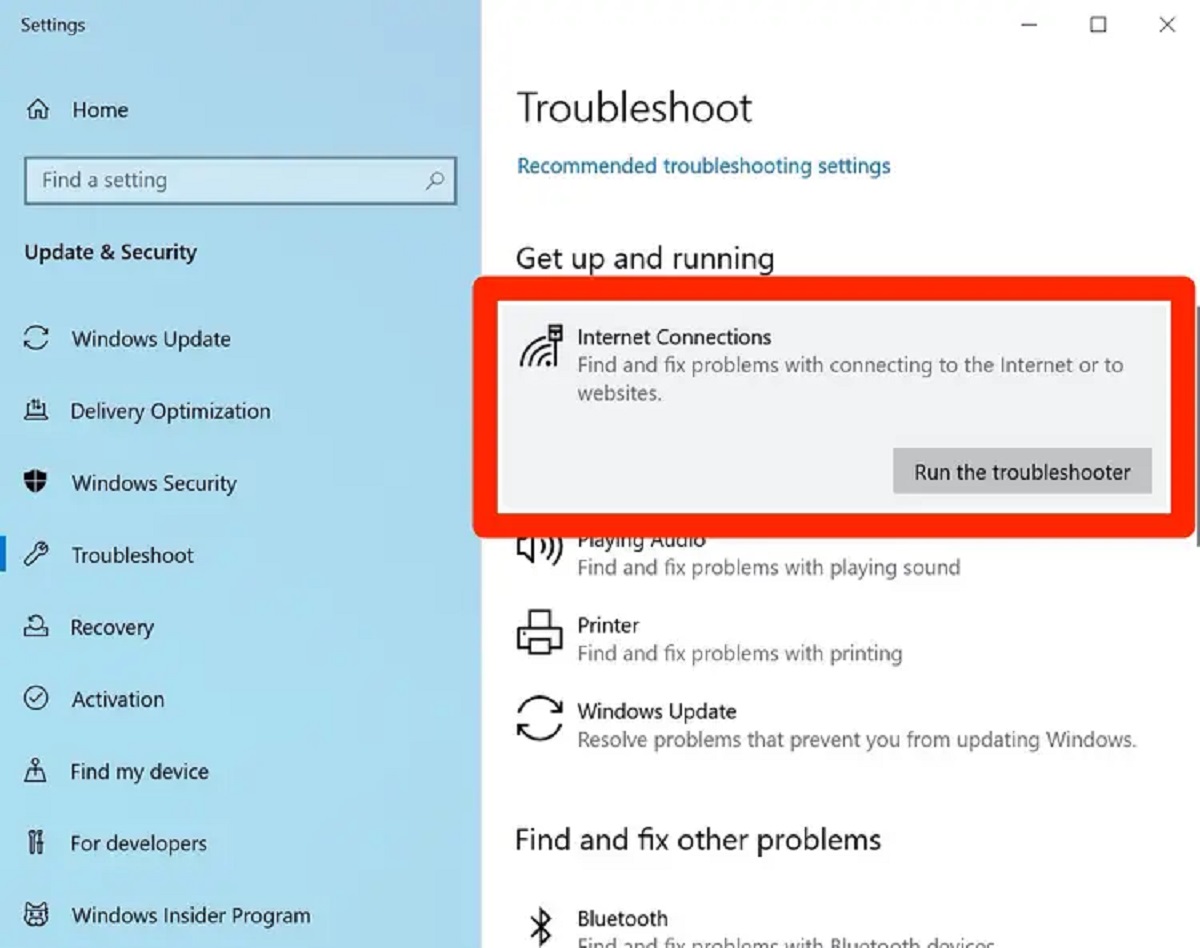
1. Open Network and Sharing Center: Right-click on the network icon in your system tray and select “Open Network and Sharing Center.” Alternatively, you can access it through the Control Panel.
2. View network details: In the Network and Sharing Center, you’ll find information about your currently connected network. Click on the network name to open the WiFi Status window.
3. Access network properties: In the WiFi Status window, click on the “Properties” button. This will open a new window with detailed information about your network.
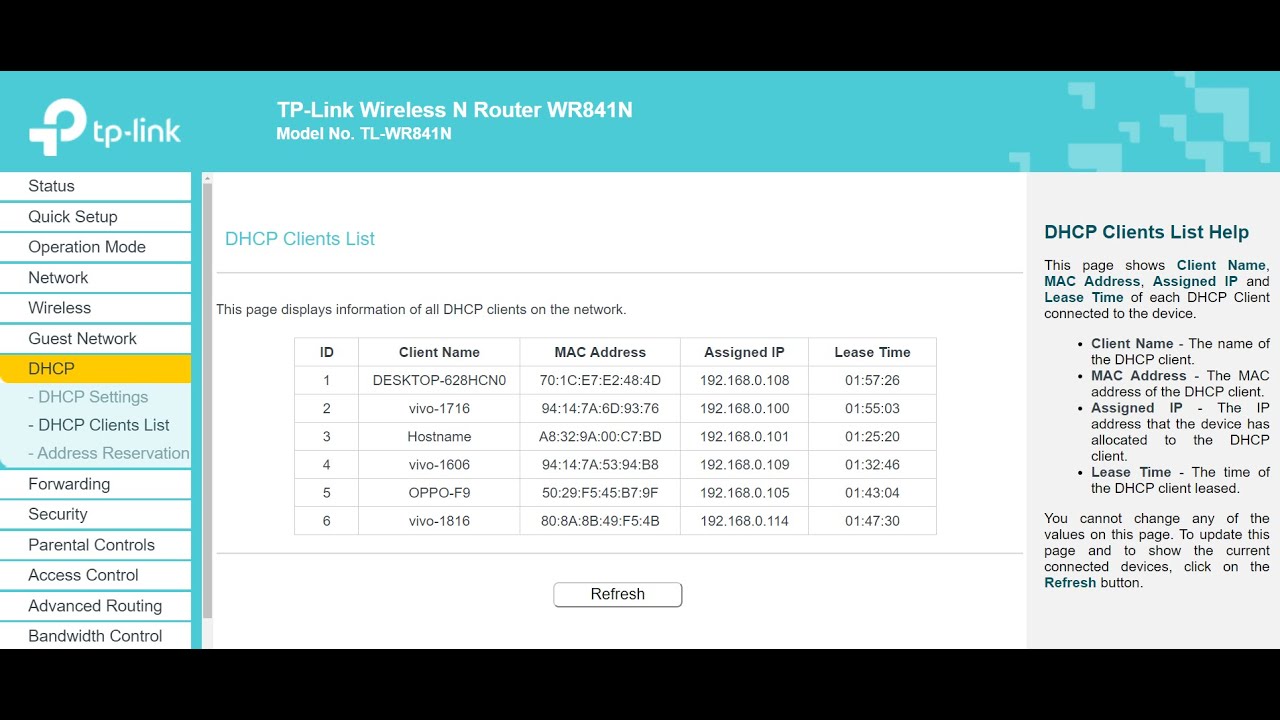
4. Check the list of connected devices: In the WiFi Properties window, navigate to the “Connections” tab. Here you will find a list of devices currently connected to your WiFi network. You can view the device names, IP addresses, and their connection status.
5. Identify and manage devices: Review the list of connected devices and ensure that you recognize each device. If you spot any unfamiliar or suspicious devices, it’s advisable to change your WiFi password and consider implementing additional security measures.
6. Close network properties: After you’ve checked the connected devices, you can close the network properties windows and return to your normal computer usage.
Note: The steps outlined above may vary slightly depending on the version of Windows you’re using. However, the general process remains the same, allowing you to identify devices connected to your WiFi network.
By following these steps, you can easily check the devices connected to your WiFi network on your Windows computer. Stay vigilant and regularly monitor your network to ensure a secure and efficient browsing experience.
How to check devices connected to WiFi on a Mac computer
If you’re using a Mac computer, checking the devices connected to your WiFi network is a straightforward process. Here’s how you can do it:
1. Open System Preferences: Click on the Apple menu in the top-left corner of your screen and select “System Preferences” from the dropdown menu.
2. Access Network preferences: In the System Preferences window, click on the “Network” icon. This will open the Network preferences panel.
3. Select your WiFi network: In the Network preferences panel, ensure that the “Wi-Fi” option is selected from the list of available network connections on the left-hand side.
4. View network details: Click on the “Advanced” button at the bottom-right corner of the Network preferences panel. This will open the Advanced WiFi settings.
5. Check the list of connected devices: In the Advanced WiFi settings, navigate to the “Wi-Fi” tab. Here, you will find a list of devices that are currently connected to your WiFi network. You can view their MAC addresses, IP addresses, and connection status.
6. Identify and manage devices: Review the list of connected devices and ensure that you recognize each device. If you notice any unfamiliar or suspicious devices, it’s advisable to change your WiFi password and consider enhancing your network security.
7. Close network preferences: Once you’ve checked the connected devices, you can close the Network preferences panel and continue using your Mac.
Note: The steps provided above may vary slightly depending on the version of macOS you’re using. However, the general process remains the same, allowing you to identify devices connected to your WiFi network.
By following these steps, you can effortlessly check the devices connected to your WiFi network on your Mac computer. Keeping a close eye on your network usage will help you maintain a secure and efficient browsing experience.
How to check devices connected to WiFi on an Android device
Checking the devices connected to your WiFi network on an Android device is a straightforward process. Here’s how you can do it:
1. Open the Settings app: Swipe down from the top of your screen to access the notification shade, and then tap on the gear icon to open the Settings app.
2. Access the Wi-Fi settings: In the Settings app, scroll down and tap on “Wi-Fi” to access the WiFi settings menu.
3. View connected devices: In the Wi-Fi settings menu, you will see a list of available networks. Tap on the network to which your device is connected. This will open the network details page.
4. Check connected devices: On the network details page, you will find a section that shows the devices currently connected to your WiFi network. The list will include the device names, MAC addresses, and their connection status.
5. Identify and manage devices: Review the list of connected devices and ensure that you recognize each device. If you come across any unfamiliar or suspicious devices, it’s advisable to change your WiFi password and consider implementing additional security measures.
6. Close the settings: After checking the connected devices, you can simply close the Settings app and continue using your Android device.
Note: The steps provided above may vary slightly depending on the Android device’s manufacturer and the version of Android you’re using. However, the general process remains the same, allowing you to identify devices connected to your WiFi network.
By following these steps, you can easily check the devices connected to your WiFi network on your Android device. Stay mindful of the devices on your network to maintain a secure and efficient browsing experience.
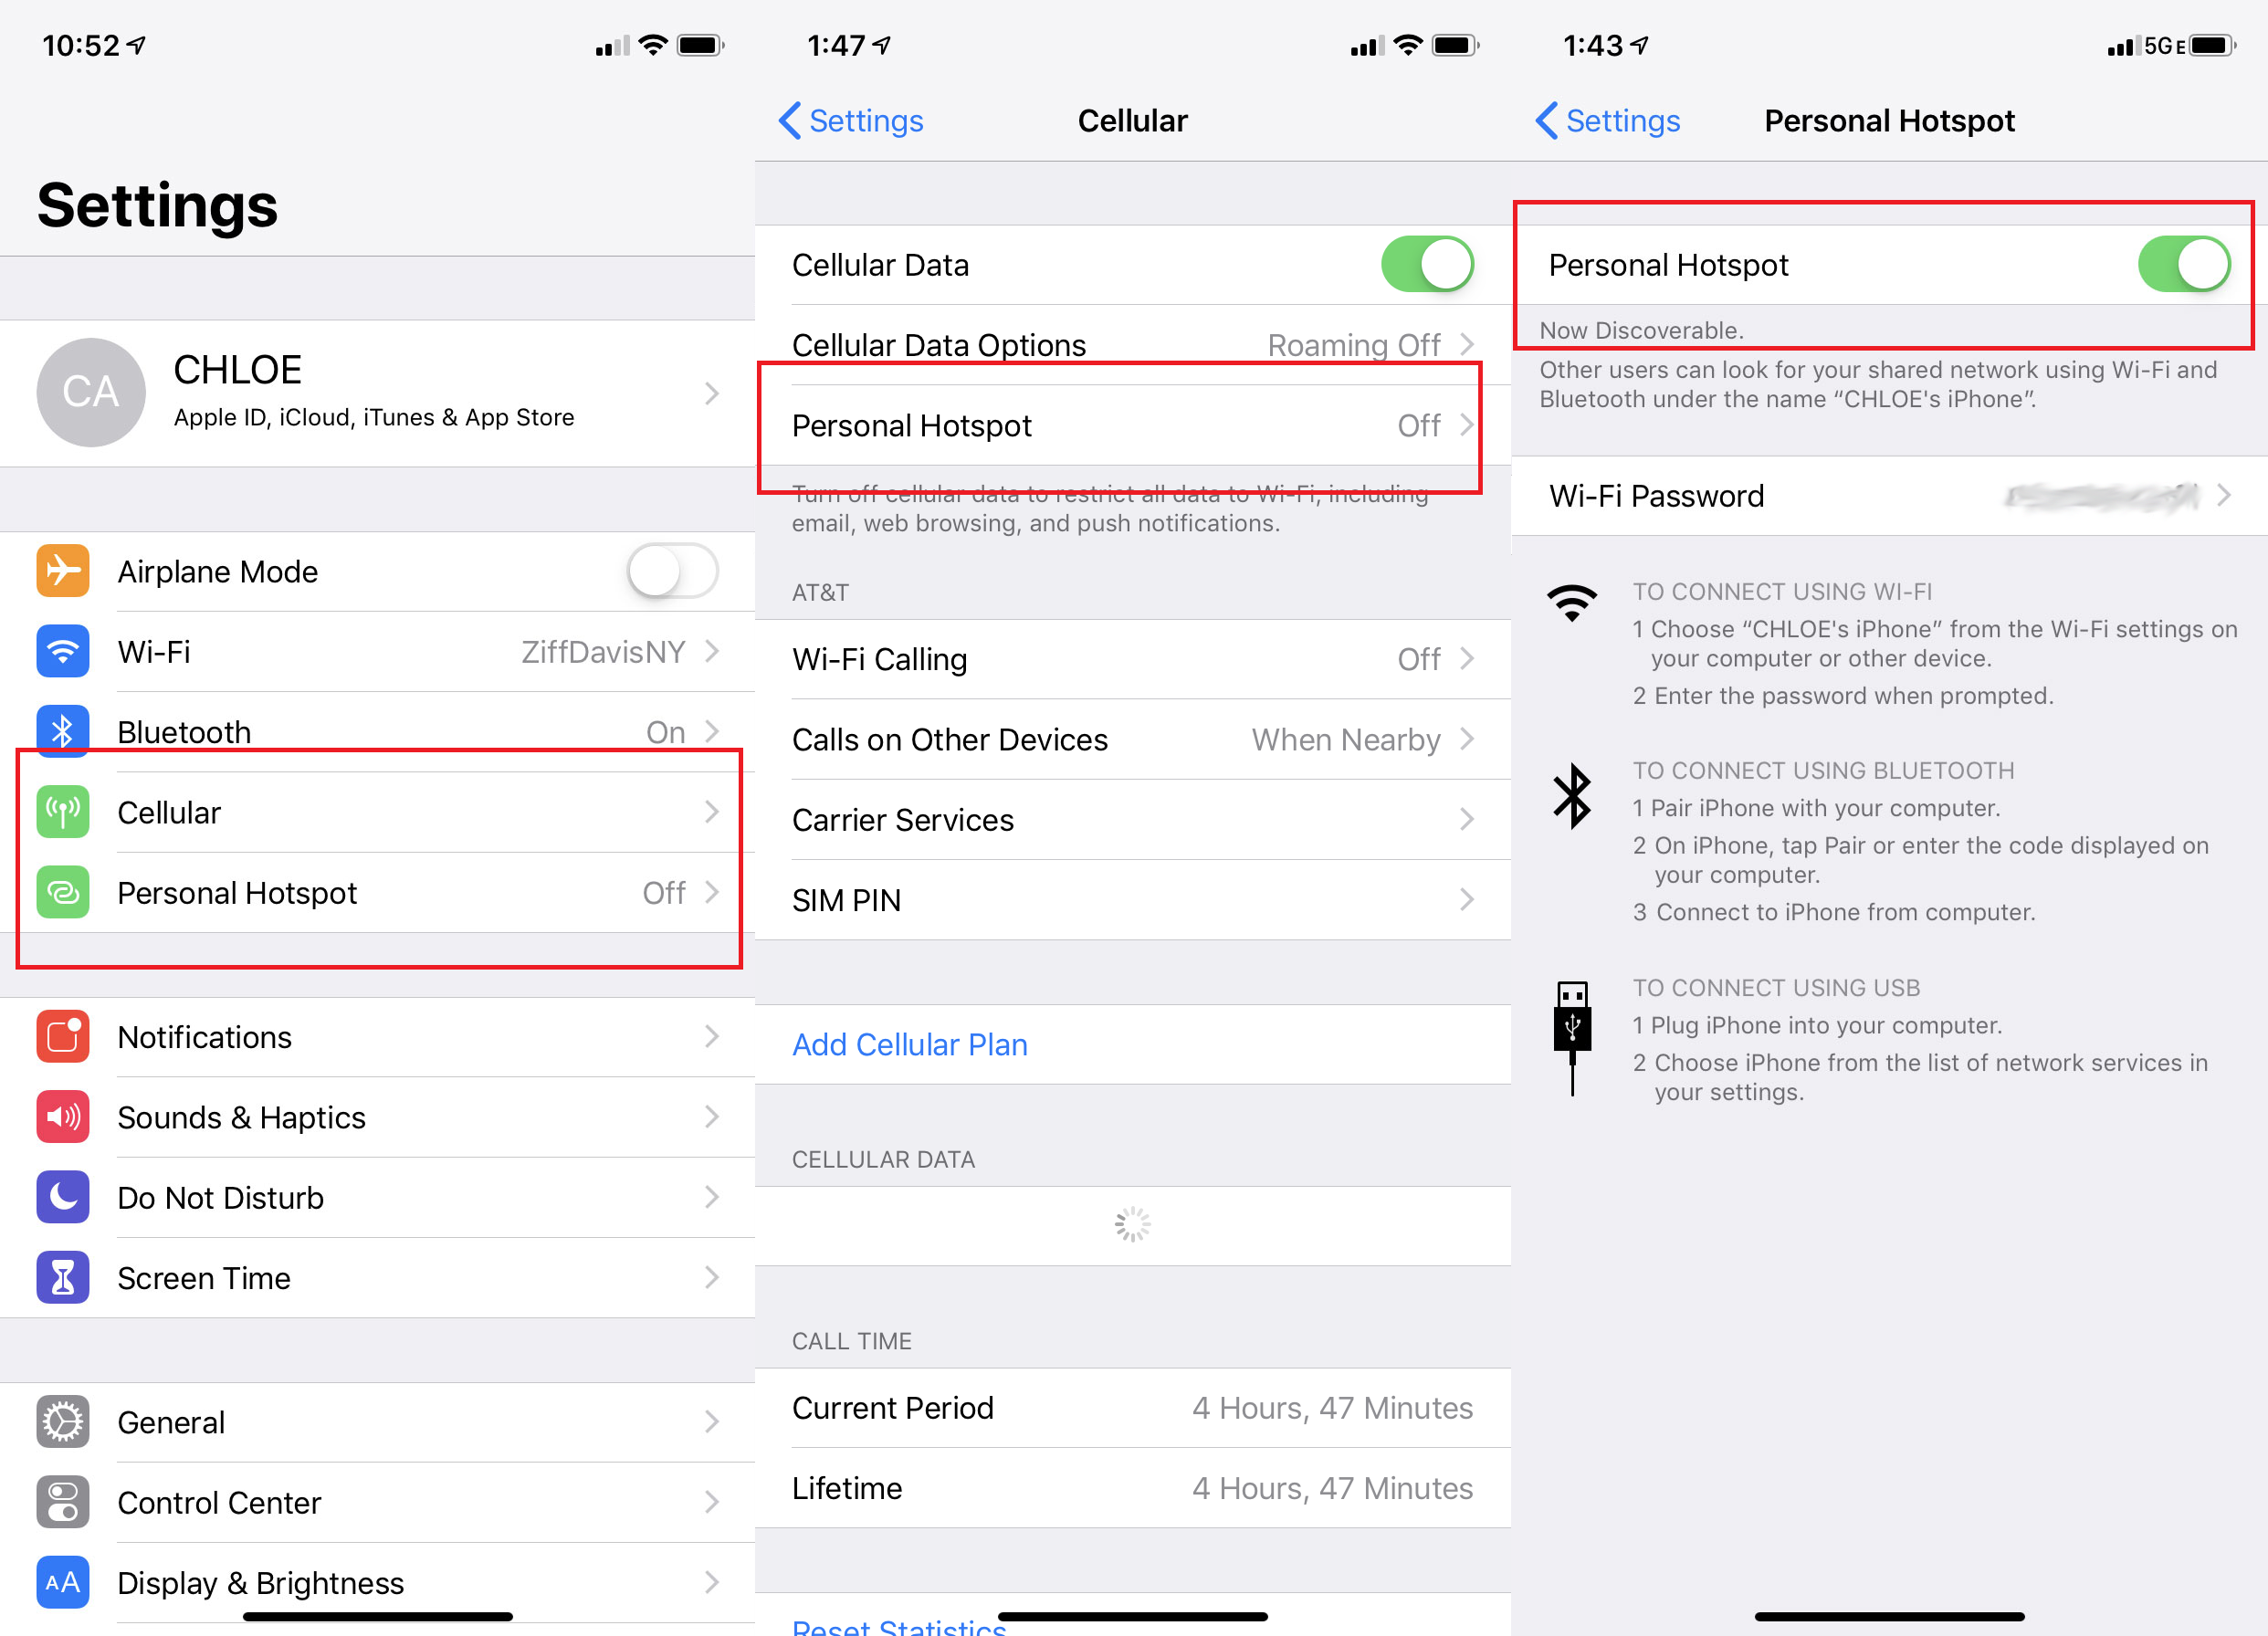
How to check devices connected to WiFi on an iOS device
Checking the devices connected to your WiFi network on an iOS device is a simple process. Here’s how you can do it:
1. Open the Settings app: Locate the Settings app on your iOS device’s home screen and tap on it to open the Settings menu.
2. Access the Wi-Fi settings: In the Settings menu, tap on “Wi-Fi” to access the WiFi settings.
3. View connected devices: Under the “Choose a Network” section, you will see a list of available WiFi networks. Tap on the network to which your iOS device is connected. This will display the network details.
4. Check connected devices: On the network details page, you will find a section that shows the devices connected to your WiFi network. The list will include the device names, IP addresses, and connection status.
5. Identify and manage devices: Review the list of connected devices and ensure that you recognize each device. If you encounter any unfamiliar or suspicious devices, it’s advisable to change your WiFi password and consider enhancing your network security.
6. Close the settings: After you have checked the connected devices, simply close the Settings app and continue using your iOS device.
Note: The steps provided above are based on the current iOS version and may differ slightly depending on the version you are using. However, the general process should still allow you to identify devices connected to your WiFi network.
By following these steps, you can easily check the devices connected to your WiFi network on your iOS device. Regularly monitoring your network ensures a secure and efficient browsing experience.
Additional tips to manage devices connected to your WiFi network
Managing devices connected to your WiFi network goes beyond simply checking the devices. Here are a few additional tips to help you effectively manage and maintain control over your network:
1. Change your WiFi password regularly: Regularly changing your WiFi password is an essential security measure. By doing so, you can prevent unauthorized access and ensure that only trusted devices are connected to your network.
2. Enable network encryption: Make sure to enable WPA2 (or higher) encryption on your WiFi network. This encryption protocol provides a robust level of security, making it harder for unauthorized devices to gain access.
3. Use MAC address filtering: MAC address filtering allows you to specify which devices are allowed to connect to your WiFi network. By configuring your router to only allow specific MAC addresses, you can enhance the security of your network.
4. Enable a guest network: If you frequently have guests accessing your WiFi, consider enabling a separate guest network. This allows you to provide WiFi access to your guests without compromising the security of your primary network.
5. Implement parental control measures: If you have children or vulnerable users on your network, use parental control features to restrict access to certain websites or set time limits for device usage. This helps ensure a safe and appropriate online experience.
6. Regularly update firmware: Keep your router firmware up to date with the latest patches and security updates. Regularly checking for and installing firmware updates helps protect against potential vulnerabilities.
7. Monitor network activity: Consider using network monitoring tools that provide insights into the traffic and usage patterns on your WiFi network. This can help you identify any unusual activity or excessive bandwidth usage.
8. Reinforce physical security: Ensure physical security for your router and WiFi equipment. Keep them in a secure location to prevent unauthorized access or tampering.
9. Educate family members or employees: Teach your family members or employees about the importance of network security. Encourage them to follow best practices and avoid connecting unauthorized devices.
10. Seek professional assistance if needed: If you’re experiencing persistent network issues or concerns, consider consulting with a professional IT expert or your Internet Service Provider (ISP) for further assistance.
By following these additional tips, you can effectively manage the devices connected to your WiFi network and maintain a secure and optimized browsing experience for all users.
Conclusion
Managing the devices connected to your WiFi network is crucial for maintaining a secure and efficient browsing experience. By regularly checking and monitoring the devices connected to your WiFi, you can identify potential security threats, optimize network performance, and ensure that only trusted devices are accessing your network.
In this article, we explored how to check devices connected to WiFi on different platforms, including Windows, Mac, Android, and iOS devices. We provided step-by-step instructions to guide you through the process and empower you to take control of your network.
Remember to prioritize network security by changing your WiFi password regularly, enabling encryption, and implementing additional security measures such as MAC address filtering. Consider creating a separate guest network to provide WiFi access to your visitors without compromising the security of your primary network.
Monitoring network activity, updating firmware, and reinforcing physical security are also essential aspects of managing your WiFi network effectively. Furthermore, educating your family members or employees about network security best practices can help create a more secure and responsible digital environment.
By following these tips and techniques, you can ensure a safe, secure, and efficient WiFi network experience for all your devices. Stay vigilant, keep your network optimized, and enjoy the benefits of a well-managed WiFi network.