Introduction
When using a Dell laptop running on Windows 10, taking screenshots can be incredibly useful for a variety of reasons. Whether you need to capture an important document, save an image, or share a memorable moment from a video, knowing how to take screenshots in Windows 10 is essential.
In this article, we will explore several methods you can use to take screenshots on your Dell laptop. From the traditional “Print Screen” key to the advanced Snipping Tool and Game Bar, we will cover a range of options to suit your needs. So, let’s dive in and discover how you can easily capture screenshots on your Dell laptop running Windows 10.
Whether you’re a student, professional, or just a casual user, being able to quickly and efficiently take a screenshot can greatly boost your productivity. You can easily capture error messages, important information from websites, or even create instructional guides to help others.
Don’t worry if you’re not tech-savvy – these methods require only a few simple steps, and you’ll be taking screenshots like a pro in no time. So grab your Dell laptop, fire it up, and let’s get started on our screenshot-taking journey together.
Method 1: Using the “Print Screen” key
The simplest and most straightforward method to take a screenshot on your Dell laptop is by using the “Print Screen” key. This method captures the entire screen and saves it to the clipboard, allowing you to paste it into an image editing software or document of your choice.
Here’s how you can use the “Print Screen” key to take a screenshot on your Dell laptop:
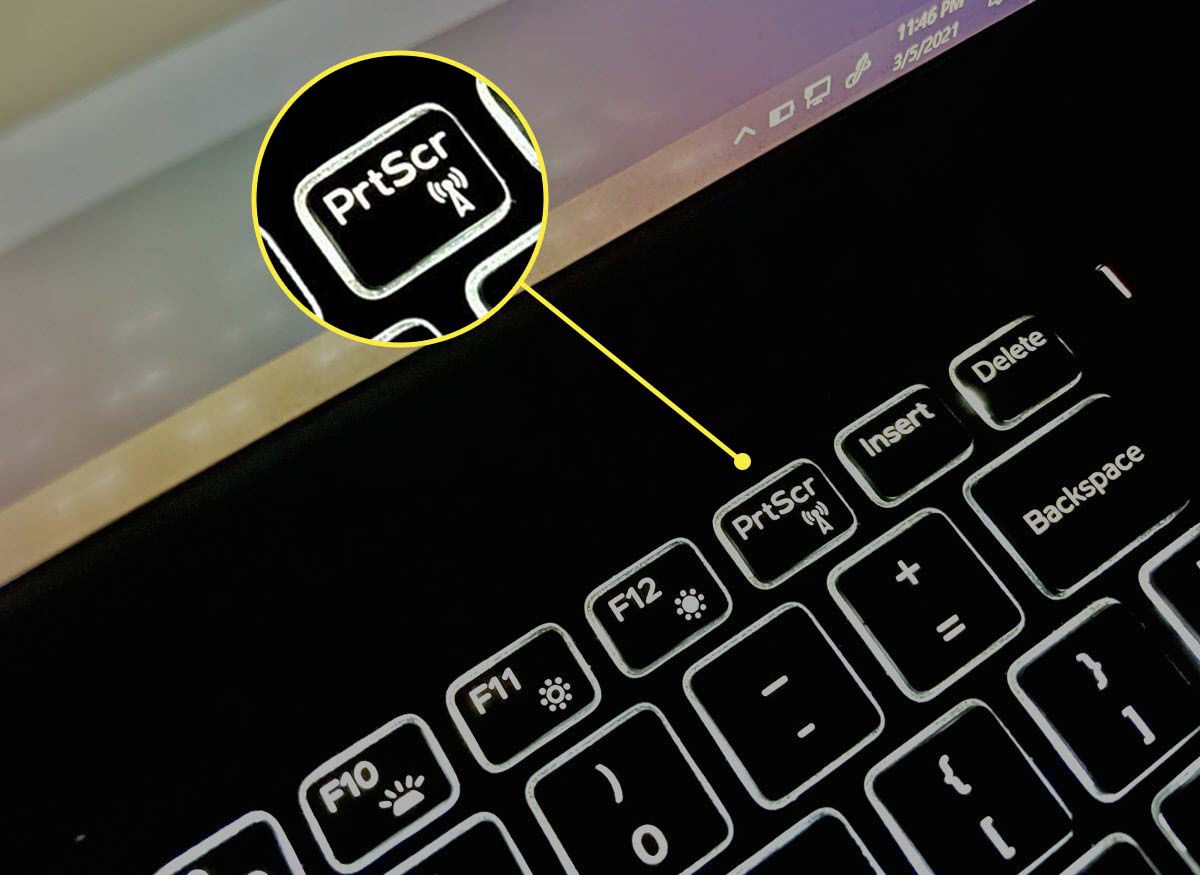
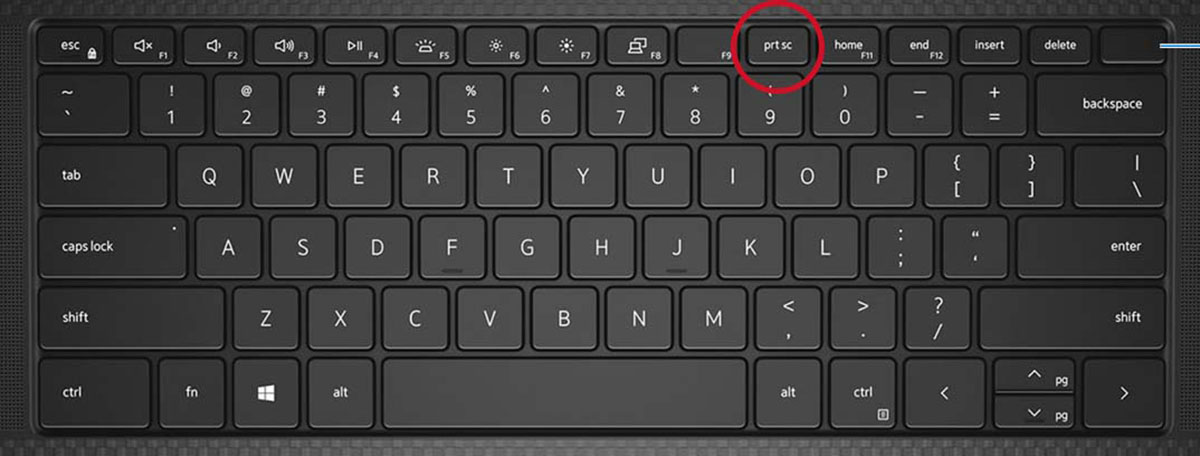
- Locate the “Print Screen” key on your keyboard. It is typically labeled as “PrtScn”, “PrtSc”, or a similar variation.
- Make sure the screen you want to capture is visible on your laptop’s display.
- Press the “Print Screen” key once. You won’t see any visual feedback indicating that the screenshot has been taken, but rest assured, it’s been saved to your clipboard.
- Open an image editing software or any document where you want to paste the screenshot, such as Microsoft Word or Paint.
- Press “Ctrl + V” or right-click and select “Paste” to insert the screenshot from the clipboard onto your document or image editing software.
That’s it! You have successfully captured a screenshot of your entire screen using the “Print Screen” key. Now you can save, edit, or share the screenshot as needed.
This method is great for capturing the entire screen, including everything that is currently displayed on your Dell laptop. However, keep in mind that if you have multiple displays connected, the screenshot will capture all the screens collectively.
Additionally, using the “Print Screen” key does not provide any options for cropping or editing the screenshot. If you need more flexibility and control over your screenshots, you may want to explore other methods, which we will discuss in the following sections.
Method 2: Using the “Windows + Print Screen” key combination
If you’re looking for a quick and convenient way to take screenshots without the need for additional software, using the “Windows + Print Screen” key combination is an excellent option. This method captures the entire screen and automatically saves it as an image file in the Screenshots folder on your Dell laptop.
Here’s how you can use the “Windows + Print Screen” key combination to take a screenshot on your Dell laptop:
- Make sure the screen you want to capture is visible on your laptop’s display.
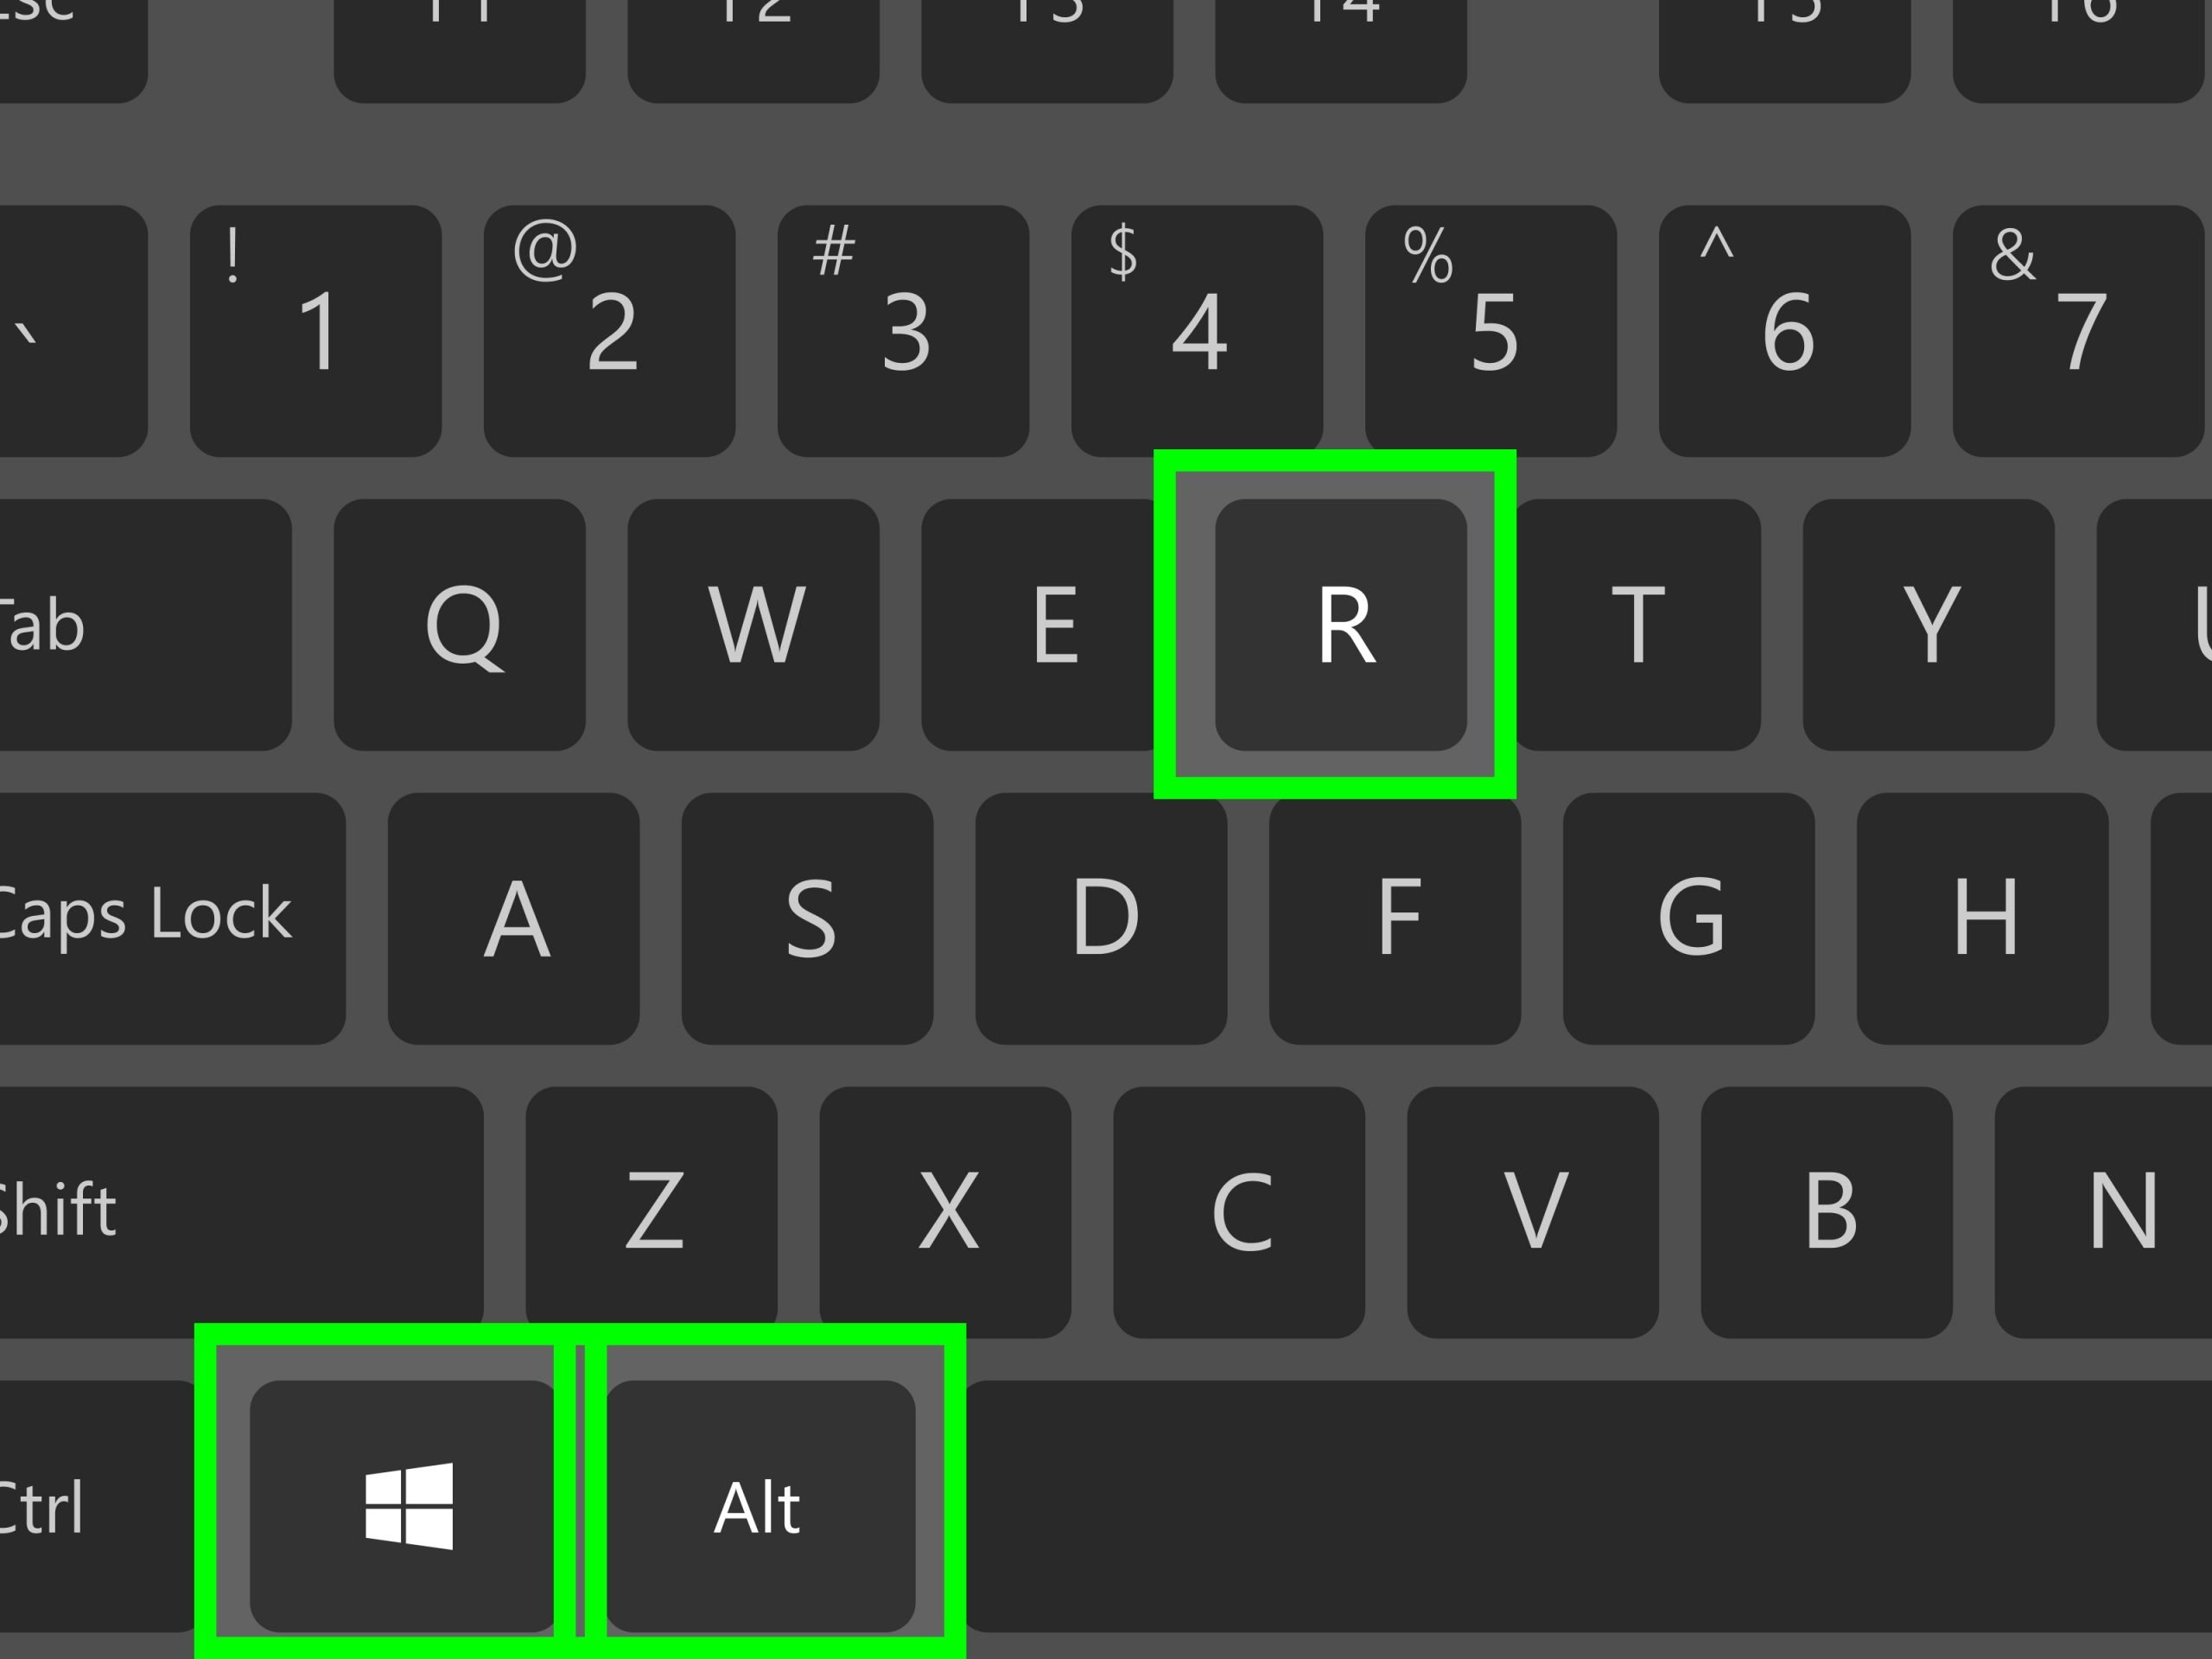
- Locate the “Windows” key on your keyboard, which is typically located between the “Ctrl” and “Alt” keys.
- Press and hold the “Windows” key, and while holding it down, press the “Print Screen” key (labeled as “PrtScn” or “PrtSc”).
- You may notice a brief dimming or flickering of the screen, indicating that the screenshot has been captured.
- Open the File Explorer by pressing the “Windows” key and “E” simultaneously.
- In the File Explorer, navigate to the “Pictures” folder and then open the “Screenshots” folder.
- You will find the screenshot saved here with a file name in the format “Screenshot (X).png”, with “X” representing a number increment.
That’s it! You have successfully taken a screenshot using the “Windows + Print Screen” key combination. The screenshot is automatically saved as an image file, ready for you to view or share.
This method offers the advantage of automatic saving, eliminating the need to paste the screenshot into an editing software or document. It provides a quick way to capture the entire screen and saves the image in a designated folder for easy access.
However, please note that this method captures the entire screen without any options for cropping or editing. If you require more control over your screenshots or need to capture only a specific portion of the screen, consider exploring the next method we will discuss.
Method 3: Using the “Alt + Print Screen” key combination
If you want to capture a screenshot of the active window on your Dell laptop instead of the entire screen, using the “Alt + Print Screen” key combination is an ideal method. This combination allows you to focus on a specific window or application and capture its contents.
Here’s how you can use the “Alt + Print Screen” key combination to take a screenshot of the active window on your Dell laptop:
- Ensure that the window you want to capture is active and visible on your laptop’s display.
- Click on the desired window to bring it into focus.
- Press and hold the “Alt” key on your keyboard.
- While holding down the “Alt” key, press the “Print Screen” key (labeled as “PrtScn” or “PrtSc”).
- Your Dell laptop will capture a screenshot of the active window and save it to the clipboard.
- Open an image editing software or document, such as Paint or Microsoft Word.
- Press “Ctrl + V” or right-click and select “Paste” to insert the screenshot from the clipboard onto your document or image editing software.
That’s it! You have successfully taken a screenshot of the active window using the “Alt + Print Screen” key combination. Now, you can save, edit, or share the screenshot as desired.
This method is particularly useful when you want to capture the contents of a specific window without any distractions from other open windows or applications. It allows for precise and focused screenshots, saving you time and effort in cropping or editing later on.
Keep in mind that using the “Alt + Print Screen” key combination captures only the active window, so if you have multiple windows open, the screenshot will only capture the contents of the window that is currently in focus.
Now that you know how to capture screenshots of the active window, let’s explore another method that offers even more flexibility and customization options.
Method 4: Using the Snipping Tool
If you’re looking for a built-in screenshot tool with more advanced features and customization options, the Snipping Tool is a great choice. It allows you to capture specific areas of your screen and provides options for annotation and saving in various file formats.
Follow these steps to use the Snipping Tool and take screenshots on your Dell laptop:
- Open the Start menu by clicking the Windows icon in the bottom left corner of your screen.
- Type “Snipping Tool” in the search bar.
- Click on the “Snipping Tool” application from the search results to launch it.
- In the Snipping Tool window, click on the “New” button.
- Your screen will appear slightly faded, indicating that the Snipping Tool is now active.
- Click and drag the cursor to select the desired area of your screen that you want to capture.
- Release the mouse button to capture the selected area.
- The captured screenshot will open in the Snipping Tool editing window.
- Use the various annotation tools provided by the Snipping Tool, such as highlighter, pen, or eraser, to enhance or annotate the screenshot if needed.
- Click on the “File” menu and choose the “Save As” option to save the screenshot in your desired location and file format (such as PNG, JPEG, or GIF).
That’s it! You have successfully utilized the Snipping Tool to capture a screenshot on your Dell laptop. The Snipping Tool offers more flexibility and control over capturing precise areas of your screen, making it ideal for specific requirements or selective captures.
With its built-in annotation tools, you can also add notes, highlights, or arrows to the screenshot, providing extra context or emphasizing important elements.
It’s important to note that the Snipping Tool may not be available on some versions of Windows 10. In that case, you can use the newer Snip & Sketch tool, which offers similar functionality. To launch Snip & Sketch, press the “Windows + Shift + S” keys simultaneously.
Now that you’re familiar with the Snipping Tool, let’s explore another method that is especially useful for gamers or those who want to capture their gaming experiences.
Method 5: Using the Game Bar
If you’re an avid gamer or enjoy recording your gaming sessions on your Dell laptop, utilizing the Game Bar is an excellent option. The Game Bar not only allows you to capture screenshots but also record videos of your gameplay without the need for third-party software.
Follow these steps to use the Game Bar and capture screenshots on your Dell laptop:
- Open the game or application you want to capture.
- While playing the game or using the application, press the “Windows + G” keys simultaneously to open the Game Bar.
- If prompted, check the box that says “Yes, this is a game” to enable the Game Bar.
- In the Game Bar overlay, you’ll see various options, including screenshot, record, and more.
- Click on the camera icon or press the “Win + Alt + PrtScn” keys to take a screenshot of the current screen.
- The screenshot will be saved in the “Captures” folder within your “Videos” folder with a filename in the format “Screenshot (X).png”.
- To access your screenshots, open the File Explorer and navigate to the “Videos” folder, then open the “Captures” folder.
That’s it! You have successfully used the Game Bar to capture a screenshot on your Dell laptop while gaming or using any other application. This method provides convenience and accessibility for gamers who want to capture and share their experiences.
Not only can you capture screenshots, but the Game Bar also offers the ability to record videos of your gameplay with options for audio capture, recording duration, and more.
It’s worth noting that the Game Bar may not be available on all laptops or for all applications. Ensure that your Dell laptop meets the hardware and software requirements and that the Game Bar is enabled in your settings.
Now that you know how to capture screenshots and record gameplay using the Game Bar, you’re equipped with a powerful tool for preserving and sharing your gaming moments.
Conclusion
Taking screenshots on your Dell laptop running Windows 10 is a simple and valuable skill that can enhance your productivity and communication. Whether you need to capture important information, save images, or share memorable moments, utilizing the various methods discussed in this article will enable you to capture screenshots effortlessly.
We started with the basic “Print Screen” key, which captures the entire screen and saves it to the clipboard. Next, we explored the “Windows + Print Screen” key combination, which automatically saves a screenshot as an image file in the Screenshots folder. Then, we discussed the “Alt + Print Screen” key combination, which captures the active window on your screen.
For users seeking more control and flexibility, we covered the Snipping Tool, which allows you to capture specific areas of your screen and provides annotation options. Lastly, we explored the Game Bar, a powerful tool for gamers to capture screenshots and record gameplay.
Remember, each method offers unique features and advantages, and you can choose the one that best suits your needs. Whether you’re a student, professional, or a gaming enthusiast, capturing screenshots on your Dell laptop is now just a few simple steps away.
So, get ready to enhance your productivity, create informative tutorials, capture memorable moments, and effectively communicate with others by mastering the art of taking screenshots on your Dell laptop.
Take some time to practice these methods, explore their capabilities, and experiment with different tools and options. Before you know it, you’ll become a pro at capturing screenshots and effortlessly integrate them into your digital workflow.
So, grab your Dell laptop, give these methods a try, and unlock the power of screenshots in Windows 10!