Introduction
Screenshots are a useful way to capture and share images of your computer screen. Whether you want to highlight an important piece of information, demonstrate a software issue, or share a funny moment from a video game, knowing where your screenshots are saved on Windows can be essential.
In this article, we will explore the various locations where Windows saves screenshots by default. We will also discuss different ways to save screenshots to specific folders, the clipboard, or using built-in Windows tools. Additionally, we will provide instructions on how to change the default screenshot folder to a location of your choice. So, if you’ve ever taken a screenshot on your Windows computer and wondered where it went, this guide is for you.
By understanding where your screenshots are saved, you can easily access and manage them. This knowledge can come in handy when you need to find a specific screenshot or organize them in a specific folder. So, let’s dive into the different methods and explore the world of Windows screenshots!
Windows Screenshots Folder
When you take a screenshot on a Windows computer using the Print Screen (PrtScn) or Windows key + Print Screen combination, the screenshot is automatically saved to a folder on your computer. By default, Windows saves screenshots in a folder named “Screenshots” within the Pictures directory.
To access the Windows Screenshots folder, follow these steps:
- Open File Explorer by clicking on the folder icon in the taskbar or by pressing the Windows key + E on your keyboard.
- Navigate to the Pictures folder by clicking on “This PC” in the left sidebar and then selecting “Pictures” under the “Folders” section.
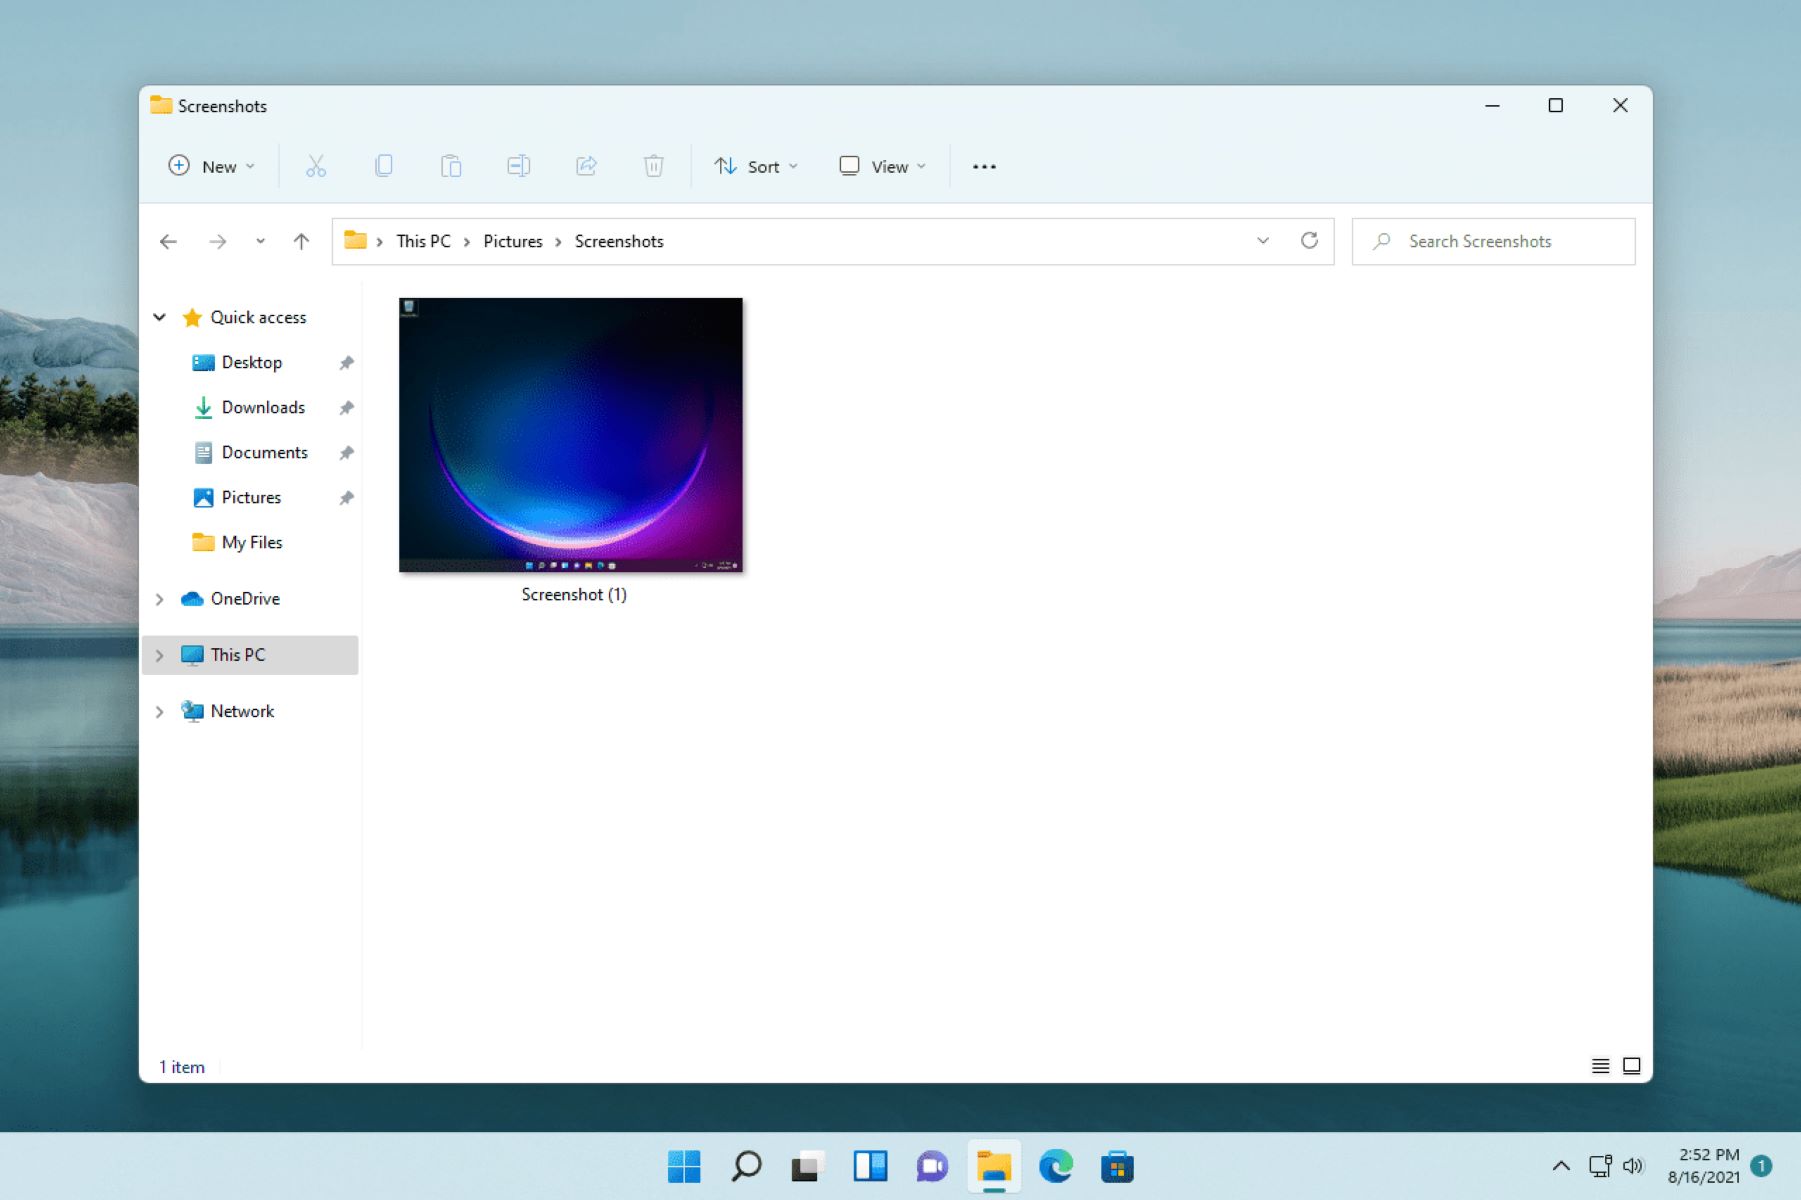
- Inside the Pictures folder, you should see a folder called “Screenshots”. This is where all your screenshots taken using the Print Screen or Windows key + Print Screen method are saved. Simply double-click on the folder to open it and access your screenshots.
In the Screenshots folder, you will find all your screenshots organized in chronological order. Each screenshot file is saved in the PNG image format, which offers high-quality images with a small file size.
It is important to note that the Screenshots folder is specific to each user account on the Windows computer. If you have multiple user accounts, each account will have its own Screenshots folder where its respective screenshots are saved.
Now that you know where the Windows Screenshots folder is located, you can easily access your screenshots and utilize them as needed.
Saving Screenshots to Desktop
If you prefer to have quick and easy access to your screenshots, you can save them directly to your desktop. This allows you to quickly find and open your screenshots without having to navigate through folders. Here’s how you can save screenshots to your desktop:
- Capture a screenshot by using the Print Screen (PrtScn) or Windows key + Print Screen combination.
- Open an image editing software, such as Paint or Adobe Photoshop.
- Once the software is open, paste the screenshot by pressing Ctrl + V on your keyboard or by clicking on the “Paste” option in the software’s toolbar.
- Edit or crop your screenshot as desired.
- Click on the “Save” option in the software’s toolbar.
- In the “Save As” dialog box, navigate to the desktop folder by selecting “Desktop” from the left sidebar.
- Provide a name for your screenshot in the “File Name” field.
- Choose the desired image format (e.g., PNG, JPEG) from the “Save as type” drop-down menu.
- Click on the “Save” button to save the screenshot to your desktop.
Once the screenshot is saved to your desktop, you can easily locate and access it without the need to navigate through folders. This method is especially useful if you frequently need to access and share screenshots.
Remember to periodically organize your desktop by moving or deleting unnecessary screenshots to keep it clutter-free.
Now that you know how to save screenshots directly to your desktop, you can quickly capture and access your images with ease.
Saving Screenshots to Clipboard
In addition to saving screenshots as image files, Windows also offers the option to save screenshots directly to the clipboard. When you save a screenshot to the clipboard, it is temporarily stored in your computer’s memory, allowing you to paste and use it in various applications. Here’s how you can save screenshots to the clipboard:
- Capture a screenshot by using the Print Screen (PrtScn) or Windows key + Print Screen combination.
- Open an application where you want to use the screenshot, such as an image editing software, a document editor, or an email composition window.
- Inside the application, paste the screenshot by pressing Ctrl + V on your keyboard or by right-clicking and selecting the “Paste” option.
- The screenshot will appear in the application, allowing you to edit, crop, or use it as needed.
Saving screenshots to the clipboard is useful when you want to immediately use them in a document, email, or any other application, without the need to save them as individual image files. This method saves you time and eliminates the need to navigate through folders to locate and open saved screenshots.
Keep in mind that when you save a new screenshot to the clipboard, the previously saved content in the clipboard is replaced. Therefore, if you have copied any other content prior to capturing a new screenshot, it will be overwritten.
By utilizing the option to save screenshots to the clipboard, you can easily capture and use images in real-time without cluttering your storage with multiple image files.
Now that you know how to save screenshots to the clipboard, you can seamlessly incorporate them into your desired applications or documents.
Using Snipping Tool to Save Screenshots
Windows provides a built-in tool called the Snipping Tool, which offers more advanced screenshot-capturing capabilities than the traditional Print Screen method. The Snipping Tool allows you to capture specific regions, windows, or the entire screen, and save the screenshots to your desired location. Here’s how you can use the Snipping Tool to save screenshots:
- Open the Snipping Tool by typing “Snipping Tool” in the Windows search bar and selecting the corresponding application.
- Once the Snipping Tool is open, click on the “New” button in the application’s toolbar.
- Select the type of capture you want to make from the dropdown menu: Free-form Snip, Rectangular Snip, Window Snip, or Full-screen Snip.
- Use your mouse or touchpad to draw a rectangle, select a window, or capture the entire screen, depending on the type of snip you chose.
- Once you release the mouse button or complete the snip, the screenshot will appear in the Snipping Tool window.
- Click on the “File” menu in the Snipping Tool and select “Save As”.
- In the “Save As” dialog box, navigate to the folder where you want to save the screenshot.
- Provide a name for the screenshot in the “File Name” field.
- Select the desired image format (e.g., PNG, JPEG) from the “Save as type” drop-down menu.
- Click on the “Save” button to save the screenshot to your chosen location.
The Snipping Tool provides flexibility in capturing screenshots, allowing you to specify the exact area or window you want to capture. This comes in handy when you need to highlight specific details or capture a particular section of the screen.
With the Snipping Tool, you can also use additional features such as highlighting, drawing, and adding text to the captured screenshots before saving them. This enables you to annotate and enhance the captured images as per your requirements.
Now that you know how to use the Snipping Tool, you can capture and save more precise and customized screenshots on your Windows computer.
Using Windows Game Bar to Save Screenshots
If you’re a gamer or frequently use your Windows computer for gaming purposes, you may already be familiar with the Windows Game Bar. This built-in feature not only allows you to record gameplay but also enables you to capture screenshots during your gaming sessions. Here’s how you can use the Windows Game Bar to save screenshots:
- While playing a game or running any application, press the Windows key + G on your keyboard to open the Windows Game Bar.
- Click on the camera icon or press the “Capture” button in the Game Bar’s menu.
- Once you capture a screenshot, a notification will appear at the bottom-right corner of your screen, indicating that the screenshot has been saved.
- To access the saved screenshots, click on the notification or open the game bar again and click on the “Gallery” option.
- The Game Bar’s Gallery will display all the screenshots you have taken. You can view, edit, or share them from there.
- If you want to change the default location where the screenshots are saved, you can do so by going to the Game Bar settings. Open the Game Bar, click on the settings icon (gear icon), and navigate to the “Captures” section. From there, you can choose a different folder or storage location for your screenshots.
The Windows Game Bar provides a convenient way to capture screenshots during your gaming sessions without the need for third-party software. It allows you to capture memorable moments, achievements, or any other content you want to preserve.
Additionally, the Game Bar offers various customization options, such as recording audio, enabling a timer for delayed screenshots, and even capturing screenshots in HDR (High Dynamic Range) format, if supported by your system.
With the Windows Game Bar, you can effortlessly capture and save screenshots while gaming, helping you capture and relive your favorite gaming moments.
Changing the Default Screenshot Folder
If you prefer to save your screenshots in a different folder or location rather than the default Windows Screenshots folder, you have the option to change the default screenshot folder. This allows you to organize your screenshots according to your preferences and easily locate them when needed. Here’s how you can change the default screenshot folder on your Windows computer:
- Open File Explorer by clicking on the folder icon in the taskbar or by pressing the Windows key + E on your keyboard.
- Navigate to the Pictures folder by clicking on “This PC” in the left sidebar and then selecting “Pictures” under the “Folders” section.
- Inside the Pictures folder, create a new folder where you want to save the screenshots. To create a new folder, right-click inside the Pictures folder, select “New”, and choose “Folder”. Provide a name for the folder.
- Once the new folder is created, right-click on it and select “Properties”.
- In the folder’s properties window, go to the “Location” tab.
- Click on the “Move” button and navigate to the new location where you want to save your screenshots.
- Once you have selected the new location, click on “Apply” and then “OK”.
By changing the default screenshot folder, Windows will now save all new screenshots to the specified location instead of the original Screenshots folder.
It’s important to note that changing the default screenshot folder affects all user accounts on your Windows computer. So, if you have multiple user accounts, they will all have their screenshots saved to the new folder.
This customization feature allows you to have more control over the storage and organization of your screenshots, making it easier to locate and manage them as per your preferences.
Now that you know how to change the default screenshot folder, you can customize the storage location of your screenshots to suit your needs and preferences.
Other Methods for Saving Screenshots
In addition to the default methods and built-in tools mentioned earlier, there are several other methods you can use to save screenshots on your Windows computer. These methods offer different features and functionalities, catering to various needs and preferences. Here are some other methods you can try:
- Third-party Screenshot Tools: There are many third-party screenshot tools available that offer advanced features such as capturing specific regions, adding annotations, and automatically saving screenshots in various formats. Examples include Snagit, Greenshot, and Lightshot.
- Keyboard Shortcut Applications: Some applications allow you to set custom keyboard shortcuts for capturing screenshots. These applications come with additional features like instant editing, cloud storage integration, and easy sharing. ShareX and PicPick are popular examples of such applications.
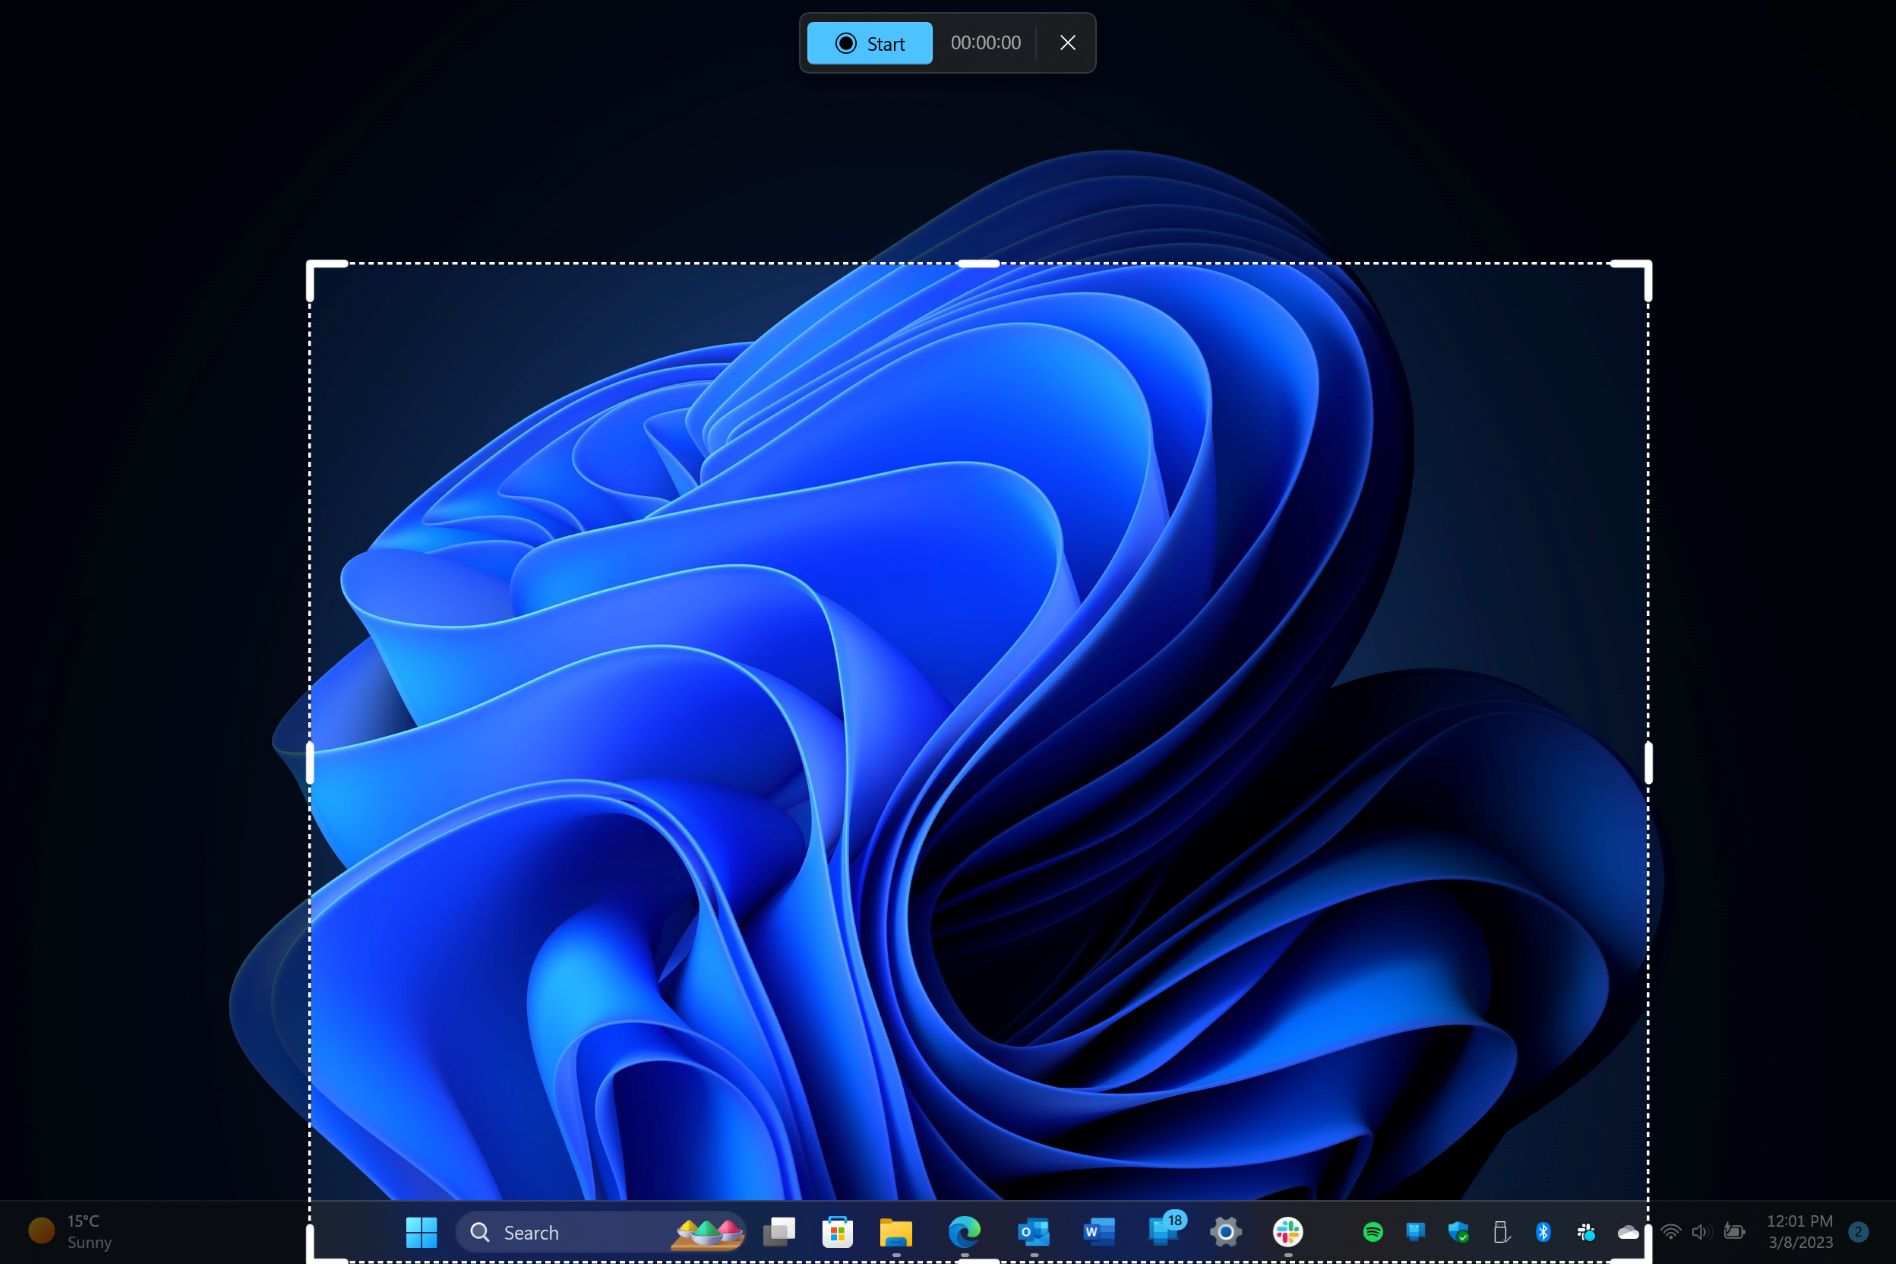
- Windows + Shift + S Shortcut: Starting from Windows 10, you can use the keyboard shortcut Windows key + Shift + S to capture a screenshot. This shortcut allows you to select a specific region to capture and then saves the screenshot to the clipboard. You can paste and save the screenshot using an image editing software or any other desired application.
- Print Screen to Paint: Another simple method is capturing a screenshot using the Print Screen (PrtScn) key and then pasting it directly into the Paint application. In Paint, you can edit, save, and annotate the screenshot before storing it.
- Game-specific Screenshot Features: Some gaming platforms or games offer their own built-in screenshot features or keybindings to capture gameplay screenshots. These features often provide specialized tools for capturing high-quality screenshots during gameplay.
Each of these methods has its own advantages and unique features. Depending on your specific needs and preferences, you can choose the method that suits you best.
Remember to consider factors such as ease of use, editing capabilities, and the ability to save screenshots in your preferred format or location when selecting a method.
By exploring these alternative methods for saving screenshots, you can enhance your screenshot-taking experience and discover the functionalities that best meet your requirements.
Conclusion
Screenshots are a valuable tool for capturing and sharing information on your Windows computer. Whether you’re using the default Print Screen method, the Snipping Tool, or the Windows Game Bar, knowing where your screenshots are saved and how to access them is essential. This article has provided a comprehensive guide on the various methods for saving screenshots on Windows.
We began by discussing the default Windows Screenshots folder, where screenshots captured using the Print Screen method are automatically saved. We then explored alternative options such as saving screenshots directly to the desktop or to the clipboard for immediate use. We also learned how to use the Snipping Tool and the Windows Game Bar to capture and save more specific screenshots.
Furthermore, we covered the process of changing the default screenshot folder to a location of your choice, allowing for better organization and accessibility of your screenshots. Lastly, we mentioned other methods such as third-party screenshot tools, custom keyboard shortcuts, and game-specific screenshot features that offer additional functionalities for capturing screenshots on Windows.
By understanding these different methods, you can choose the approach that aligns with your needs, preferences, and workflow. Whether you’re a gamer, a professional needing to highlight information, or simply someone who likes to capture and share interesting moments, Windows provides various options to satisfy your screenshot requirements.
Embrace the power of screenshots on your Windows computer and make use of them to enhance your communication, troubleshooting, and documentation experiences. With the knowledge gained from this article, you are equipped to take full advantage of the screenshot capabilities on your Windows device.