Introduction
Are you a MacBook Pro user who wants to capture and save moments from your screen? Taking a screenshot is a quick and convenient way to accomplish this task. Whether you want to share information, capture an error message, or save an image from your favorite website, knowing how to take a screenshot on your MacBook Pro is an essential skill.
In this article, we will explore the various methods available to take screenshots on your MacBook Pro. From keyboard shortcuts to dedicated applications, you will learn how to capture the entire screen, specific windows, or even selected portions of your display. By the end of this guide, you’ll be a screenshot expert, ready to capture and save anything you need.
Before we dive into the specific methods, let’s briefly discuss the importance of taking screenshots. Screenshots are not only useful for personal purposes but also great for professional use. They allow you to capture valuable information such as receipts, important documents, or interesting web content. Screenshots can also be a handy tool when troubleshooting technical issues, as they enable you to capture error messages or document specific steps for future reference.
Now that we understand the significance of screenshots, let’s explore the different ways to take them on your MacBook Pro. Whether you’re a seasoned Mac user or new to the platform, this article will provide you with all the information you need to become proficient in taking screenshots on your MacBook Pro.
Overview of Different Ways to Take a Screenshot on MacBook Pro
Taking a screenshot on your MacBook Pro is surprisingly simple, thanks to the built-in tools and keyboard shortcuts provided by macOS. Let’s explore the different methods you can use to capture your screen:
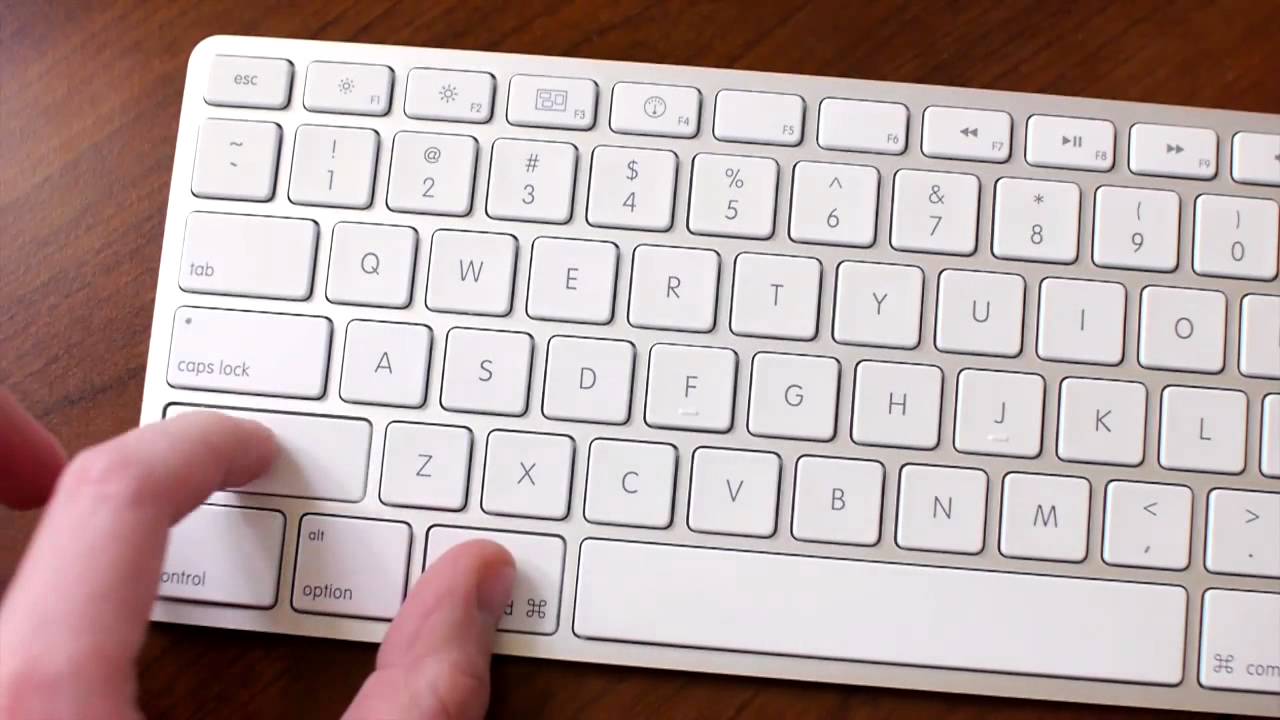
- 1. Using Keyboard Shortcuts: macOS offers a range of keyboard shortcuts to quickly capture screenshots. Pressing “Command + Shift + 3” simultaneously captures the entire screen and saves it as a PNG file on your desktop. Pressing “Command + Shift + 4” enables you to select an area of the screen to capture. Additionally, you can press “Command + Shift + 4” and then press the spacebar to capture a specific window.
- 2. Using the Grab Application: The Grab application, available in the Utilities folder of your Applications, provides a more advanced set of tools for capturing screenshots. With Grab, you can capture the screen, specific windows, or even a selection of the screen. It also allows you to set a timer delay for capturing specific moments.
- 3. Taking a Screenshot of a Specific Window: If you prefer a more precise approach, you can capture a screenshot of a specific window on your MacBook Pro. Press “Command + Shift + 4” to enter the screen capture mode, then press the spacebar. Your cursor will transform into a camera icon, allowing you to click on the window you want to capture. The screenshot will be saved as a PNG file on your desktop.
- 4. Taking a Screenshot of a Selected Portion of the Screen: If you only need to capture a specific portion of the screen, you can use the “Command + Shift + 4” keyboard shortcut. This will activate the screen capture mode with crosshairs. Click and drag to select the desired area, then release the mouse button to capture the screenshot. The selected portion will be saved as a PNG file on your desktop.
- 5. Saving Screenshots to Desired Locations: By default, macOS saves screenshots on your desktop. However, if you prefer to save them to a different location, such as a specific folder or an external drive, you can easily change the default save location. Simply open Terminal and enter the command “defaults write com.apple.screencapture location [path]” (replace [path] with the desired location).
With these various methods at your disposal, capturing screenshots on your MacBook Pro becomes a breeze. Experiment with different techniques to find the one that works best for you. Now that you know the overview of the different ways to take a screenshot on your MacBook Pro, let’s dive into each method in more detail.
Using Keyboard Shortcuts
One of the quickest and most accessible methods to take a screenshot on your MacBook Pro is by using keyboard shortcuts. macOS provides a range of keyboard combinations that allow you to capture different areas of your screen with ease.
To capture the entire screen, simply press the “Command + Shift + 3” keys simultaneously. The screenshot will be instantly saved as a PNG file on your desktop. This method is perfect for capturing the full content of your screen, including multiple windows, menus, and the dock.
If you only need to capture a specific portion of the screen, you can use the “Command + Shift + 4” keys. This activates the screen capture mode, where your cursor will transform into crosshairs. Click and drag to create a rectangular selection around the area you want to capture. Once you release the mouse button, the selected portion will be saved as a PNG file on your desktop.
You can also use keyboard shortcuts to capture a specific window. Press “Command + Shift + 4” to enter the screen capture mode, then press the spacebar. Your cursor will change into a camera icon. Simply move the camera over the desired window, and it will be highlighted. Click on the window to capture a screenshot of it. The captured image will be saved as a PNG file on your desktop.
Keyboard shortcuts offer a convenient and speedy way to capture screenshots on your MacBook Pro. You can easily become accustomed to these shortcuts and dramatically increase your productivity when it comes to capturing and saving screen content.
Remember to experiment with different keyboard combinations to find the method that works best for your needs. Whether you’re capturing the entire screen, a specific portion, or a selected window, keyboard shortcuts provide a seamless and efficient way to take screenshots on your MacBook Pro.
Using the Grab Application
In addition to the keyboard shortcuts provided by macOS, you can also utilize the Grab application to capture screenshots on your MacBook Pro. Grab offers a more advanced set of tools and features for capturing screen content.
The Grab application is included in the Utilities folder, which you can find within your Applications directory. To open Grab, simply go to Finder, click on the “Go” menu, and select “Utilities”. Look for the Grab icon and double-click to launch the application.
Once Grab is open, you’ll have several options for capturing screenshots. The application allows you to capture the entire screen, a selection, a specific window, or even a timed screenshot.
To capture the entire screen using Grab, go to the “Capture” menu and select “Screen”. This will capture the entire content of your screen and display it in a new Grab window. From here, you can save the screenshot in your desired format and location.
If you want to capture a specific window, click on “Capture” in the menu bar and choose “Window”. A crosshair cursor will appear, and you can click on the window you want to capture. The selected window will be highlighted, and the screenshot will be shown in a new Grab window for you to save.
Grab also provides the option to capture a specific selection of the screen. Choose “Capture” from the menu bar and select “Selection”. The cursor will change into crosshairs, and you can click and drag to create a rectangular selection around the desired area. Once released, the selected portion will be displayed in a new Grab window.
If you need to capture a timed screenshot, go to the “Capture” menu and click on “Timed Screen”. This option gives you a 10-second timer before capturing the screen. This is useful when you need to capture a specific moment or set up the screen for a screenshot.
Using Grab provides you with additional flexibility and control when it comes to capturing screenshots on your MacBook Pro. Whether you need to capture the entire screen, specific windows, or selected areas, the Grab application offers a range of tools to fulfill your needs.
Take advantage of the different capture options within Grab and explore its features to enhance your screenshot-taking capabilities on your MacBook Pro.
Taking a Screenshot of a Specific Window
If you want to capture a specific window on your MacBook Pro, there is a simple method to do so. This approach is especially useful when you only need to capture a single window instead of the entire screen.
To take a screenshot of a specific window, start by pressing the “Command + Shift + 4” keys simultaneously. This keyboard shortcut activates the screen capture mode. Once you see the crosshair cursor, press the spacebar. You will notice that the cursor transforms into a small camera icon.
With the camera icon enabled, move your cursor over the window you want to capture. As you hover over different windows, they will be highlighted and have a blue shadow. Click on the window you want to capture, and it will be outlined in a subtle gray border.
Once you click, the screenshot of the designated window will be taken and saved as a PNG file on your desktop. By default, the screenshot file will be named “Screen Shot [date] at [time].png”. You can easily edit or rename the file as needed.
This method of capturing specific windows provides a precise way to capture content without including any unrelated parts of the screen. It is particularly helpful when you want to highlight a specific application, dialogue box, or other focused windows in your screenshot.
Keep in mind that if you prefer to capture multiple windows or the entire screen, you can utilize other keyboard shortcuts we discussed earlier. However, when you only need to capture a specific window, this method ensures a clean and focused screenshot.
With the ability to easily capture specific windows on your MacBook Pro, you can efficiently convey information or save relevant content for future reference.
Taking a Screenshot of a Selected Portion of the Screen
If you have the need to capture a specific portion of your screen on your MacBook Pro, you can easily do so by taking a screenshot of a selected area. This method allows you to capture and save only the part of the screen that is relevant to your needs.
To begin, press the “Command + Shift + 4” keys simultaneously. This keyboard shortcut activates the screen capture mode, which is indicated by a crosshair cursor.
With the crosshair cursor active, click and drag your mouse to select the desired portion of the screen that you want to capture. As you drag, you’ll notice that the selected area is highlighted and outlined by a semi-transparent rectangle.
Once you’ve selected the area, release the mouse button. At this point, the screenshot of the selected portion will be taken, and it will be saved as a PNG file on your desktop.
By default, the screenshot file will be named “Screen Shot [date] at [time].png”, but you can easily rename or edit the file as needed.
This method allows you to capture specific parts of the screen, whether it’s a particular image, text, or any other element that you want to highlight or refer to later.
The ability to take screenshots of selected portions of the screen provides flexibility and precision when it comes to capturing exactly what you need, without including irrelevant content. It’s particularly useful when you want to draw attention to a specific detail or focus on a specific area of interest.
Experiment with this method to master the art of capturing selected portions of your screen on your MacBook Pro. It will undoubtedly enhance your ability to convey information effectively and efficiently.
Saving Screenshots to Desired Locations
By default, when you capture a screenshot on your MacBook Pro, the image file is saved on your desktop. However, you have the flexibility to save screenshots to different locations of your choosing. This is particularly useful if you prefer to keep your desktop clutter-free or have a specific folder where you save your screenshots.
To change the default save location for screenshots, you can use the Terminal application on your MacBook Pro.
Here’s how to change the default location:
- Open the Terminal application by going to “Applications” > “Utilities” > “Terminal”.
- Type the following command and press enter:
defaults write com.apple.screencapture location [path](Replace [path] with the desired location where you want to save your screenshots. For example, if you want to save them in a folder called “Screenshots” on your desktop, enter:
defaults write com.apple.screencapture location ~/Desktop/Screenshots) - Once you’ve entered the command, press enter to execute it.
- After making this change, you need to restart the SystemUIServer for the changes to take effect. You can do this by entering the following command in Terminal and pressing enter:
killall SystemUIServer
After following these steps, any new screenshots you capture on your MacBook Pro will be saved in the location you specified, rather than on the desktop.
This customization option allows you to keep your screenshots organized and easily accessible. You can create specific folders to organize your screenshots by date, project, or any other categorization that suits your needs.
Remember, if you ever want to revert to the default save location (desktop), you can use the following command in Terminal:
defaults write com.apple.screencapture location ~/DesktopHaving the ability to save screenshots to desired locations gives you greater control over where your captured images are stored and allows for better organization and accessibility.
Conclusion
Taking screenshots on your MacBook Pro is a valuable skill that can enhance your productivity and communication. With a variety of methods available, capturing and saving screen content becomes a breeze.
We’ve explored different ways to take screenshots on your MacBook Pro, including keyboard shortcuts, the Grab application, capturing specific windows, and selecting portions of the screen. Each method provides its own advantages and allows you to capture exactly what you need, whether it’s the entire screen or a specific detail.
Keyboard shortcuts offer a quick and easy way to capture screenshots with just a few keystrokes. The Grab application provides additional features and tools, allowing for more advanced capturing options. Taking screenshots of specific windows or selecting portions of the screen ensures precise and focused captures.
Moreover, customizing the save location of your screenshots allows you to keep your desktop organized and easily access your captured images.
By mastering the art of taking screenshots on your MacBook Pro, you can efficiently capture and save important information, communicate effectively, troubleshoot technical issues, and keep a record of memorable moments.
So, start exploring the various methods discussed in this article and find the ones that work best for you. With practice, you’ll become adept at capturing and saving screenshots on your MacBook Pro, empowering you to effectively convey information and streamline your workflow.