Introduction
When it comes to capturing screenshots on your Dell Ultrabook, there are several methods you can utilize. Whether you need to capture an important document, save a memorable moment from a video, or simply share an interesting web page with others, knowing how to take screenshots on your Dell Ultrabook can be incredibly useful.
In this article, we will explore various methods that you can use to take screenshots on your Dell Ultrabook. From using the Print Screen button to employing the Windows Snipping Tool and the Dell Capture App, we will guide you through each step. Additionally, we will discuss alternative third-party applications that can further enhance your screenshot-taking experience.
Having the ability to capture screenshots not only allows you to preserve important information, but it also enables you to share your screen contents with ease. Whether you are a student, a professional, or a tech-savvy individual, mastering the art of taking screenshots on your Dell Ultrabook is an essential skill.
So, whether you’re an experienced Dell Ultrabook user or have recently acquired one, let’s dive into the various methods you can use to capture screenshots and discover how these techniques can streamline your digital workflow.
Step 1: Using the Print Screen Button
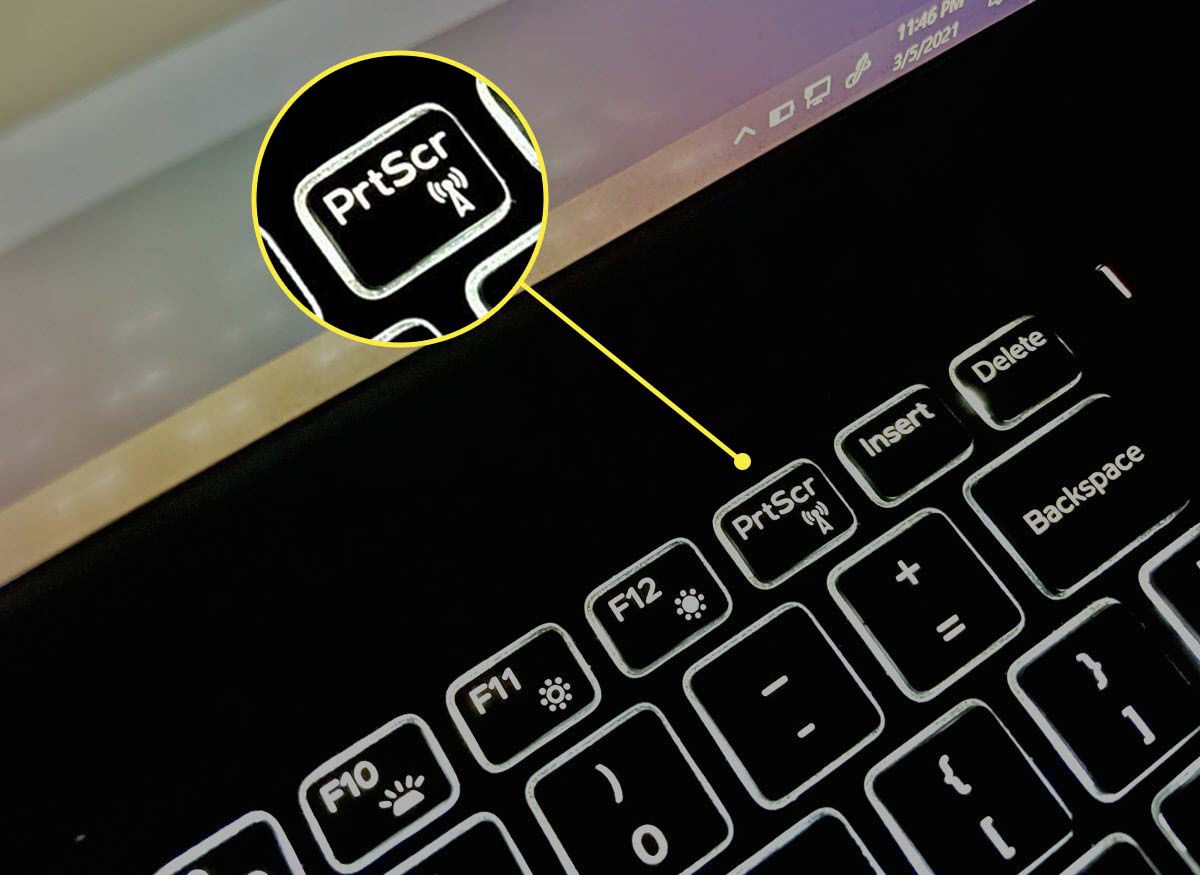
One of the simplest and most common ways to capture a screenshot on your Dell Ultrabook is by using the Print Screen button. This button, usually labeled as “PrtScn” or “Print Scr,” is located on the top row of your keyboard.
To capture a screenshot using the Print Screen button, follow these simple steps:
- Ensure that the screen you want to capture is on your Dell Ultrabook display.
- Press the Print Screen button on your keyboard. You won’t receive any notification that the screenshot has been taken.
- Open an image editing program, such as Microsoft Paint or Photoshop, or even a word processing software like Microsoft Word.
- Press Ctrl + V or go to the Edit menu and select Paste to paste the screenshot into the program.
- Edit the screenshot as desired, such as cropping or adding annotations.
- Save the image to your preferred location on your Dell Ultrabook.
Using the Print Screen button is a quick and convenient way to capture a screenshot. However, it captures the entire screen, so if you only need to capture a specific portion of the screen, you may want to explore other methods.
Now that we’ve covered how to capture a screenshot using the Print Screen button, let’s move on to the next method: using the Windows Snipping Tool.
Step 2: Using the Windows Snipping Tool
If you’re looking for more flexibility in capturing screenshots on your Dell Ultrabook, the Windows Snipping Tool is a powerful built-in tool that allows you to capture specific parts of your screen or entire windows.
To use the Windows Snipping Tool, follow these steps:
- Open the Start menu and search for “Snipping Tool.” Click on the Snipping Tool app to launch it.
- In the Snipping Tool window, click on the “New” button. Your screen will turn gray, and a crosshair cursor will appear.
- Click, hold, and drag your cursor to select the specific portion of the screen you want to capture. Release the mouse button to take the screenshot.
- The captured screenshot will now appear in the Snipping Tool window. From here, you can use various annotation tools to mark up the screenshot if needed.
- Once you’re satisfied with the screenshot, click on the “Save” button in the Snipping Tool window to save it to your desired location on your Dell Ultrabook.
The Windows Snipping Tool provides you with more control over the selection and capture of your screenshots. From capturing a specific area of a webpage to capturing a particular error message, the Snipping Tool allows you to capture exactly what you need.
Now that you’re familiar with using the Windows Snipping Tool, let’s move on to the Dell Capture App, which is a specialized screenshot tool provided by Dell for their Ultrabooks.
Step 3: Using the Dell Capture App
If you own a Dell Ultrabook, you may have access to the Dell Capture App, a pre-installed application designed specifically for capturing screenshots on Dell devices. The Dell Capture App offers a variety of features and customization options to enhance your screenshot-taking experience.
Follow these steps to use the Dell Capture App:
- Locate and open the Dell Capture App on your Dell Ultrabook. It may be found in the Dell apps folder or in the system tray.
- In the Dell Capture App, you will find different screenshot options, such as capturing the entire screen, a specific window, or a selected area.
- Select the desired screenshot option based on your specific requirement.
- Once you have chosen the capture method, click on the “Capture” button to take the screenshot.
- The screenshot will be automatically saved to a default location predetermined by the Dell Capture App. You can also specify a custom location if needed.
- Open the location where the screenshot has been saved to view and edit it as needed.
The Dell Capture App provides a streamlined and user-friendly interface, allowing you to quickly capture screenshots without the need for any external tools or additional settings.
Now that we’ve covered the Dell Capture App, let’s explore the option of using third-party applications for capturing screenshots on your Dell Ultrabook.
Step 4: Using Third-Party Applications
If you’re looking for additional features and advanced functionalities beyond what the built-in options offer, you might consider using third-party applications to capture screenshots on your Dell Ultrabook. There are numerous options available, each with its own unique set of features.
Here are some popular third-party applications for capturing screenshots:
- Snagit: Snagit is a versatile screenshot tool that provides a wide range of features, including screen recording, scrolling capture, and image editing capabilities.
- Lightshot: Lightshot is a lightweight and user-friendly screenshot tool that allows you to capture specific areas of the screen, annotate the captured image, and share it online.
- Greenshot: Greenshot offers a simple and intuitive interface, enabling you to capture screenshots, add annotations, and save or share them effortlessly.
- PicPick: PicPick is a comprehensive screenshot tool that not only allows you to capture screenshots but also provides additional features like image editing, color picker, and pixel ruler.
When choosing a third-party application, consider your specific requirements, such as desired features, ease of use, and compatibility with your Dell Ultrabook’s operating system.
Once you have selected a third-party application, follow the instructions provided by the application to capture and save screenshots on your Dell Ultrabook.
By utilizing third-party applications, you can have more control and flexibility in capturing and editing screenshots, elevating your productivity and enhancing your overall user experience.
Now that we have explored the various methods of capturing screenshots on your Dell Ultrabook, let’s summarize what we’ve learned.
Conclusion
Capturing screenshots on your Dell Ultrabook is a handy skill that can enhance your productivity, assist in troubleshooting, and simplify content sharing. We have explored several methods to capture screenshots, from using the Print Screen button to utilizing the Windows Snipping Tool, the Dell Capture App, and third-party applications.
The Print Screen button offers a quick and simple way to capture screenshots, while the Windows Snipping Tool provides more control and allows you to capture specific areas of your screen. The Dell Capture App is a specialized tool tailored for Dell Ultrabooks, offering a user-friendly interface and convenient options for capturing screenshots. Finally, third-party applications offer advanced features and customization for those seeking additional functionalities.
Whether you need to capture an important document, share a moment from a video, or highlight an error message, these methods have you covered. Choose the method that best suits your needs and explore its features to capture and save screenshots effortlessly.
Remember to experiment with editing tools available in various applications to enhance your screenshots, such as cropping, annotating, or adding captions. This allows you to convey your message clearly and effectively.
Now that you are equipped with the knowledge to capture screenshots on your Dell Ultrabook, you can save valuable information, share important content, and streamline your digital workflow. So go ahead, start capturing those screenshots, and make the most out of your Dell Ultrabook!