Introduction
Screen shots, also known as screenshots, are a convenient way to capture and save images of your computer screen. They can be helpful for various purposes, such as troubleshooting tech issues, creating instructional guides, or simply capturing memorable moments from your digital interactions.
If you’re using a Dell computer, you’ll be pleased to know that there are several methods available to take screen shots effortlessly. In this article, we will explore seven different methods that you can use to capture screen shots on your Dell computer, ranging from using keyboard shortcuts to utilizing dedicated screenshot tools.
By having a variety of options, you can choose the method that suits your preference and specific needs. Whether you’re a casual user looking for a quick way to capture a screen shot or a professional who requires advanced editing features, there’s a method for everyone.
Each method mentioned here is designed for different scenarios and accessibility. Some methods may require built-in software or third-party applications. Additionally, certain methods may be more suitable for capturing the entire screen, a specific window, or a particular area of the screen.
In the following sections, we’ll dive into each method in detail, providing step-by-step instructions to help you capture screen shots effectively on your Dell computer. So, without further ado, let’s jump right into the first method: using the PrtScn button.
Method 1: Using the PrtScn Button
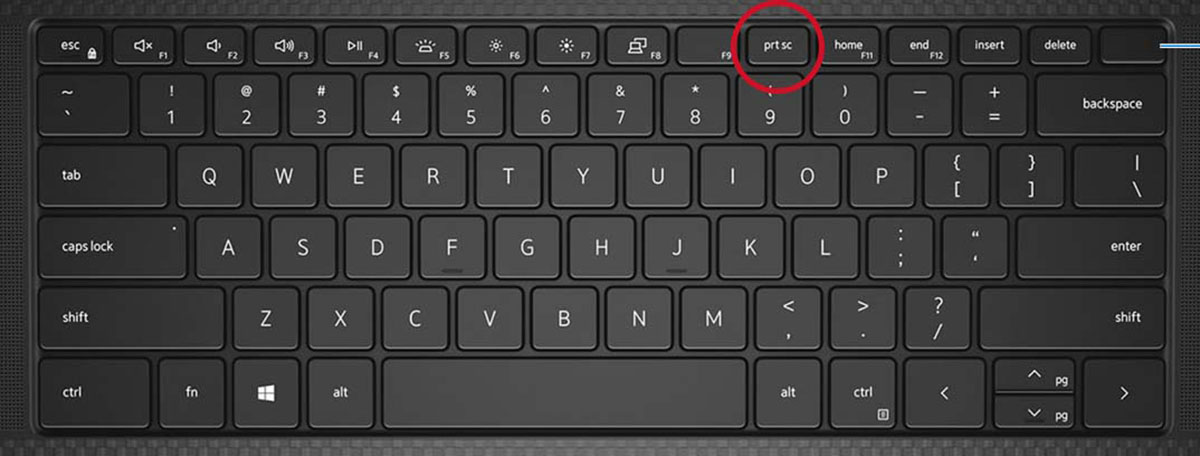
The PrtScn button, which stands for “Print Screen,” is a commonly used method to capture screen shots on Dell computers. This method allows you to capture an image of the entire screen and save it to the clipboard, which you can then paste into an image editing software or document.
To use this method, follow these steps:
- Locate the PrtScn button on your Dell keyboard. It is typically located in the top row, above the numeric keys.
- Make sure the content you want to capture is visible on your screen.
- Press the PrtScn button. You won’t notice any immediate visual change, but the screen shot will be saved to your clipboard.
- Open an image editing software or a document where you want to paste the screen shot.
- Press Ctrl + V or right-click and select Paste to insert the screen shot from the clipboard.
Once you’ve pasted the screen shot, you can further edit or save it according to your needs. This method is quick, straightforward, and doesn’t require any additional software.
However, it’s important to note that using the PrtScn button captures the entire screen. If you want to capture a specific window or a particular area of the screen, you may need to consider alternative methods, which we will explore in the following sections.
Now that you know how to use the PrtScn button to capture screen shots on your Dell computer, let’s move on to the next method: using the Alt + PrtScn buttons.
Method 2: Using the Alt + PrtScn Buttons
If you want to capture a specific window rather than the entire screen, using the Alt + PrtScn buttons is an effective method on Dell computers. This method allows you to capture the active window and save it to the clipboard for further use.
To use this method, follow these steps:
- Ensure the window you want to capture is active and visible on your Dell computer screen.
- Press the Alt + PrtScn buttons simultaneously. This will capture the active window and save it to your clipboard.
- Open an image editing software or a document where you want to paste the screen shot.
- Press Ctrl + V or right-click and select Paste to insert the screen shot from the clipboard.
Once you’ve pasted the screen shot, you can edit or save it according to your requirements. This method is particularly useful when you only need to capture a specific window and don’t want to include the rest of the screen in the screen shot.
However, it’s important to note that using the Alt + PrtScn buttons captures only the active window. If you have multiple windows open, make sure the desired window is in focus before using this method.
Now that you know how to capture a specific window using the Alt + PrtScn buttons on your Dell computer, let’s move on to the next method: using the Windows + PrtScn buttons.
Method 3: Using the Windows + PrtScn Buttons
If you’re using a Dell computer with a Windows operating system, you can take advantage of the built-in Windows + PrtScn buttons to capture screen shots effortlessly. This method allows you to capture the entire screen and automatically saves the image to a designated “Screenshots” folder on your computer.
Here’s how you can use the Windows + PrtScn buttons to capture screen shots on your Dell computer:
- Ensure the content you want to capture is visible on your screen.
- Press the Windows + PrtScn buttons simultaneously. You might notice a brief dimming of the screen, indicating that the screen shot has been captured.
- Open the “Screenshots” folder on your computer. This folder is typically located in the “Pictures” directory.
- You will find the captured screen shot saved with a timestamp in the “Screenshots” folder.
Using the Windows + PrtScn buttons offers the convenience of automatically saving the screen shot to a specific folder, eliminating the need to paste it into an image editing software or document manually. This method is particularly useful if you want to quickly capture multiple screen shots without interrupting your workflow.
However, it’s important to note that using the Windows + PrtScn buttons captures the entire screen and doesn’t offer the flexibility to capture a specific window or a selected area. If you need more control over what you capture, consider exploring the alternative methods we will discuss in the following sections.
Now that you know how to use the Windows + PrtScn buttons to capture screen shots on your Dell computer, let’s move on to the next method: using the Windows + Shift + S shortcuts.
Method 4: Using the Windows + Shift + S Shortcuts
Another handy method that you can use to capture screen shots on your Dell computer is by utilizing the Windows + Shift + S shortcuts. This method allows you to capture a selected area of the screen and save it to the clipboard for further use.
Follow these steps to use the Windows + Shift + S shortcuts:
- Make sure the content you want to capture is visible on your Dell computer screen.
- Press the Windows + Shift + S buttons simultaneously. This will activate the snipping tool.
- A smaller toolbar will appear at the top of your screen, offering options to capture a rectangular or freeform area.
- Select the desired snipping mode and use your cursor to draw around the area you want to capture.
- The captured area will be saved to your clipboard.
- Open an image editing software or a document where you want to paste the screen shot.
- Press Ctrl + V or right-click and select Paste to insert the screen shot from the clipboard.
Once you’ve pasted the screen shot, you can edit or save it according to your requirements. This method provides flexibility by allowing you to capture specific areas of the screen, making it ideal for highlighting specific details or cropping out unnecessary elements.
It’s important to note that the Windows + Shift + S shortcuts are available on Windows 10 and later versions. If you’re using an older version of Windows, consider exploring alternative methods or upgrading your operating system.
Now that you know how to use the Windows + Shift + S shortcuts to capture screen shots on your Dell computer, let’s move on to the next method: using the Snipping Tool.
Method 5: Using the Snipping Tool
If you’re using a Dell computer with Windows operating system, you can utilize the Snipping Tool to capture screen shots with more control and flexibility. The Snipping Tool is a built-in screenshot utility in Windows that allows you to capture selected areas, windows, or the entire screen, and provides additional editing options.
Here’s how you can use the Snipping Tool to capture screen shots on your Dell computer:
- Open the Start menu and search for “Snipping Tool”. Click on the Snipping Tool app to open it.
- Click on “New” in the Snipping Tool window.
- A crosshair cursor will appear. Click and drag the cursor to select the area you want to capture.
- Release the mouse button to capture the selected area.
- The captured screen shot will open in the Snipping Tool editor, where you can annotate, highlight, or save it.
- In the Snipping Tool editor, click on “File” and select “Save As” to save the screen shot to your desired location.
The Snipping Tool provides various snipping modes, including Free-form Snip, Rectangular Snip, Window Snip, and Full-screen Snip. These options allow you to capture specific areas, windows, or the entire screen, depending on your needs.
In addition to capturing screen shots, the Snipping Tool offers basic editing features, such as highlighting, drawing, and adding text. This can be useful if you want to emphasize certain elements or provide additional context to your screen shots.
Now that you know how to use the Snipping Tool to capture screen shots on your Dell computer, let’s move on to the next method: using the Snip & Sketch tool.
Method 6: Using the Snip & Sketch Tool
The Snip & Sketch tool is a modern and versatile screenshot tool available on Dell computers running Windows 10. This tool provides an enhanced user interface and additional features compared to the Snipping Tool, making it a powerful option for capturing and editing screen shots.
Here’s how you can use the Snip & Sketch tool to capture screen shots on your Dell computer:
- Open the Start menu and search for “Snip & Sketch”. Click on the Snip & Sketch app to launch it.
- Click on “New” or press the “Print Screen” (PrtScn) button on your keyboard to start capturing.
- A white overlay will appear on your screen, indicating that the Snip & Sketch tool is active.
- Select the desired snipping mode from the toolbar at the top – Rectangular Snip, Freeform Snip, Window Snip, or Fullscreen Snip.
- Use your cursor to select the area or window you want to capture.
- The captured screen shot will be loaded in the Snip & Sketch editor, where you can annotate, crop, or save it.
- In the Snip & Sketch editor, click on “File” and select “Save As” to save the screen shot to your preferred location.
The Snip & Sketch tool offers a seamless capturing experience and provides advanced editing options. You can use the pencil, highlighter, and pen tools to annotate the screen shot, add text, or crop and resize the image to your liking.
Additionally, the Snip & Sketch tool allows you to take delayed screen shots, set up a window snip using the Alt + Print Screen shortcut, and easily share your screen shots with others.
Now that you know how to use the Snip & Sketch tool to capture screen shots on your Dell computer, let’s move on to the next method: using third-party screenshot apps.
Method 7: Using Third-Party Screenshot Apps
In addition to the built-in screenshot tools, there are several third-party apps available that offer advanced features and customization options for capturing screen shots on your Dell computer. These apps provide a wide range of functionalities, such as capturing specific areas, editing, annotating, and sharing screen shots.
Here are some popular third-party screenshot apps that you can consider using:
- Snagit: Snagit is a comprehensive screen capture and screen recording software that offers powerful editing and sharing capabilities. With Snagit, you can capture screenshots, customize them with various effects and annotations, and share them in multiple formats.
- Greenshot: Greenshot is a lightweight and open-source screenshot tool that allows you to capture screenshots, annotate them, and save them in different formats. It offers configurable hotkeys, output destinations, and various capture modes.
- Lightshot: Lightshot is a simple yet effective screenshot tool that enables you to capture specific areas, add annotations, and share your screen shots online. It also offers a built-in image editor for quick edits before saving or sharing.
When choosing a third-party screenshot app, consider your specific needs and preferences. Look for apps that offer the features and functionality you require, while also considering factors such as ease of use, compatibility with your operating system, and available support.
Once you have selected and installed a third-party screenshot app on your Dell computer, familiarize yourself with its features and shortcuts. These apps often provide a variety of capturing options and editing tools, allowing you to tailor your screen shots to meet your specific requirements.
Now that you are aware of the various third-party screenshot apps available for your Dell computer, you can explore these options for additional functionality and customization.
With the completion of this section, we have covered seven different methods for capturing screen shots on a Dell computer. Each method offers its unique advantages and can be utilized based on your specific needs and preferences. It is recommended to experiment with different methods and determine the one that best suits your requirements.
Conclusion
Capturing screen shots on your Dell computer can be a useful skill to have, whether you need to troubleshoot technical issues, create instructional guides, or simply save memorable moments from your digital experiences. In this article, we have explored seven different methods you can use to capture screen shots on your Dell computer.
From the simplicity of using the PrtScn button to the advanced features offered by third-party screenshot apps, each method has its own advantages and can be selected based on your specific requirements.
The PrtScn button, Alt + PrtScn buttons, Windows + PrtScn buttons, and Windows + Shift + S shortcuts are built-in methods that provide quick and convenient ways to capture screen shots without the need for additional software. These methods allow you to capture the full screen or selected windows and areas, providing flexibility based on what you want to capture.
The Snipping Tool and Snip & Sketch tool offer more advanced features, such as editing and annotating capabilities, making them ideal for users who require additional customization and enhancements in their screen shots.
For users seeking even more features and customization options, third-party screenshot apps like Snagit, Greenshot, and Lightshot offer comprehensive solutions. These apps provide extensive editing tools, image annotations, and advanced sharing features.
With these various methods at your disposal, you can choose the one that best suits your needs and preferences. Explore and experiment with different methods to find the workflow that works best for you.
Remember, capturing screen shots is not just about capturing images; it’s about communicating and conveying information effectively. Use the appropriate method for each situation and be mindful of the content you want to capture.
With the knowledge gained from this article, you can confidently capture screen shots on your Dell computer and enhance your digital experience, troubleshooting, and communication capabilities.