Introduction
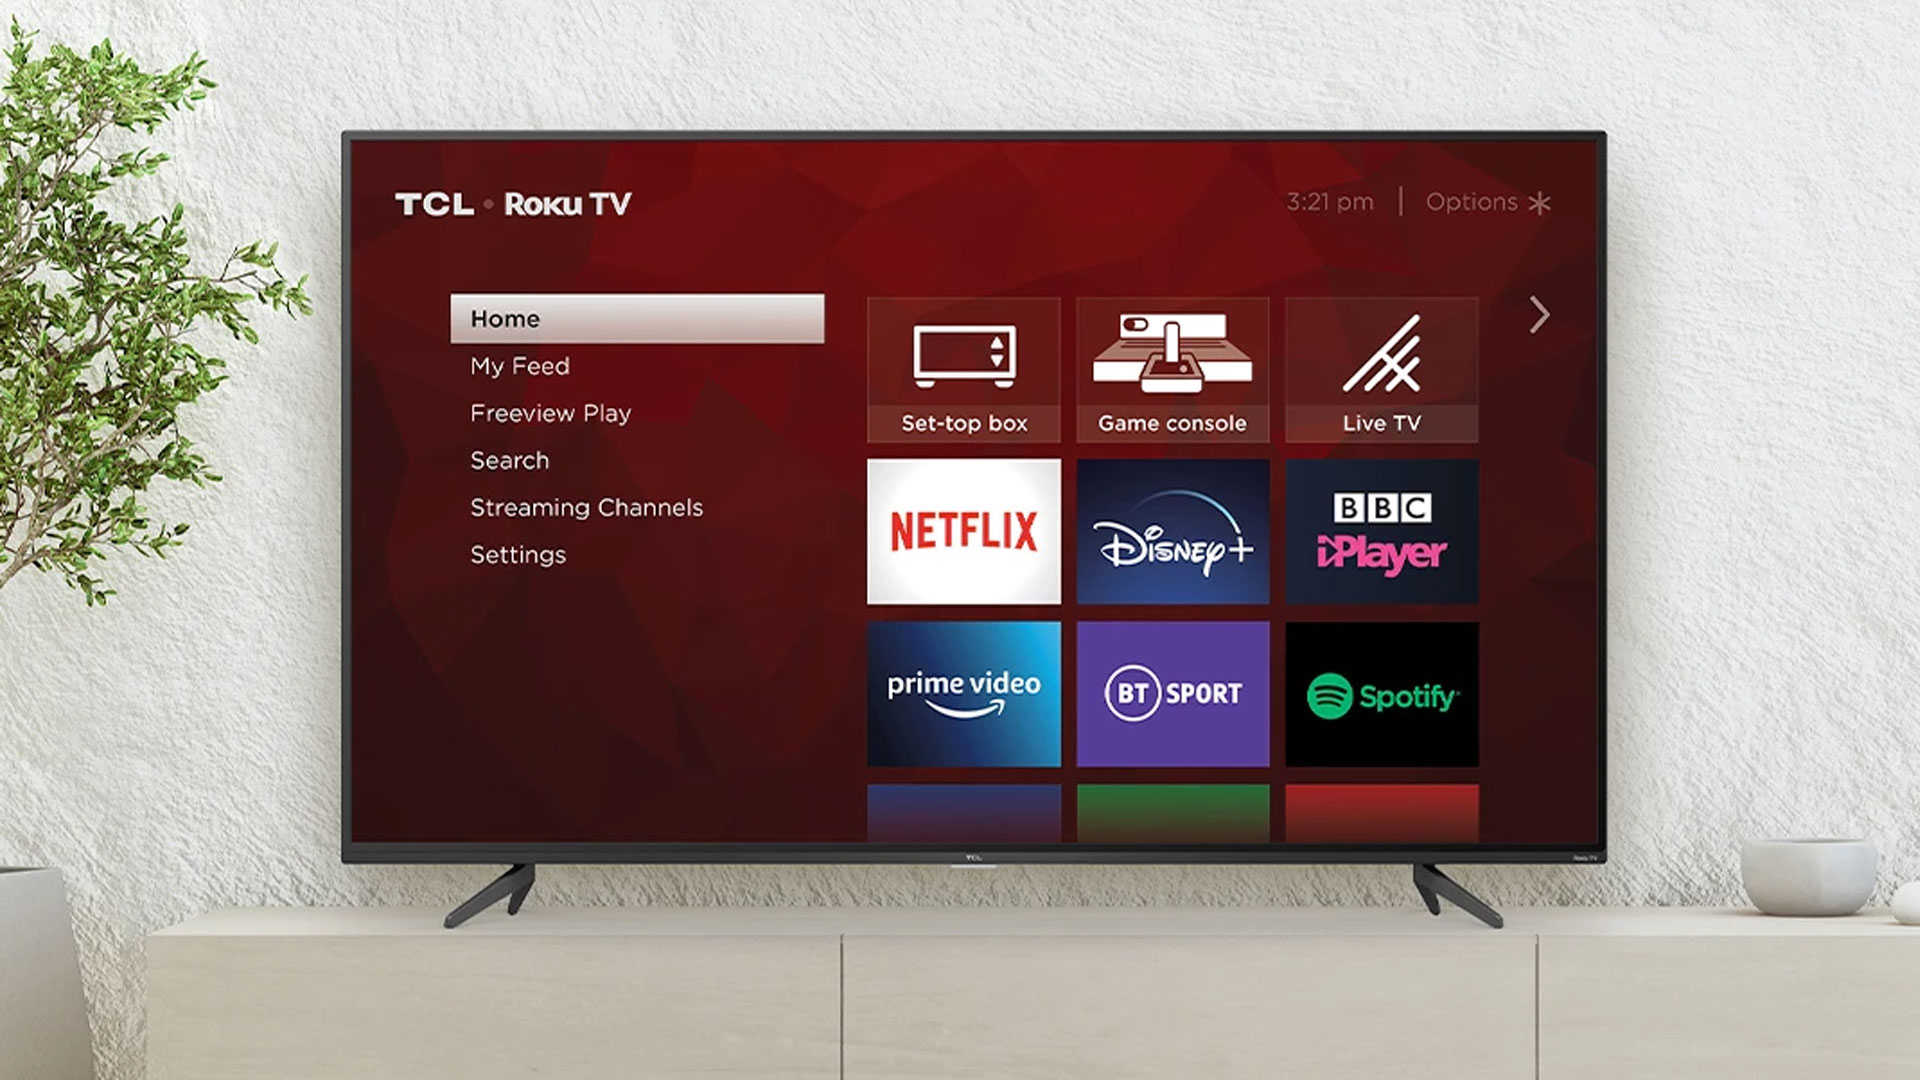
Welcome to the world of Roku TV, where you have access to a wide range of entertainment options at your fingertips. Roku TV combines the convenience of streaming platforms with the traditional TV experience, offering you a seamless way to enjoy your favorite shows, movies, and more.
One of the key features of Roku TV is the ability to scan for channels. Channel scanning allows you to discover and add both over-the-air channels and streaming channels to your Roku TV lineup. By performing a channel scan, you can ensure that you have access to all available channels in your area.
In this guide, we will take you through the step-by-step process of scanning channels on your Roku TV. Whether you’re setting up your Roku TV for the first time or looking to update your channel lineup, this guide will provide you with all the information you need.
But before we dive into the details, let’s take a moment to understand why channel scanning is important. With the ever-growing number of over-the-air channels and streaming services available, it’s essential to ensure that your Roku TV is tuned to the right frequencies and has the latest channel updates. By regularly scanning for channels, you can enjoy a variety of content options and never miss out on the latest shows, sports events, or live news broadcasts.
Now that we’ve covered the importance of channel scanning, let’s get started on the step-by-step process. Whether you’re using an antenna or streaming services, the process is simple and easy to follow. So, grab your remote, sit back, and get ready to explore the world of entertainment with your Roku TV!
Understanding Channel Scanning on Roku TV
If you’re new to Roku TV or unfamiliar with channel scanning, don’t worry – we’ve got you covered. Channel scanning is the process of searching for and adding channels to your Roku TV lineup. This includes both traditional over-the-air channels and streaming channels.
When it comes to over-the-air channels, Roku TV utilizes an antenna to receive signals and display them on your television. By scanning for over-the-air channels, you can access free content, including local news, weather updates, and even some popular network shows. It’s a great way to enhance your TV viewing experience and expand your channel options without the need for a cable or satellite subscription.
In addition to over-the-air channels, Roku TV also provides access to a wide range of streaming channels. These streaming channels offer a diverse selection of content, including movies, TV shows, live sports, news, documentaries, and much more. By scanning for streaming channels, you can discover new and exciting content to suit your interests and preferences.
Now that you understand the basics of channel scanning, let’s explore the step-by-step process of scanning channels on your Roku TV. Whether you’re using an antenna or relying solely on streaming services, the process is quite straightforward and can be done in just a few minutes.
Before we proceed with the step-by-step instructions, it’s worth noting that the exact steps may vary slightly depending on the specific model of your Roku TV and the version of the Roku operating system. However, the overall process remains consistent across all Roku TV devices.
With that said, let’s move on to the next section where we’ll guide you through the first step of accessing the Antenna TV input on your Roku TV.
Step 1: Access the Antenna TV input
Before you can start scanning for channels on your Roku TV, you need to ensure that you’re accessing the correct input source. If you’re using an antenna to receive over-the-air channels, follow the instructions below to access the Antenna TV input:
- Grab your Roku TV remote and press the Home button to access the main menu.
- Using the arrow keys on your remote, navigate to the left side of the screen to find the Settings option.
- Press the OK button on your remote to enter the Settings menu.
- In the Settings menu, scroll down and select TV Inputs using the arrow keys.
- Press the OK button to access the TV Inputs settings.
- Here, you’ll see a list of available input sources. Look for the one that is labeled as Antenna TV or TV. This is the input you’ll need to select to proceed with the channel scanning process.
- Use the arrow keys to highlight the Antenna TV input, and press the OK button to select it.
Now that you’ve successfully accessed the Antenna TV input on your Roku TV, you’re ready to move on to the next step of the channel scanning process. In the next section, we’ll guide you through the process of opening the Settings menu to continue scanning for channels.
Step 2: Open the Settings Menu
After accessing the Antenna TV input on your Roku TV, the next step is to open the Settings menu. The Settings menu is where you’ll find all the necessary options to configure and customize your Roku TV’s settings, including the channel scanning feature.
Follow these steps to open the Settings menu on your Roku TV:
- Ensure that you are on the Antenna TV input screen.
- Using the Roku TV remote, press the Home button to go back to the main menu.
- Using the arrow keys, navigate to the right side of the screen to find the Settings option.
- Once you’ve highlighted the Settings option, press the OK button on your remote to open the Settings menu.
By now, you should see the Settings menu displayed on your screen. This menu provides access to various settings and options for your Roku TV, including display settings, audio settings, network settings, and more.
Now that you have successfully accessed the Settings menu, you’re ready to proceed to the next step, which is selecting the “TV Inputs” option and choosing the Antenna TV input. This action will enable you to start the channel scanning process on your Roku TV.
Step 3: Select “TV Inputs” and choose the Antenna TV input
Now that you have accessed the Settings menu on your Roku TV, it’s time to select the “TV Inputs” option and choose the Antenna TV input. This step is crucial as it allows your Roku TV to recognize and scan the over-the-air channels received through your antenna.
Follow these steps to select “TV Inputs” and choose the Antenna TV input:
- Ensure that you are in the Settings menu.
- Using the arrow keys on your Roku TV remote, navigate down until you see the “TV Inputs” option.
- Highlight the “TV Inputs” option and press the OK button on your remote to enter the TV Inputs settings.
- In the TV Inputs settings, you will see a list of available input sources. Look for the input that corresponds to your Antenna TV. It may be labeled as “Antenna TV”, “TV”, or something similar.
- Use the arrow keys to highlight the Antenna TV input and press the OK button on your remote to select it.
By selecting the Antenna TV input, you are telling your Roku TV to focus on scanning for over-the-air channels rather than streaming channels or other input sources. This step ensures that the channel scan includes all the available over-the-air channels in your area.
Once you have chosen the Antenna TV input, you are ready to move on to the next step – initiating the channel scan. In the next section, we will guide you through the process of starting the channel scan on your Roku TV.
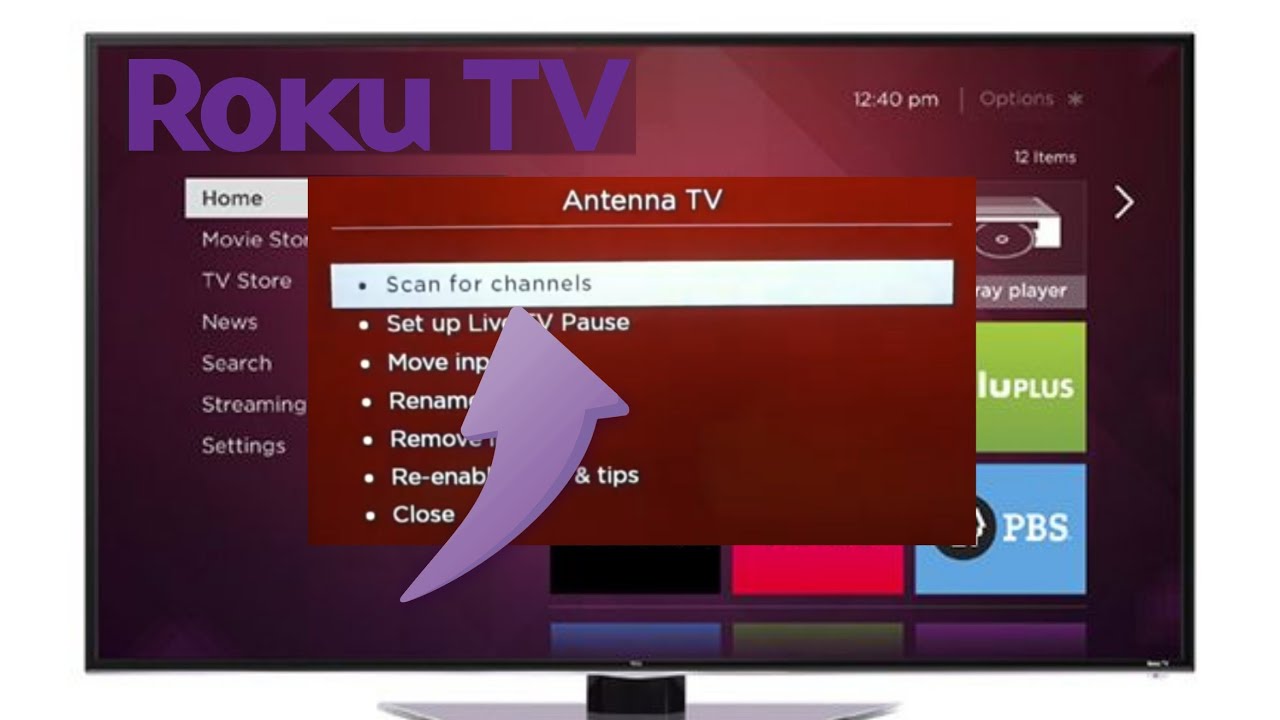
Step 4: Choose “Scan Again” to Start the Channel Scan
With the Antenna TV input selected on your Roku TV, it’s time to start the channel scan. The channel scan will search for all available over-the-air channels in your area and add them to your Roku TV’s lineup.
Follow these steps to initiate the channel scan:
- Make sure you are in the TV Inputs settings menu.
- Using the arrow keys on your Roku TV remote, navigate down until you see the “Antenna TV” input.
- Highlight the Antenna TV input and press the OK button on your remote to access the input settings.
- Within the Antenna TV input settings, navigate down until you see the “Scan Again” option.
- Highlight the “Scan Again” option and press the OK button on your remote to initiate the channel scan.
Once you have selected the “Scan Again” option, your Roku TV will begin the process of scanning for over-the-air channels. The scan process may take several minutes, so it’s important to be patient and allow the scan to complete.
During the channel scan, your Roku TV will search for all available over-the-air channels in your area. It will identify and add each channel to your lineup, enabling you to access them through the channel guide or by directly entering the channel number.
Now that you have started the channel scan, it’s time to wait for the process to complete. In the next step, we’ll guide you on what to do once the channel scan is finished, so you can start enjoying your newly added channels on your Roku TV.
Step 5: Wait for the Channel Scan to Complete
After initiating the channel scan on your Roku TV, it’s important to give it some time to complete the scanning process. The duration of the scan can vary depending on various factors, such as the number of channels available in your area and the signal strength of your antenna.
While the channel scan is in progress, you will see a progress bar or indicator on your screen. This indicates that the scan is actively searching for available channels and adding them to your Roku TV’s lineup.
During this waiting period, it’s best to refrain from interrupting or changing any settings on your Roku TV. Allow the scan to continue without interruption to ensure accurate and complete detection of available channels.
The length of time required for the channel scan to complete may range from a few minutes to significantly longer, depending on the complexity of your local channel landscape. It’s essential to exercise patience during this step, as the scan is a crucial process in ensuring that you have access to all the available channels in your area.
Once the channel scan is complete, your Roku TV will display a message indicating that the scan has finished successfully. At this point, you are ready to move on to the next steps, where we will guide you on how to review the scanned channels and perform any necessary adjustments to your channel lineup.
Now, take a moment to sit back and let your Roku TV do its job of scanning for channels. Once the scan is complete, we will move on to the next steps to ensure that you have the best channel lineup possible on your Roku TV.
Step 6: Review the Scanned Channels
Once the channel scan on your Roku TV is complete, it’s time to review the scanned channels. This step allows you to see the full list of channels that were found during the scan and make sure that you have all the desired channels in your lineup.
To review the scanned channels on your Roku TV, follow these steps:
- Look for the on-screen message or notification indicating that the channel scanning process has finished.
- Using your Roku TV remote, press the Home button to return to the main menu.
- Navigate to the left side of the screen to find the Live TV option.
- Highlight the Live TV option and press the OK button on your remote to access the list of scanned channels.
- Using the arrow keys, scroll through the list of scanned channels on your Roku TV. Each channel will be displayed with its respective channel number or name.
As you review the scanned channels, make note of any channels that may be missing or any channels that you may prefer to remove from your lineup. This will help you customize your channel lineup to better suit your preferences and viewing habits.
If you notice any missing channels, double-check the antenna connection to ensure it is secure and properly positioned. Additionally, you can consider repositioning your antenna or purchasing an amplified antenna for better reception.
While reviewing the scanned channels, you may also discover new channels that you were not aware of before. This is an excellent opportunity to explore and access a wider range of content on your Roku TV.
Now that you have reviewed the scanned channels and familiarized yourself with the offerings, you can proceed to the next steps, where we will guide you on checking for any missing or additional channels and reorganizing your channel lineup if desired.
Step 7: Check for Missing or Additional Channels
After reviewing the scanned channels on your Roku TV, it’s important to check for any missing or additional channels that you may want to include in your lineup. This step allows you to ensure that you have access to all the channels you desire and make any necessary adjustments.
To check for missing or additional channels on your Roku TV, follow these steps:
- While on the Live TV screen, use the arrow keys on your Roku TV remote to navigate through the list of scanned channels.
- If you come across a channel that you expected to be included in the lineup but is missing, it may indicate an issue with your antenna reception. Double-check the antenna connection and try repositioning the antenna to improve reception.
- If you discover additional channels that were not included in the initial scan, there are a couple of ways you can add them to your Roku TV’s lineup. You can perform a channel rescan to check for any newly available channels, or you can manually add the specific channel using the Roku Channel Store.
- To perform a channel rescan, go back to the Settings menu by pressing the Home button on your remote and selecting Settings. From there, navigate to TV Inputs and select the Antenna TV input. Choose the Scan Again option to initiate a new channel scan.
- If you prefer to manually add a specific channel, go to the Roku Channel Store from the main menu. Use the search function or browse through the available categories to find the desired channel. Once you locate the channel, select it, and follow the on-screen instructions to add it to your Roku TV.
By checking for missing or additional channels, you can ensure that your Roku TV lineup is complete and tailored to your preferences. Whether it’s adding in a local news channel, a sports network, or a specific streaming service, taking the time to verify and update your channel lineup will enhance your viewing experience.
Now that you have checked for missing or additional channels, you can move on to the next steps, where we will guide you on how to reorganize your channel lineup and personalize your Roku TV even further.
Step 8: Reorganize the Channel Lineup (Optional)
Once you have checked for missing or additional channels on your Roku TV, you may decide to reorganize your channel lineup to your liking. This step is optional but can be beneficial if you want to customize the order in which the channels appear or group them based on your preferences.
To reorganize the channel lineup on your Roku TV, follow these steps:
- While on the Live TV screen, navigate to the channel that you want to move within the lineup.
- Press the Star button on your Roku TV remote to open the options menu for the selected channel.
- In the options menu, select the “Move channel” or “Move channel up/down” option, depending on the specific Roku TV model and software version.
- Use the arrow keys to move the channel up or down in the lineup to your desired position.
- Once you have placed the channel in the desired position, press the OK button to confirm and save the changes.
- Repeat the process for any other channels you wish to rearrange in the lineup.
Reorganizing the channel lineup on your Roku TV allows you to prioritize your favorite channels, group similar channels together, or place frequently watched channels in more accessible positions.
Remember, the ability to rearrange channels may vary depending on your specific Roku TV model and software version. If you don’t see the option to move channels, refer to the user manual or check for any available software updates for your Roku TV.
Now that you have the flexibility to customize the order of channels in your lineup, you can create a personalized viewing experience that suits your preferences and makes navigation more convenient.
In the next steps, we will guide you through additional customizations you can make to your channel lineup, such as renaming or hiding channels, to further enhance your Roku TV experience.
Step 9: Rename or Hide Channels (Optional)
In addition to reorganizing the channel lineup on your Roku TV, you have the option to further personalize your viewing experience by renaming or hiding channels. This step is entirely optional but can be useful if you want to customize the display names of channels or hide channels that you rarely watch.
To rename or hide channels on your Roku TV, follow these steps:
- While on the Live TV screen, navigate to the channel that you want to rename or hide.
- Press the Star button on your Roku TV remote to open the options menu for the selected channel.
- In the options menu, select the “Options” or “Rename channel” option, depending on the specific Roku TV model and software version.
- If you choose to rename the channel, use the on-screen keyboard to enter the desired name for the channel.
- If you prefer to hide the channel, select the “Hide channel” option to remove it from your channel lineup.
- Once you have either renamed or hidden the channel, press the OK button to save the changes.
- Repeat the process for any other channels you wish to rename or hide.
Renaming channels can be useful if you want to customize the display names to be more descriptive or easily identifiable. For example, you can rename a channel from “Local News” to “Channel 5 News” for clarity.
Hiding channels allows you to eliminate channels from your lineup that you rarely watch or have no interest in. This can help streamline your Roku TV interface and make it easier to navigate through your preferred channels.
Remember that the ability to rename or hide channels may depend on your specific Roku TV model and software version. If you don’t see these options in the menu, refer to the user manual or check for any available software updates.
With the option to rename or hide channels, you can truly customize your Roku TV to match your viewing preferences and create a personalized entertainment experience.
Now that you have completed these optional customizations, you’re ready to sit back, relax, and enjoy your personalized channel lineup on your Roku TV.
Frequently Asked Questions (FAQs)
Here are some frequently asked questions about scanning channels on Roku TV:
1. How often should I scan for channels on my Roku TV?
It is recommended to perform a channel scan whenever you set up your Roku TV for the first time, move to a new location, or if you suspect that there are new channels available in your area. Additionally, it’s a good idea to periodically rescan your channels to ensure you have the most up-to-date lineup.
2. Can I scan for channels on Roku TV without an antenna?
Yes, even without an antenna, you can still scan for streaming channels on your Roku TV. However, to access over-the-air channels, you will need a functioning antenna connected to your Roku TV.
3. What should I do if some of the scanned channels have poor reception?
If you encounter poor reception for certain channels, try repositioning your antenna to improve the signal strength. You may also consider upgrading to a higher-quality antenna or using an amplified antenna for better performance.
4. How can I remove or delete unwanted channels from my Roku TV lineup?
To remove or delete unwanted channels from your Roku TV lineup, navigate to the channel you wish to remove, press the Star button on your remote, and select the “Remove channel” option. This will remove the channel from your Roku TV’s lineup.
5. Is there a way to rearrange the channels based on my preference?
Yes, you can easily rearrange the order of channels on your Roku TV. While on the Live TV screen, navigate to the channel you want to move, press the Star button on your remote, and select the “Move channel” option. Use the arrow keys to move the channel to your desired position in the lineup.
6. Can I access and watch the scanned channels from other devices?
No, the scanned channels on your Roku TV are specific to that device and cannot be accessed or watched on other devices. Each Roku TV has its own channel lineup.
If you have any other questions or issues related to scanning channels on your Roku TV, refer to the Roku support documents or contact their customer support for further assistance.
With these FAQs, we hope to address some common concerns and help you navigate the channel scanning process on your Roku TV.
Now that you have a better understanding of how to scan channels on your Roku TV, you can enjoy a vast selection of content and customize your viewing experience to suit your preferences.
Conclusion
Scanning channels on your Roku TV is a simple and essential process that allows you to access a wide variety of over-the-air and streaming channels. By following the step-by-step instructions outlined in this guide, you can ensure that your Roku TV is tuned to the right frequencies and has the latest channel updates.
We began by understanding the importance of channel scanning and how it allows you to discover new content options and never miss out on the latest shows and news broadcasts. Then, we walked through each step of the channel scanning process, from accessing the Antenna TV input to reviewing the scanned channels.
We also explored optional customizations such as reorganizing the channel lineup, renaming channels, and hiding channels that are rarely watched. These customizations allow you to personalize your Roku TV experience and create a seamless and convenient viewing setup.
Additionally, we provided answers to some frequently asked questions to address any lingering concerns you may have had about scanning channels on your Roku TV.
Now that you are equipped with the knowledge and skills to scan, review, and customize your channel lineup on your Roku TV, you can enjoy a wide range of entertainment options at your fingertips. Remember to periodically rescan for channels to ensure that you have the most up-to-date lineup.
Thank you for choosing Roku TV, and we hope this guide has been helpful in enhancing your viewing experience. Sit back, relax, and enjoy the endless entertainment possibilities that await you on your Roku TV!