Introduction
Welcome to our step-by-step guide on how to install macOS from an external hard drive. Whether you’re upgrading your existing macOS or starting from scratch, using an external hard drive as your installation source offers flexibility and convenience. This method is particularly handy if you encounter issues with your internal drive or if you have multiple Mac computers that need to be updated. By following the instructions provided in this guide, you’ll be up and running with the latest macOS version in no time.
Before we dive into the installation process, it’s essential to ensure you have the necessary prerequisites. This includes having an external hard drive with ample storage capacity, a stable internet connection, and a Mac computer compatible with the macOS version you intend to install. Additionally, it’s crucial to back up your important data before proceeding with any installation to avoid any potential data loss.
In the upcoming sections, we’ll walk you through the step-by-step process of installing macOS from an external hard drive. We’ll cover everything from formatting the external hard drive to setting it up as a bootable macOS installer. We’ll also guide you through the process of changing the startup disk on your Mac and performing the installation itself. By following these instructions carefully, you’ll have a smooth and successful installation experience.
It’s worth noting that the specific steps may vary slightly depending on the version of macOS you’re installing and the Mac model you’re using. However, the overall process remains similar, and we’ll provide any necessary variations along the way to ensure you have all the information you need.
Without further ado, let’s get started with formatting the external hard drive in preparation for the installation process. Once you’ve completed this initial step, you’ll be well on your way to installing macOS and enjoying all the new features and improvements it has to offer.
Prerequisites
Before beginning the installation process for macOS from an external hard drive, there are a few prerequisites you need to have in place. These requirements ensure a smooth and successful installation. Here’s what you’ll need:
- An external hard drive: Choose a high-capacity external hard drive with enough storage space to accommodate both the macOS installer and your data.
- A stable internet connection: This is necessary for downloading the macOS installer and any updates during the installation process.
- A compatible Mac computer: Make sure your Mac is compatible with the version of macOS you intend to install. Check the system requirements for the specific macOS version you’re planning to use.
- A backup of your important data: Before proceeding with the installation, it’s crucial to back up all your important files and documents. This will prevent any potential data loss during the installation process.
Once you have these prerequisites in place, you’re ready to proceed with the installation process. It’s always a good idea to double-check that you have all the necessary resources before starting to avoid any unnecessary delays or issues.
Please note that the specific requirements and steps may differ depending on the version of macOS and your Mac model. Always refer to the official documentation and guidelines provided by Apple to ensure compatibility and accurate installation steps.
In the next section, we’ll walk you through the process of formatting the external hard drive, which is the first crucial step in preparing for the installation of macOS. Properly formatting the external hard drive will ensure that it is compatible with your Mac and ready to serve as the installation source.
Formatting the External Hard Drive
One of the first steps in preparing an external hard drive for macOS installation is formatting it correctly. Formatting ensures that the drive is compatible with Mac and can be used as a bootable installer. Follow these steps to format your external hard drive:
- Connect your external hard drive to your Mac using the appropriate cable.
- Open the Finder by clicking on the Finder icon in the Dock.
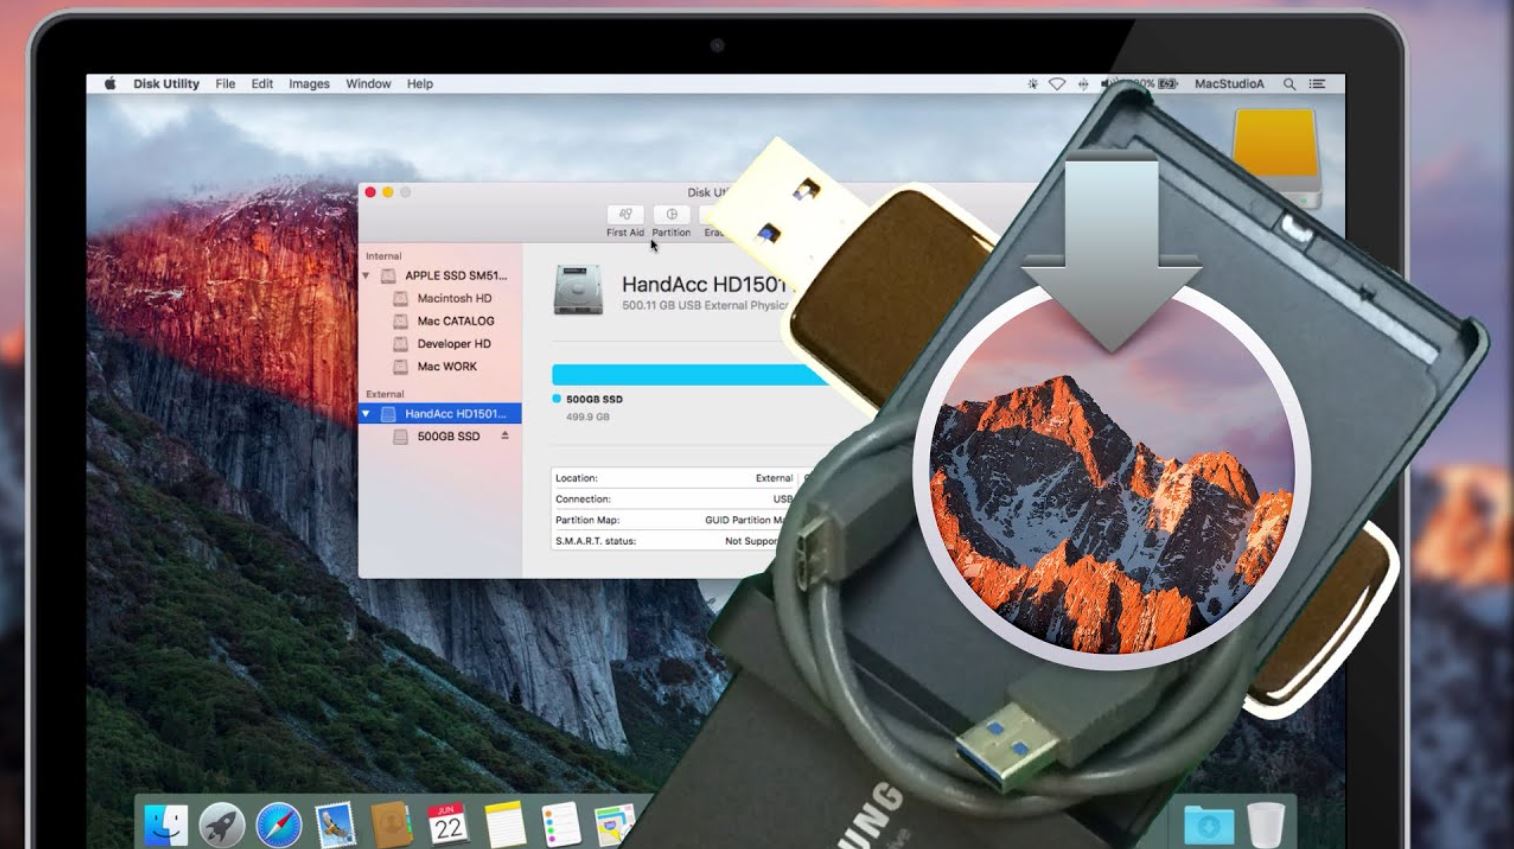
- Go to “Applications” > “Utilities” and launch the “Disk Utility” app.
- In the Disk Utility window, you’ll see a list of drives and volumes on the left-hand side. Select your external hard drive from the list.
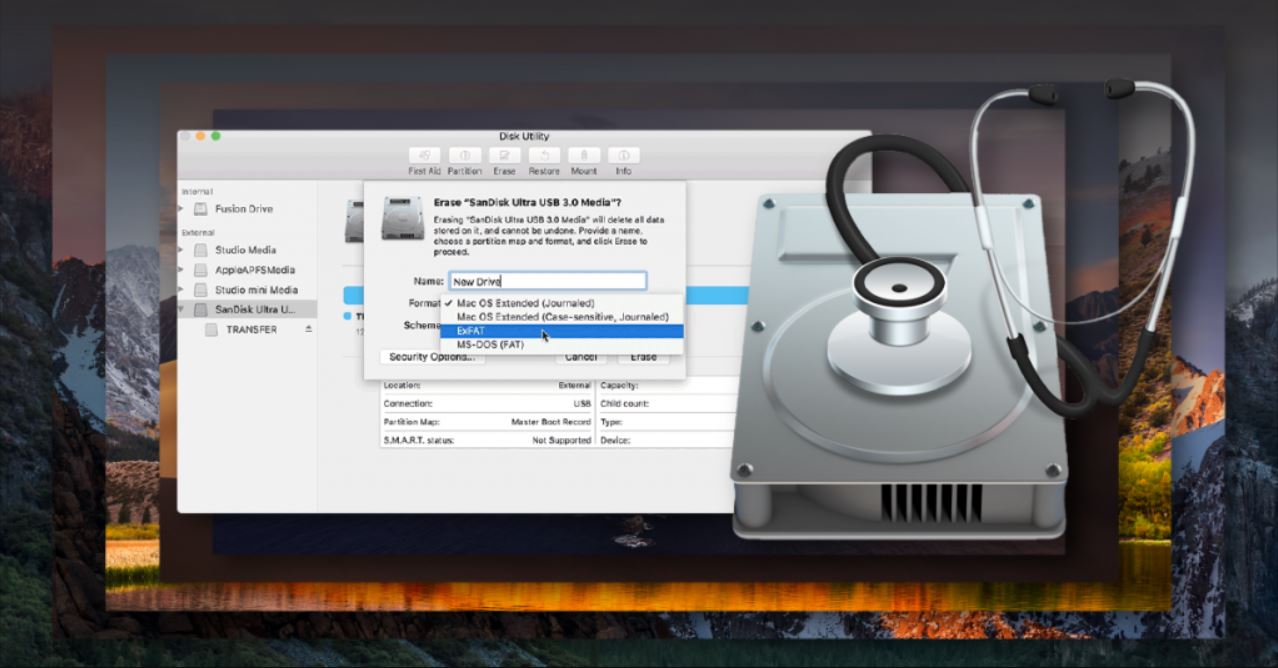
- Click on the “Erase” tab located at the top of the Disk Utility window.
- Choose a name for your external hard drive. This name will appear on your Mac’s desktop and in the Finder.
- Select the appropriate format for the external hard drive. For macOS installations, it’s recommended to choose “Mac OS Extended (Journaled)” as the format.
- If necessary, choose a partition scheme. For Intel-based Macs, choose “GUID Partition Map.” For older PowerPC-based Macs, choose “Apple Partition Map.”
- Finally, click on the “Erase” button to begin the formatting process. This will delete all data on the external hard drive, so make sure you have backed up any important files beforehand.
Once the formatting process is complete, your external hard drive is ready to be set up as a bootable macOS installer. The next section will guide you through the process of creating a bootable installer on your external hard drive.
Creating a Bootable macOS Installer
After formatting your external hard drive, the next step is to create a bootable macOS installer on the drive. This will allow you to install macOS on your Mac computer using the external drive as the installation source. Follow these steps to create a bootable macOS installer:
- Make sure you have the macOS installer downloaded from the App Store or another trusted source. If you haven’t downloaded it yet, go to the App Store and search for the version of macOS you wish to install.
- Once you have the installer downloaded, open the Terminal application on your Mac. You can find it by going to “Applications” > “Utilities” > “Terminal.”
- In the Terminal window, type the following command:
sudo /Applications/Install\ macOS\ [Version Name].app/Contents/Resources/createinstallmedia --volume /Volumes/[External Drive Name]- Replace “[Version Name]” with the name of the downloaded macOS installer. For example, if you have macOS Catalina downloaded, the command would be
sudo /Applications/Install\ macOS\ Catalina.app/Contents/Resources/createinstallmedia --volume /Volumes/[External Drive Name] - Replace “[External Drive Name]” with the name you chose for your external hard drive during the formatting process.
- Hit the Enter key to execute the command. You may be prompted to enter your administrator password.
- Wait for the process to complete. This may take some time depending on the speed of your Mac and the size of the macOS installer.
- Replace “[Version Name]” with the name of the downloaded macOS installer. For example, if you have macOS Catalina downloaded, the command would be
Once the command finishes executing, you will have a bootable macOS installer on your external hard drive. This installer can be used to install macOS on any compatible Mac computer. In the next section, we’ll guide you through the process of setting up the external hard drive as the startup disk on your Mac.
Setting up the External Hard Drive
Before you can proceed with the installation of macOS from the external hard drive, you need to set it up as the startup disk on your Mac. The startup disk is the disk that your Mac uses to start up and run the operating system. Follow these steps to set up the external hard drive as the startup disk:
- Connect the external hard drive to your Mac, if it’s not already connected.
- Restart your Mac by going to the Apple menu in the top-left corner and selecting “Restart.”
- As your Mac restarts, press and hold the Option (⌥) key on your keyboard until the Startup Manager screen appears.
- In the Startup Manager, you’ll see a list of available startup disks. Use the arrow keys on your keyboard to select the external hard drive.
- Once you’ve selected the external hard drive, press the Return (↩) key on your keyboard to start up your Mac from the external hard drive.
Your Mac will now boot up using the macOS installer from the external hard drive. This is the last step before the actual installation process begins. In the next section, we’ll guide you through the installation process itself, where you’ll be able to install macOS on your Mac computer using the external hard drive as the installation source.
Changing the Startup Disk
In order to install macOS from the external hard drive, you’ll need to change the startup disk on your Mac. Changing the startup disk ensures that your Mac boots from the external hard drive rather than the internal drive. Follow these steps to change the startup disk:
- Make sure your Mac is powered on and connected to the external hard drive.
- Go to the Apple menu in the top-left corner of your screen and select “System Preferences.”
- In the System Preferences window, click on “Startup Disk.” It may be located in the “System” or “System & Security” section, depending on the version of macOS you’re using.
- You’ll see a list of available startup disks. Select the external hard drive from the list.
- If necessary, enter your administrator password to confirm your selection.
- Click on the “Restart” button to restart your Mac.
Your Mac will now restart using the selected external hard drive as the startup disk. The installation process for macOS will begin from the external hard drive. In the next section, we’ll walk you through the installation steps, taking you one step closer to having macOS up and running on your Mac.
Installing macOS from the External Hard Drive
With the external hard drive set up as the startup disk, you’re now ready to proceed with the installation of macOS. Follow these steps to install macOS from the external hard drive:
- Your Mac will automatically boot from the external hard drive and launch the macOS installer. Wait for the installer to load.
- In the macOS installer, select your preferred language and click “Continue.”
- Read and agree to the End User License Agreement (EULA) by clicking “Agree.”
- Next, you’ll see a list of available drives on which you can install macOS. Select the internal drive of your Mac from the list.
- Click on “Install” to begin the installation process.
- Wait for the installation process to complete. This may take some time, so be patient.
- Once the installation is finished, your Mac will restart. You can safely disconnect the external hard drive at this point.
- Follow the on-screen prompts to set up macOS on your Mac. This includes selecting your country, creating a user account, and choosing preferences.
- After the setup is complete, you’ll be greeted with the macOS desktop, and you can start using your newly installed system.
Congratulations! You have successfully installed macOS from the external hard drive. Take some time to explore the new features and functionalities of macOS on your Mac. If you have any data backed up, you can now restore it to your Mac.
It’s important to note that the installation process may vary depending on the version of macOS and your specific Mac model. Always refer to the official guidelines provided by Apple for accurate and up-to-date instructions.
Now that you have macOS installed, you can enjoy all the benefits of the latest operating system on your Mac. Remember to keep your system updated with the latest macOS updates to ensure optimal performance and security.
Final Thoughts
Installing macOS from an external hard drive can be a convenient and practical method for upgrading your system or performing a clean installation. It provides flexibility and allows you to easily install macOS on multiple Mac computers or troubleshoot issues with your internal drive. Here are a few final thoughts and tips to keep in mind:
First and foremost, always remember to back up your important data before proceeding with any installation. While the process we’ve outlined is generally safe, it’s better to be safe than sorry when it comes to your valuable files.
Ensure that you have a stable internet connection throughout the installation process. This will ensure that you can download any necessary updates and complete the installation smoothly.
If you encounter any issues during the installation process or have any questions, refer to the official documentation provided by Apple. They have extensive resources available to help you troubleshoot and find solutions to common installation problems.
After successfully installing macOS, take the time to explore the new features and improvements. macOS offers a wide range of functionalities that can enhance your productivity and overall user experience.
Remember to regularly update your macOS installation with the latest software updates. These updates often include important security patches, bug fixes, and performance improvements.
If you encounter any difficulties with your installation or need further assistance, don’t hesitate to reach out to Apple Support or visit the Apple Support Communities. There are plenty of knowledgeable individuals who can provide guidance and support to help you overcome any obstacles.
By following the steps and tips provided in this guide, you should now be equipped with the knowledge to successfully install macOS from an external hard drive. Enjoy the benefits of the latest macOS version and make the most out of your Mac!