Introduction
Welcome to our guide on how to hard reset a Dell laptop without a password. If you’ve forgotten your password or are locked out of your Dell laptop for any reason, don’t worry – we’ve got you covered. Performing a hard reset can help you regain access to your device and start fresh.
A hard reset is a process that restores your Dell laptop to its original factory settings, erasing all data and customizations. It is a drastic step that should only be taken if you have exhausted all other options and are unable to recover your password. Keep in mind that a hard reset will remove all files and programs from your laptop, so make sure to back up any important data before proceeding.
In this guide, we will explore different methods to hard reset your Dell laptop without a password. These methods are applicable to various Dell laptop models and can help you regain control over your device. Whether you’re using Windows 10, Windows 8, or an earlier version of Windows, there are solutions available for you.
Please note that performing a hard reset on your Dell laptop should only be done if you are the rightful owner or have proper authorization to do so. Using these methods without permission may violate ethical and legal guidelines.
Now, let’s dive into the different methods you can use to hard reset your Dell laptop without a password. Each method has its own requirements and instructions, so make sure to read and follow them carefully to ensure successful results.
Method 1: Performing a Factory Reset Using System Recovery
If you’re unable to access your Dell laptop due to a forgotten password, one of the most common ways to perform a hard reset is by utilizing the built-in system recovery options. This method will restore your laptop to its original factory settings, effectively wiping out all data and settings.
To begin, start your Dell laptop and press the “F8” key repeatedly until the “Advanced Boot Options” menu appears. Use the arrow keys to highlight the “Repair Your Computer” option, and press “Enter” to select it.
Next, you’ll be prompted to select your keyboard layout. Choose the appropriate option and click “Next.” Then, enter your administrative username and password or select the Administrator account if available.
Once you’re logged in, you’ll be presented with a menu of system recovery options. Locate and click on the “Dell Factory Image Restore” or “Dell Factory Image Recovery and DataSafe Options” option, depending on your Dell laptop model.
Follow the on-screen instructions to proceed with the factory reset. This typically involves confirming your decision to restore the laptop to factory settings and waiting for the process to complete. Keep in mind that the duration of the reset may vary depending on the speed of your computer.
After the factory reset is finished, your Dell laptop will restart and present you with a fresh operating system as if it were brand new. You will need to go through the initial setup process, including configuring your language preferences, creating a new user account, and setting up any necessary network connections.
It’s important to note that performing a factory reset using system recovery will erase all data on your Dell laptop, including personal files, installed programs, and custom settings. Therefore, it’s crucial to back up any important files before proceeding with this method.
Now that you know how to perform a factory reset using the system recovery options, you can regain control of your Dell laptop and start anew. However, if this method doesn’t work or you’re experiencing difficulties, don’t worry – there are other solutions available.
Method 2: Using the Trinity Rescue Kit
If the previous method didn’t work or you’re looking for an alternative solution to hard reset your Dell laptop without a password, you can try using the Trinity Rescue Kit. The Trinity Rescue Kit is a free and powerful utility that can help you reset passwords, recover data, and perform various system maintenance tasks.
Please note that using the Trinity Rescue Kit requires some technical knowledge and may not be suitable for beginners. If you’re uncomfortable or unfamiliar with advanced computer troubleshooting, it’s recommended to seek assistance from a professional.
Here’s how you can use the Trinity Rescue Kit to hard reset your Dell laptop:
- Start by downloading the Trinity Rescue Kit from its official website onto a separate computer.
- Once downloaded, you’ll need to create a bootable USB drive or CD/DVD using the Trinity Rescue Kit ISO file. The instructions for creating the bootable media are provided on the Trinity Rescue Kit website.
- Insert the bootable USB drive or CD/DVD into your locked Dell laptop.
- Restart your laptop and access the boot menu by pressing the appropriate key during startup. This key varies depending on your Dell laptop model but is usually F12 or Esc. Consult your laptop’s manual or Dell’s support website for the specific key.
- In the boot menu, select the bootable media you created with the Trinity Rescue Kit and press Enter to boot from it.
- Once the Trinity Rescue Kit interface loads, follow the on-screen instructions to navigate to the password reset option.
- Select the appropriate user account for which you want to reset the password.
- Choose the password reset method that suits your needs and follow the provided instructions to reset the password.
- After resetting the password, exit the Trinity Rescue Kit and restart your Dell laptop.
Upon restarting, you should be able to log in to your Dell laptop without a password. Remember to create a new password to secure your device and prevent unauthorized access.
The Trinity Rescue Kit can be a valuable tool when it comes to hard resetting your Dell laptop without a password. However, it’s important to exercise caution and only use this method if you’re confident in your abilities.
If you’re still unable to hard reset your Dell laptop using the Trinity Rescue Kit or prefer a different approach, don’t worry – there are other methods available.
Method 3: Using Windows Password Key
If you’re looking for another effective method to hard reset your Dell laptop without a password, consider using the Windows Password Key. This software allows you to create a bootable USB drive or CD/DVD that can help you reset the password on your Dell laptop.
Here’s a step-by-step guide on how to use the Windows Password Key:
- Start by downloading and installing the Windows Password Key software on a separate working computer.
- Launch the program and insert a blank USB drive or CD/DVD into the computer.
- Choose the USB drive or CD/DVD as the media to burn the password reset files.
- Click on the “Burn” button to create the bootable password reset disk.
- Once the bootable disk is created, remove it from the computer and insert it into your locked Dell laptop.
- Restart your laptop and access the boot menu by pressing the specified key during startup (usually F12 or Esc for Dell laptops).
- Select the bootable USB drive or CD/DVD that contains the Windows Password Key.
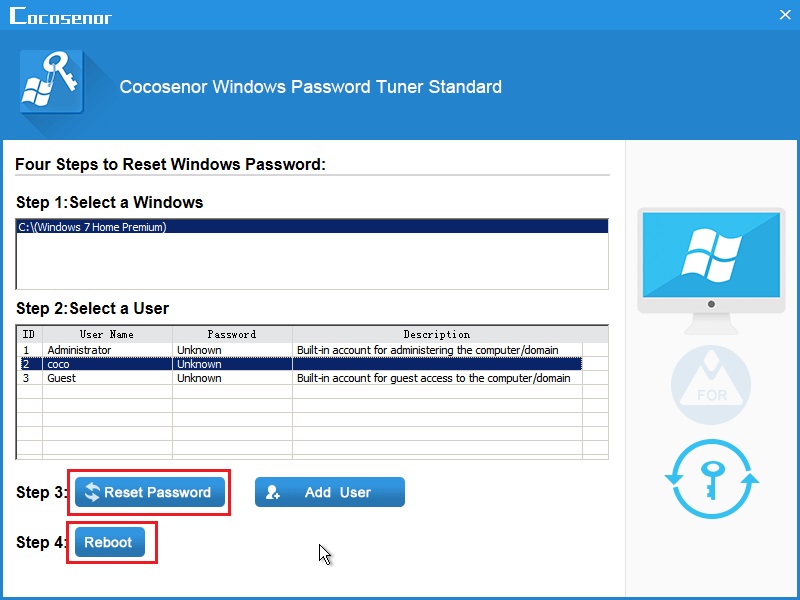
- Once the program loads, follow the on-screen instructions to select the Windows installation on your Dell laptop.
- Choose the user account for which you want to reset the password.
- Click on the “Reset Password” button and wait for the process to complete.
- After successfully resetting the password, remove the bootable disk and restart your Dell laptop.
Upon restarting, you should now be able to log in to your Dell laptop without a password. Make sure to set a new password to secure your device.
The Windows Password Key is a reliable and convenient solution for hard resetting your Dell laptop. It provides a straightforward process to reset passwords, even if you’re not tech-savvy.
However, please note that using third-party software always carries some risks, so it’s essential to download programs from reputable sources and exercise caution when using them. Additionally, ensure that you have proper authorization to perform a hard reset on your Dell laptop.
If you prefer a different method or encounter any difficulties, don’t worry – there are more options available.
Method 4: Removing the CMOS Battery
If you’re comfortable working with hardware components, another method to hard reset your Dell laptop without a password is by removing the CMOS battery. The CMOS battery is a small, round battery located on the motherboard that stores the BIOS settings and keeps the internal clock running.
Here’s how you can use this method:
- Start by turning off your Dell laptop and unplugging it from any power source.
- Open up your laptop’s casing by removing the screws or latches that secure the back cover.
- Locate the CMOS battery on the motherboard. It is typically a small, coin-shaped battery.
- Carefully remove the CMOS battery from its socket. You may need to use a flat-headed screwdriver or your fingers to do so.
- Leave the CMOS battery out of the socket for at least 5 minutes to ensure that all power is drained from the motherboard.
- After the waiting period, reinsert the CMOS battery back into its socket.
- Secure the back cover of your laptop by reattaching the screws or latches.
- Plug in your laptop and turn it on.
Upon booting up, your Dell laptop’s BIOS settings will be reset to their default values, including the removal of any BIOS or password locks. This effectively hard resets your laptop without the need for a password.
However, it’s important to note that opening your laptop’s casing and tampering with internal components may void your warranty or cause damage if not done correctly. If you’re unsure about performing this method, it’s recommended to seek assistance from a professional technician or contact Dell support.
Removing the CMOS battery is a technical solution that can be effective in hard resetting your Dell laptop without a password. However, as with any hardware-related method, exercise caution and only proceed if you’re confident in your abilities.
If this method isn’t suitable or you’re facing difficulties, don’t worry – there are alternative approaches available.
Method 5: Contacting Dell Support
If all else fails or if you’re uncomfortable attempting any of the above methods, contacting Dell Support is always a viable option. Dell has a dedicated support team that can assist you in recovering access to your Dell laptop.
Here’s what you can do to get in touch with Dell Support:
1. Visit the Dell Support website (www.dell.com/support) and navigate to the “Contact Us” page.
2. Choose the appropriate option for your location and select the option to receive support for laptops.
3. Depending on your location and Dell product, you may have the choice to call Dell Support directly, initiate a live chat, or submit a support ticket.
4. Explain your situation to the Dell Support representative and provide them with the necessary information about your laptop’s model and issue.
5. Follow the instructions provided by the Dell Support representative. They may guide you through a specific process or request additional details to verify your ownership.
Dell Support will assist you in resetting your Dell laptop’s password and regaining access to your device. They have the expertise and resources to provide you with the most appropriate solution based on your specific situation.
However, it’s important to note that contacting Dell Support may incur additional costs, depending on your warranty status and the support options available to you. Be prepared to provide proof of ownership or purchase if requested.
Remember, reaching out to Dell Support is a reliable and authorized way to resolve your password-related issues. They are equipped to handle a wide range of support requests and can provide you with the guidance you need to hard reset your Dell laptop without a password.
If you’ve exhausted all other methods or prefer the expertise of professionals, don’t hesitate to contact Dell Support for assistance.