Introduction
Welcome to our comprehensive guide on how to create a new email address. In today’s digital age, having a personal or professional email address is essential for staying connected, managing online accounts, and communicating with others effectively. Whether you are starting a new business, joining a social network, or simply wanting a fresh email account, this step-by-step tutorial will walk you through the entire process.
An email address consists of two main components: the username and the domain name. The username is the unique identifier for your email account, while the domain name represents the email service provider you choose. By following the steps outlined in this guide, you will be able to create a new email address that perfectly suits your needs.
This guide is suitable for beginners and does not require any technical expertise. We will provide instructions for popular email service providers, including Gmail, Yahoo Mail, and Outlook. So, regardless of your preferred email service provider, you will find all the necessary information here.
Before we dive into the step-by-step process of creating a new email address, it is important to note that while many email services are free, some may require a monthly or yearly subscription for additional features and benefits. This guide focuses on the free version of each email service provider, but we will also mention any premium options that are available.
Without further ado, let’s get started on creating your new email address and unlock the endless possibilities that come with it.
Step 1: Choosing an Email Service Provider
The first step in creating a new email address is selecting the email service provider you want to use. With numerous options available, it’s important to consider factors such as reliability, user-friendly interface, storage capacity, security features, and additional services offered.
Among the most popular and widely-used email service providers are Gmail, Yahoo Mail, Outlook, and ProtonMail. Each has its own set of features and benefits, so take some time to compare and evaluate which one aligns best with your needs.
Gmail: Gmail, provided by Google, is known for its user-friendly interface, powerful search capabilities, and integration with other Google services such as Google Drive and Google Calendar. It offers a large storage capacity and robust spam filtering features. Gmail also provides the option to add a customized domain to your email address.
Yahoo Mail: Yahoo Mail offers a simple and intuitive interface, with features like drag-and-drop functionality for easy organization of emails, built-in chat, and attachment preview. It provides generous storage capacity and allows you to link multiple email accounts for easy management.
Outlook: Outlook, formerly known as Hotmail, is Microsoft’s email service provider. It offers a clean and modern interface, seamless integration with other Microsoft services like Microsoft Office Online and Skype, and advanced spam and phishing protection. Outlook provides a customizable inbox with a clutter-free option and the ability to create and manage folders.
ProtonMail: ProtonMail is a secure email service provider that focuses on privacy and encryption. It offers end-to-end encryption, ensuring that only the intended recipient can read your emails. ProtonMail is known for its strong privacy features and commitment to user data protection.
Once you have decided on an email service provider, visit their official website to sign up and create a new account. Look for the “Sign Up” or “Create Account” button on the homepage, usually prominently displayed.
Remember to choose a reputable and trustworthy email service provider that prioritizes security and has positive user reviews. This will ensure a smooth and secure email experience.
Step 2: Creating an Email Address
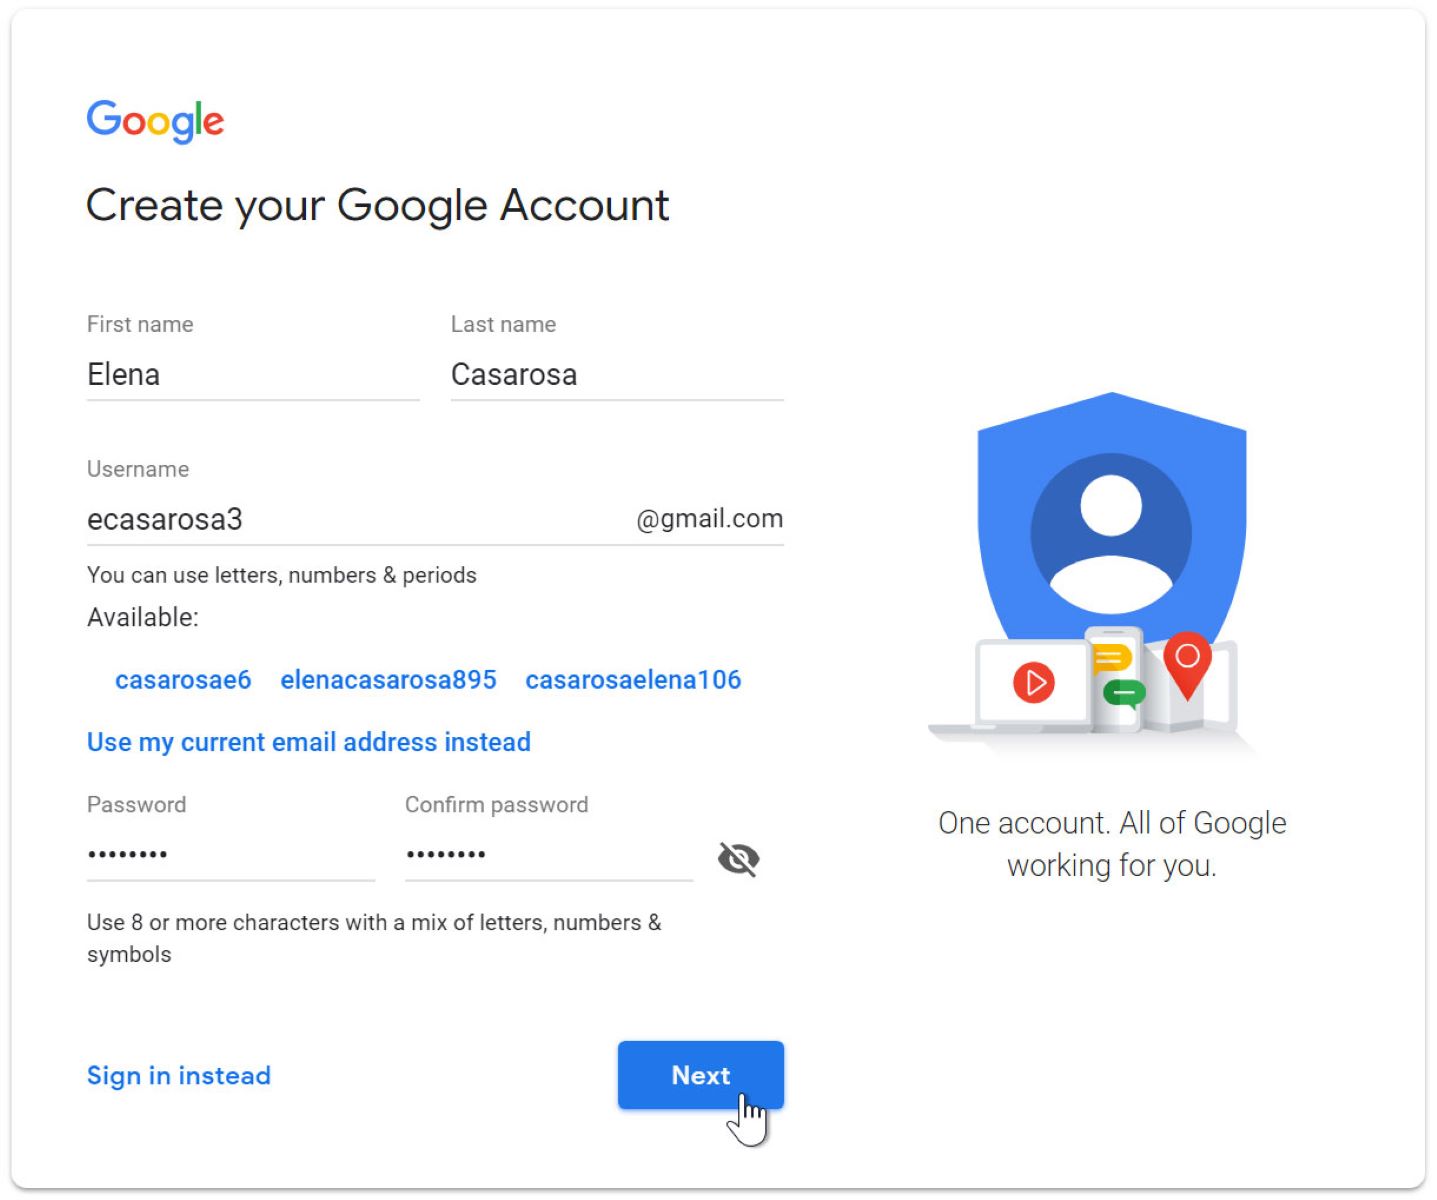
After selecting an email service provider, the next step is to create your email address. This involves choosing a username and combining it with the domain name provided by the email service provider.
When it comes to selecting a username, it’s important to choose something unique and easy to remember. Many common usernames may already be taken, so try adding numbers, dots, or underscores to make it more personalized. Avoid using personal information such as your full name or birthdate, as this could compromise your privacy.
Most email service providers offer a variety of domain name options. For example, Gmail’s domain is “@gmail.com,” Yahoo Mail’s domain is “@yahoo.com,” and Outlook’s domain is “@outlook.com.” Some providers may also offer country-specific domain options.
When creating your email address, you will typically see a registration form that requires you to input your desired username and select the domain name from a drop-down menu. Fill out the form according to the instructions provided and ensure that all required fields are entered correctly.
Once you have entered the necessary information, click on the “Next” or “Continue” button to proceed. If your chosen username is not available, the email service provider will suggest alternatives or prompt you to choose a different username.
It’s also worth noting that some email service providers may have additional options to add a custom domain, allowing you to create a personalized email address that matches your website or brand. However, custom domain options are often available for premium or business accounts.
After successfully creating your email address, you will be redirected to your inbox or a confirmation page, depending on the email service provider. If you are redirected to a confirmation page, follow the on-screen instructions to complete the setup process.
Once your email address is created, you can start using it to send and receive emails. Log in to your newly created email account using the username and password you selected during the registration process.
Remember to choose a strong and unique password to protect your email account from unauthorized access. Avoid using easily guessable passwords and consider adding a combination of letters, numbers, and special characters for added security.
Congratulations! You have successfully created your own email address. Now, you can start exploring the various features and settings of your email account to fully customize and optimize your email experience.
Step 3: Adding Personal Information
Once you have created your email address, the next step is to add your personal information to your email account. This includes providing details such as your name, alternate email address, phone number, and more. Adding personal information is important for account recovery, verification purposes, and to enhance the professionalism of your emails.
To add personal information, log in to your email account and look for the “Settings” or “Account Info” section, usually located in the top-right corner of the email interface. Click on the appropriate option to access the account settings page.
In the account settings page, you will find various fields where you can enter your personal information. Start by adding your full name or the name you want to display when sending emails. This will ensure that recipients can easily identify you when they receive your emails.
Some email service providers may also allow you to add an alternate email address or phone number for account recovery purposes. This can be helpful if you ever forget your password or need to reset your account.
Additionally, you may have the option to add a profile picture to your email account. A profile picture adds a personal touch to your emails and helps recipients recognize you more easily. Choose a clear and professional-looking photo that represents you or your brand well.
Furthermore, take some time to explore the additional settings and preferences that are available within your email account. You can customize the signature that is automatically added to your outgoing emails, set up filters to sort incoming messages, and adjust notification settings according to your preferences.
Remember to review the privacy settings of your email account and choose the level of privacy and security that aligns with your preferences. These settings may allow you to control who can see your personal information, who can send you emails, and what information is shared with third parties.
Once you have entered your personal information and made any desired adjustments to the account settings, click on the “Save” or “Update” button to apply the changes.
It’s important to regularly review and update your personal information to ensure the accuracy and relevance of the details associated with your email account. This will help you maintain a professional online presence and make it easier for others to connect with you.
Now that you have added your personal information, you are ready to fully utilize your email account and enjoy the seamless communication it provides.
Step 4: Choosing a Username and Password
When creating an email account, one of the most important steps is choosing a username and password. These credentials are crucial for accessing your email account securely and for identifying yourself when sending and receiving emails.
When selecting a username, it’s essential to choose something unique and memorable. Avoid using personal information such as your full name or date of birth, as this can compromise your privacy. Instead, opt for a combination of letters, numbers, or symbols that reflect your personality or business.
It’s worth noting that some email service providers may offer suggestions or indicate whether a chosen username is already taken. Take the time to explore different options and find a username that you are comfortable with and that represents you or your brand effectively.
After choosing a username, the next step is to create a strong password. A strong password is essential for protecting your email account from unauthorized access and potential security breaches. Here are some tips for creating a secure password:
- Include a combination of uppercase and lowercase letters.
- Use numbers and special characters.
- Avoid using easily guessable and common passwords.
- Ensure your password is at least eight characters long.
- Avoid using dictionary words or obvious sequences.
It’s important to choose a password that you can remember, but also one that is not easily guessable by others. Avoid using the same password for multiple accounts, as this puts your email account and other accounts at risk if one is compromised.
Some email service providers may have specific password requirements, such as a minimum length or the inclusion of certain characters. Read the password guidelines provided during the account creation process to ensure your password meets the requirements.
Remember to keep your password confidential and avoid sharing it with others. If you suspect that your password has been compromised, change it immediately to protect your account.
Lastly, note that some email service providers may offer additional security features such as two-factor authentication (2FA). Enabling 2FA adds an extra layer of security to your email account by requiring a second verification step, such as entering a unique code sent to your phone, in addition to your password.
By carefully selecting a username and creating a strong password, you can secure your email account and ensure that your personal information and communications remain safe. Take the time to choose unique and secure credentials that will provide you with peace of mind and protect your digital presence.
Step 5: Setting Up Email Preferences
Once you have chosen a username and password for your email account, the next step is to set up your email preferences. Email preferences allow you to customize how your inbox looks and functions, giving you a more personalized and efficient email experience.
Most email service providers offer a range of preferences that you can adjust to suit your needs. Here are some common email preferences that you may want to consider:
- Inbox Organization: Set up folders or labels to organize your emails. This helps you keep track of different categories of emails, such as work, personal, or subscriptions.
- Filter and Sorting: Create filters or rules to automatically sort incoming emails into specific folders. You can prioritize certain senders, mark certain emails as spam, or categorize emails based on keywords.
- Email Signature: Customize your email signature to include your name, contact information, job title, or any additional details you want to share with recipients. A professional email signature adds a personal touch and provides essential information about you.
- Auto-reply: If you’re going on vacation or will be away from your email for an extended period, set up an auto-reply message to let senders know that you may not respond promptly. Include the dates you’ll be away and provide alternative points of contact if necessary.
- Notification Preferences: Determine how you want to be notified about new emails. You can choose to receive email notifications on your desktop or mobile device, or you can opt for a daily or weekly summary of new emails.
These preferences contribute to a streamlined and organized email management system, allowing you to stay on top of your inbox and find emails more easily.
Furthermore, consider adjusting your privacy and security settings to enhance the protection of your email account. Review the options available to control who can send you emails, who can see your online status, and what information is shared with third parties.
If you frequently communicate in multiple languages, you may also have the option to change the default language of your email account. This can be useful if you prefer to compose and read emails in a language other than the default language provided by the email service provider.
Take some time to explore the various preferences and settings available in your email account. Experiment with different options to find a configuration that suits your workflow and helps you manage your emails effectively.
By setting up your email preferences, you can streamline your email management process and tailor your inbox to your specific needs and preferences. Enjoy the freedom to customize your email account and make the most of your email communication.
Step 6: Verifying Email Address
Verifying your email address is an important step to ensure the security and functionality of your email account. Email verification helps to confirm that the email address you provided during the account creation process is valid and belongs to you.
After creating your email account, the email service provider may require you to verify your email address before granting full access to your account. The verification process usually involves sending a verification link or code to the email address you provided.
To verify your email address, follow these steps:
- Log in to your email account using your newly created username and password.
- Look for a verification email from the email service provider in your inbox. If you don’t see it in your primary inbox, check the spam or junk folder.
- Open the verification email and click on the provided verification link or enter the verification code in the specified field.
- Follow the on-screen instructions to complete the verification process.
Verifying your email address helps to prevent unauthorized access to your account and ensures that you receive important notifications and updates regarding your email account.
In some cases, email service providers may require additional steps for verification, such as providing a phone number or answering security questions. These measures are in place to enhance the security of your account and protect your personal information.
If you encounter any issues during the verification process or do not receive the verification email, check the email service provider’s support documentation or contact their customer support for assistance.
Remember, email verification is crucial for maintaining the security and functionality of your email account. Completing this step ensures that your account is fully activated and ready for use.
Once your email address is verified, you can start enjoying the benefits and features of your email service provider, such as sending and receiving emails, organizing your inbox, and customizing your email settings.
Now that your email address is verified, you can move on to the final step of the process and further customize your email account to enhance your email experience.
Step 7: Customizing Your Email Account
Now that you have successfully created and verified your email address, the final step is to customize your email account according to your preferences. Customizing your email account offers the opportunity to personalize your inbox, optimize your workflow, and reflect your unique style or brand.
Here are some customization options you can explore:
- Themes and Layouts: Many email service providers offer a variety of themes and layouts to change the visual appearance of your inbox. You can choose from different color schemes, background images, and display options to create a look that resonates with your personal style or aligns with your brand identity.
- Organization and Folders: Set up folders or labels to categorize and organize your emails. This allows you to create a system that suits your workflow and makes it easier to find specific emails.
- Auto-Reply: Customize your automatic reply message for when you are away or on vacation. This ensures that senders receive a timely response and informs them of your availability.
- Priority Inbox: Some email service providers offer a priority inbox feature that automatically sorts important emails into a separate section. This helps you focus on important messages without being overwhelmed by less urgent ones.
- Keyboard Shortcuts: Familiarize yourself with built-in keyboard shortcuts to navigate through your inbox more efficiently. Using keyboard shortcuts can save time and streamline your email management process.
- Filters and Rules: Take advantage of filters and rules to automate the organization and management of your emails. Set up rules to automatically move specific emails to designated folders or apply certain actions based on sender, subject, or keywords.
- Signature: Create a professional and informative email signature that appears at the end of every email you send. Include your name, job title, contact information, and any other relevant details to improve your email communication and brand yourself effectively.
Additionally, explore the settings and preferences available in your email account to further customize your experience. Adjust notification settings, language settings, privacy settings, and any other options that are offered by your email service provider.
Remember to regularly update and review your customization choices to ensure they continue to meet your needs. Tweak your organization system, adjust your theme, or modify your signature as required.
Customizing your email account not only makes it visually appealing but also enhances your productivity and efficiency. A customized email account reflects your personal or brand identity and sets a positive and professional tone in your communications.
By spending some time to personalize and optimize your email account, you can enjoy a more seamless and enjoyable email experience.
Conclusion
Congratulations! You have successfully gone through the step-by-step process of creating a new email address. By choosing an email service provider, creating your email address, adding personal information, selecting a username and password, setting up email preferences, verifying your email address, and customizing your email account, you have unlocked the vast potential that email communication offers.
An email address serves as your digital identity, enabling you to connect with others, manage online accounts, and stay organized in both your personal and professional life. With the customization options available, you can tailor your email account to suit your unique needs and preferences.
Remember to regularly review and update your email settings, preferences, and personal information for optimal performance and security. This ensures that your email account remains secure and meets your evolving communication needs.
Whether you use your email account for personal correspondence, business communication, or a combination of both, the ability to send and receive messages efficiently is invaluable.
Continue to explore the features and functions offered by your chosen email service provider, as they often provide tools and resources to enhance your email experience. Never hesitate to reach out to customer support if you encounter any difficulties or have questions about your email account.
Lastly, make sure to practice good email etiquette, such as using clear and concise language, respecting others’ privacy, and avoiding the spread of spam or phishing attempts. By being a responsible email user, you contribute to creating a positive and secure digital environment for everyone.
Now that you are equipped with a new email address, embrace the possibilities and enjoy the seamless communication it provides. Whether you are staying connected with friends and family, managing your professional network, or engaging with online communities, your email account will be your trusted companion in the digital realm.
Happy emailing!