Introduction
Welcome to the world of iTunes, where you can organize, manage, and enjoy your vast collection of music, movies, and TV shows. As an avid iTunes user, you’ve spent countless hours curating the perfect playlists, creating a library of your favorite movies, and organizing your media just the way you like it. But have you ever thought about what would happen if your computer crashed or your iTunes library was accidentally deleted?
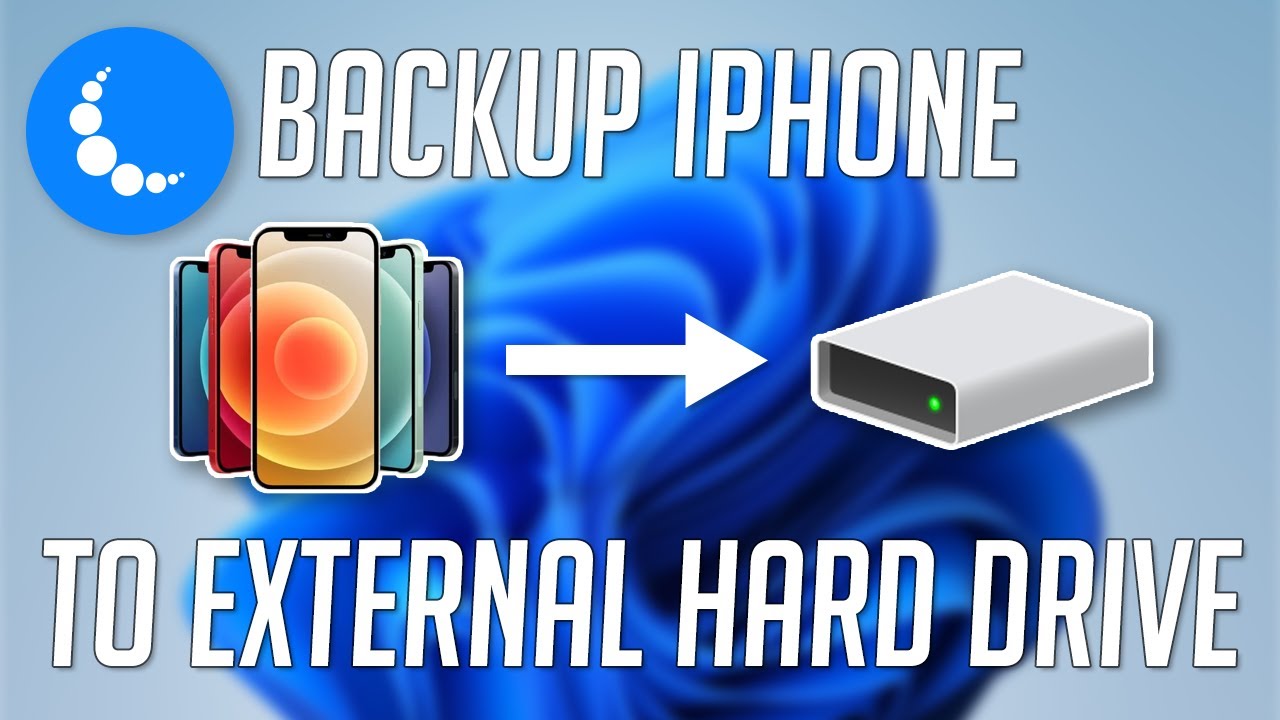
Backing up your iTunes library is vitally important to ensure the safety and preservation of all your media files. By creating a backup onto an external hard drive, you can safeguard your valuable collection and avoid the heartbreak of losing years of carefully curated content. In this guide, we’ll take you through the step-by-step process of backing up your iTunes library onto an external hard drive, so you can have peace of mind knowing your media is secure.
Before we delve into the nitty-gritty details, it’s important to understand why backing up your iTunes library is crucial. Computer crashes, hardware failures, and accidental file deletions are unfortunate occurrences that can happen to anyone at any time. Without a backup, you run the risk of losing all your cherished media files, leaving you with hours of painstaking work down the drain.
Moreover, upgrading to a new computer or reinstalling your operating system may also result in the loss of your iTunes library if you don’t have a backup. By taking the time to backup your iTunes library onto an external hard drive, you can easily transfer your library to a new computer or recover it in the event of a system failure.
Now that you understand the importance of backing up your iTunes library, let’s dive into the details of what you’ll need and the step-by-step process of creating a backup onto an external hard drive. So, grab your favorite beverage, sit back, and get ready to safeguard your precious media files!
Why should you backup your iTunes?
Backing up your iTunes library is essential for several reasons. Let’s explore some of the most important reasons why you should make it a priority:
Protection against data loss: Computers can be unpredictable, and data loss can occur due to various reasons such as hardware failures, software glitches, or accidental deletion. By backing up your iTunes library, you ensure that your music, movies, and other media files are safely stored, allowing you to recover them easily in case of any unforeseen incidents.
Preserving your carefully curated collection: As an iTunes user, you’ve likely spent a significant amount of time organizing and curating your music library. Creating playlists, adding album artwork, and sorting your music by genre or mood can be a time-consuming process. By backing up your iTunes library, you’re preserving all the effort you’ve put into creating the perfect collection.
Easy migration to a new computer: If you plan to upgrade your computer or replace it with a new one, having a backup of your iTunes library simplifies the migration process. Rather than manually transferring all your media files and reorganizing your library, you can simply restore it from the backup, saving you time and effort.
Peace of mind: Knowing that your iTunes library is safely backed up provides peace of mind. You no longer have to worry about losing your favorite songs or movies due to unforeseen events. With a backup copy on an external hard drive, you can enjoy your media collection with confidence.
Flexibility for customization: Backing up your iTunes library also allows you to experiment with customization and modifications without the fear of losing the original files. You can try out new software, plugins, or organizational methods, knowing that you always have a backup to revert to if needed.
Protection against system failures: System failures can happen unexpectedly, leading to the loss of data stored on your computer’s hard drive. By having a backup of your iTunes library on an external hard drive, you minimize the risk of losing your precious media files in case of a system crash or hardware malfunction.
Convenience during repairs or maintenance: If you need to send your computer for repairs or perform maintenance tasks that involve reformatting your hard drive, having a backup of your iTunes library ensures that you won’t lose any of your media files during the process.
By considering these reasons, it becomes clear why backing up your iTunes library is a crucial practice. It not only protects your data but also provides the freedom to explore and enjoy your media collection without any worries. So, let’s move on to the next section to learn what you’ll need to get started with the backup process!
What you’ll need
Before you begin the process of backing up your iTunes library, it’s important to gather the necessary tools and equipment. Here’s what you’ll need:
- An external hard drive: Choose a reliable external hard drive with sufficient storage capacity to accommodate your entire iTunes library. It’s recommended to use a dedicated external hard drive solely for the purpose of backing up your iTunes library to avoid any conflicts or accidental deletions.
- A USB or Thunderbolt cable: Depending on the type of external hard drive you have, you’ll need a USB or Thunderbolt cable to connect it to your computer. Ensure that the cable is compatible with both your computer and the external hard drive.
- A computer with iTunes installed: Make sure you have a computer with iTunes installed and that it is up to date. This will be the device from which you’ll be transferring your iTunes library to the external hard drive.
- Enough free space on your external hard drive: Ensure that your external hard drive has enough free space to accommodate your entire iTunes library. Take into consideration the size of your media collection, including music, movies, TV shows, and podcasts.
- Time and patience: Backing up your iTunes library may take some time, especially if you have a large collection of media files. Set aside enough time for the process and remain patient throughout.
Once you have all the necessary items prepared, you’re ready to move on to the next section, where we’ll guide you through the step-by-step process of backing up your iTunes library onto your external hard drive. Let’s get started!
Step 1: Prepare your external hard drive
Before you begin the process of backing up your iTunes library, you’ll need to ensure that your external hard drive is ready to receive the backup. Follow these steps to prepare your external hard drive:
- Connect your external hard drive: Use the appropriate USB or Thunderbolt cable to connect your external hard drive to your computer. Ensure that both ends of the cable are securely attached.
- Format your external hard drive: If your external hard drive is new or has been previously used for other purposes, you may need to format it to ensure compatibility with your computer and to create a clean storage space for your iTunes backup. Formatting options can usually be found in your computer’s Disk Management or Disk Utility application. Follow the on-screen instructions to format your external hard drive using the recommended settings.
- Create a dedicated folder: Once your external hard drive is connected and formatted, create a dedicated folder on the drive where you’ll store your iTunes backup. Name this folder something recognizable and descriptive, such as “iTunes Backup” or “iTunes Library Backup”. This folder will serve as the destination for your iTunes files.
- Check available storage space: Ensure that your external hard drive has enough free space to accommodate your entire iTunes library. You can check the storage capacity of your drive by right-clicking on its icon or accessing its properties. Make sure the available space is equal to or greater than the size of your iTunes library.
Once you’ve completed these steps, your external hard drive will be prepared and ready to receive the backup of your iTunes library. In the next section, we’ll guide you through the process of locating your iTunes folder on your computer. Stay tuned!
Step 2: Locate your iTunes folder
Now that your external hard drive is prepared, the next step is to locate your iTunes folder on your computer. Follow these steps to find the location of your iTunes folder:
- Open iTunes on your computer: Launch the iTunes application on your computer by clicking on its icon in the taskbar or searching for it in the application menu. Ensure that you have the latest version of iTunes installed.
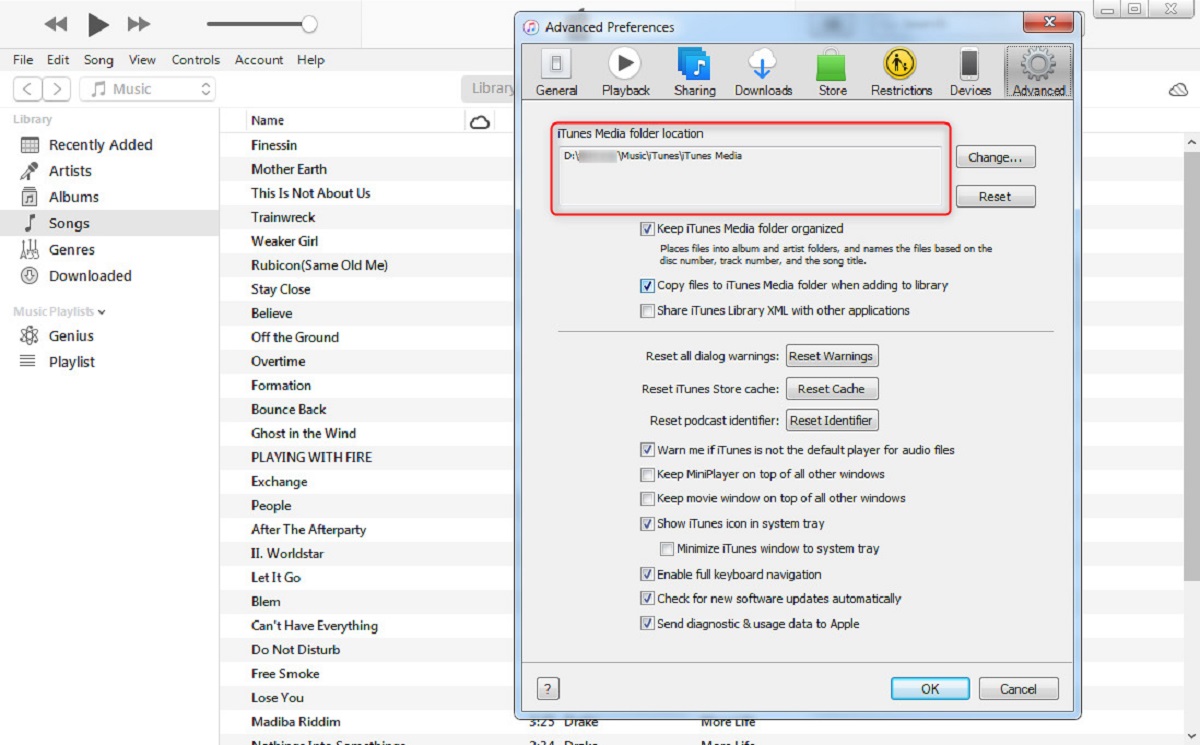
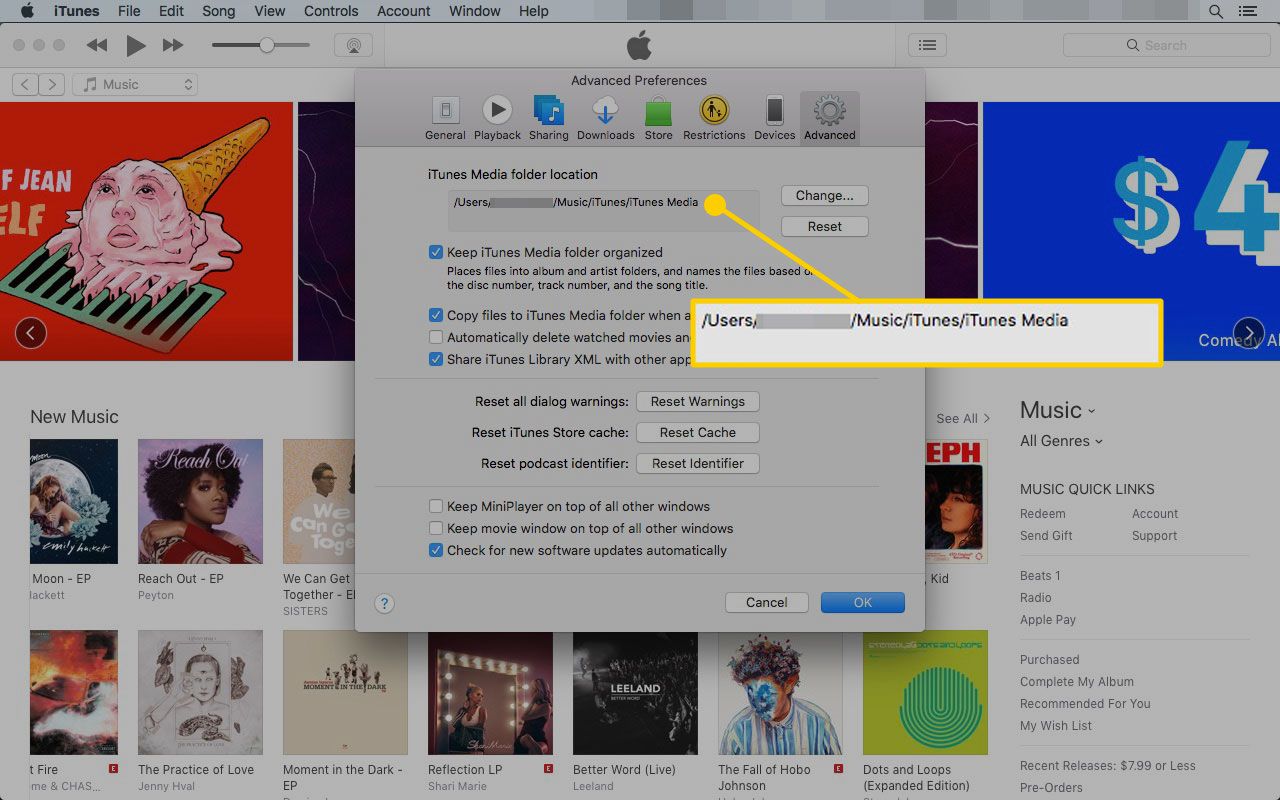
- Access the Preferences menu: In the top menu bar, click on “iTunes” (on a Mac) or “Edit” (on a Windows PC) and select “Preferences” from the dropdown menu. A new window will open with various options and settings.
- Go to the “Advanced” tab: In the Preferences window, navigate to the “Advanced” tab. Here, you’ll find advanced settings and options for iTunes.
- Check the location of your iTunes Media folder: Under the “Advanced” tab, you’ll see the location of your iTunes Media folder listed. This is the folder where all your media files, including music, videos, and podcasts, are stored. Take note of the folder path listed next to “iTunes Media folder location”.
By following these steps, you’ll be able to locate the iTunes folder on your computer. It’s important to remember the location of this folder, as it contains all your media files that you’ll be copying to your external hard drive in the next step. In the upcoming section, we’ll guide you through the process of copying the iTunes folder to your external hard drive. Stay tuned!
Step 3: Copy the iTunes folder to your external hard drive
Having located your iTunes folder in the previous step, it’s now time to copy the entire folder and its contents to your external hard drive. Follow these steps to copy the iTunes folder:
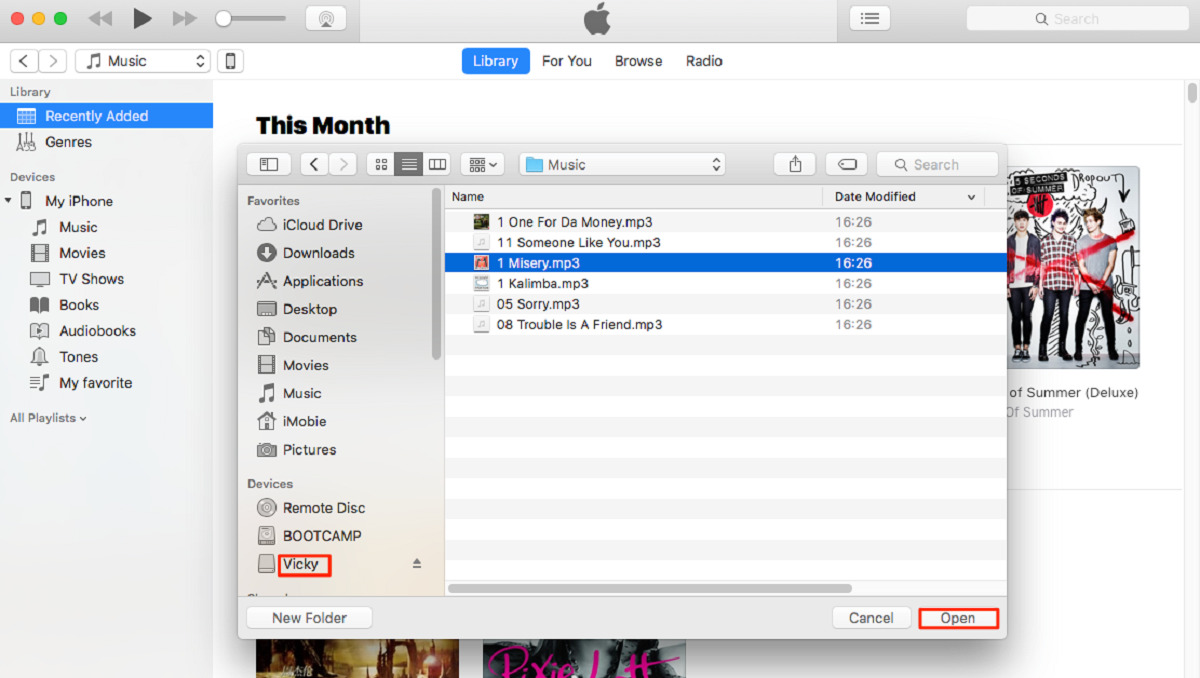
- Open a new File Explorer (Windows) or Finder (Mac) window: On your computer, open a new File Explorer window (Windows) or Finder window (Mac) by clicking on the respective icon in your taskbar or dock.
- Navigate to the location of your iTunes folder: Use the information you obtained in the previous step to navigate to the location of your iTunes folder. This is the folder that contains all your media files.
- Copy the iTunes folder: Once you’ve located the iTunes folder, right-click on it and select “Copy” (Windows) or press Command+C (Mac) to copy the folder with all its contents.
- Open your external hard drive folder: Navigate to the dedicated folder you created on your external hard drive in Step 1. This is where you will paste the copied iTunes folder.
- Paste the iTunes folder onto your external hard drive: Right-click inside the external hard drive folder and select “Paste” (Windows) or press Command+V (Mac) to paste the iTunes folder and its contents onto the external hard drive.
- Wait for the copying process to complete: The copying process may take some time, especially if you have a large iTunes library. Ensure that you have enough space on your external hard drive to accommodate the entire folder.
Once the copying process is complete, your iTunes folder and all its contents will be successfully copied to your external hard drive. This ensures that you have a backup of your entire iTunes library stored on a separate device. In the next section, we’ll show you how to point iTunes to the new location on your external hard drive.
Step 4: Point iTunes to the new location
Now that you have successfully copied your iTunes folder to your external hard drive, it’s important to let iTunes know about the new location. Follow these steps to point iTunes to the new location:
- Open iTunes on your computer: Launch the iTunes application on your computer. Ensure that you have the latest version of iTunes installed.
- Access the Preferences menu: In the top menu bar, click on “iTunes” (on a Mac) or “Edit” (on a Windows PC) and select “Preferences” from the dropdown menu. A new window will open with various options and settings.
- Go to the “Advanced” tab: In the Preferences window, navigate to the “Advanced” tab. This is where you’ll find advanced settings and options for iTunes.
- Change the iTunes Media folder location: Under the “Advanced” tab, you’ll see the current location of your iTunes Media folder listed. Click on the “Change” button next to the location to specify a new folder location.
- Select the new iTunes folder location: A file browser window will appear. Navigate to the external hard drive folder where you copied the iTunes folder in the previous step. Select the folder and click “Open” to confirm the new location.
- Confirm the changes: Back in the Preferences window, you should now see the new location of your iTunes Media folder listed. Click “OK” or “Apply” to save the changes and confirm the new folder location.
By following these steps, you have successfully pointed iTunes to the new location of your iTunes folder on the external hard drive. This ensures that iTunes will now access and manage your media files from the new location. In the next step, we’ll guide you through testing the backup to ensure everything is working properly. Stay tuned!
Step 5: Test the backup
After successfully pointing iTunes to the new location on your external hard drive, it’s important to test the backup to ensure that everything is working as expected. Follow these steps to test the backup of your iTunes library:
- Close iTunes: Make sure that iTunes is closed on your computer before proceeding with the testing.
- Disconnect or unmount your external hard drive: Safely disconnect or unmount your external hard drive from your computer. This ensures that iTunes will be forced to access your media files from the new location on your external hard drive.
- Reconnect or remount your external hard drive: Once your external hard drive is disconnected or unmounted, reconnect or remount it to your computer.
- Open iTunes: Launch iTunes on your computer. It may take a few moments for iTunes to recognize the new location of your iTunes library on the external hard drive.
- Check your media files: Navigate through your media library in iTunes and ensure that all your music, movies, TV shows, and other media files are accessible and playable. Test a few files to verify that they are working as expected.
- Play a media file: Select a media file and click on the play button to test if it plays smoothly without any issues. This will confirm that the backup has been successfully restored and that iTunes is functioning properly.
If everything is working correctly and you can access and play your media files from the new location on your external hard drive, congratulations! You have successfully created a backup of your iTunes library and ensured that it is accessible for future use. You can now enjoy your music, movies, and other media files with peace of mind, knowing that they are backed up on a separate device.
It’s important to regularly update your iTunes backup by repeating these steps whenever you add new media files to your library or make significant changes to your collection. By keeping your backup up to date, you can ensure that your iTunes library is always safe and protected.
With the completion of Step 5, you have successfully tested the backup of your iTunes library. In the next section, we’ll conclude our guide and summarize the importance of backing up your iTunes library. Stay tuned!
Conclusion
Backing up your iTunes library onto an external hard drive is a crucial practice to protect your valuable media files and ensure their longevity. By following the step-by-step process outlined in this guide, you have successfully created a backup of your iTunes library and pointed iTunes to the new location on your external hard drive.
Throughout this guide, we highlighted the importance of backing up your iTunes library. We discussed the potential risks of data loss due to computer crashes, hardware failures, accidental file deletions, or system upgrades. By having a backup, you can easily recover your iTunes library and continue to enjoy your music, movies, and other media files without any interruptions.
We outlined the essential tools you’ll need for the backup process, including an external hard drive, a USB or Thunderbolt cable, and a computer with iTunes installed. Additionally, we provided instructions on preparing your external hard drive, locating your iTunes folder, copying it to the external hard drive, and pointing iTunes to the new location.
Lastly, we emphasized the importance of testing the backup to ensure that everything is functioning as expected. By reconnecting your external hard drive and accessing your media files through iTunes, you can verify that your backup has been successfully restored and that all your media files are accessible and playable.
Remember, creating a backup of your iTunes library is not a one-time event. It’s crucial to regularly update your backup when you add new media files or make changes to your collection. This will ensure that your backup remains up to date and reflects the most recent state of your iTunes library.
With your iTunes library securely backed up on an external hard drive, you can have peace of mind knowing that your media files are protected and easily recoverable in the event of any unforeseen incidents.
So, take a moment to pat yourself on the back for completing this process, and always remember the importance of backing up your iTunes library. Happy listening and watching!