Introduction
Welcome to the world of digital music! With the rise of online streaming platforms and the convenience of downloading your favorite songs, it’s no surprise that many people have built up extensive music libraries on their computers. However, as our libraries continue to grow, we may encounter space constraints on our devices. This is where moving your iTunes library to an external hard drive can be a game-changer.
By shifting your iTunes library to an external hard drive, you can free up valuable storage space on your computer, allowing it to run more efficiently and smoothly. Additionally, this method provides a reliable backup solution, protecting your precious music collection from accidental loss or system crashes.
But how exactly can you copy your iTunes library to an external hard drive? What are the steps involved, and what tools do you need? In this guide, we will answer all these questions and provide you with a comprehensive, step-by-step process to successfully transfer your iTunes library. Whether you’re a seasoned iTunes user or a beginner just starting your music collection, this guide will help you navigate the process with ease.
Before we dive into the technical aspects, make sure you have everything you need. First and foremost, you’ll need a compatible external hard drive with sufficient storage capacity to accommodate your iTunes library. It’s essential to choose a reputable brand to ensure reliability and data security.
Furthermore, ensure that your computer and external hard drive are in good working condition and have the necessary cables to establish a connection. In most cases, a USB or Thunderbolt cable will suffice.
Now that you have your external hard drive ready, let’s get started on the step-by-step guide to copy your iTunes library. We’ll walk you through each stage, from preparing your iTunes library to the final step of verifying the successful transfer. So, without further ado, let’s jump right in!
Why You Should Consider Moving Your iTunes Library to an External Hard Drive
If you’re still on the fence about whether to move your iTunes library to an external hard drive, let’s explore some compelling reasons why this is a smart move.
1. Space Efficiency: One of the primary reasons to transfer your iTunes library is to free up valuable space on your computer. As music collections continue to expand, they can quickly consume a significant portion of your hard drive. By moving your library to an external hard drive, you can reclaim that space and use it for other important files or applications.
2. Convenient Backup: Computers are not invulnerable to malfunctions or crashes, and losing your music library can be devastating. By keeping a backup of your library on an external hard drive, you can protect your collection from any unforeseen events. It’s like having an insurance policy for your precious music files.
3. Portability: Want to enjoy your music on different devices or share it with friends? With an external hard drive, you can easily carry your entire iTunes library wherever you go. Just plug it into any compatible device, and you’ll have access to your music collection in an instant.
4. Organizational Flexibility: External hard drives offer the flexibility to organize your iTunes library in a way that suits your preferences. You can create custom folders, arrange your music by genre, artist, or album, and even include additional information like album art or lyrics. This allows for a more streamlined and personalized music experience.
5. Improved Computer Performance: By offloading your music files to an external hard drive, you can alleviate the burden on your computer’s resources. This can result in improved performance, faster boot times, and smoother multitasking. With more space for your computer to breathe, you’ll notice a significant difference in its overall speed and responsiveness.
6. Room for Growth: If you’re an avid music enthusiast or a DJ, chances are your music library will continue to expand over time. An external hard drive can provide the scalability you need to accommodate future music additions without worrying about running out of space on your computer.
In summary, transferring your iTunes library to an external hard drive offers space efficiency, convenient backup, portability, organizational flexibility, improved computer performance, and room for growth. It’s a practical and efficient solution to keep your music collection safe, accessible, and enjoyable. So, let’s dive into the step-by-step guide and get started on moving your iTunes library to an external hard drive!
What You’ll Need to Get Started
Before you embark on the process of copying your iTunes library to an external hard drive, it’s important to ensure that you have all the necessary tools and resources. Here’s a list of everything you’ll need to get started:
1. Compatible External Hard Drive: First and foremost, you’ll need an external hard drive with sufficient storage capacity to accommodate your iTunes library. Make sure the hard drive is compatible with your computer and has all the necessary cables for connectivity.
2. USB or Thunderbolt Cable: Depending on your computer and the external hard drive you’re using, you’ll need a USB or Thunderbolt cable to establish a connection between the two devices.
3. Updated iTunes Software: Before initiating the transfer, ensure that you have the latest version of iTunes installed on your computer. This will help in preventing any compatibility issues and ensure a smooth transfer process.
4. Adequate Free Space: Check the available storage space on your computer to ensure that you have enough room for temporary files during the transfer process. It’s a good practice to have at least double the size of your iTunes library as free space on your computer.
5. Patience and Time: Transferring a large iTunes library to an external hard drive can take some time, depending on the size of your collection and the speed of your computer. Ensure that you have ample time set aside to complete the process without interruptions.
6. Internet Connection: While not essential for the transfer itself, having a stable internet connection may be useful if you need to download any software updates or troubleshoot any issues that may arise during the process.
7. Backup of Your iTunes Library: Though not a requirement, it’s always advisable to create a backup of your iTunes library before initiating the transfer. This backup can be stored on an external hard drive or in cloud storage for added security.
Once you have gathered all the necessary tools and resources, you’ll be well-prepared to begin the process of copying your iTunes library to an external hard drive. So, let’s move on to the next section, where we’ll provide you with a step-by-step guide to ensure a successful transfer.
Step-by-Step Guide: How to Copy Your iTunes Library to an External Hard Drive
Now that you have everything you need, let’s dive into the step-by-step process of copying your iTunes library to an external hard drive:
Step 1: Connect the External Hard Drive: Plug in your external hard drive to your computer using the appropriate cable. Ensure that both devices are properly connected and recognized by your computer.
Step 2: Open iTunes: Launch iTunes on your computer. If prompted, make sure you have the latest version installed. It’s crucial to keep your iTunes software updated for a smooth transfer process.
Step 3: Consolidate Your iTunes Library: In the iTunes menu, go to “File” and select “Library” > “Organize Library.” Check the box that says, “Consolidate files” and click “OK”. This will ensure that all your music files are gathered in one location, making the transfer process more organized.
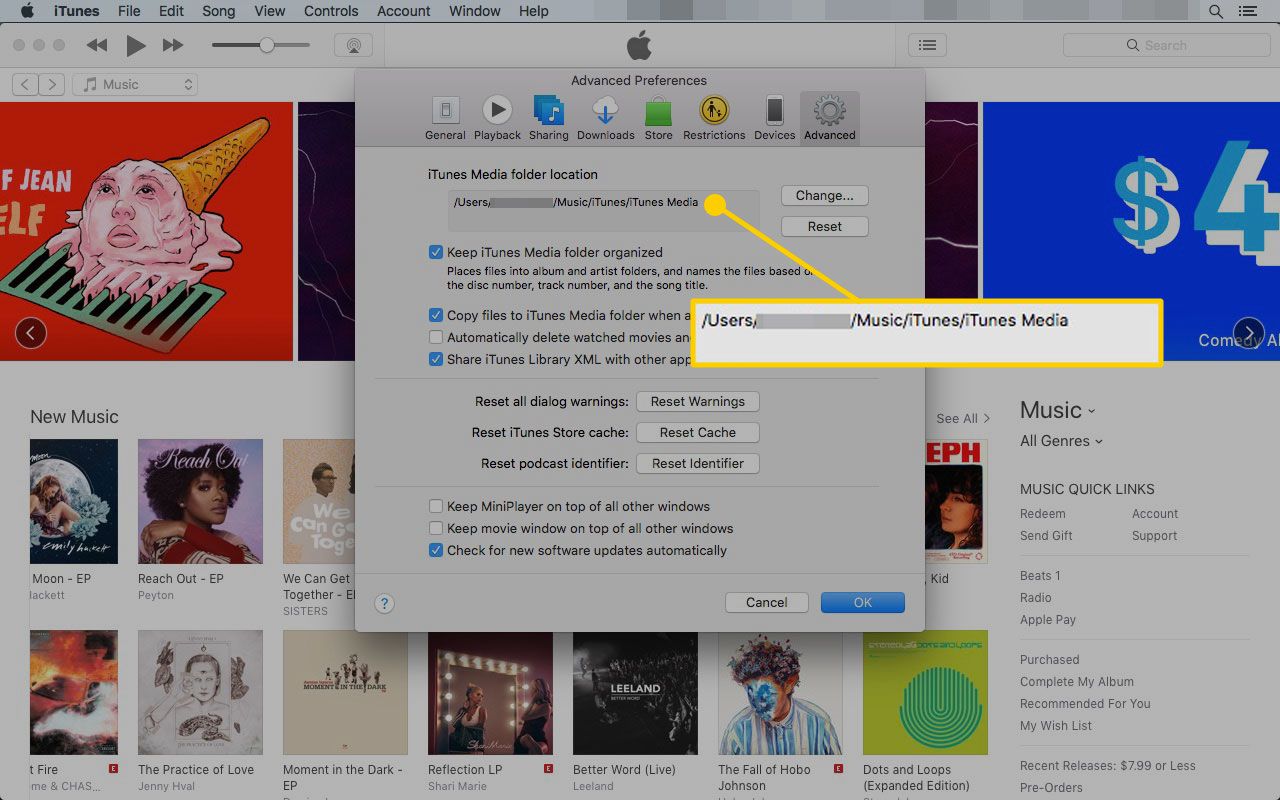
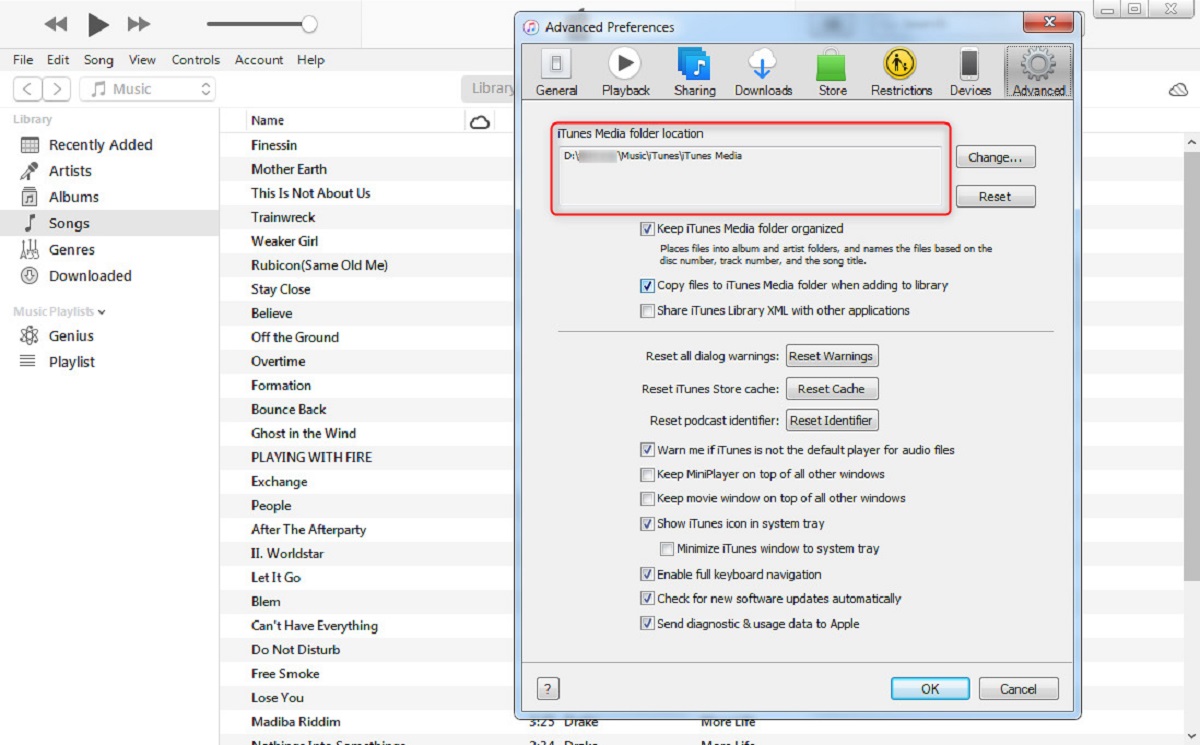
Step 4: Transfer iTunes Library to the External Hard Drive: In the iTunes menu, go to “Edit” > “Preferences” > “Advanced”. Here you will see the option to change the iTunes Media folder location. Click the “Change” button and choose the external hard drive as the new location. Click “OK” to save the changes. This will set the external hard drive as the destination for your iTunes library.
Step 5: Copy Your iTunes Library: To start the actual transfer process, go back to the iTunes menu and select “File” > “Library” > “Organize Library”. Check the box that says, “Reorganize files in the folder ‘iTunes Media'”. Click “OK” to begin the copying process. This may take some time, depending on the size of your library and the speed of your computer.
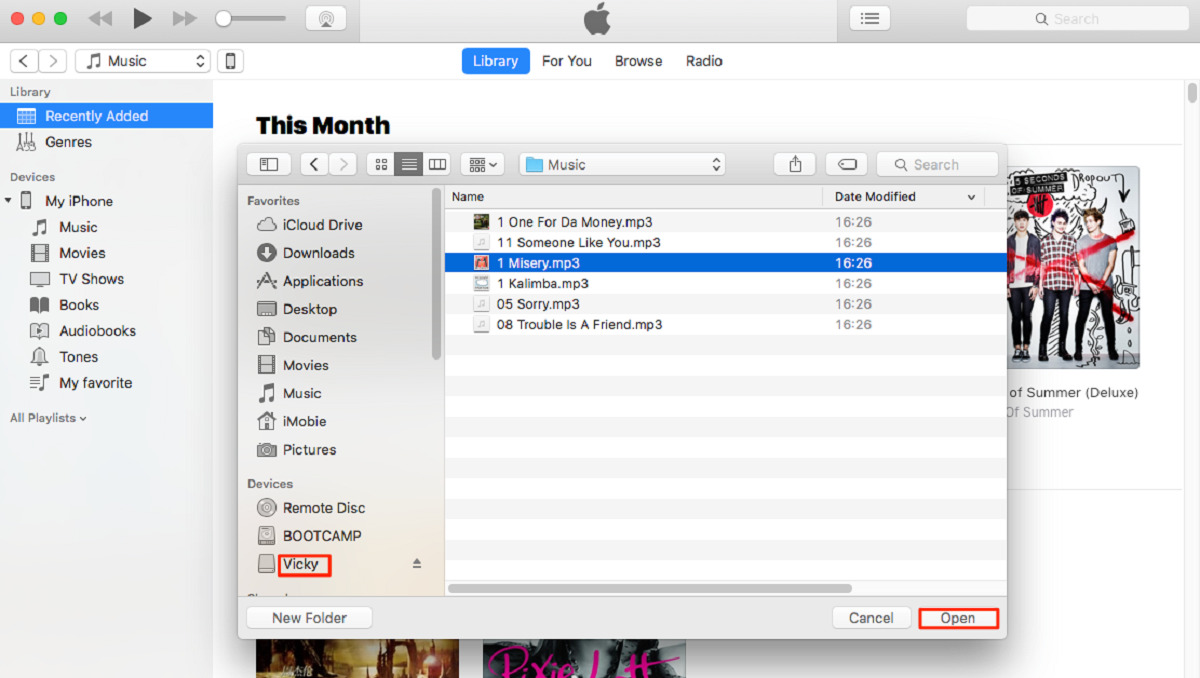
Step 6: Verify the Transfer: Once the transfer is complete, go to the external hard drive and locate the iTunes folder. Open it to confirm that all your music files, playlists, and other content have been successfully copied. You can also open iTunes and ensure that everything appears as expected.
Step 7: Disconnect the External Hard Drive: Safely eject the external hard drive from your computer by clicking the eject symbol next to the drive’s name. Wait until you receive confirmation that it is safe to remove the device before unplugging it.
Step 8: Update iTunes Library Location: If you plan to use your iTunes library exclusively from the external hard drive in the future, it’s important to update the iTunes library location. Open iTunes and go to “Edit” > “Preferences” > “Advanced”. Click the “Change” button and select the external hard drive as the new iTunes Media folder location.
With these easy-to-follow steps, you can successfully copy your iTunes library to an external hard drive, freeing up space on your computer and ensuring the safety and accessibility of your music collection. Now let’s address some common troubleshooting tips to help you overcome any potential issues that may arise during the process.
Troubleshooting Tips: Common Issues and How to Resolve Them
Although transferring your iTunes library to an external hard drive is a relatively straightforward process, you may encounter some common issues along the way. Here are a few troubleshooting tips to help you resolve them:
1. Disk Space Errors: If you receive an error message stating that there is not enough disk space on your external hard drive, double-check the available storage and ensure that it can accommodate the entire iTunes library. If needed, consider freeing up space on the external hard drive or using a different one with more storage capacity.
2. File Transfer Interruptions: Transferring a large iTunes library can take a significant amount of time, and interruptions in the process may occur. To prevent this, ensure that your computer does not go to sleep or hibernate mode during the transfer. Disable any power-saving settings that could interrupt the transfer process.
3. Unrecognized External Hard Drive: If your computer does not recognize the external hard drive, try connecting it to a different USB or Thunderbolt port. If possible, test the hard drive on another computer to ensure that it is functioning properly. You may also need to install any necessary drivers or software for the hard drive to be recognized.
4. Corrupted Files: In some cases, transfer errors can result in corrupted files within your iTunes library. It’s always a good idea to create a backup of your library before transferring it. If you encounter any corrupted files, you can restore them from the backup or redownload them from the iTunes Store.
5. Permission Issues: If you encounter permission issues while transferring your iTunes library, make sure you have the necessary administrative rights on your computer. Try running iTunes as an administrator by right-clicking on the application icon and selecting “Run as Administrator.”
6. Incomplete Transfers: If the transfer process gets interrupted or stops before completion, you may be left with an incomplete iTunes library on your external hard drive. In this case, repeat the steps to transfer your library from the beginning, ensuring that you have a stable and uninterrupted connection between your computer and the external hard drive.
If you encounter any other issues during the transfer process, it’s always a good idea to consult the iTunes support website or reach out to Apple support for further assistance. They can provide you with specific guidance based on your unique situation.
By utilizing these troubleshooting tips, you can address common issues and ensure a successful transfer of your iTunes library to an external hard drive. Now, let’s explore the benefits of storing your iTunes library on an external hard drive.
Benefits of Storing your iTunes Library on an External Hard Drive
Storing your iTunes library on an external hard drive comes with several noteworthy benefits. Let’s explore the advantages of making this shift:
1. Increased Storage Space: Moving your iTunes library to an external hard drive enables you to free up precious storage space on your computer. This is especially beneficial if you have a large collection of music and limited internal storage. By offloading your library to an external hard drive, you can create room for other files, applications, and improve your computer’s performance.
2. Portability and Flexibility: Having your iTunes library on an external hard drive grants you the flexibility to access your music from multiple devices. Whether you’re using your computer, a laptop, or a friend’s computer, all you need to do is connect the external hard drive and enjoy your music library instantly. This portability is especially convenient for DJs and music enthusiasts who frequently need access to their collection on different setups.
3. Backup and Data Security: Storing your iTunes library solely on your computer puts it at risk of data loss due to hardware failure, system crashes, or accidental deletions. By keeping a copy of your library on an external hard drive, you create a reliable backup solution. Should anything happen to your computer, you can easily restore your music library from the external hard drive without losing a single track.
4. Organization and Customization: External hard drives offer flexibility in organizing and customizing your iTunes library. You can create folders, subfolders, or use existing organizational structures on the external hard drive to sort your music based on genres, artists, albums, or playlists. This enables you to navigate your library with ease, ensuring a more personalized and tailored music experience.
5. Protection Against Software Updates: Occasionally, software updates or changes in operating systems can cause compatibility issues with your iTunes library. By keeping your library on an external hard drive, you reduce the risk of potential conflicts or loss of data during these updates. You can continue using your trusted version of iTunes without worrying about compatibility concerns.
6. Scalability and Room for Growth: As your music collection expands, you’ll need ample space to accommodate new additions. An external hard drive provides the flexibility to expand your iTunes library without worrying about running out of storage. You can simply upgrade to a larger capacity external hard drive or add multiple drives to cater to your growing collection.
7. Improved Media Playback: Accessing your music from an external hard drive can result in improved media playback performance. The external hard drive’s dedicated resources ensure that your music is streamed or played smoothly without any interruptions caused by other applications or processes happening on your computer.
With these benefits in mind, it’s evident that storing your iTunes library on an external hard drive offers increased storage space, portability, data security, organization, customization, protection against software updates, scalability, and improved media playback – all contributing to an enhanced music listening experience.
Now that we’ve explored the benefits of using an external hard drive for your iTunes library, let’s wrap up this guide and summarize the key points.
Conclusion
Transferring your iTunes library to an external hard drive is a practical solution to optimize your computer’s storage space, enhance the portability of your music collection, and ensure the security of your precious files. By following the step-by-step guide outlined in this article, you can successfully copy your iTunes library to an external hard drive and enjoy the numerous benefits that come with it.
From freeing up space on your computer to creating a reliable backup solution, an external hard drive offers the convenience, scalability, and flexibility that every music enthusiast desires. With your iTunes library stored safely on an external hard drive, you can access your favorite songs, playlists, and albums from any device with ease.
Remember to keep your iTunes software updated, check for sufficient disk space, and stay patient during the transfer process. Troubleshoot any issues that may arise along the way, and don’t forget to keep a backup of your library to safeguard against any unforeseen events.
So, whether you’re a music lover looking to streamline your digital collection or a DJ seeking seamless access to your tracks, moving your iTunes library to an external hard drive is a practical and effective solution. Embrace the benefits of increased storage space, enhanced portability, and organizational flexibility as you embark on this exciting journey.
We hope this guide has provided you with the necessary information and confidence to successfully transfer your iTunes library to an external hard drive. Enjoy the expanded storage, improved performance, and peace of mind that come with having your music collection securely stored on an external hard drive. Happy listening!