Introduction
Transferring your iTunes movies to an external hard drive can be a smart and practical solution to free up space on your computer or to have a reliable backup for your precious movie collection. Whether you have accumulated a large library over the years or want to preserve your digital movies securely, this guide will walk you through the step-by-step process of transferring iTunes movies to an external hard drive.
With the increasing popularity of streaming services, you might wonder why it is necessary to transfer your iTunes movies to an external hard drive. While streaming offers convenience, it also requires a stable internet connection and can be subject to limited availability of certain titles. By having your movies stored locally on an external hard drive, you can enjoy them whenever you want, even without an internet connection. Additionally, it ensures that you have full control over your movie collection and can access them at any time.
Before we dive into the transfer process, there are a few things you’ll need. First, make sure you have an external hard drive with sufficient storage capacity to accommodate your iTunes movies. It’s recommended to use a high-quality and reliable drive to ensure the safety of your digital content. Secondly, ensure that your computer and iTunes software are up to date to avoid any compatibility issues during the transfer process.
Now that we have the basics covered, let’s proceed with the step-by-step instructions to transfer your iTunes movies to an external hard drive. By following these steps carefully, you’ll be able to free up space on your computer and enjoy your digital movies hassle-free.
Step 1: Prepare Your External Hard Drive
Before you begin the transfer process, it’s important to properly prepare your external hard drive. Follow these steps to ensure a smooth and successful transfer:
- Connect your external hard drive to your computer using a USB cable. Make sure the drive is recognized and appears in your computer’s file explorer.
- If your external hard drive is not formatted for your operating system (Windows or macOS), you will need to format it. Formatting erases all existing data on the drive, so make sure to back up any important files beforehand.
- To format the drive on Windows, right-click on the drive in the file explorer, select “Format,” and follow the on-screen instructions. On macOS, open “Disk Utility,” select the drive, click on the “Erase” tab, and choose the desired file system (usually exFAT for cross-platform compatibility).
- Assign a recognizable name to your external hard drive. This will make it easier to identify when selecting the destination for your iTunes movies.
- Create a dedicated folder on your external hard drive to store your iTunes movies. This will help keep your movies organized and easily accessible.
By following these steps, you set the foundation for a successful transfer of your iTunes movies to your external hard drive. With a properly prepared external hard drive, you’re ready to proceed to the next step of authorizing your computer.
Step 2: Authorize Your Computer
In order to access and transfer your iTunes movies to an external hard drive, it’s important to authorize your computer. This step ensures that your computer is authorized to play the protected content from your iTunes account. Follow these steps to authorize your computer:
- Open the iTunes application on your computer. If you’re not already signed in, sign in with your Apple ID and password.
- Once signed in, go to the “Account” tab located in the top menu bar of the iTunes window.
- In the drop-down menu, click on “Authorization” and select “Authorize This Computer”.
- Enter your Apple ID and password when prompted and click on “Authorize”.
- If successful, a message will appear confirming that your computer has been authorized.
It’s important to note that you can authorize up to five computers with your iTunes account. If you’ve already reached the maximum limit, you may need to deauthorize one of your previously authorized computers before proceeding with the authorization process on your current computer.
By authorizing your computer, you ensure that you have the necessary permissions to access and transfer your iTunes movies. With your computer properly authorized, you can proceed to the next step of locating your iTunes media folder.
Step 3: Locate Your iTunes Media Folder
In order to successfully transfer your iTunes movies to the external hard drive, you need to locate your iTunes media folder. Follow these steps to find the folder on your computer:
- Open the iTunes application on your computer if it’s not already open.
- Go to the “Edit” tab in the top menu bar and select “Preferences”.
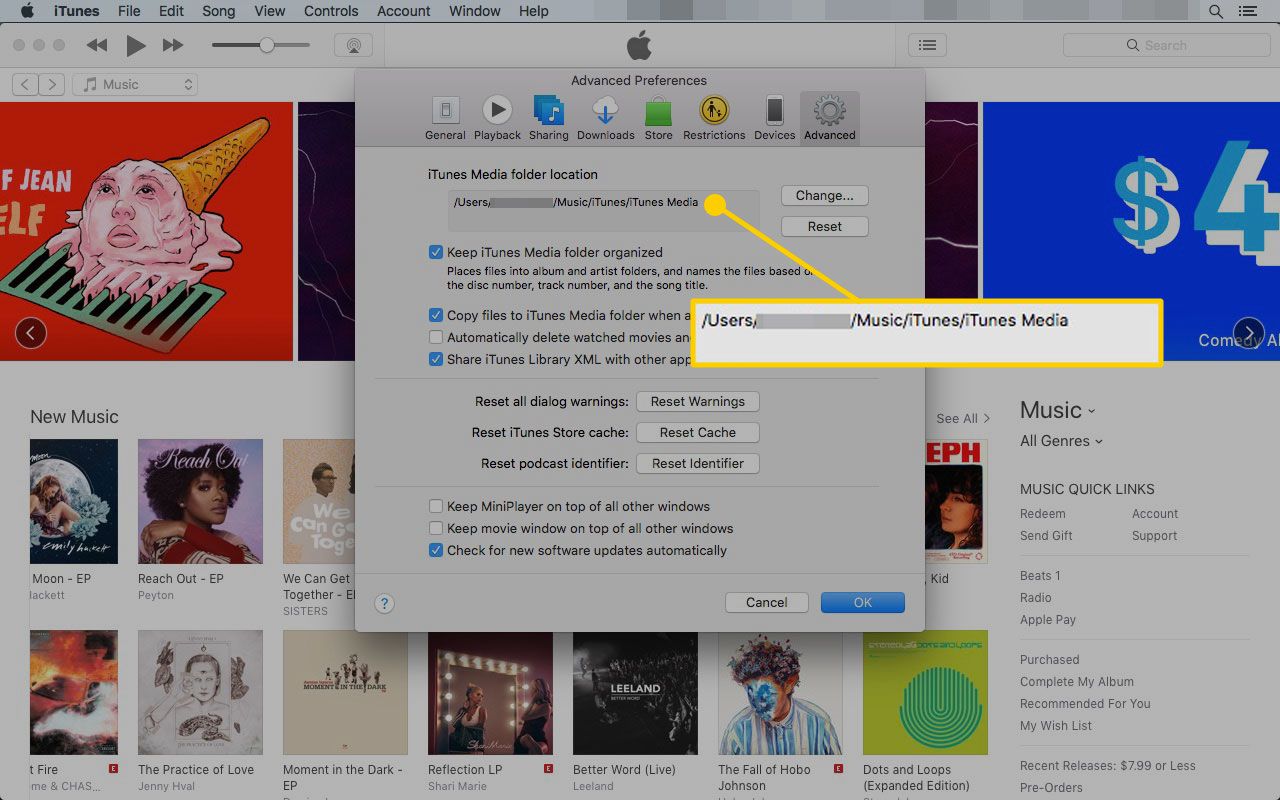
- A window will appear with various tabs. Click on the “Advanced” tab.
- Within the “Advanced” tab, you’ll find the “iTunes Media folder location” section. Take note of the folder path listed next to “iTunes Media folder location”. This path indicates the current location on your computer where your iTunes movies are stored.
- You can also click on the “Change” button within the “iTunes Media folder location” section to choose a different location for your iTunes media folder. This step is optional, but it allows you to specify a specific folder on your external hard drive as the new location.
Once you have located your iTunes media folder, you are one step closer to transferring your movies to the external hard drive. It’s important to remember the folder path or choose a new location on your external hard drive where you want to store your iTunes movies. Now, let’s move on to the next step of copying your iTunes movies to the external hard drive.
Step 4: Copy iTunes Movies to External Hard Drive
Once you have located your iTunes media folder, you are ready to transfer your iTunes movies to your external hard drive. Follow these steps to copy your iTunes movies:
- Open the file explorer on your computer and navigate to the location of your iTunes media folder.
- Select the movies you want to transfer to the external hard drive. You can either select individual movies or use the Ctrl or Command key to select multiple movies at once.
- Right-click on the selected movies and choose “Copy” from the context menu.
- Now, go to your external hard drive in the file explorer and open the dedicated folder you created to store your iTunes movies.
- Right-click inside the folder and choose “Paste” from the context menu to copy the selected iTunes movies into the folder.
- Depending on the size of the movies and the speed of your computer, the copying process may take some time. Be patient and let the process complete.
- Once the copying process is finished, verify that the movies have been successfully copied to your external hard drive by checking the folder.
It’s important to note that the transfer speed may vary depending on the size of the files and the speed of your external hard drive. It’s recommended to keep your computer plugged in during the transfer process to avoid any interruptions.
With your iTunes movies successfully copied to your external hard drive, you’re almost done. The next step is to update the iTunes media location to ensure that iTunes can find your movies in the new location.
Step 5: Update iTunes Media Location
After transferring your iTunes movies to the external hard drive, it’s important to update the iTunes media location so that iTunes can locate and play your movies from the new location. Follow these steps to update the media location in iTunes:
- Open the iTunes application on your computer.
- Go to the “Edit” tab in the top menu bar and select “Preferences”.
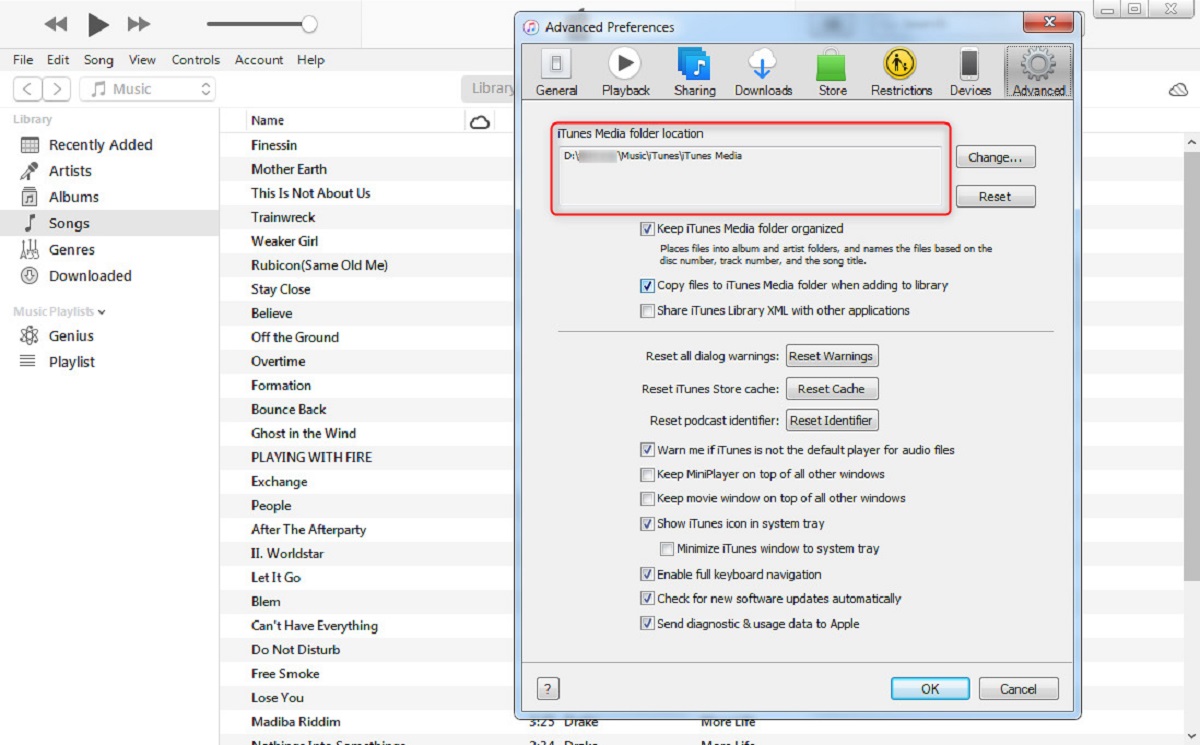
- In the Preferences window, click on the “Advanced” tab.
- Within the “Advanced” tab, you’ll find the “iTunes Media folder location” section.
- Click on the “Change” button next to the current folder location.
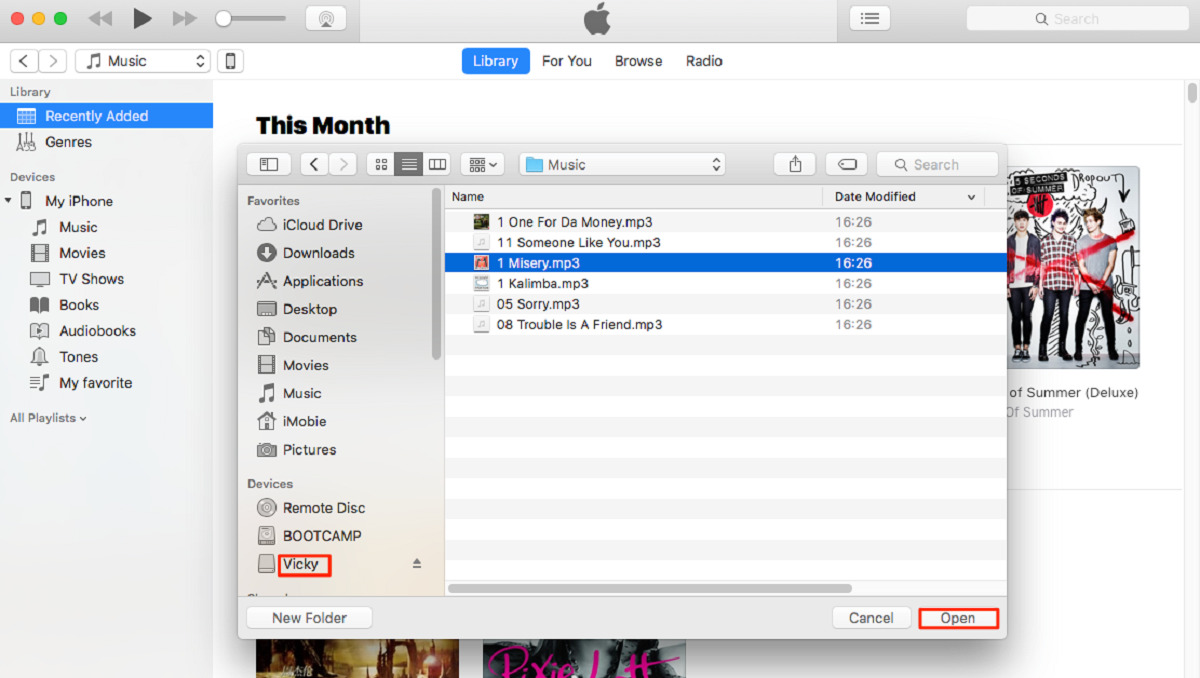
- A new window will appear. Browse to the folder on your external hard drive where you copied your iTunes movies in the previous step.
- Select the folder and click “OK” to confirm the new media location.
- Click “OK” in the Preferences window to save the changes.
By updating the iTunes media location, you’re informing iTunes about the new location of your movies on the external hard drive. This ensures that when you play a movie from iTunes, it will access the correct file in the new location.
It’s important to note that if you ever disconnect or remove the external hard drive, iTunes may not be able to locate your movies until you reconnect the drive and update the media location again. Therefore, it’s recommended to keep the external hard drive connected whenever you want to access your iTunes movies.
With the media location successfully updated, you’re ready to test the transfer and ensure that your iTunes movies play correctly from the external hard drive. Let’s move on to the next step.
Step 6: Test the Transfer
After completing the transfer process and updating the iTunes media location, it’s important to test the transfer to ensure that your iTunes movies play correctly from the external hard drive. Follow these steps to test the transfer:
- Keep your external hard drive connected to your computer.
- Open the iTunes application on your computer.
- In the iTunes library, navigate to the “Movies” section.
- Find one of the transferred movies in the list and double-click on it to play it.
- Ensure that the movie starts playing without any issues.
- Check for any audio or video synchronization problems during playback.
- If the movie plays without any issues, navigate to your other transferred movies and test them as well.
- If you encounter any issues, make sure that the external hard drive is connected and that the media location in iTunes is correctly set.
- You may need to restart iTunes or your computer if the movies are still not playing correctly.
By testing the transfer, you can verify that the iTunes movies have been successfully transferred to the external hard drive and that they play without any problems. If you encounter any issues during the test, double-check the instructions from the previous steps and ensure that all the necessary steps have been properly followed.
Once you have confirmed that your iTunes movies play correctly from the external hard drive, you can enjoy your movie collection with the convenience and freedom that comes with having them stored on a separate storage device. Congratulations on successfully transferring your iTunes movies!
Conclusion
Transferring your iTunes movies to an external hard drive is a great way to free up space on your computer and ensure the safety and accessibility of your movie collection. It allows you to enjoy your movies offline and gives you control over your digital content. By following the step-by-step process outlined in this guide, you can successfully transfer your iTunes movies to an external hard drive.
Throughout the process, we covered important steps such as preparing the external hard drive, authorizing your computer, locating the iTunes media folder, copying the movies to the external hard drive, updating the media location in iTunes, and testing the transfer. Each of these steps is crucial in ensuring a smooth and successful transfer of your iTunes movies.
Remember to properly prepare your external hard drive, authorize your computer, and locate the iTunes media folder before copying the movies. Ensure that you update the media location in iTunes to access and play the movies from the new storage location. Finally, don’t forget to test the transfer to confirm that your movies play correctly.
With your iTunes movies safely stored on the external hard drive, you can enjoy an organized and accessible movie collection. Whether you’re streaming your movies or watching them offline, having your iTunes movies on an external hard drive provides convenience and peace of mind.
Now that you have successfully transferred your iTunes movies to an external hard drive, you can explore new ways to organize and enjoy your digital content. Stay organized, keep backups of your files, and continue to enjoy your favorite movies hassle-free.