Introduction
Welcome to our guide on how to back up iTunes to an external hard drive. If you’re an avid iTunes user, you know that your media library can quickly grow to a substantial size, consisting of music, movies, TV shows, podcasts, and more. Losing all of this precious content due to a computer crash or accidental deletion can be heartbreaking and frustrating.
That’s why it’s crucial to have a reliable backup strategy in place to ensure the safety and preservation of your iTunes library. One of the most effective ways to achieve this is by backing up your iTunes library to an external hard drive. By doing so, you not only free up space on your computer but also create an additional layer of protection against potential data loss.
In this guide, we will walk you through the step-by-step process of backing up your iTunes library to an external hard drive. Whether you have a vast collection of music or a carefully curated playlist, following these instructions will give you peace of mind knowing that your iTunes library is safe and secure.
Before we dive into the details, it’s important to note that the exact steps may vary slightly depending on your operating system and the version of iTunes you’re using. However, the overall process remains the same, so don’t worry if some menu options or settings appear slightly different. Let’s get started!
Why Should You Back Up iTunes to an External Hard Drive?
Backing up your iTunes library to an external hard drive offers several important benefits and safeguards for your media collection. Let’s explore why it’s crucial to have a backup of your iTunes library:
1. Data Protection: Computers are prone to hardware malfunctions, viruses, and accidental deletions. By having an external hard drive backup, you protect your iTunes library from potential data loss. If anything happens to your computer, you can easily restore your library from the backup without losing any of your precious media.
2. Space Management: iTunes libraries can grow quite large, especially if you have an extensive collection of music, movies, and TV shows. Transferring your iTunes library to an external hard drive frees up valuable space on your computer’s internal storage. This allows your computer to run more efficiently, with improved performance and faster startup times.
3. Portability: By moving your iTunes library to an external hard drive, you gain the flexibility to access your media from multiple devices. You can easily connect the external hard drive to any compatible computer or media player to enjoy your music or videos on the go. This is particularly useful if you have a laptop with limited storage capacity or if you frequently travel and want to carry your entire media library with you.
4. Safekeeping: Storing your iTunes library solely on a computer’s internal storage leaves your media vulnerable to potential risks like hard drive failures, system crashes, or accidental deletions. By preserving a backup copy on an external hard drive, you have an additional layer of protection against these risks. This ensures that your media files remain intact, even if something unexpected happens to your computer.
In summary, backing up your iTunes library to an external hard drive provides essential data protection, helps manage your computer’s storage capacity, offers portability, and ensures the safekeeping of your valuable media collection. Now that we understand the importance of this backup strategy, let’s proceed to the next section to learn what you will need for the backup process.
What You Will Need
Before you begin the process of backing up your iTunes library to an external hard drive, it’s important to gather the necessary tools and ensure you have everything ready. Here’s what you’ll need:
1. An External Hard Drive: Choose a reliable external hard drive with sufficient storage capacity to accommodate your iTunes library. Consider the size of your media collection and allow for future growth. USB or Thunderbolt connectivity is recommended for easy compatibility with your computer.
2. Compatible Cables: Depending on the type of external hard drive you’ve selected, make sure you have the appropriate cables to connect it to your computer. Most external hard drives come with the necessary cables, but double-check to ensure compatibility.
3. A Computer with iTunes Installed: Ensure that you have a computer with iTunes installed and that it is up to date. The steps provided in this guide are applicable to both Windows and macOS operating systems.
4. Adequate Free Space on Your External Hard Drive: Before starting the backup process, ensure that your external hard drive has enough free space to accommodate your entire iTunes library. Check the size of your library by navigating to the iTunes Media folder (which we will discuss in the next section) or by accessing the “Get Info” option for your iTunes library within iTunes.
5. Patience and Time: Depending on the size of your iTunes library and the speed of your computer and external hard drive, the backup process may take some time. It’s important to have patience and allocate enough time to complete the backup without interruption.
Once you have gathered these essential items, you are ready to proceed with the backup process. Remember, having a reliable external hard drive and ensuring you have enough free space will help ensure a successful backup without any interruptions. Now that you have everything you need, let’s move on to the next section, where we will guide you through the step-by-step process of backing up your iTunes library to an external hard drive.
Step 1: Connect Your External Hard Drive
The first step in backing up your iTunes library to an external hard drive is to ensure that your external hard drive is properly connected to your computer. Follow these steps to connect your external hard drive:
1. Power off your computer: Before making any physical connections, it is advisable to turn off your computer to prevent any potential damage or data loss.
2. Locate the USB or Thunderbolt port on your computer: Depending on the type of port your external hard drive requires, locate the appropriate USB or Thunderbolt port on your computer. These ports are typically found on the sides or back of your computer’s tower or on the side of your laptop.
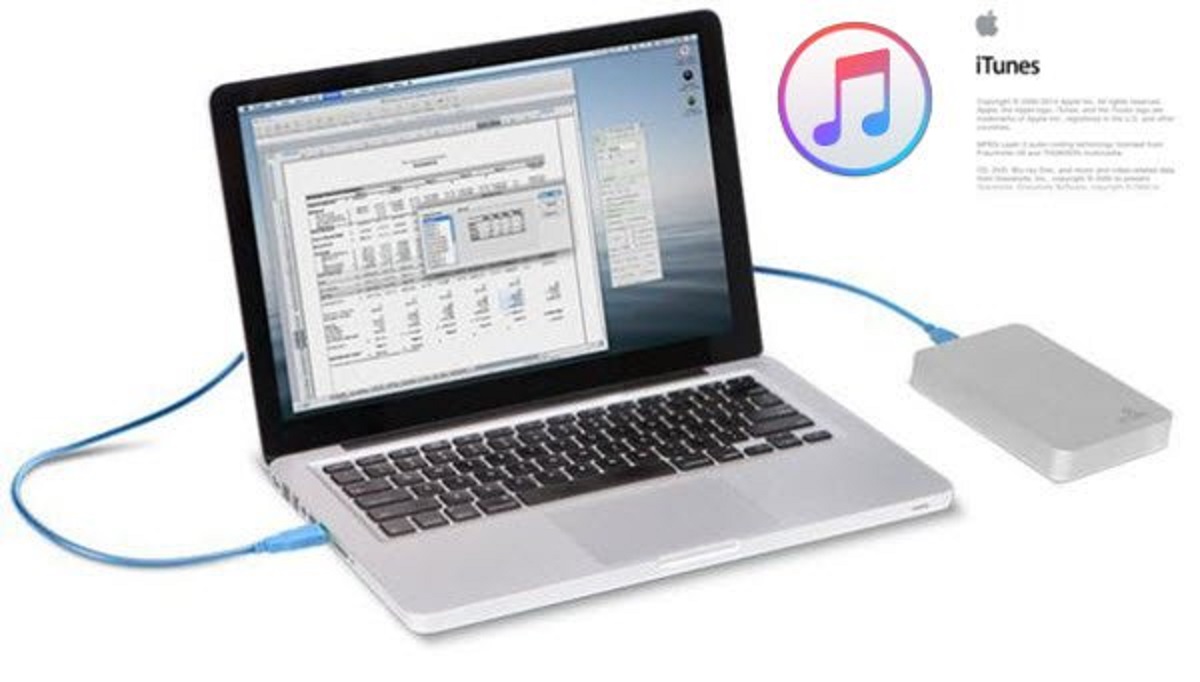
3. Connect the external hard drive to your computer: Take the cable that came with your external hard drive and plug one end into the external hard drive. Then, plug the other end of the cable into the USB or Thunderbolt port on your computer.
4. Power on your external hard drive: Once the connection is made, power on your external hard drive, if necessary. Some external hard drives are powered via USB connection and do not require a separate power source, while others may have an external power adapter.
5. Wait for your computer to recognize the external hard drive: Your computer should automatically detect the connected external hard drive. Wait for a few seconds to allow the computer to recognize the drive. You may also receive a notification or see an icon appearing on your computer’s desktop indicating that the external hard drive is ready.
Once you have successfully connected your external hard drive to your computer and ensured that it is detected, you are ready to proceed to the next step. In the upcoming section, we will guide you on how to locate your iTunes media folder to prepare it for the backup process.
Step 2: Locate Your iTunes Media Folder
Before you can start the process of backing up your iTunes library to an external hard drive, you need to locate your iTunes media folder. The media folder contains all your music, movies, TV shows, podcasts, and other media files. Follow these steps to find your iTunes media folder:
1. Open iTunes on your computer: Launch the iTunes application on your computer by clicking on the iTunes icon in your applications folder (for macOS) or the Start menu (for Windows).
2. Access iTunes Preferences: For macOS users, click on “iTunes” in the menu bar at the top of your screen and select “Preferences.” For Windows users, click on “Edit” in the menu bar at the top of the iTunes window and click on “Preferences”.
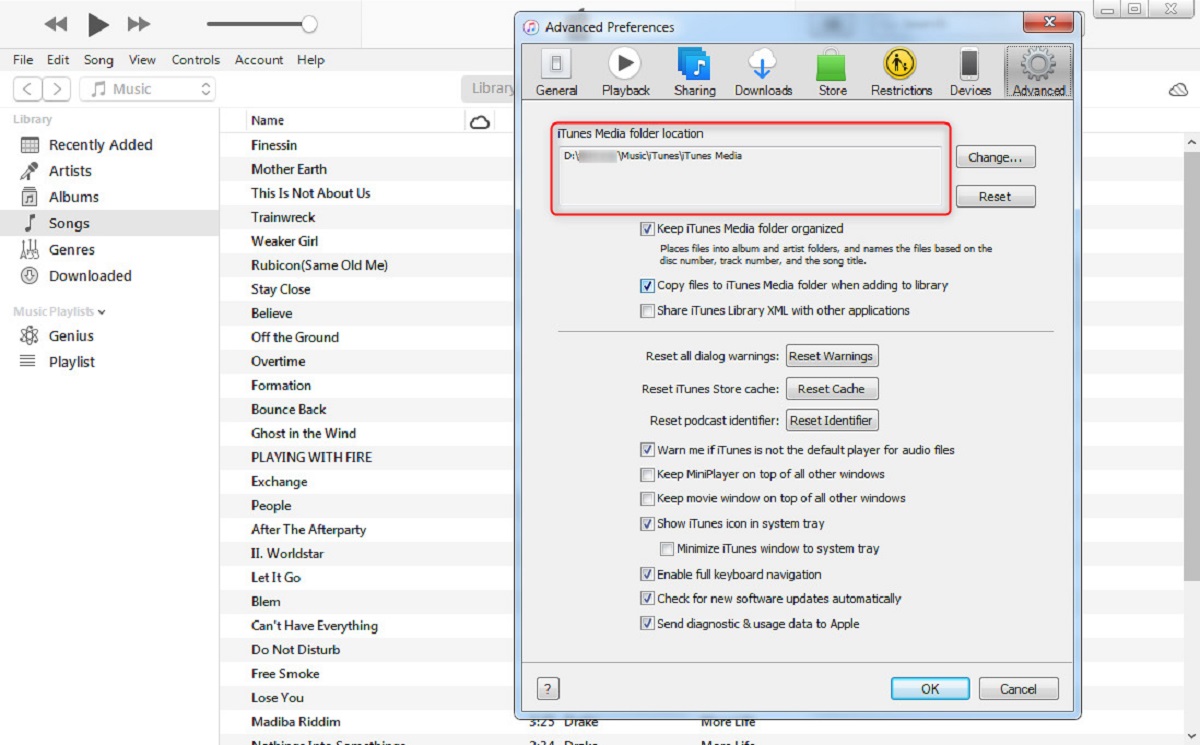
3. Select the “Advanced” tab: In the iTunes Preferences window, click on the “Advanced” tab. This tab contains settings related to your iTunes media folder.
4. Take note of the “iTunes Media folder location”: On the “Advanced” tab, locate the “iTunes Media folder location” section. Here, you will find the path to your iTunes media folder. It will be displayed as a file path, such as “iTunes/Music/” for macOS or “C:\Users\Username\My Music\iTunes\iTunes Media\” for Windows.
5. Access the iTunes media folder on your computer: Open a new Finder window (for macOS) or File Explorer window (for Windows) and navigate to the path displayed in the “iTunes Media folder location” section. This is where your iTunes media files are stored on your computer’s internal storage.
Now that you have located your iTunes media folder, you are ready to proceed to the next step, where we will guide you through the process of copying your iTunes media folder to the external hard drive.
Step 3: Copy Your iTunes Media Folder to the External Hard Drive
Now that you have located your iTunes media folder, it’s time to copy it to the external hard drive. By doing so, you will create a backup of your entire iTunes library. Follow these steps to copy your iTunes media folder to the external hard drive:
1. Open a new Finder window or File Explorer window: Open a new Finder window on macOS or File Explorer window on Windows by clicking on the respective icon in your applications or taskbar.
2. Navigate to your iTunes media folder: Using the file path you identified in the previous step, navigate to your iTunes media folder that is stored on your computer’s internal storage.
3. Select the iTunes media folder: Once you are inside the iTunes media folder, select the entire folder by clicking on it once. It should be named “iTunes Media” or “iTunes” depending on your iTunes version.
4. Copy the selected folder: Right-click on the selected iTunes media folder and choose the “Copy” option from the context menu. Alternatively, you can press “Ctrl+C” (Windows) or “Command+C” (macOS) on your keyboard to copy the folder.
5. Navigate to the external hard drive: In the same Finder window (macOS) or File Explorer window (Windows), navigate to your connected external hard drive. You may need to click on the relevant icon or browse through your drives/folders to locate it.
6. Create a new folder on the external hard drive for the iTunes backup: Right-click on an empty area within the external hard drive window and select the “New Folder” option from the context menu. Give the new folder a name of your choice, such as “iTunes Backup”.
7. Paste the iTunes media folder into the new folder on the external hard drive: Right-click inside the newly created folder on the external hard drive and select the “Paste” option from the context menu. Alternatively, you can press “Ctrl+V” (Windows) or “Command+V” (macOS) on your keyboard to paste the iTunes media folder.
8. Wait for the copy process to complete: The copying process may take some time, depending on the size of your iTunes library. Ensure that the progress bar or dialogue box indicates that the copy process is complete before proceeding.
Congratulations! You have successfully copied your iTunes media folder to the external hard drive. This backup ensures that all your music, movies, TV shows, podcasts, and other media files are safely stored on the external hard drive. In the next step, we will update iTunes preferences to ensure that your iTunes library is properly synced with the newly created backup on the external hard drive.
Step 4: Update iTunes Preferences
After successfully copying your iTunes media folder to the external hard drive, it’s important to update the iTunes preferences to ensure that your iTunes library recognizes the new backup location. Here’s how you can update the iTunes preferences:
1. Open iTunes on your computer: Launch the iTunes application on your computer by clicking on the iTunes icon in your applications folder (for macOS) or the Start menu (for Windows).
2. Access iTunes Preferences: For macOS users, click on “iTunes” in the menu bar at the top of your screen and select “Preferences”. For Windows users, click on “Edit” in the menu bar at the top of the iTunes window and click on “Preferences”.
3. Select the “Advanced” tab: In the iTunes Preferences window, click on the “Advanced” tab. This tab contains settings related to your iTunes media folder location.
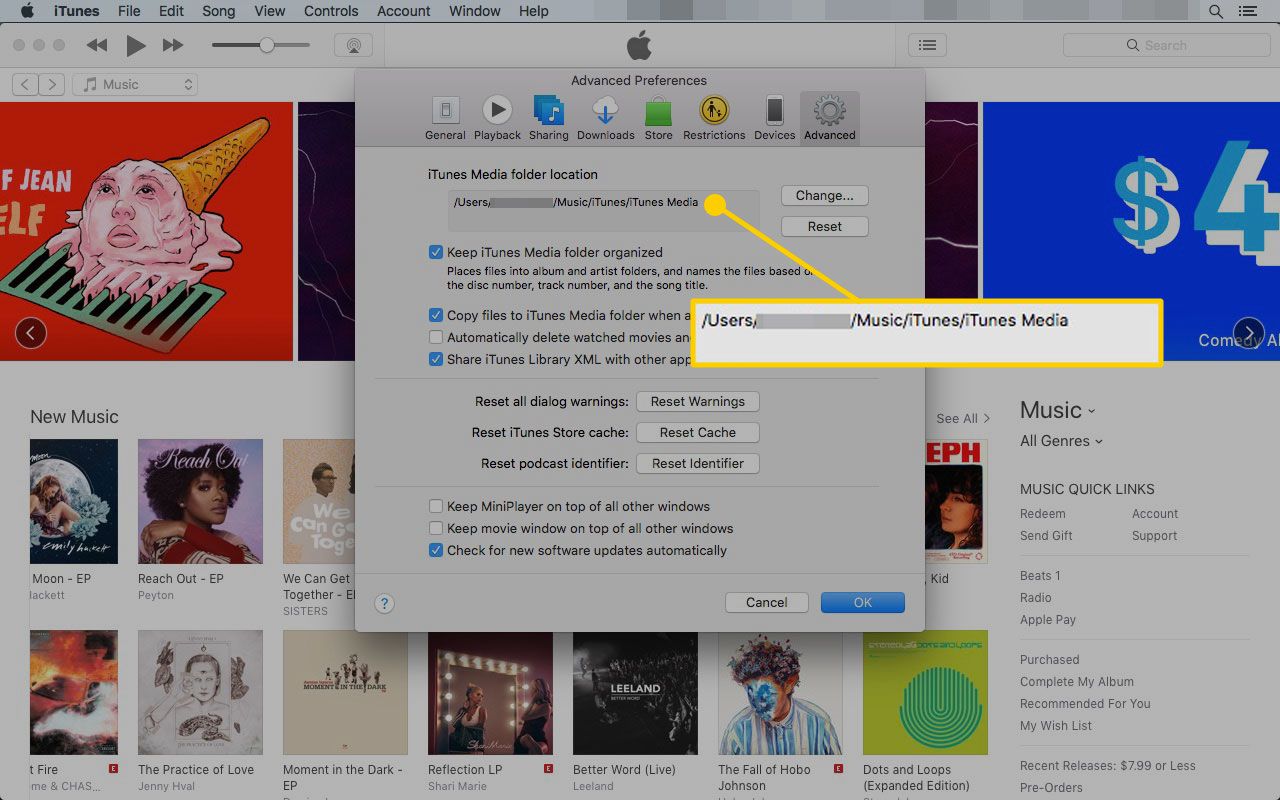
4. Update the iTunes media folder location: On the “Advanced” tab, you will find the “iTunes Media folder location” section. Click on the “Change” button next to it.
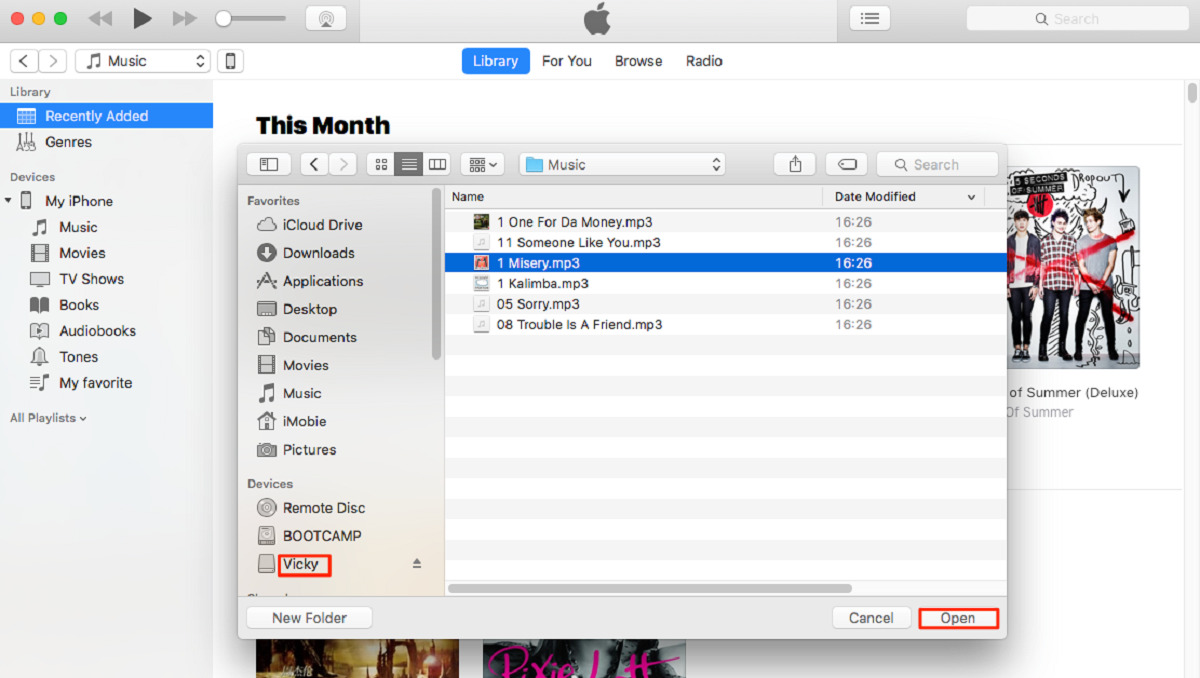
5. Locate the iTunes media folder on the external hard drive: In the window that appears, navigate to the external hard drive where you copied your iTunes media folder. Select the newly created folder on the external hard drive, such as “iTunes Backup”.
6. Click “Select Folder” or “Open” (depending on your operating system): Once you have located the iTunes media folder on the external hard drive, click the appropriate button to confirm the selection.
7. Apply the changes: Click on the “OK” button in the iTunes Preferences window to apply the updated iTunes media folder location.
8. Wait for iTunes to update: iTunes will now update the media library location, recognizing the backup on the external hard drive. It may take a few moments for iTunes to update and sync properly with the new location. Be patient and wait for the process to complete.
Once iTunes has finished updating the preferences and syncing with the new media folder location, you can be confident that your iTunes library is now properly connected to the backup on the external hard drive. In the next step, we will test the backup to ensure that everything is working correctly.
Step 5: Test Your Backup
After completing the backup of your iTunes library to an external hard drive and updating the preferences in iTunes, it is essential to test the backup to ensure that everything is working correctly. Follow these steps to test your iTunes backup:
1. Disconnect your external hard drive: Safely disconnect the external hard drive from your computer by ejecting it properly. This will ensure that the backup is not being accessed or modified during the testing process.
2. Launch iTunes: Open the iTunes application on your computer by clicking on the iTunes icon in your applications folder (for macOS) or the Start menu (for Windows).
3. Connect the external hard drive: Reconnect your external hard drive to your computer using the appropriate cable. Make sure it is properly recognized and appears in your file explorer or Finder window.
4. Check the iTunes preferences: Access the iTunes Preferences by clicking on “iTunes” in the menu bar (macOS) or “Edit” in the menu bar (Windows), and selecting “Preferences”. Verify that the iTunes media folder location still points to the external hard drive.
5. Play a media file: Select a music track, movie, TV show, or any other media file from your iTunes library and play it. Ensure that the file plays smoothly and without any issues.
6. Browse your library: Use the various features of iTunes to browse different sections of your library, such as music, movies, TV shows, podcasts, and playlists. Make sure all your media files are accessible and readily available for playback.
7. Sync a device: If you have any Apple devices, such as an iPhone, iPad, or iPod, connect it to your computer and sync it with your iTunes library. Verify that the device syncs correctly and the media files are transferred without any errors.
By testing your backup, you ensure that your iTunes library is functioning properly from the external hard drive. If you encounter any issues during the testing process, double-check the iTunes preferences, ensure the external hard drive is properly connected, and verify that the media files are intact in the backup folder. If needed, reconnect your original internal hard drive and consult professional technical support to resolve any potential problems.
Congratulations! You have successfully backed up your iTunes library to an external hard drive and tested the backup. Now, you can enjoy peace of mind knowing that your valuable iTunes media collection is securely stored and ready for access and playback whenever you need it.
Conclusion
Backing up your iTunes library to an external hard drive is a crucial step in ensuring the safety and preservation of your media collection. By following the step-by-step guide outlined in this article, you have learned how to connect your external hard drive, locate your iTunes media folder, copy it to the external hard drive, update the iTunes preferences, and test the backup.
Creating a backup of your iTunes library offers several benefits, including data protection, space management, portability, and safekeeping. With a backup in place, you can enjoy your music, movies, TV shows, and other media files without the fear of losing them due to computer crashes, viruses, or accidental deletions.
Remember to gather the necessary tools, including an external hard drive with sufficient storage capacity, compatible cables, and a computer with iTunes installed. Be patient throughout the backup process, as it may take some time, depending on the size of your iTunes library.
After successfully copying your iTunes media folder to the external hard drive and updating the preferences in iTunes, it is essential to test the backup to ensure everything is functioning correctly. By disconnecting and reconnecting the external hard drive, playing media files, browsing your library, and syncing devices, you can verify the integrity of your backup.
In the event of a computer crash, accidental deletion, or any other data loss scenario, having a backup of your iTunes library on an external hard drive provides peace of mind. You can easily restore your media collection and continue enjoying your favorite songs, movies, TV shows, and podcasts.
Remember to regularly update your backup as you add new media files to your iTunes library. This will help ensure that your backup is up to date and ready for any unforeseen circumstances.
We hope that this guide has been helpful in assisting you with backing up your iTunes library to an external hard drive. By taking the time to perform this backup, you are taking a proactive step in protecting and preserving your valuable media collection. Enjoy your iTunes library with confidence, knowing that it is securely backed up and ready for your enjoyment.