Introduction
Welcome to our guide on how to transfer music from an external hard drive to iTunes! If you are a music lover with a vast collection of songs stored on your external hard drive, you might want to have easy access to them in your iTunes library. By following the steps outlined in this article, you’ll be able to import your music files into iTunes, enabling you to organize, play, and sync your favorite songs with your Apple devices.
Transferring your music library from an external hard drive to iTunes not only allows for convenience but also ensures that your music is backed up in multiple locations, reducing the risk of data loss. Whether you’ve recently upgraded your computer, had a hard drive failure, or simply want to consolidate your music collection, this guide will provide you with the necessary steps to accomplish your goal.
We will walk you through the process, providing clear instructions and tips to streamline the transfer. From connecting your external hard drive to your computer to importing the music into iTunes, we’ve got you covered. By the end of this guide, you’ll have a fully synced and organized music library that you can enjoy anytime, anywhere. So, let’s dive in and get started!
Step 1: Connect the External Hard Drive to Your Computer
The first step in transferring your music from an external hard drive to iTunes is to connect the external hard drive to your computer. Locate an available USB port on your computer and insert the USB cable that is connected to your external hard drive. If your external hard drive requires an external power source, make sure it is plugged in as well.
Once connected, your computer should recognize the external hard drive and assign it a drive letter. This drive letter will allow you to access the contents of the external hard drive. You can view the assigned drive letter in the file explorer of your operating system.
For Windows users, open the File Explorer and navigate to “This PC” or “My Computer” to see the list of drives available. Look for the drive that corresponds to your external hard drive and take note of its drive letter (e.g., E:, F:, etc.).
Mac users can access the external hard drive through the Finder. Look for the drive name or icon on the left-hand side of the Finder window. Click on it to see the contents of the external hard drive.
Once you have successfully connected and located the external hard drive, you’re ready to move on to the next step.
Step 2: Open iTunes
With your external hard drive connected to your computer, it’s time to open iTunes. If you haven’t installed iTunes on your computer, ensure you download and install the latest version from the official Apple website.
To open iTunes on Windows, click on the “Start” button, then navigate to the iTunes icon in your list of applications or search for it using the search bar. Mac users can find iTunes in their Launchpad or in the Applications folder.
Once you’ve located the iTunes application, double-click on it to launch the program. It may take a few moments to open, depending on your computer’s speed and the size of your iTunes library.
When iTunes opens, you’ll be greeted with the iTunes interface, which provides access to your music library, playlists, and other features. Take a moment to familiarize yourself with the different sections of iTunes, such as the sidebar, main window, and menu options.
Before we proceed to the next step, ensure that you have the latest version of iTunes installed on your computer. Updating to the latest version will ensure compatibility with your operating system and minimize any potential issues during the transfer process.
Now that iTunes is open and updated, you’re ready to move on to the next step and locate your music library folder.
Step 3: Locate Your Music Library Folder
In order to transfer your music from the external hard drive to iTunes, you need to locate your music library folder. This folder is where iTunes stores all the audio files that make up your music library, including imported songs, albums, and playlists.
The location of the music library folder varies depending on your operating system. Here’s how you can find it:
Windows:
- Open iTunes on your computer.
- Click on the “Edit” tab located in the top menu bar.
- Select “Preferences” from the dropdown menu.
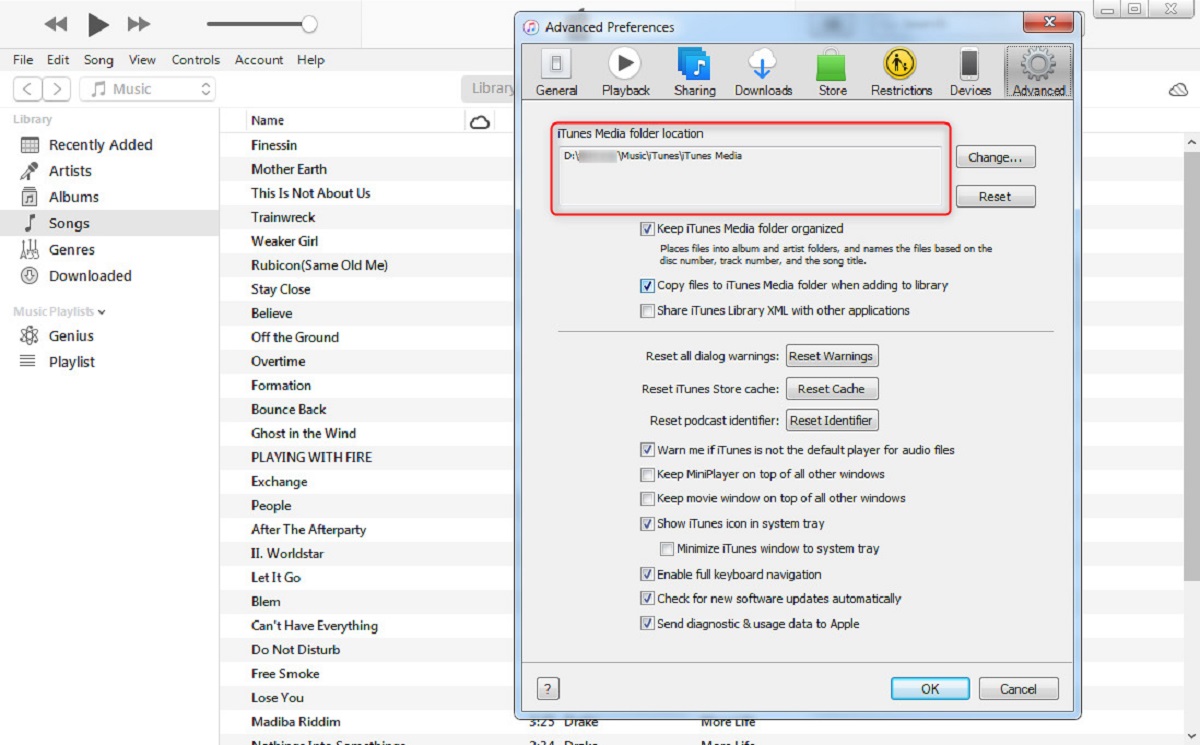
- A Preferences window will appear. Click on the “Advanced” tab.
- Note down the path listed next to “iTunes Media folder location”. This is the location of your music library folder.
Mac:
- Open iTunes on your computer.
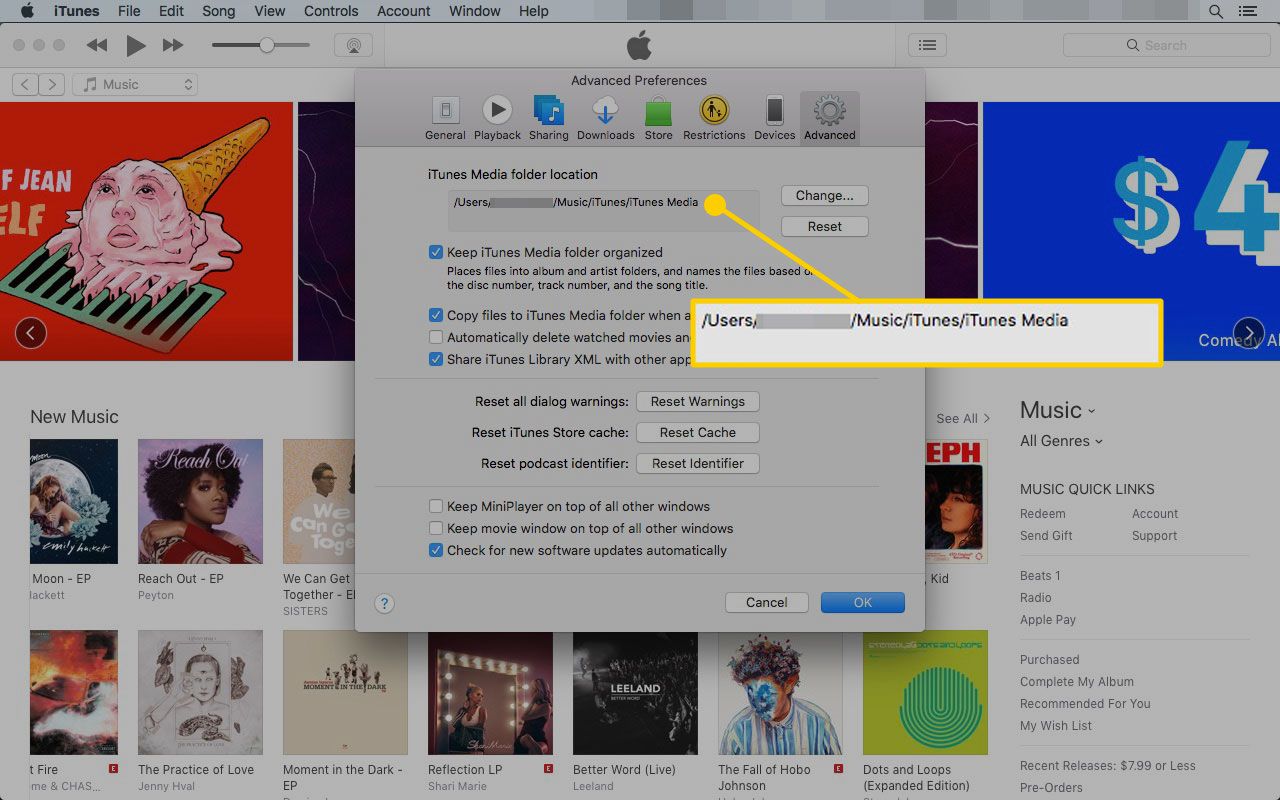
- Click on the “iTunes” tab located in the top menu bar.
- Select “Preferences” from the dropdown menu.
- A Preferences window will appear. Click on the “Advanced” tab.
- Note down the path listed next to “iTunes Media folder location”. This is the location of your music library folder.
Once you have located your music library folder, keep it handy as we will be using it in the next step to copy and paste the music from your external hard drive into iTunes.
Step 4: Copy the Music from the External Hard Drive
Now that you have located your music library folder, it’s time to copy the music from your external hard drive into iTunes. Follow these steps to proceed:
- Open a new file explorer window (Windows) or Finder window (Mac).
- Navigate to the location where your music files are stored on your external hard drive. This could be within a specific folder or directly in the root directory of the drive.
- Select the music files or folders that you want to transfer to iTunes by clicking and dragging your cursor over them or holding down the Ctrl/Cmd key and clicking on individual files or folders.
- Right-click on the selected files or folders and choose “Copy” from the context menu. Alternatively, you can use the Ctrl+C (Windows) or Command+C (Mac) keyboard shortcuts.
By copying the music files from your external hard drive, they are temporarily stored in your computer’s clipboard.
With the music files from your external hard drive successfully copied, it’s time to proceed to the next step and paste them into your iTunes music library folder.
Step 5: Paste the Music into the Music Library Folder
Now that you have copied the music files from your external hard drive, it’s time to paste them into your iTunes music library folder. By doing this, you will make the music files accessible within the iTunes application. Follow these steps to proceed:
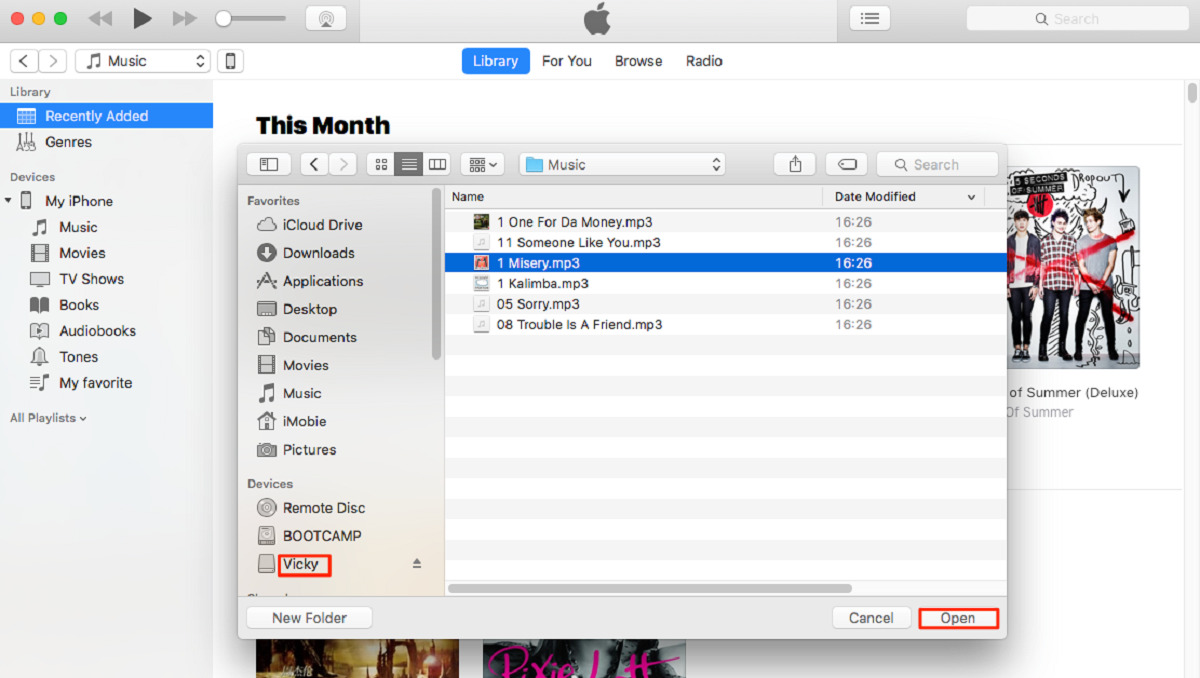
- Open a new file explorer window (Windows) or Finder window (Mac).
- Navigate to the location of your iTunes music library folder that you identified in the previous step.
- Right-click on an empty area within the music library folder and choose “Paste” from the context menu. Alternatively, you can use the Ctrl+V (Windows) or Command+V (Mac) keyboard shortcuts.
Your music files will begin to copy over from the external hard drive to your iTunes music library folder. The time it takes to complete this step will depend on the size of the music files being transferred and the speed of your computer.
Note: It’s important to keep the file structure intact when pasting the music files into the music library folder. This means that if you had your music organized in folders on your external hard drive, those folders should be maintained when pasting the music into the iTunes folder.
Once the copying process is complete, you will see the transferred music files within your iTunes music library folder. Now, it’s time to import the music into iTunes so that you can access and manage it within the application.
Step 6: Import the Music into iTunes
After pasting the music files into your iTunes music library folder, the next step is to import the music into iTunes. By doing this, iTunes will recognize and organize the newly added music files, making them easily accessible within the application. Follow these steps to import the music into iTunes:
- Open iTunes on your computer if it’s not already open.
- Click on the “File” tab located in the top menu bar.
- Select “Add File to Library” or “Add Folder to Library” from the dropdown menu, depending on whether you want to import individual music files or an entire music folder.
- A file explorer (Windows) or Finder (Mac) window will appear. Navigate to your iTunes music library folder and select the music files or folder that you want to import.
- Click on the “Open” button to start the import process.
iTunes will now begin importing the selected music files or folder into your iTunes library. The duration of the import process will vary depending on the number of files being imported and the speed of your computer.
Once the import is complete, you will be able to see the imported music in your iTunes library. The music will be automatically organized based on their artist, album, and other relevant details. You can now enjoy your music within iTunes, create playlists, and sync them with your Apple devices.
It is important to note that the imported music files are not duplicated or moved from their original location. They are simply referenced within the iTunes library, allowing you to access and manage them conveniently.
Now that you have successfully imported the music into iTunes, let’s move on to the next step to verify and organize your music within the application.
Step 7: Verify and Organize Your Music in iTunes
After importing the music into iTunes, it’s important to verify and organize your music library to ensure everything is properly displayed and easily accessible. Follow these steps to verify and organize your music within iTunes:
- In iTunes, click on the “Music” tab located in the top left corner of the application. This will display your music library.
- Scroll through your library and verify that all the imported music files are present. Check for any missing or incomplete songs.
- If you notice any inconsistencies or missing information, you can manually edit the song details in iTunes. Right-click on a song, select “Get Info,” and fill in the appropriate information such as the artist, album, genre, and artwork.
- To further organize your music, you can create playlists within iTunes. Click on the “File” tab and select “New” followed by “Playlist.” Give your playlist a name and drag and drop the desired songs into the playlist.
- You can also create smart playlists that automatically update based on specific criteria, such as genre, artist, or play count. Click on the “File” tab and select “New” followed by “Smart Playlist” to create a smart playlist.
- If you have a large music library, you can use the search bar at the top right corner of iTunes to quickly find specific songs, albums, or artists.
By verifying and organizing your music within iTunes, you’ll have a well-structured music library that is easy to navigate and enjoy. Take the time to ensure all the song details are accurate, and create playlists or smart playlists to customize your music listening experience.
Now that you have successfully verified and organized your music in iTunes, you can choose to delete the music files from your external hard drive to free up space (optional). Remember to make sure that you have backed up your music files before proceeding with deletion.
Congratulations! You have successfully transferred and organized your music from an external hard drive into iTunes. You can now enjoy your favorite songs, create playlists, and sync your music library with your Apple devices.
Step 8: Delete the Music Files from the External Hard Drive (Optional)
Once you have successfully transferred your music files from the external hard drive to iTunes and ensured that everything is properly organized, you may choose to delete the music files from the external hard drive to free up space. However, before proceeding with deletion, it is crucial to ensure that you have made a backup of your music files or have them stored in a secure location.
If you are confident that your music files are safely stored within iTunes and you no longer need them on the external hard drive, follow these steps to delete them:
- Open a file explorer window (Windows) or Finder window (Mac).
- Navigate to the location where your music files are stored on the external hard drive.
- Select the music files or folders that you want to delete by clicking and dragging your cursor over them or holding down the Ctrl/Cmd key and clicking on individual files or folders.
- Right-click on the selected files or folders and choose “Delete” or “Move to Trash” from the context menu.
- Confirm the deletion when prompted.
Deleting the music files from the external hard drive will permanently remove them from the storage device. Therefore, it is crucial to double-check and ensure that the files have been successfully imported into iTunes and are accessible within the application.
By removing the music files from the external hard drive, you not only free up valuable storage space but also reduce the risk of data loss, as having duplicate copies of your music files can lead to confusion and potential errors in the future.
Once you have confirmed the successful transfer and deletion of your music files, you can enjoy your music library within iTunes without relying on the external hard drive.
With the completion of this optional step, you have successfully transferred your music from an external hard drive to iTunes, organized your music library, and, if applicable, freed up space on your external hard drive.
Conclusion
Congratulations! You have successfully learned how to transfer music from an external hard drive to iTunes. By following the steps outlined in this guide, you can easily import your music files into iTunes and enjoy seamless access to your favorite songs, albums, and playlists.
We started by connecting the external hard drive to your computer and opening iTunes. Then, we located the iTunes music library folder and copied the music files from the external hard drive. After that, we pasted the music into the music library folder and imported it into iTunes. We verified and organized our music within iTunes, creating playlists and utilizing search functions for a personalized music experience.
Lastly, we discussed the optional step of deleting the music files from the external hard drive to save space, but only after ensuring a backup or secure storage option. This step can help declutter your external hard drive and reduce the risk of data loss.
Now, you can enjoy your music library within iTunes, sync it with your Apple devices, and have easy access to your favorite tunes whenever and wherever you want.
Remember to regularly back up your music library to avoid any potential data loss. Additionally, keep your iTunes application updated to benefit from the latest features and enhancements.
Thank you for following this guide and happy listening!