Introduction
Safari, the widely used web browser developed by Apple, offers a seamless and intuitive browsing experience. However, the frequent notifications from websites can sometimes disrupt your browsing flow or invade your privacy. If you find these notifications distracting or unnecessary, you'll be pleased to know that Safari provides a straightforward method to disable them. By following a few simple steps, you can regain control over your browsing experience and enjoy uninterrupted sessions on the web.
In this guide, we will walk you through the process of turning off notifications in Safari, ensuring that you can browse without the interruption of constant pop-ups and alerts. Whether you're using Safari on your Mac, iPhone, or iPad, the steps to disable notifications remain consistent, making it convenient for users across various devices.
By the end of this tutorial, you will have the knowledge and confidence to manage your Safari notifications effectively, allowing you to tailor your browsing experience to your preferences. So, let's dive in and explore the steps to disable notifications in Safari, empowering you to take charge of your browsing environment.
Step 1: Open Safari
To begin the process of disabling notifications in Safari, you first need to open the browser on your device. Whether you're using a Mac, iPhone, or iPad, the steps to open Safari are consistent across all platforms.
On Mac:
If you're using a Mac, you can easily access Safari from the Dock, which is typically located at the bottom of the screen. Simply click on the Safari icon in the Dock, and the browser will launch, ready for you to proceed with the next steps to manage your notifications.
Alternatively, you can also open Safari from the Applications folder. Navigate to the Applications folder on your Mac, locate the Safari icon, and double-click on it to launch the browser.
On iPhone or iPad:
For users of iPhone or iPad, opening Safari is just a tap away. Locate the Safari icon on your device's home screen – it's recognizable by its compass-like design – and tap on it to open the browser. Once Safari is launched, you can move on to the next steps to customize your notification settings.
By opening Safari on your preferred device, you've taken the initial step towards gaining control over your browsing experience. With the browser now open and ready for your input, you're all set to proceed to the next stage of managing your notifications effectively.
Step 2: Access Safari Preferences
Once Safari is open on your device, the next step is to access the browser's preferences. This is where you can delve into the various settings and make adjustments to tailor your browsing experience. By accessing Safari preferences, you gain the ability to customize a wide range of features, including notifications, security, privacy, and more.
On Mac:
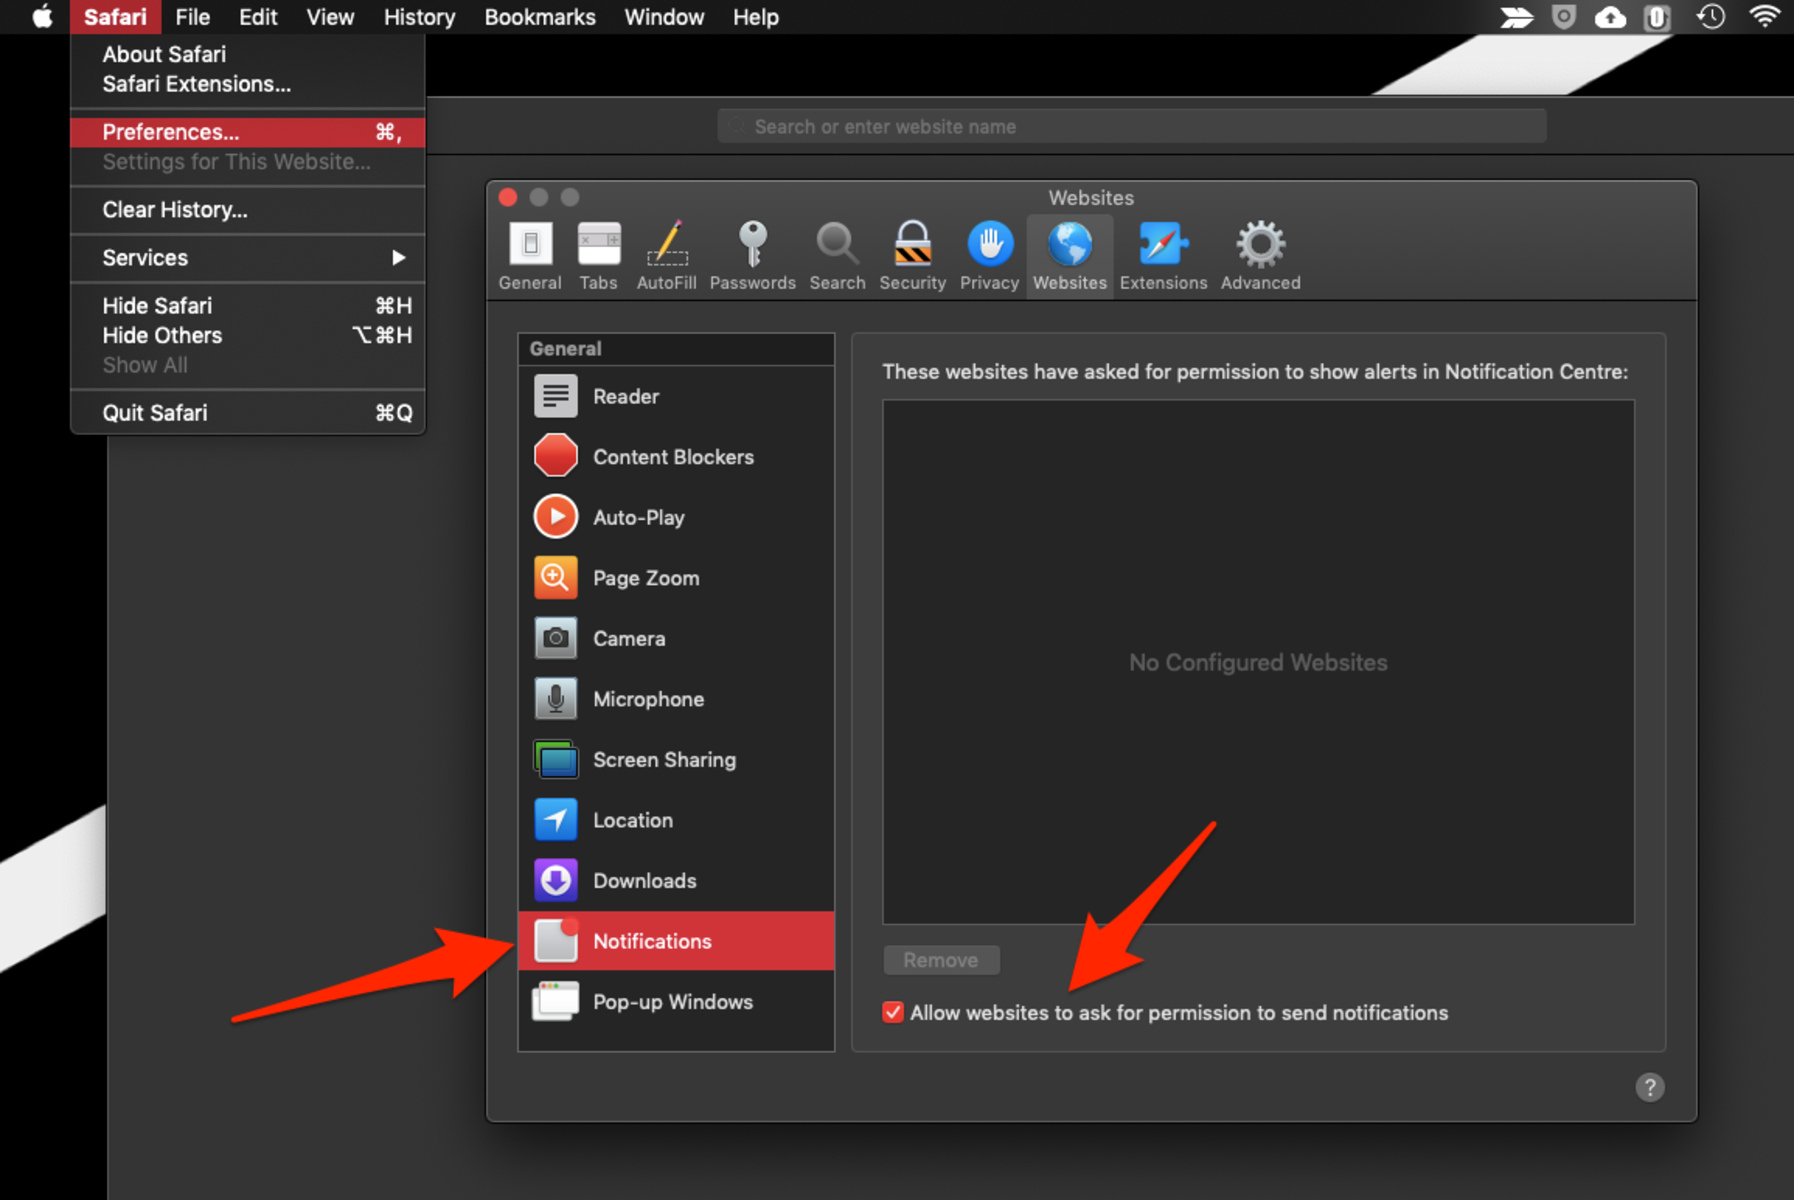
To access Safari preferences on a Mac, you can simply click on "Safari" in the top menu bar, located at the top-left corner of the screen. A drop-down menu will appear, and you can select "Preferences" from the list. Alternatively, you can use the keyboard shortcut "Command + ," to directly open the Preferences window.
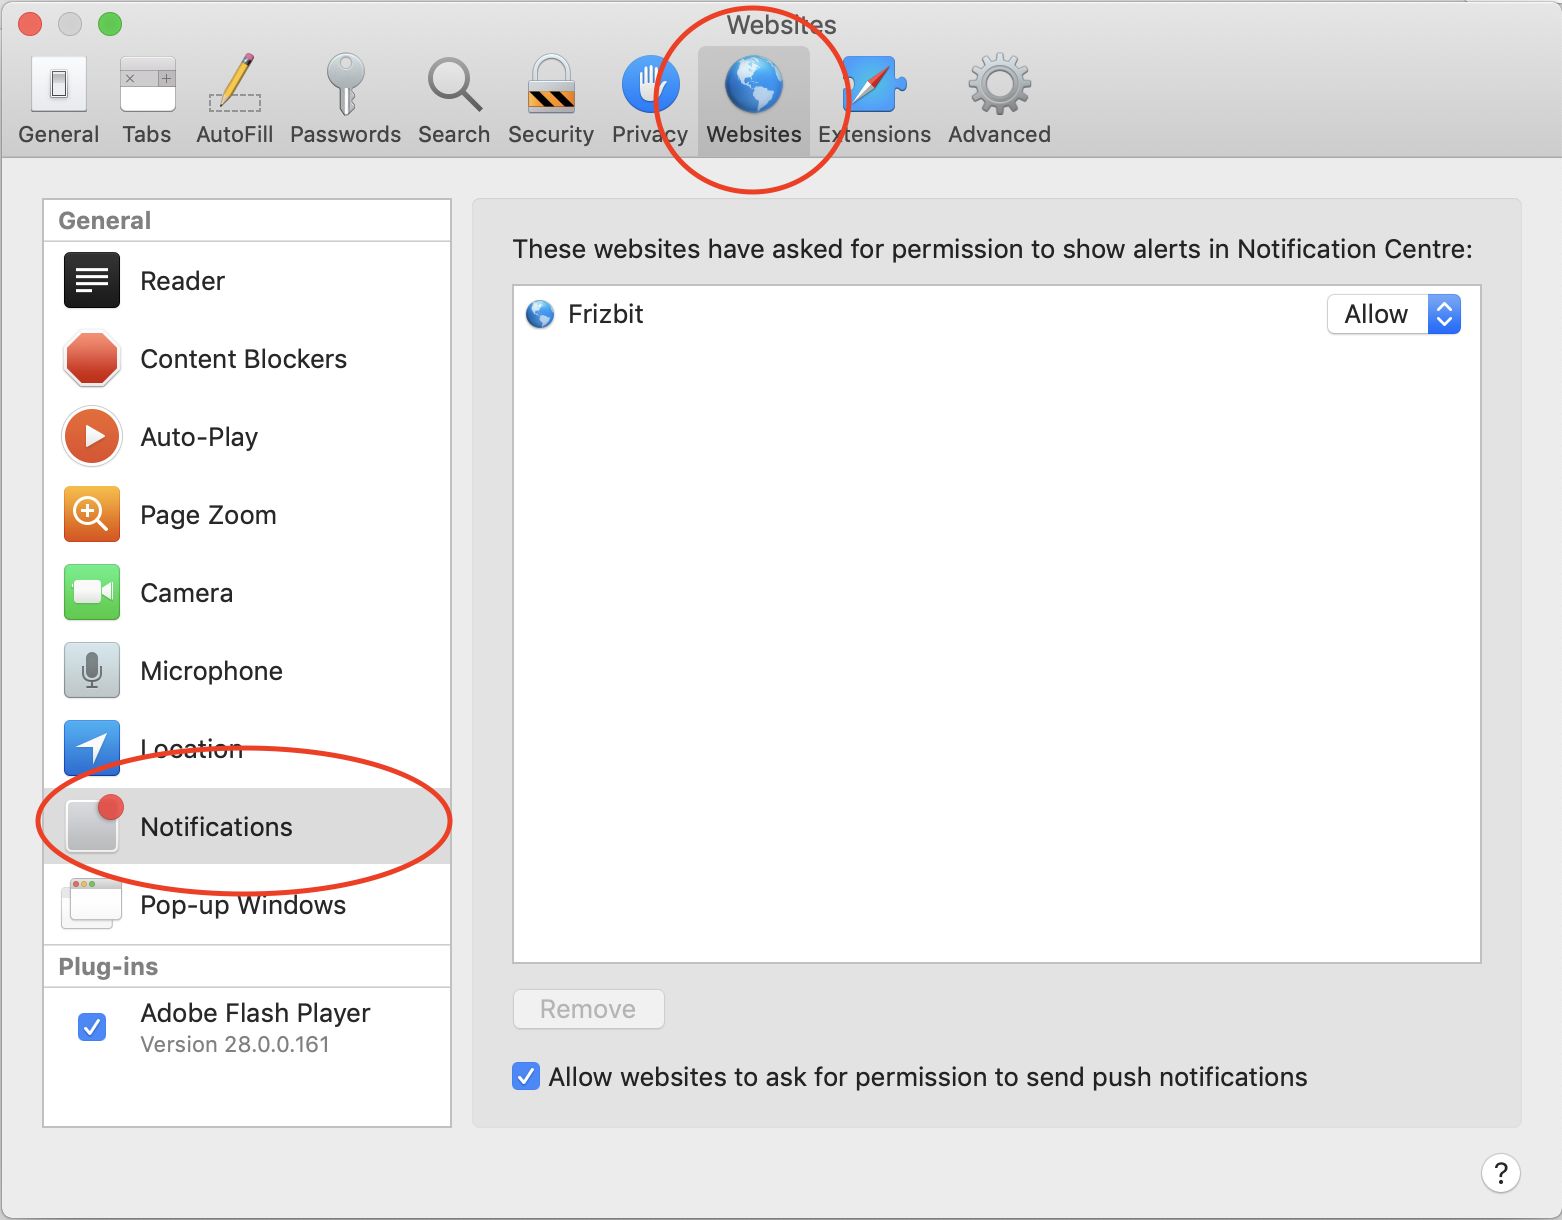
Upon selecting "Preferences," a new window will open, presenting a range of tabs at the top, including "General," "Tabs," "Search," "Security," "Privacy," "Websites," "Extensions," and "Advanced." To proceed with managing notifications, you'll want to click on the "Websites" tab.
On iPhone or iPad:
For users of iPhone or iPad, accessing Safari preferences is a bit different due to the mobile interface. After opening Safari, tap on the "Aa" icon located in the address bar. This will reveal a drop-down menu, where you can select "Settings for This Website."
Upon tapping "Settings for This Website," a new menu will appear, offering options to manage settings such as content blockers, camera access, microphone access, and notifications. To proceed with disabling notifications, tap on "Notifications" to access the relevant settings.
By accessing Safari preferences, you gain the ability to fine-tune your browsing experience according to your preferences. This level of customization empowers you to manage notifications, enhance security, and personalize various aspects of your browsing environment. With Safari preferences now within reach, you're ready to proceed to the next step of disabling notifications for a seamless browsing experience.
Step 3: Go to Notifications
Upon accessing Safari preferences, the next crucial step in the process of disabling notifications is to navigate to the specific settings related to notifications. This allows you to pinpoint the exact location where you can manage and customize the notification preferences according to your preferences.
On Mac:
After clicking on the "Websites" tab within Safari preferences, you will be presented with a list of website-specific settings. Among these settings, you will find "Notifications" listed on the left-hand side. Clicking on "Notifications" will reveal a comprehensive list of websites that have requested to show notifications. This list provides you with an overview of the websites that are currently allowed to display notifications in Safari.
On iPhone or iPad:
Upon tapping on "Notifications" within the "Settings for This Website" menu, you will be directed to a screen that displays the current notification settings for the specific website you are visiting. Here, you can view whether notifications are allowed, blocked, or if you haven't made a decision yet. This granular control allows you to manage notifications on a per-website basis, ensuring that you can tailor the notification settings to align with your browsing preferences.
By navigating to the notifications settings within Safari preferences, you gain the ability to review and manage the websites that are permitted to display notifications. This level of control empowers you to make informed decisions about which websites can interrupt your browsing with notifications and which ones you prefer to block. With the notifications settings now within reach, you're ready to proceed to the final step of disabling notifications and reclaiming uninterrupted browsing sessions.
Step 4: Disable Notifications for Websites
Now that you have navigated to the notifications settings within Safari preferences, you are just a few clicks away from disabling notifications for websites that may disrupt your browsing experience. This final step empowers you to take control of the notifications displayed by various websites, allowing you to tailor your browsing environment to suit your preferences.
On Mac:
Within the Notifications section of Safari preferences, you will see a list of websites that have requested to show notifications. To disable notifications for a specific website, simply locate the website in the list and uncheck the box next to it. This action effectively blocks the website from displaying notifications in the future, ensuring that your browsing sessions remain uninterrupted.
Additionally, you have the option to manage notification settings for all websites at once. By selecting the "Allow websites to ask for permission to send push notifications" checkbox, you can prevent any website from requesting to show notifications, providing you with a blanket control over notification requests.
On iPhone or iPad:
After accessing the notifications settings for a specific website, you will be presented with options to allow or disallow notifications. To disable notifications for the website you are visiting, simply toggle off the "Allow Notifications" option. This instantly blocks the website from displaying notifications on your device, allowing you to browse without interruptions.
Moreover, Safari on iPhone or iPad also provides the "Website Settings" option, where you can manage notifications for all websites you visit. By tapping on "Website Settings," you can view and modify the notification settings for all websites, granting you the flexibility to customize your browsing experience according to your preferences.
By following these straightforward steps, you have successfully disabled notifications for websites in Safari. This level of control ensures that you can browse the web without the distraction of constant notifications, allowing you to focus on the content that matters to you.
With notifications now disabled for websites, you have effectively tailored your browsing experience to align with your preferences. This level of customization empowers you to enjoy uninterrupted browsing sessions, free from the intrusion of unnecessary notifications. By taking charge of your notification settings in Safari, you have unlocked the ability to browse the web on your terms, ensuring a seamless and personalized browsing experience.


