Introduction
When it comes to browsing the web on your iPhone, Safari has been the go-to browser for many users. Its seamless integration with iOS and user-friendly interface have made it a popular choice. However, there are instances where you might want to explore alternative browsers or limit access to Safari for various reasons. Whether you're looking to enhance your digital well-being, improve productivity, or simply prefer a different browsing experience, there are several methods to completely remove or restrict Safari from your iPhone.
In this article, we'll delve into the various reasons why you might consider removing Safari from your iPhone and explore multiple methods to achieve this. From disabling Safari to utilizing built-in features like Screen Time and Restrictions, as well as leveraging third-party browsers, we'll cover the step-by-step processes to help you achieve your desired browsing setup on your iPhone.
By understanding the different approaches to removing or limiting Safari, you can tailor your browsing experience to align with your preferences and needs. Whether it's for personal use, parental controls, or workplace restrictions, having the knowledge and tools to manage Safari on your iPhone empowers you to take control of your digital environment.
So, if you're ready to explore the possibilities of customizing your iPhone's browsing capabilities, let's dive into the methods for removing or restricting Safari to suit your specific requirements. Whether you're seeking enhanced productivity, improved focus, or a different browsing experience, the following methods will equip you with the necessary insights to achieve your desired browsing setup on your iPhone.
Why Remove Safari from iPhone
There are several compelling reasons why you might consider removing Safari from your iPhone. Understanding these motivations can help you make an informed decision about customizing your browsing experience to better suit your needs and preferences.
-
Digital Well-being: In today's digital age, managing screen time and promoting a healthy balance between online and offline activities is increasingly important. By removing Safari, you can limit your access to web browsing, thereby reducing the temptation to spend excessive time online. This can contribute to improved digital well-being and help foster a healthier relationship with technology.
-
Productivity Enhancement: For individuals seeking to boost their productivity, removing Safari can eliminate potential distractions. By reducing the availability of web browsing on your iPhone, you can create a more focused environment conducive to accomplishing tasks and staying on track with your goals.
-
Parental Controls: Parents may opt to remove Safari from their children's iPhones to implement stricter parental controls. This can be particularly beneficial for managing and monitoring a child's online activities, ensuring they access age-appropriate content and minimizing the risk of exposure to unsuitable material.
-
Workplace Restrictions: In professional settings, employers may choose to restrict access to Safari on company-issued iPhones to maintain a secure and focused work environment. By removing Safari or implementing browsing limitations, organizations can mitigate potential security risks and enhance employee productivity during work hours.
-
Preference for Alternative Browsers: Some users simply prefer alternative browsers that offer different features, customization options, or privacy enhancements. By removing Safari, individuals can exclusively utilize their preferred third-party browser, tailoring their browsing experience to align with their specific preferences and requirements.
By recognizing the diverse reasons for removing Safari from an iPhone, individuals can make informed decisions about managing their digital environment. Whether it's for personal well-being, productivity optimization, parental controls, workplace regulations, or browser preference, the ability to customize the browsing experience on an iPhone empowers users to align their digital habits with their unique needs and priorities.
Method 1: Disable Safari
Disabling Safari on your iPhone is a straightforward method to limit access to the default web browser. Whether you're looking to minimize distractions, enhance productivity, or implement parental controls, disabling Safari can effectively serve these purposes. Here's a step-by-step guide to disable Safari on your iPhone:
-
Access Settings: Begin by tapping the "Settings" app on your iPhone's home screen. This will open the main settings menu, where you can manage various aspects of your device.
-
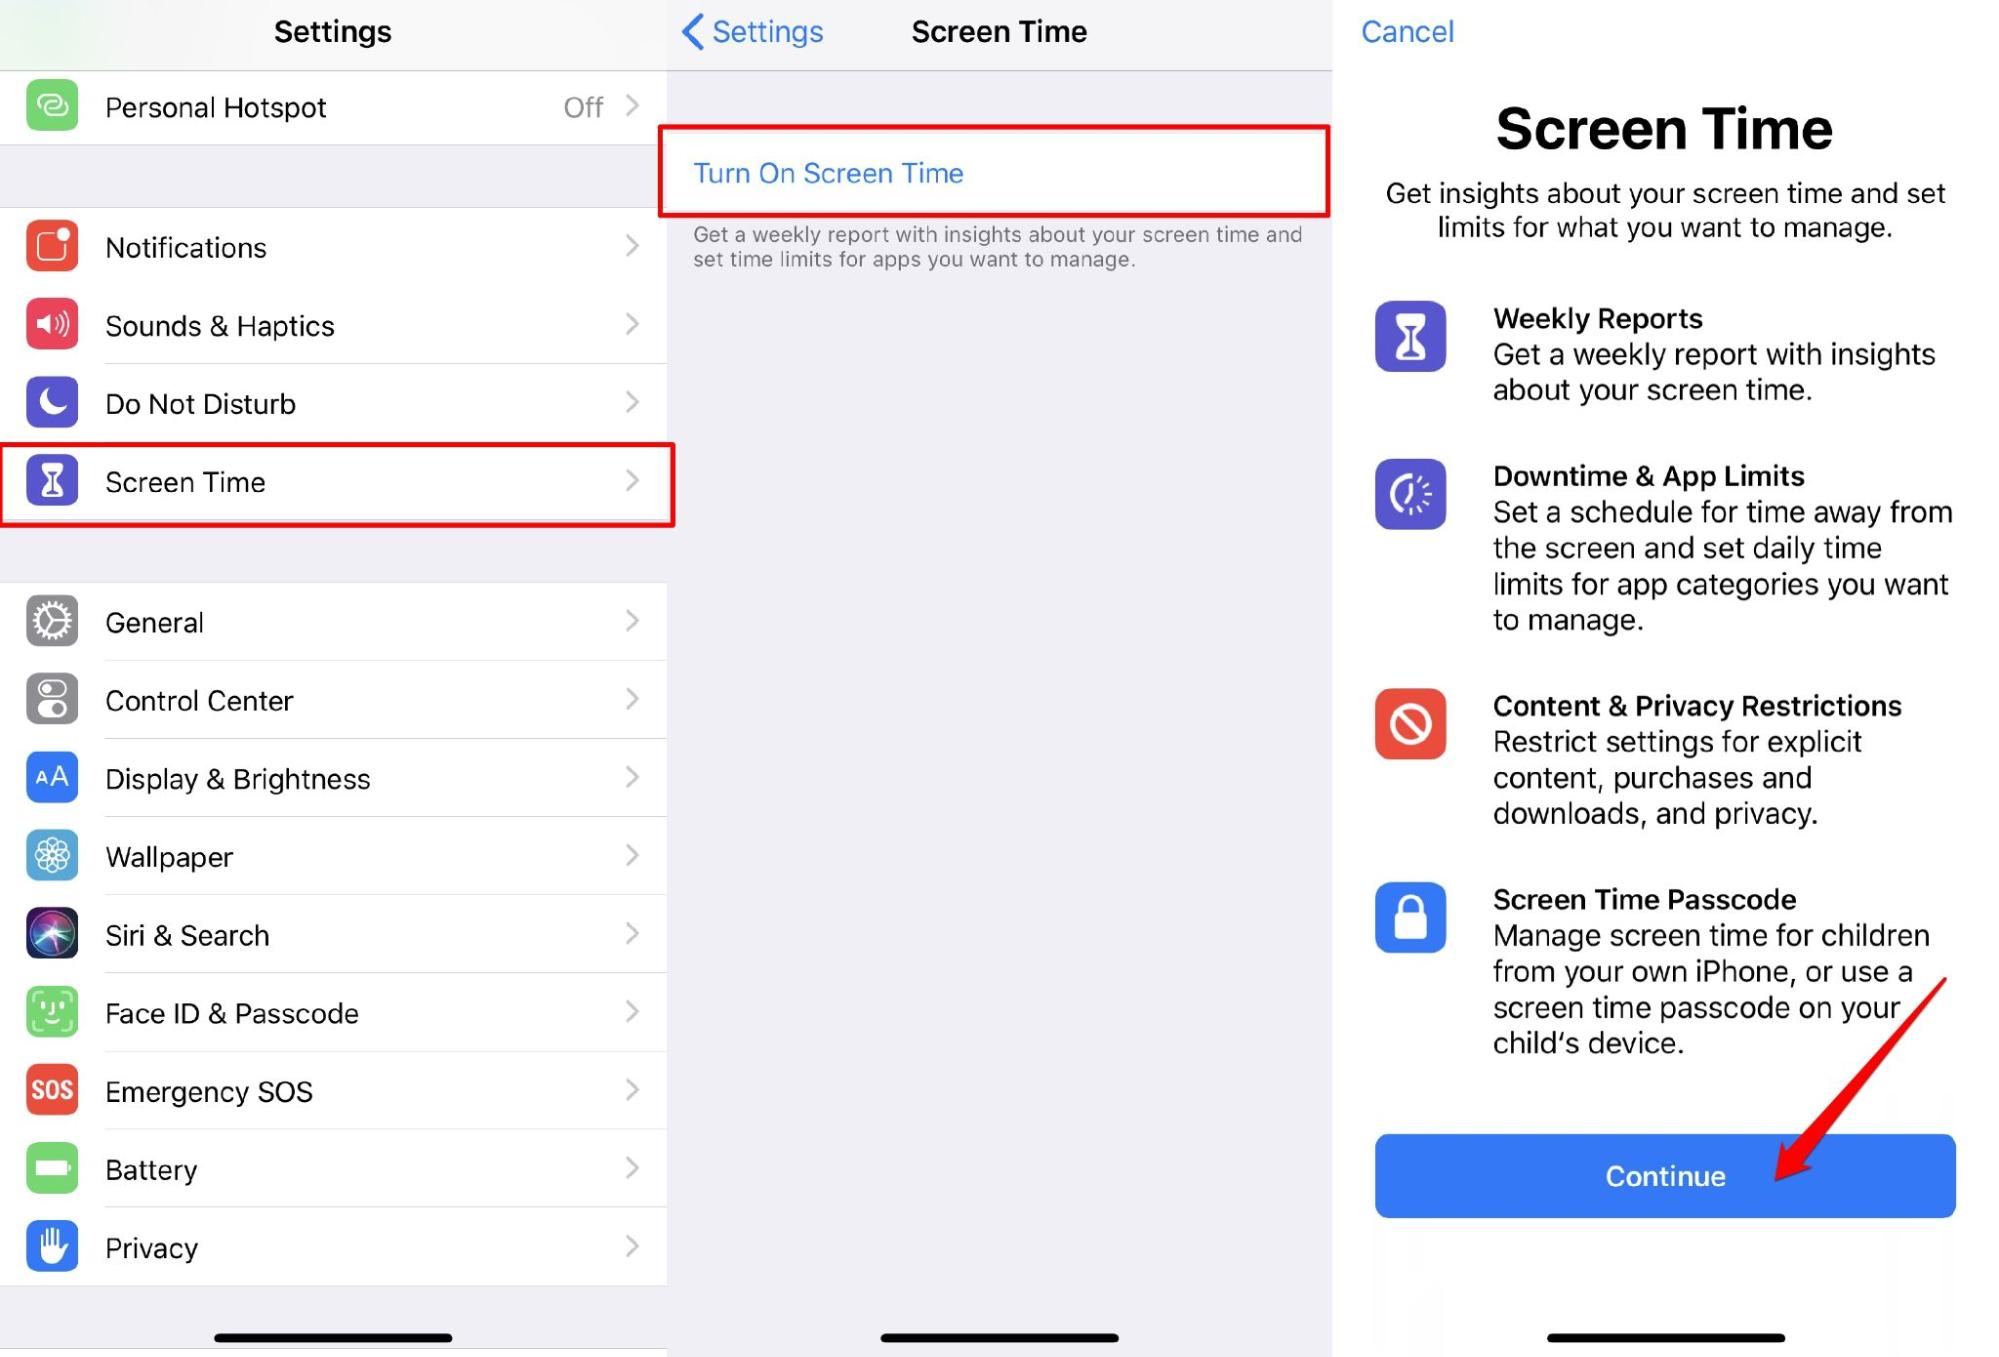
Navigate to Screen Time: Within the Settings menu, locate and tap on "Screen Time." This feature provides insights into your device usage and enables you to set specific restrictions and limits.
-
Tap Content & Privacy Restrictions: Under the Screen Time settings, select "Content & Privacy Restrictions." This section allows you to customize restrictions for various aspects of your iPhone's functionality, including web browsing.
-
Enable Content & Privacy Restrictions: If Content & Privacy Restrictions are not already enabled, tap "Turn On" to activate this feature. You may be prompted to set a Screen Time passcode if you haven't done so previously.
-
Select Allowed Apps: Within the Content & Privacy Restrictions menu, tap on "Allowed Apps." This will display a list of apps that can be accessed on your iPhone.
-
Disable Safari: Locate Safari in the list of allowed apps and toggle the switch to turn it off. Once disabled, Safari will no longer appear on your iPhone's home screen or within folders.
By following these steps, you can effectively disable Safari on your iPhone, limiting access to the default web browser. This method provides a simple yet effective way to manage web browsing capabilities on your device, aligning with your specific needs and preferences.
Whether you're implementing parental controls for a child's device, seeking to enhance your own productivity, or customizing your browsing experience, disabling Safari offers a practical solution to tailor your iPhone's functionality to suit your requirements.
Method 2: Use Screen Time to Limit Safari
Utilizing the Screen Time feature on your iPhone provides a powerful means to manage and regulate various aspects of your device usage, including web browsing capabilities. By leveraging Screen Time, you can set specific restrictions and limits for Safari, effectively controlling the access to the default web browser. This method is particularly beneficial for individuals seeking to exercise greater control over their digital habits, promote a healthier balance between online and offline activities, and enhance productivity. Here's a detailed guide on how to use Screen Time to limit Safari on your iPhone:
-
Access Screen Time: Begin by navigating to the "Settings" app on your iPhone and tapping on "Screen Time." This will open the Screen Time menu, where you can view insights into your device usage and access various controls.
-
View App Usage: Within the Screen Time menu, tap on "See All Activity" under the "Most Used" section. This allows you to gain insights into your app usage patterns and identify the frequency and duration of Safari usage.
-
Set App Limits: To limit the usage of Safari, tap on "App Limits" within the Screen Time menu. You can then select "Add Limit" and choose the "Website" category, which includes Safari.
-
Customize Time Limits: After selecting the "Website" category, you can set specific time limits for Safari usage. This enables you to define the maximum amount of time that can be spent on web browsing within a given timeframe, such as daily or weekly limits.
-
Confirm and Apply Limits: Once you've customized the time limits for Safari, tap "Add" to confirm and apply the restrictions. Your iPhone will then enforce the specified limits on Safari usage, providing notifications when the allotted time is nearly exhausted.
By utilizing Screen Time to limit Safari, you can effectively regulate and manage web browsing activities on your iPhone. This method empowers users to exercise greater control over their digital habits, promoting a balanced and mindful approach to utilizing the default web browser. Whether it's for personal well-being, parental controls, or productivity enhancement, leveraging Screen Time to limit Safari offers a versatile and intuitive solution to tailor your browsing experience to align with your specific needs and preferences.
With the ability to set customized time limits and receive notifications about Safari usage, individuals can cultivate a healthier relationship with technology and optimize their digital experiences according to their unique requirements.
Method 3: Use Restrictions to Hide Safari
Utilizing the built-in Restrictions feature on your iPhone provides a practical method to hide Safari from the home screen and restrict access to the default web browser. This approach is particularly useful for implementing parental controls, managing device usage for children, or maintaining a focused browsing environment. By leveraging Restrictions, you can effectively customize the accessibility of Safari to align with your specific requirements and preferences. Here's a comprehensive guide on how to use Restrictions to hide Safari on your iPhone:
-
Access Settings: Begin by opening the "Settings" app on your iPhone's home screen. This will allow you to navigate to the device's settings menu, where you can manage various features and restrictions.
-
Navigate to Screen Time: Within the Settings menu, tap on "Screen Time." This feature provides insights into your device usage and enables you to set specific restrictions and limits, including those related to web browsing.
-
Tap Content & Privacy Restrictions: Under the Screen Time settings, select "Content & Privacy Restrictions." This section allows you to customize restrictions for various aspects of your iPhone's functionality, including Safari.
-
Enable Content & Privacy Restrictions: If Content & Privacy Restrictions are not already enabled, tap "Turn On" to activate this feature. You may be prompted to set a Screen Time passcode if you haven't done so previously.
-
Hide Safari: Within the Content & Privacy Restrictions menu, tap on "Allowed Apps." This will display a list of apps that can be accessed on your iPhone.
-
Disable Safari: Locate Safari in the list of allowed apps and toggle the switch to turn it off. Once disabled, Safari will be hidden from the home screen and won't be accessible unless re-enabled through the Restrictions settings.
By following these steps, you can effectively utilize Restrictions to hide Safari on your iPhone, providing a straightforward means to manage web browsing accessibility. This method offers a versatile solution for implementing parental controls, restricting access to Safari for specific users, or customizing the browsing experience to suit your unique preferences.
Whether you're seeking to create a more secure and focused browsing environment for children or implementing restrictions for personal well-being, leveraging Restrictions to hide Safari empowers you to tailor your iPhone's functionality according to your specific needs and priorities. With the ability to customize app accessibility and enforce restrictions, this method provides a valuable tool for managing web browsing capabilities on your device.
Method 4: Use a Third-Party Browser
Exploring alternative browsers is a compelling approach to customizing your browsing experience on your iPhone. While Safari serves as the default web browser, the App Store offers a diverse selection of third-party browsers that provide unique features, enhanced privacy options, and specialized functionalities. By opting to use a third-party browser, you can tailor your web browsing experience to align with your specific preferences and requirements, whether it's for improved privacy, advanced customization, or specialized browsing capabilities.
Step-by-Step Guide to Using a Third-Party Browser:
-
Explore App Store: Begin by accessing the App Store on your iPhone and browsing the available third-party browsers. Popular options include Google Chrome, Mozilla Firefox, Opera, and Microsoft Edge, among others. Consider exploring user reviews, ratings, and feature descriptions to identify a browser that best suits your needs.
-
Download and Install: Once you've selected a third-party browser, tap the "Get" or "Download" button to acquire the app. Follow the on-screen prompts to install the browser on your iPhone. Upon successful installation, the third-party browser will appear on your home screen alongside Safari.
-
Customize Settings: After launching the third-party browser, take advantage of its customization options and settings. Many third-party browsers offer advanced privacy features, ad-blocking capabilities, and personalized browsing experiences. Explore the settings menu to tailor the browser to your preferences, such as adjusting privacy controls, enabling dark mode, or customizing the homepage layout.
-
Set as Default Browser (Optional): Depending on the browser and iOS version, you may have the option to set the third-party browser as your default choice for opening links and accessing web content. This can be particularly beneficial if you prefer the features and interface of the third-party browser over Safari.
-
Enjoy Enhanced Features: Utilize the unique features and functionalities offered by the third-party browser to enhance your browsing experience. This may include seamless synchronization with desktop browsers, integrated note-taking capabilities, enhanced privacy protections, or specialized browsing modes tailored to specific content types.
By embracing a third-party browser, you can unlock a wealth of features and customization options that cater to your individual browsing preferences. Whether it's for improved privacy, advanced functionality, or a different user interface, third-party browsers offer a diverse array of options to elevate your web browsing experience on your iPhone.
With the flexibility to choose from a range of third-party browsers, users can tailor their browsing environment to align with their specific needs and preferences. Whether it's for enhanced privacy, specialized features, or a different user interface, exploring third-party browsers empowers individuals to customize their web browsing experience according to their unique requirements.
Conclusion
In conclusion, the ability to remove or restrict Safari from your iPhone offers a range of benefits and customization options to align with your specific needs and preferences. Whether you're aiming to enhance digital well-being, boost productivity, implement parental controls, or explore alternative browsing experiences, the methods outlined in this article provide valuable insights and practical solutions for tailoring your iPhone's browsing environment.
By understanding the diverse motivations for removing Safari, such as promoting a healthier balance between online and offline activities, minimizing distractions, or customizing the browsing experience to suit individual preferences, users can make informed decisions about managing their digital habits. The methods presented, including disabling Safari, utilizing Screen Time to limit access, leveraging Restrictions to hide the browser, and exploring third-party alternatives, empower individuals to take control of their browsing experience.
Disabling Safari and using Screen Time to set specific restrictions offer intuitive ways to manage web browsing capabilities, promoting a mindful and balanced approach to digital usage. These methods are particularly valuable for individuals seeking to enhance productivity, implement parental controls, or exercise greater control over their digital habits.
Furthermore, utilizing Restrictions to hide Safari provides a straightforward means to customize app accessibility, catering to specific user requirements and promoting a secure and focused browsing environment. This method is especially beneficial for parents managing their children's device usage or individuals seeking to implement strict browsing restrictions.
Exploring third-party browsers presents an exciting opportunity to tailor the browsing experience to individual preferences, offering enhanced features, advanced privacy options, and specialized functionalities. By embracing alternative browsers, users can enjoy a diverse array of options to elevate their web browsing experience, whether it's for improved privacy, advanced functionality, or a different user interface.
Ultimately, the methods for removing or restricting Safari on your iPhone empower you to align your digital habits with your unique needs and priorities. By leveraging these approaches, individuals can cultivate a healthier relationship with technology, enhance productivity, and customize their browsing experience to suit their specific preferences. Whether it's for personal well-being, parental controls, workplace regulations, or browser preference, the ability to manage Safari on your iPhone provides valuable tools for tailoring your digital environment.