Check Safari Availability
Before proceeding with the reinstallation of Safari on your iPhone 4, it's crucial to ensure that the Safari browser is available on the device. Safari is the default web browser for iOS devices, including the iPhone 4, and it should be present unless it has been intentionally removed or restricted.
To check the availability of Safari on your iPhone 4, start by locating the Safari app icon on the home screen. The Safari icon features a compass design and is typically found on one of the device's main screens. If the Safari app icon is visible, it indicates that Safari is currently installed and available for use on your iPhone 4.
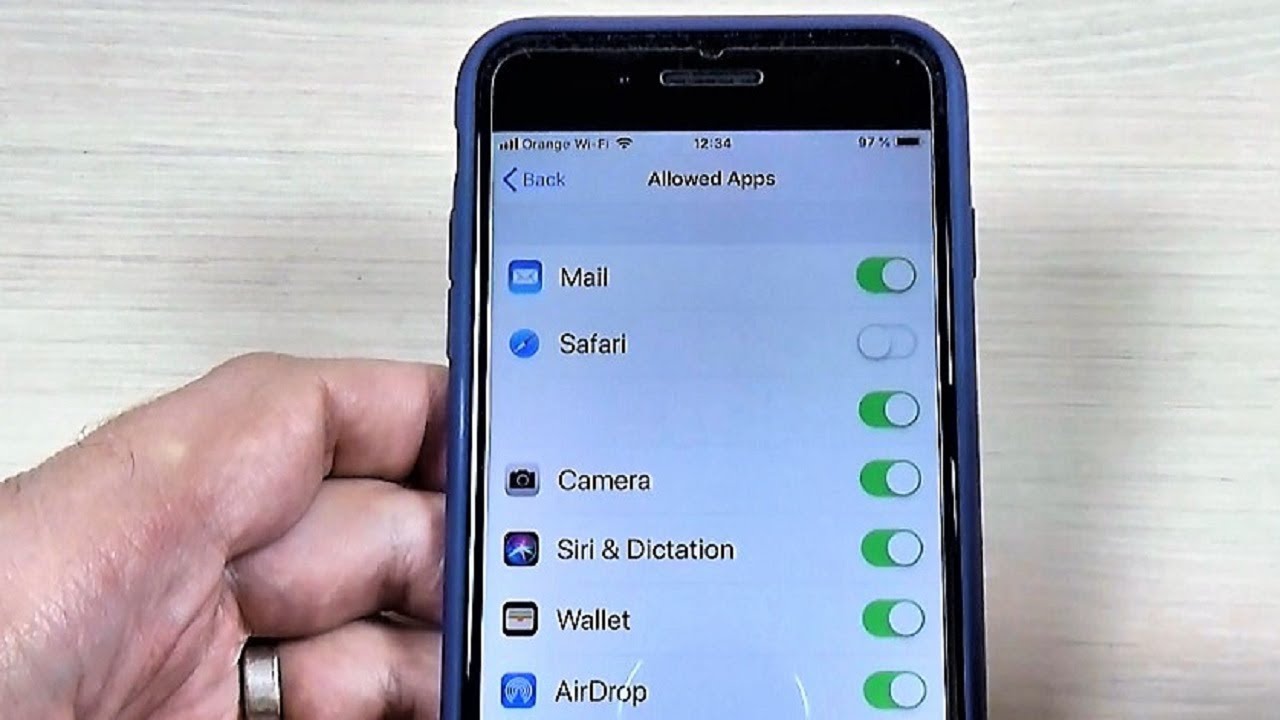
In the event that the Safari app icon is not visible on the home screen, it's essential to confirm whether Safari has been restricted or removed from the device. To do this, navigate to the "Settings" app on your iPhone 4 and scroll down to find the "Screen Time" or "Restrictions" option. If "Screen Time" or "Restrictions" is enabled, it may have been used to restrict access to the Safari app. In this case, you will need to adjust the settings to allow Safari to be used on the device.
If, after checking the "Settings" app, you find that Safari is neither restricted nor available on your iPhone 4, it's possible that the Safari app has been inadvertently deleted. In such a scenario, you will need to reinstall Safari from the App Store to restore the browser on your device.
Ensuring the availability of Safari on your iPhone 4 is the first step in the process of reinstalling the browser. Once you have confirmed the status of Safari on your device, you can proceed with the necessary steps to either reinstall the app or adjust the settings to make it accessible again.
By verifying the presence and accessibility of Safari on your iPhone 4, you can effectively prepare for the subsequent actions required to reinstall the browser and restore its functionality on your device.
Backup iPhone Data
Before initiating the reinstallation process for Safari on your iPhone 4, it is imperative to safeguard your device's data by creating a comprehensive backup. This precautionary measure ensures that no valuable information is lost during the reinstallation and helps to restore your device to its previous state after the process is completed.
iCloud Backup
One of the most convenient methods to back up your iPhone 4 data is by utilizing iCloud, Apple's cloud storage service. To perform an iCloud backup, ensure that your device is connected to a stable Wi-Fi network and plugged into a power source. Then, navigate to the "Settings" app on your iPhone 4, tap on your name at the top of the screen, and select "iCloud." From there, choose "iCloud Backup" and toggle the switch to enable it. Tap on "Back Up Now" to initiate the backup process. It's essential to remain connected to the Wi-Fi network until the backup is completed.
iTunes Backup
Alternatively, you can create a backup of your iPhone 4 data using iTunes, a software application developed by Apple. To do this, connect your iPhone 4 to a computer with the latest version of iTunes installed. Once connected, launch iTunes and select your device. Under the "Summary" tab, click on "Back Up Now" to initiate the backup process. It's important to ensure that the backup is encrypted to include all sensitive information such as passwords and health data.
Data Backup Considerations
When backing up your iPhone 4 data, it's crucial to include a wide range of information, including contacts, photos, videos, app data, settings, and any other pertinent data that you wish to preserve. By creating a comprehensive backup, you can rest assured that your valuable information is securely stored and can be easily restored after the reinstallation of Safari.
By diligently backing up your iPhone 4 data using either iCloud or iTunes, you can mitigate the risk of data loss and ensure that your device's information is safeguarded throughout the process of reinstalling Safari. This proactive approach empowers you to proceed with the reinstallation process with confidence, knowing that your data is securely preserved and can be readily restored as needed.
Delete Safari App
To reinstall Safari on your iPhone 4, you may need to delete the Safari app if it is present but not functioning as expected. Deleting the Safari app will pave the way for a fresh installation, potentially resolving any underlying issues that may have caused the browser to malfunction.
To delete the Safari app from your iPhone 4, follow these steps:
-
Access the Home Screen: Begin by navigating to the home screen of your iPhone 4, where all the app icons are displayed.
-
Enter Edit Mode: To delete the Safari app, you need to enter the edit mode. This can be done by pressing and holding the Safari app icon until all the app icons start wiggling. This signifies that you are now in edit mode, allowing you to rearrange or delete apps.
-
Locate the Safari App: While in edit mode, locate the Safari app icon. The Safari icon features a compass design and is typically found on one of the main screens of the device.
-
Delete the Safari App: Once you have located the Safari app icon, tap on it to select it. This will prompt a small "x" to appear on the top-left corner of the app icon. Tap on the "x" to initiate the deletion process. A confirmation dialog will appear, asking if you want to delete Safari. Confirm the deletion by selecting "Delete," and the Safari app will be removed from your iPhone 4.
-
Exit Edit Mode: After deleting the Safari app, exit the edit mode by pressing the home button or swiping up from the bottom of the screen, depending on the iPhone 4 model.
By following these steps, you can effectively delete the Safari app from your iPhone 4, paving the way for a fresh installation. Once the Safari app is successfully deleted, you can proceed with reinstalling it from the App Store to restore the browser's functionality on your device.
Deleting the Safari app is a crucial step in the process of resolving any issues related to the browser's performance on your iPhone 4. By removing the existing installation, you create the opportunity for a clean and fresh installation, potentially addressing any underlying issues and ensuring the optimal functionality of Safari on your device.
Reinstall Safari from App Store
Reinstalling Safari from the App Store is a straightforward process that allows you to restore the browser to your iPhone 4, ensuring seamless and reliable web browsing capabilities. The App Store serves as a centralized platform where users can discover, download, and install a wide range of applications, including Safari, the default web browser for iOS devices. By following the steps outlined below, you can effortlessly reinstall Safari from the App Store, enabling you to enjoy its full functionality on your iPhone 4.
-
Access the App Store: Begin by locating the App Store icon on the home screen of your iPhone 4. The App Store icon features a blue background with a white letter "A" made from a pencil, paintbrush, and ruler. Tap on the App Store icon to launch the application.
-
Search for Safari: Once the App Store is open, navigate to the search tab located at the bottom of the screen. Tap on the search tab and enter "Safari" into the search bar. As you type, the App Store will display search results based on your input.
-
Select Safari: From the search results, locate the official Safari app developed by Apple. The app icon features a compass design and is labeled "Safari." Tap on the Safari app to access its detailed information page.
-
Download and Install: On the Safari app's information page, you will find the option to download and install the app. Tap on the "Download" or "Get" button, which may display a cloud icon with an arrow, indicating that the app is available for download. After tapping the download button, the App Store will initiate the installation process, and the Safari app will be downloaded and installed on your iPhone 4.
-
Wait for Installation: Depending on your internet connection speed, the download and installation process may take a few moments to complete. Ensure that your iPhone 4 is connected to a stable Wi-Fi network to expedite the process.
-
Access Safari: Once the installation is finished, the Safari app will be accessible from your home screen. Tap on the Safari icon to launch the browser and begin enjoying its features, including fast and secure web browsing, tab management, and access to bookmarks.
By reinstalling Safari from the App Store, you can effectively restore the browser to your iPhone 4, ensuring that you have access to a reliable and feature-rich web browsing experience. The seamless process of reinstalling Safari from the App Store empowers you to swiftly address any issues related to the browser's functionality and enjoy its full capabilities on your device.
This reinstallation process allows you to leverage the latest version of Safari, benefit from performance enhancements, and access new features and security updates, thereby enhancing your overall browsing experience on your iPhone 4.
Restore iPhone Data
After successfully reinstalling Safari on your iPhone 4, the next crucial step is to restore your device's data from the backup you created earlier. This process ensures that all your valuable information, including contacts, photos, app data, settings, and more, is seamlessly reintegrated into your device, allowing you to resume your digital activities without any loss of data.
iCloud Data Restoration
If you backed up your iPhone 4 data using iCloud, you can easily restore your device by following these simple steps:
-
Initial Setup: Upon turning on your iPhone 4 after the Safari reinstallation, you will be prompted to set up your device. Follow the on-screen instructions until you reach the "Apps & Data" screen.
-
Select Restore from iCloud Backup: On the "Apps & Data" screen, select "Restore from iCloud Backup." You will be prompted to sign in to your iCloud account using your Apple ID and password.
-
Choose Backup: After signing in, select the most relevant backup from the list of available iCloud backups. It's advisable to choose the most recent backup to ensure that your device reflects the latest state of your data.
-
Restoration Process: Once you select the backup, the restoration process will commence. Your iPhone 4 will begin downloading the selected backup from iCloud and restoring your data. It's essential to remain connected to a stable Wi-Fi network throughout this process.
-
Completion: After the restoration process is complete, your iPhone 4 will restart, and your data will be fully restored. You can then proceed to use your device with all your previously backed-up information intact.
iTunes Data Restoration
If you opted to back up your iPhone 4 data using iTunes, the restoration process involves the following steps:
-
Connect to Computer: Connect your iPhone 4 to the computer that you used to create the iTunes backup. Launch iTunes if it doesn't open automatically.
-
Select Device: Once your iPhone 4 is connected, select it within iTunes. If prompted, enter your device passcode or choose to "Trust This Computer."
-
Choose Backup: Under the "Summary" tab, select "Restore Backup." Choose the most relevant backup from the list of available iTunes backups and proceed with the restoration process.
-
Restoration Process: iTunes will then restore your iPhone 4 using the selected backup. It's important to keep your device connected to the computer until the process is complete.
-
Completion: After the restoration process finishes, your iPhone 4 will restart, and all your backed-up data will be restored to the device.
By diligently restoring your iPhone 4 data from the backup you created, whether through iCloud or iTunes, you can seamlessly reintegrate your valuable information into your device. This ensures that you can continue using your iPhone 4 with all your essential data preserved, allowing for a smooth transition back to your familiar digital environment.