Introduction
In today’s digital age, tablets have become an integral part of our lives. Whether you use an Android tablet, an iPad, or a Windows tablet, you may have encountered issues like slow performance, freezing apps, or glitches in the system. One common solution to address these issues is by clearing the cache on your tablet.
The cache is a temporary storage location where data from websites, apps, and system processes are stored to facilitate faster and smoother operation. While it serves a useful purpose, over time, the cache can accumulate large amounts of unnecessary data, resulting in decreased performance and potential compatibility issues.
Clearing the cache on your tablet can provide several benefits. It can free up valuable storage space, improve app performance, and resolve issues related to cache corruption. Whether you want to speed up your tablet, troubleshoot app problems, or clear out unnecessary data, this guide will walk you through the process of clearing the cache on various tablet platforms.
Why Clear Cache?
Clearing the cache on your tablet is an essential maintenance task that can significantly improve its performance and resolve various issues. Here are a few key reasons why clearing the cache is important:
- Improved Performance: As you use your tablet, the cache fills up with temporary data from websites and apps. Over time, this accumulation can slow down your device, causing sluggishness and lag. Clearing the cache frees up valuable storage space and allows your tablet to run more efficiently, resulting in faster load times and smoother operation.
- Fix App Glitches: If you’re experiencing app crashes, freezing, or other issues, clearing the cache can often resolve these problems. Corrupted or outdated cache data can interfere with app performance, leading to instability. By clearing the cache, you remove any potentially problematic data, allowing the app to start fresh and function properly.
- Save Storage Space: Cached data can consume a significant amount of storage space on your tablet. By clearing the cache, you can reclaim this space, giving you more room to store important files, photos, or videos. This is especially beneficial if you have limited storage capacity or if you notice your tablet’s storage running low.
- Privacy and Security: Clearing the cache can help protect your privacy and sensitive information. Cached data may contain login credentials, personal details, or browsing history. By regularly clearing the cache, you reduce the risk of unauthorized access to your data, ensuring your personal information remains secure.
- Resolve Compatibility Issues: Sometimes, outdated or incompatible cache data can cause conflicts with the operating system or other apps. This can lead to unusual behavior, errors, or even crashes. By clearing the cache, you eliminate any potential compatibility issues, ensuring smooth and error-free operation of your tablet.
Now that you understand the importance of clearing the cache on your tablet, let’s explore the step-by-step process for doing so on different tablet platforms.
Step 1: Understanding Cache
Before diving into the process of clearing the cache on your tablet, it is essential to have a basic understanding of what cache is and how it works.
Cache is a temporary storage location where your tablet stores data from websites, apps, and system processes. It serves as a quick-access memory that allows your tablet to retrieve information more efficiently and reduce load times. Instead of fetching data from the internet or apps every time you open them, your tablet can retrieve it from the cache, resulting in faster performance.
The cache contains various types of data, such as images, scripts, style sheets, and other elements that make up websites and apps. When you visit a website or use an app, certain data is stored in the cache to speed up future visits or app launches. This process is known as caching.
While cache improves performance, it can also accumulate unnecessary data over time. This can include outdated or obsolete information, cookies, advertising trackers, and other types of temporary files. This excess data can lead to reduced performance, storage issues, and potential compatibility conflicts.
Understanding how cache works on your tablet is important because it allows you to comprehend why clearing the cache is necessary. Clearing the cache removes the stored data, freeing up storage space and ensuring that your tablet is working with the most up-to-date versions of web pages and apps.
Now that you have a better understanding of what cache is and how it functions, let’s move on to the specific steps for clearing the cache on different tablet platforms.
Step 2: Clearing Cache on Android Tablet
If you have an Android tablet, clearing the cache can help improve performance and resolve various issues. Follow these step-by-step instructions to clear the cache on your Android tablet:
Option 1: Clearing Cache for Apps:
- Go to the “Settings” app on your Android tablet.
- Scroll down and select “Apps” or “App Manager” (the name may vary depending on your device).
- Tap on the specific app for which you want to clear the cache.
- On the app’s information page, tap on “Storage” or “Storage & cache”.
- Select “Clear Cache” to remove the temporary files associated with that app.
- Repeat this process for any other apps that you want to clear the cache for.
Option 2: Clearing Cache for All Apps at Once:
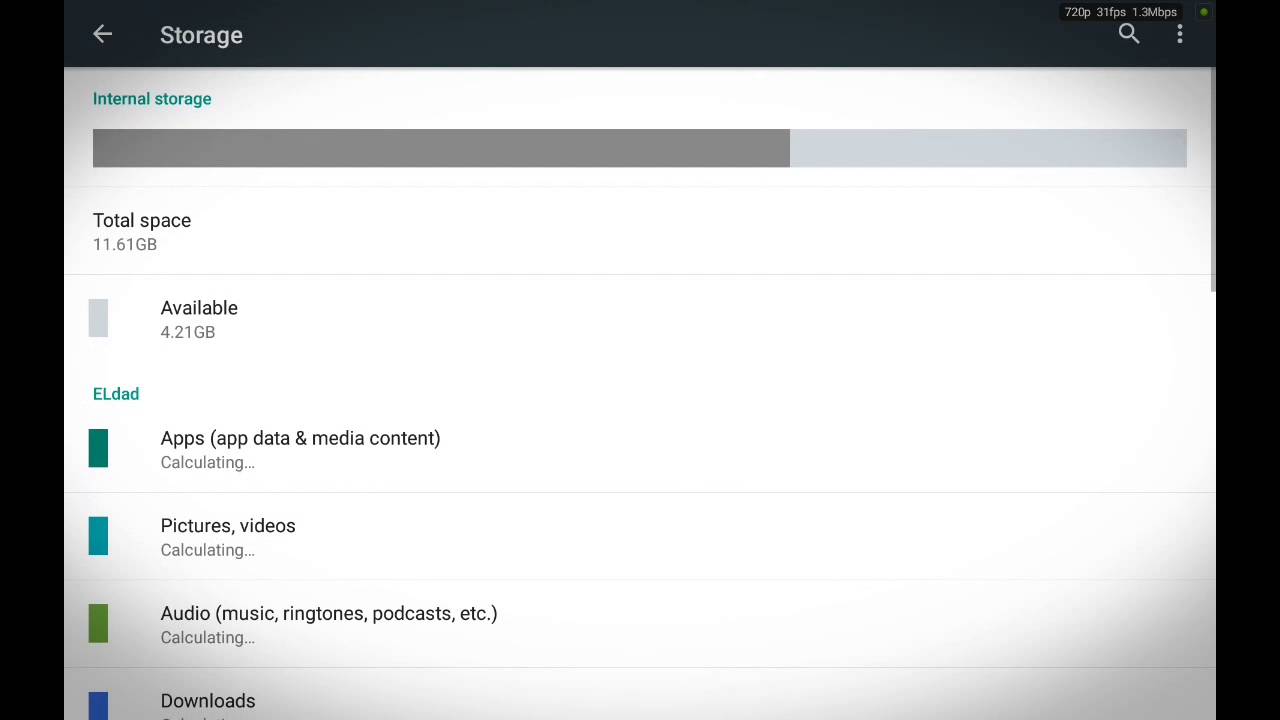
- Go to the “Settings” app on your Android tablet.
- Scroll down and select “Storage” or “Storage & memory”.
- Tap on “Cached data” or “Cached files”.
- When prompted, confirm that you want to clear the cached data for all apps.
It’s important to note that the steps may vary slightly depending on the Android version and the manufacturer’s custom interface on your tablet. If you can’t find the exact options mentioned above, look for similar settings related to apps or storage in your tablet’s settings menu.
Clearing the cache on your Android tablet can help optimize its performance and resolve issues related to outdated or corrupted temporary files. Now that you know how to clear the cache on an Android tablet, let’s move on to clearing the cache on an iPad or iPhone.
Option 1: Clearing Cache for Apps
To improve the performance of specific apps on your Android tablet, you can clear the cache for individual apps. Here’s how:
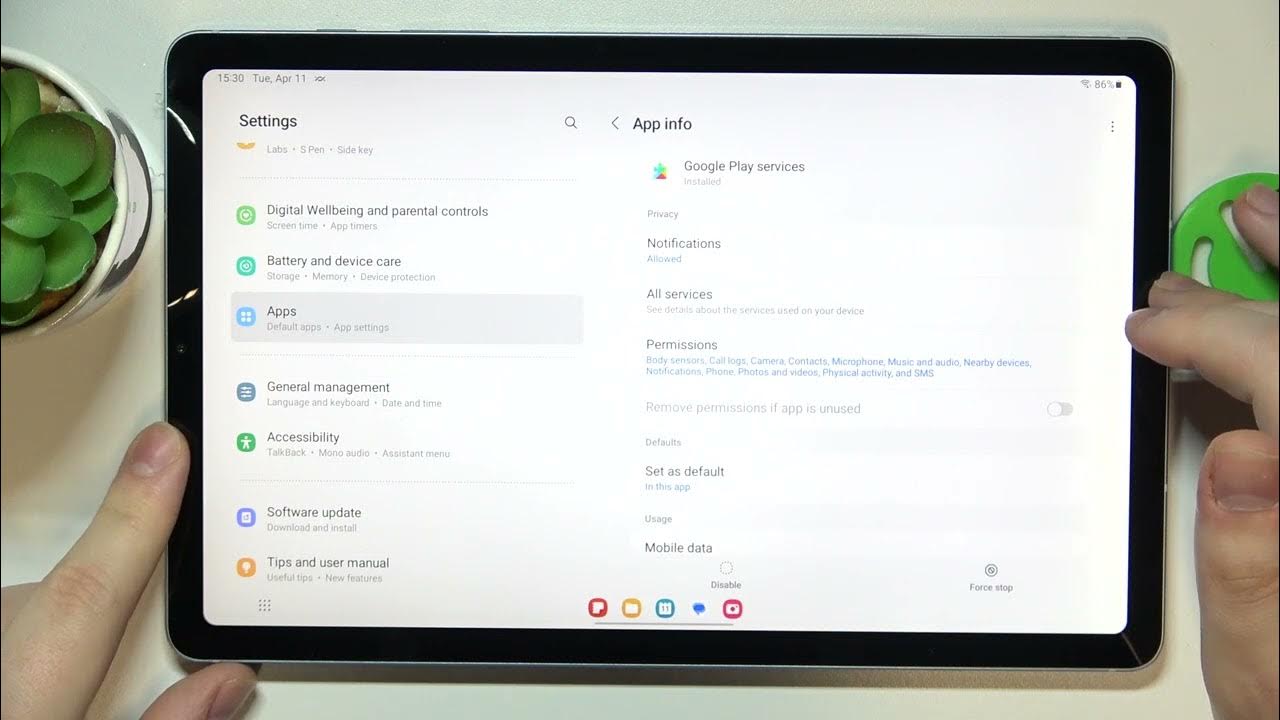
- Go to the “Settings” app on your Android tablet.
- Scroll down and select “Apps” or “App Manager” (the name may vary depending on your device).
- Look for the app for which you want to clear the cache and tap on it.
- On the app’s information page, you will see various options. Tap on “Storage & Cache” or “Storage” (depending on your Android version).
- Next, tap on “Clear Cache” or “Clear Storage” (the wording may vary).
- A confirmation message will appear. Tap on “OK” to confirm the cache clearance for the selected app.
- Repeat these steps for any other apps that you want to clear the cache for.
Clearing the cache for specific apps can resolve issues like app crashes, freezing, or slow performance. It removes temporary files stored by those apps, giving them a fresh start and potentially improving their efficiency.
It’s worth mentioning that some apps may not provide the option to clear the cache directly from the tablet’s settings. In such cases, you can also try clearing the cache from within the app itself. Look for a “Clear Cache” or “Storage” option in the app’s settings menu, usually accessed by tapping on the three-dot menu icon or navigating to the app’s specific settings section.
By clearing the cache for specific apps, you can optimize their performance and resolve any issues caused by a buildup of temporary files. However, if you want to clear the cache for all apps on your Android tablet at once, proceed to the next section.
Option 2: Clearing Cache for All Apps at Once
If you prefer to clear the cache for all apps on your Android tablet simultaneously, follow these steps:
- Go to the “Settings” app on your Android tablet.
- Scroll down and select “Storage” or “Storage & memory”.
- Look for the option that says “Cached data” or “Cached files” and tap on it.
- A pop-up message will appear, asking for confirmation to clear the cached data for all apps. Tap on “OK” to proceed.
Clearing the cache for all apps at once can be a quick and convenient way to free up storage space and improve overall tablet performance. It removes the accumulated temporary files from all installed apps, allowing them to function more efficiently.
Do keep in mind that clearing the cache for all apps will also remove any data that may be required for quick access or offline use. This means that some apps may take a little longer to load data the next time you use them, as they will need to fetch it again from the internet or internal storage. However, this is a small trade-off for the benefits of a cleaner and faster-performing tablet.
Now that you are familiar with the methods to clear the cache on an Android tablet, you can easily optimize the performance of individual apps or all apps simultaneously. In the next section, we will explore the process of clearing the cache on an iPad or iPhone.
Step 3: Clearing Cache on iPad or iPhone
If you own an iPad or iPhone, clearing the cache can help improve performance and resolve issues. Let’s explore how to clear the cache on your iOS device:
Option 1: Clearing Cache for Safari:
- Open the “Settings” app on your iPad or iPhone.
- Scroll down and select “Safari” from the list of apps.
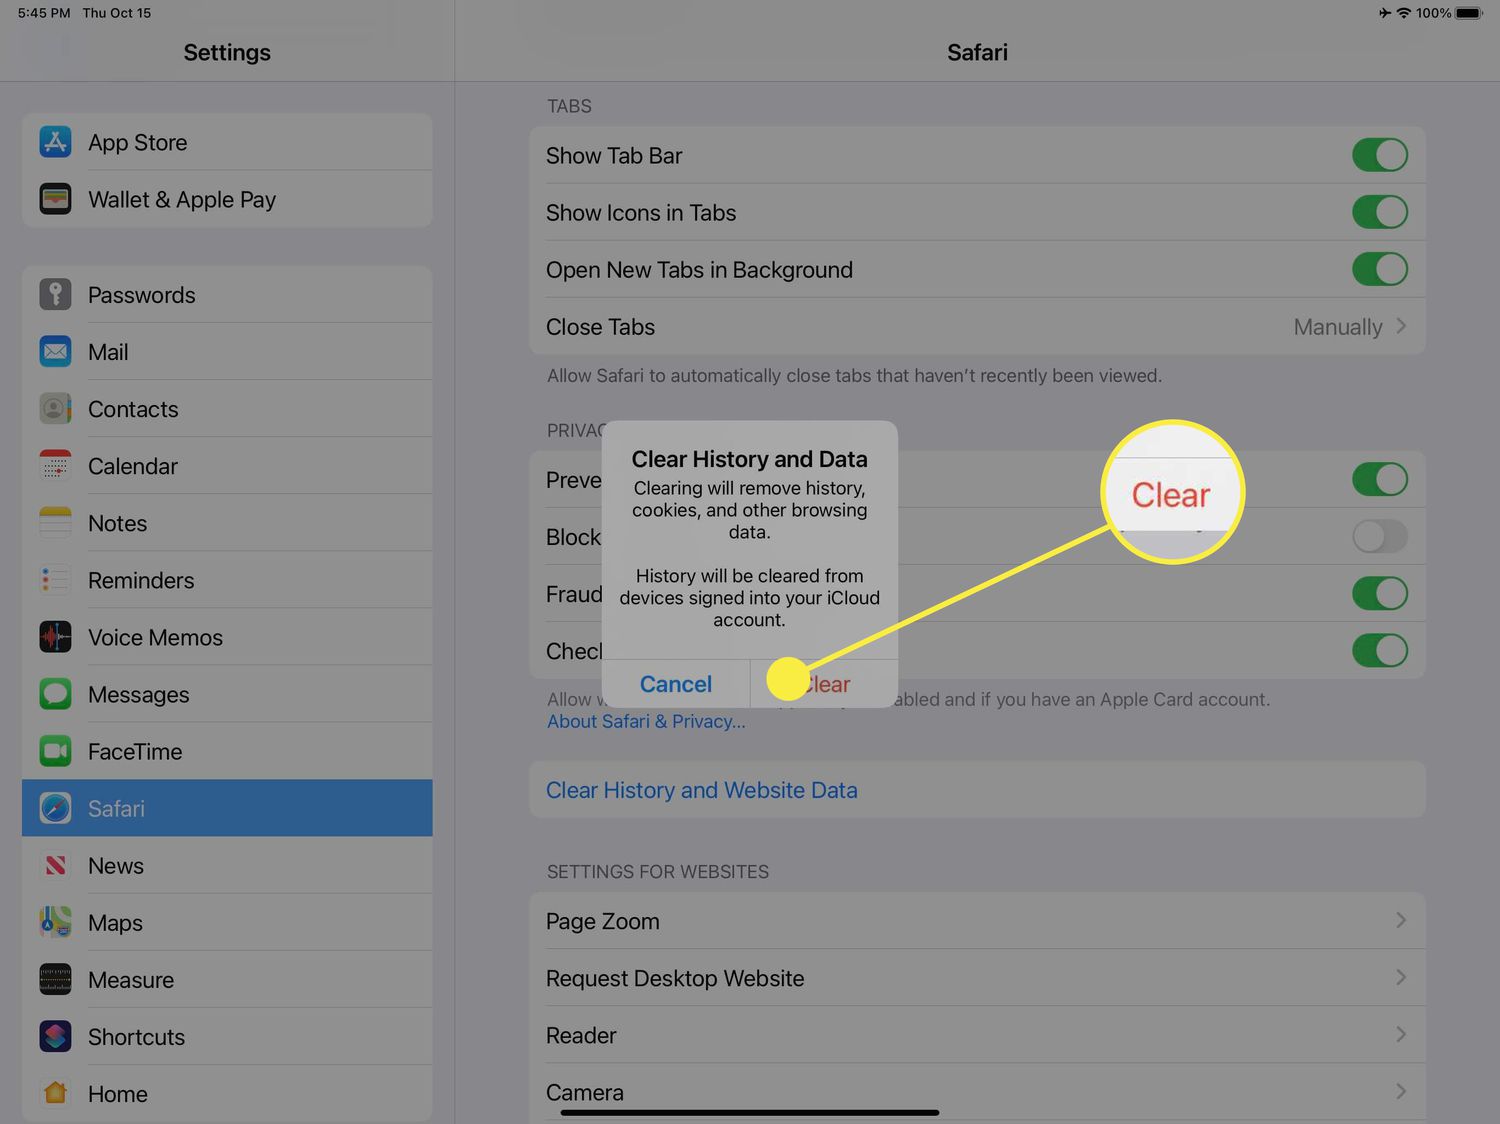
- Scroll down again and tap on “Clear History and Website Data”.
- A confirmation pop-up will appear. Tap on “Clear History and Data” to proceed.
This action will not only clear the cache but also delete your browsing history, cookies, and other website data stored by Safari. It can help optimize the performance of Safari and resolve issues related to cached data.
Option 2: Clearing Cache for Other Apps:
- Open the “Settings” app on your iPad or iPhone.
- Scroll down and select the specific app for which you want to clear the cache.
- Look for the “Clear Cache” or similar option within the app’s settings.
- Tap on the option to clear the cache for that particular app.
Not all apps provide the option to clear the cache within their settings. If you can’t find a specific cache-clearing option within an app, you can try uninstalling and reinstalling the app. This will effectively clear the cache for that app.
Clearing the cache on your iPad or iPhone can help optimize performance, resolve app issues, and free up storage space. It ensures that your device is running with the latest versions of web pages and apps, without any unnecessary data slowing it down.
Now that you know how to clear the cache on an iPad or iPhone, let’s move on to clearing the cache on a Windows tablet.
Option 1: Clearing Cache for Safari
If you use Safari as your primary web browser on your iPad or iPhone, clearing the cache can help improve performance and resolve issues. Follow these steps to clear the cache for Safari:
- Open the “Settings” app on your iPad or iPhone.
- Scroll down and tap on “Safari” from the list of settings.
- Under the Safari settings, scroll down to find the “Clear History and Website Data” option.
- Tap on “Clear History and Website Data”.
- A confirmation pop-up will appear, informing you that clearing the history and data will remove browsing history, cookies, and other website data. Tap on “Clear History and Data” to proceed.
By clearing the cache for Safari, you remove temporary files, cookies, and other website data that might be stored on your iOS device. This action can help optimize Safari’s performance, resolve issues related to cached data, and free up storage space.
Keep in mind that clearing the cache and history for Safari will remove your browsing history and any saved website data. You will need to log in again to websites, and certain websites may not remember your preferences or login details.
Now that you know how to clear the cache for Safari on your iPad or iPhone, let’s explore clearing the cache for other apps on your iOS device.
Option 2: Clearing Cache for Other Apps
Clearing the cache for specific apps on your iPad or iPhone can help optimize their performance and resolve issues. Follow these steps to clear the cache for other apps on your iOS device:
- Open the “Settings” app on your iPad or iPhone.
- Scroll down and look for the specific app for which you want to clear the cache.
- Tap on the app’s name to access its settings.
- Look for an option related to “Storage” or “Clear Cache” within the app’s settings.
- If you find a “Clear Cache” option, tap on it to clear the cache for that particular app.
- If the app does not have a cache-clearing option in its settings, you can try uninstalling and reinstalling the app. This will effectively clear the cache for that app.
Clearing the cache for other apps can help optimize their performance, resolve issues related to cached data, and free up storage space on your iOS device. It ensures that apps start fresh and do not rely on outdated or unnecessary temporary files.
It is important to note that not all apps provide the option to clear the cache within their settings. In such cases, uninstalling and reinstalling the app can effectively clear the cache. However, make sure to back up any important data or settings associated with the app before uninstalling it.
Now that you know how to clear the cache for other apps on your iPad or iPhone, you can optimize their performance, resolve issues, and ensure your device runs smoothly.
Step 4: Clearing Cache on Windows Tablet
If you own a Windows tablet, clearing the cache can help optimize performance and resolve various issues. Follow these step-by-step instructions to clear the cache on your Windows tablet:
Option 1: Clearing Cache in Settings:
- Tap on the “Start” button located on the taskbar of your Windows tablet.
- Click on the “Settings” gear icon to open the Settings menu.
- From the Settings menu, select “System” and then click on “Storage” in the left-hand panel.
- Under the “Storage” section, click on “Free up space now”.
- Windows will calculate the amount of space you can free up. Once the calculation is complete, scroll down and click on “Delete temporary files”.
- Ensure the “Temporary files” option is checked, and then click on the “Remove files” button to clear the cached temporary files.
Option 2: Clearing Cache in Internet Explorer:
- Launch the Internet Explorer app on your Windows tablet.
- Click on the gear icon located in the upper-right corner to open the Tools menu.
- From the Tools menu, select “Internet options”.
- In the Internet Options window, under the “General” tab, click on the “Delete” button in the “Browsing history” section.
- Ensure the “Temporary Internet files and website files” option is checked, and then click on the “Delete” button to clear the cache for Internet Explorer.
Clearing the cache on your Windows tablet can help optimize performance, free up storage space, and resolve any issues caused by a buildup of temporary files. It ensures that your tablet is running with the most up-to-date versions of web pages and applications.
Please note that the steps may vary slightly depending on the version of Windows and the device manufacturer. If the exact options mentioned above are not available, look for similar settings related to storage or clearing temporary files in the settings or control panel of your Windows tablet.
Now that you know how to clear the cache on a Windows tablet, you can optimize its performance and resolve any cache-related issues that may impact its functionality.
Option 1: Clearing Cache in Settings
Clearing the cache in the settings of your Windows tablet can help optimize performance and free up storage space. Here’s how you can do it:
- Tap on the “Start” button located on the taskbar of your Windows tablet.
- Click on the “Settings” gear icon to open the Settings menu.
- From the Settings menu, select “System” and then click on “Storage” in the left-hand panel.
- Under the “Storage” section, click on “Free up space now”.
- Windows will calculate the amount of space you can free up. Once the calculation is complete, scroll down and click on “Delete temporary files”.
- Ensure the “Temporary files” option is checked, and then click on the “Remove files” button to clear the cached temporary files.
Clearing the cache through the settings of your Windows tablet helps remove temporary files that may accumulate over time. These files are stored from various sources, including system processes, apps, and web browsers. By clearing the cache, you can improve overall performance and free up storage space on your device.
It’s important to note that clearing the cache in the settings menu may also remove other temporary files such as those stored by Windows Update. These files are safe to remove and will not affect the functionality of your Windows tablet. Additionally, the process may take some time depending on the amount of data that needs to be cleared.
If you’re experiencing performance issues or noticing that your Windows tablet is running low on storage space, clearing the cache through the settings menu can be an effective solution. However, keep in mind that this process only clears temporary files and does not affect personal files or installed apps.
Now that you know how to clear the cache in the settings of your Windows tablet, you can optimize its performance and free up valuable storage space. In the next section, we will explore clearing the cache specifically in the Internet Explorer browser.
Option 2: Clearing Cache in Internet Explorer
If you use the Internet Explorer browser on your Windows tablet, clearing the cache can help improve its performance and resolve issues. Here’s how you can clear the cache in Internet Explorer:
- Launch the Internet Explorer app on your Windows tablet.
- Click on the gear icon located in the upper-right corner to open the Tools menu.
- From the Tools menu, select “Internet options”.
- In the Internet Options window, under the “General” tab, click on the “Delete” button in the “Browsing history” section.
- Ensure the “Temporary Internet files and website files” option is checked, and then click on the “Delete” button to clear the cache for Internet Explorer.
Clearing the cache in Internet Explorer helps remove temporary files, cookies, and other website data that are stored on your Windows tablet. This action can improve performance, resolve issues related to cached data, and ensure that you’re accessing the most up-to-date web content.
When you clear the cache in Internet Explorer, it removes temporary files that may be taking up storage space and potentially causing issues with how websites load and interact with the browser. By clearing the cache, you’re essentially starting fresh with a clean slate, which can result in faster browsing and better overall performance.
It’s important to note that clearing the cache in Internet Explorer may also delete other browsing data such as cookies and website preferences. This means you may need to log in again to websites or reconfigure certain settings after clearing the cache.
Clearing the cache in Internet Explorer is a recommended maintenance step to ensure optimal performance and a smooth browsing experience on your Windows tablet.
Now that you know how to clear the cache in Internet Explorer, you can optimize its performance and resolve any cache-related issues. In the next section, we will wrap up this guide on clearing cache on tablets.
Conclusion
Clearing the cache on your tablet is an important maintenance task that can greatly improve its performance and resolve various issues. Whether you own an Android tablet, an iPad, or a Windows tablet, knowing how to clear the cache can help optimize your device’s performance and free up valuable storage space.
By clearing the cache, you can experience faster load times, smoother app performance, and improve overall functionality. It allows your tablet to start fresh, ensuring that it operates with the most up-to-date versions of websites, apps, and system processes.
In this guide, we have explored the step-by-step process for clearing the cache on different tablet platforms. We discussed the importance of clearing the cache, the various options available, and how to access the cache-clearing settings specific to each platform.
For Android tablets, you can clear the cache for individual apps or all apps at once through the settings menu. This allows you to target specific apps or remove temporary files for the entire device simultaneously.
On iPads and iPhones, you can clear the cache for Safari or other apps through the device’s settings. Clearing the cache helps optimize performance, resolve issues, and ensure a smoother browsing experience.
For Windows tablets, you can clear the cache through the settings menu or within the Internet Explorer browser. Clearing the cache helps improve performance and resolve issues related to temporary files stored on the device.
Regularly clearing the cache on your tablet is a proactive measure to maintain its performance and prevent potential issues. It is recommended to perform this task periodically or whenever you notice performance issues, app glitches, or low storage space.
Now that you have a clear understanding of how to clear the cache on your tablet, you can take the necessary steps to optimize its performance, resolve issues efficiently, and ensure you have a seamless and enjoyable user experience.