Introduction
Welcome to our comprehensive guide on how to clear cache on your Samsung tablet. As a Samsung tablet user, you may have encountered moments when your device starts to slow down, apps become unresponsive, or you experience other performance issues. One common troubleshooting step to address these issues is clearing the cache.
But what exactly is cache and why does it affect the performance of your Samsung tablet? Cache refers to temporary data stored by apps and the operating system to speed up processes and improve user experience. It includes images, web pages, login information, and other data that is stored locally on your device.
Over time, unused cache can accumulate and take up valuable storage space, resulting in sluggish performance. Clearing the cache helps free up storage and can resolve various issues such as app crashes, slow performance, and freezing screens.
In this guide, we will explore different methods to clear the cache on your Samsung tablet. Whether you’re using the latest Samsung Galaxy Tab or an older model, this guide will walk you through step-by-step instructions to keep your tablet running smoothly.
Please note that clearing the cache does not delete any personal data or settings from your device. It only removes temporary files, which will be regenerated as you use the respective apps or visit websites. So, let’s dive in and learn how to clear the cache on your Samsung tablet, ensuring optimal performance and a seamless user experience.
Understanding Cache on Samsung Tablets
Before we delve into the methods of clearing the cache on your Samsung tablet, let’s first understand what cache is and how it works. Cache is a storage area where data is temporarily stored by apps and the operating system for quick retrieval. It helps to speed up processes and improve the performance of your device.
When you use apps or browse the internet on your Samsung tablet, certain data such as images, web pages, and other resources are downloaded and stored in the cache. This allows for faster access to these resources the next time you open the app or visit the website.
Cache can be categorized into two types: app cache and system cache. App cache consists of temporary files specific to individual apps installed on your tablet. It may include images, videos, user preferences, login information, and other app-related data. System cache, on the other hand, encompasses system files and data that the operating system uses to execute processes quickly.
While cache serves an important purpose in improving performance, it can also accumulate over time and take up significant storage space. This can result in slower performance, decreased available storage, and potential issues with app functionality.
Clearing the cache helps to address these issues by removing the unnecessary temporary files. It forces the apps and operating system to rebuild the cache with fresh data, potentially resolving performance-related problems and freeing up storage space.
It’s important to note that clearing the cache does not delete any essential data or settings from your Samsung tablet. It simply removes temporary files that are not required for the smooth functioning of your device. Applications will still retain your personal data, account information, and other preferences, ensuring a seamless user experience after clearing the cache.
Now that we have a basic understanding of cache and its significance on Samsung tablets, let’s proceed to explore the various methods of clearing the cache to maintain optimal performance and keep your device running smoothly.
Why Clear the Cache on Your Samsung Tablet?
Clearing the cache on your Samsung tablet is a crucial maintenance task that offers several benefits for the overall performance and functionality of your device. Let’s take a closer look at why it’s important to regularly clear the cache:
1. Improved Performance: As you use various apps and browse the internet on your Samsung tablet, cache files accumulate and occupy storage space. Over time, this can contribute to slower performance, app crashes, and lagging responses. By clearing the cache, you allow your device to start fresh and access updated data, resulting in smoother and faster operation.
2. Free Up Storage Space: A significant advantage of clearing the cache is reclaiming valuable storage space on your Samsung tablet. Cache files can accumulate over time and consume a considerable amount of storage, which can lead to insufficient space for new apps, photos, videos, or system updates. Clearing the cache helps to free up storage, ensuring you have ample space for your personal content and preventing your device from becoming cluttered.
3. Resolve App Issues: Sometimes, apps may encounter problems like crashes, freezing, or not displaying content correctly. These issues can be attributed to outdated or corrupted cache files. By clearing the cache of specific apps, you provide a clean slate for them to rebuild the necessary data, potentially resolving various app-related issues and ensuring smooth performance.
4. Enhanced Privacy and Security: Cache files can contain sensitive data such as login credentials or temporary session information. Clearing the cache helps to remove these temporary files and further enhances your privacy and security by reducing the chances of unauthorized access to your personal information.
5. Improves Battery Life: When cache files build up on your Samsung tablet, it can indirectly affect the battery life. The device has to work harder and consume more power to retrieve data from the cache, resulting in higher energy consumption. By clearing the cache, you help optimize your tablet’s resource utilization and potentially extend the battery life.
In summary, clearing the cache on your Samsung tablet is essential to maintain optimal performance, free up storage space, resolve app-related issues, enhance privacy and security, and improve battery life. Now that we understand the importance of clearing the cache, let’s proceed to explore the different methods to accomplish this on your Samsung tablet.
Different Methods to Clear Cache on Samsung Tablet
Now that we recognize the significance of clearing the cache on our Samsung tablets, let’s explore the various methods available to achieve this. There are multiple approaches you can take to clear the cache on your device, depending on your preferences and the specific apps or areas of your tablet you want to target. Let’s discuss each method:
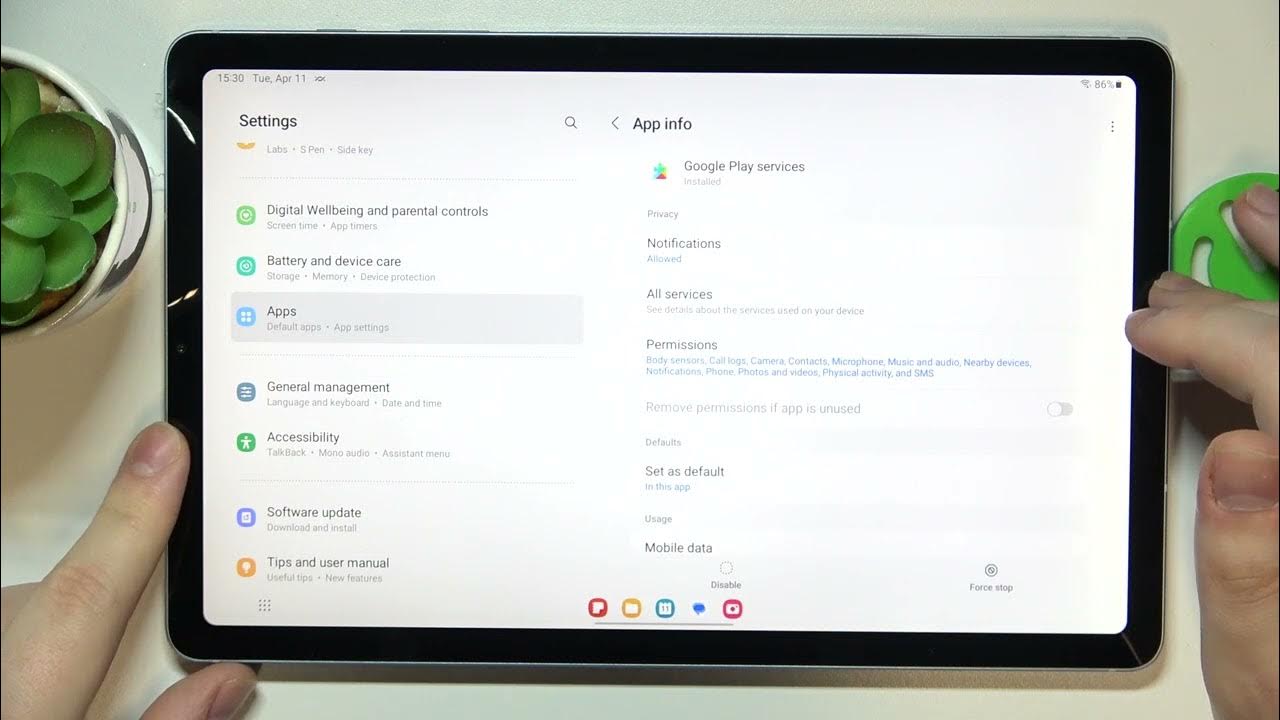
1. Clearing Cache from Individual Apps: This method allows you to selectively remove the cache of specific apps installed on your Samsung tablet. To do this, go to the Settings menu, navigate to the Apps section, and select the desired app. From there, you can access the app’s Storage settings and choose to clear the cache. This method is ideal if you want to target particular apps that you suspect may be causing performance issues.
2. Clearing Cache from Application Manager: The Application Manager provides a comprehensive view of all the apps installed on your Samsung tablet. From here, you can clear the cache for multiple apps simultaneously or individually. To access the Application Manager, go to the Settings menu, select Apps, and then choose Application Manager. From there, select the desired app and clear its cache. This method is convenient when you want to clear the cache of several apps at once.
3. Clearing Cache Using Device Settings: Another method to clear the cache on your Samsung tablet is through the device settings. This method allows you to clear the cache of all apps and system processes simultaneously. To do this, go to the Settings menu, select Storage or Device Maintenance (depending on your device model), and choose the option to clear the cache. Keep in mind that clearing the cache using this method will delete the cache for all apps and the system, potentially improving overall performance.
4. Using Third-Party Cache Clearing Apps: If you prefer a more automated and convenient approach, you can utilize third-party cache clearing apps available on the Play Store. These apps are designed specifically to help you clear cache files quickly and efficiently. Simply download a cache clearing app of your choice, grant the necessary permissions, and let the app do the work for you. This method is particularly useful if you want a one-tap solution to clear the cache of all apps and system files.
It’s important to note that while clearing the cache can resolve performance issues, it may also result in temporarily slower performance for certain apps as they rebuild their cache. Additionally, clearing the cache will not delete any personal data or settings. Any data that was previously stored in the cache, such as login information or preferences, will be regenerated as you use the apps or visit websites.
Now that we have explored the different methods to clear the cache on your Samsung tablet, you can choose the one that suits your needs best. Let’s proceed to the next section and walk through the step-by-step instructions for each method.
Method 1: Clearing Cache from Individual Apps
One effective way to clear the cache on your Samsung tablet is by clearing the cache from individual apps. This method allows you to specifically target and remove the cache of selected apps that may be causing performance issues. Here’s how you can clear the cache from individual apps:
- Open the Settings menu on your Samsung tablet.
- Navigate to the Apps or Applications section.
- Scroll through the list of installed apps and find the app you want to clear the cache for.
- Tap on the app to access its settings.
- Within the app settings, locate the Storage or Storage & cache option.
- Tap on Clear cache.
- A confirmation prompt may appear, asking if you want to clear the app’s cache. Confirm the action by tapping OK or Clear.
- Wait for the cache clearing process to complete. This may take a few moments.
- Once the cache has been cleared, you can navigate back to the app and continue using it.
By following these steps, you can clear the cache of individual apps on your Samsung tablet. This method allows you to target specific apps that you suspect may be causing performance issues, providing you with the ability to troubleshoot and improve the overall performance of your device.
It’s worth noting that clearing the cache from individual apps will not delete any personal data or settings associated with the app. The cache primarily contains temporary files and data that can be safely removed to free up storage space and optimize performance.
If you experience persistent issues with a particular app even after clearing its cache, you may consider exploring other troubleshooting options or reaching out to the app’s developer for further assistance. Additionally, you can also explore the next method, which involves clearing the cache from the Application Manager, to target multiple apps at once.
Now that you’re familiar with the process of clearing the cache from individual apps on your Samsung tablet, you can effectively manage the cache and maintain optimal performance. Let’s move on to the next method and learn how to clear the cache using the Application Manager.
Method 2: Clearing Cache from Application Manager
A convenient way to clear the cache on your Samsung tablet is by using the Application Manager. This method allows you to clear the cache of multiple apps simultaneously or individually. Here’s how you can clear the cache from the Application Manager:
- Open the Settings menu on your Samsung tablet.
- Navigate to the Apps or Applications section.
- You will see a list of all the apps installed on your device. Scroll through the list and find the app(s) you want to clear the cache for.
- Tapping on an app will open its settings.
- Look for the option that says Storage or Storage & cache.
- Tap on Clear cache.
- A confirmation prompt may appear, asking if you want to clear the app’s cache. Confirm the action by tapping OK or Clear.
- Wait for the cache clearing process to complete. The time required may vary depending on the size of the app’s cache.
- You can repeat this process for multiple apps to clear their cache simultaneously.
By utilizing the Application Manager, you can easily manage and clear the cache of multiple apps on your Samsung tablet. This method allows you to target specific apps that may be using a significant amount of cache or causing performance issues.
Clearing the cache from the Application Manager is particularly useful when you want to address cache-related issues for multiple apps at once. It provides a convenient way to optimize storage space, improve performance, and ensure a smooth user experience on your Samsung tablet.
Remember that clearing the cache from the Application Manager will not delete any personal data or settings associated with the apps. It only removes the temporary files stored in the cache, allowing the apps to rebuild the necessary data for optimal performance.
If you encounter persistent performance issues or application crashes even after clearing the cache, you may need to explore alternative troubleshooting options. Additionally, you can also consider using other cache clearing methods, such as clearing the cache using device settings or utilizing third-party cache clearing apps.
Now that you know how to clear the cache from the Application Manager on your Samsung tablet, you can effectively manage and optimize the cache for improved performance across multiple apps. Let’s move on to the next method and explore how to clear the cache using the device settings.
Method 3: Clearing Cache Using Device Settings
Another method to clear the cache on your Samsung tablet is through the device settings. This method allows you to clear the cache of all apps and system processes simultaneously. Here’s how you can clear the cache using the device settings:
- Open the Settings menu on your Samsung tablet.
- Navigate to the Storage or Device Maintenance (depending on your device model) section.
- Look for the option that says Storage or Device Storage.
- Tap on the option to open the storage settings.
- Within the storage settings, you will find various options. Look for the one that says Cache or Cached data.
- Tap on the Cache or Cached data option.
- A confirmation prompt may appear, asking if you want to clear the cache. Confirm the action by tapping OK or Continue.
- Wait for the cache clearing process to complete. This may take a few moments, depending on the amount of cache data on your device.
- Once the cache has been cleared, you can exit the settings and continue using your Samsung tablet.
By clearing the cache using the device settings, you can effectively remove the cache of all apps and system processes on your Samsung tablet. This method provides a comprehensive way to free up storage space, improve performance, and ensure a smoother user experience.
Clearing the cache through the device settings is particularly useful when you want to address cache-related issues across the device as a whole. It removes all the temporary files stored in the cache, allowing apps and the system to rebuild the necessary data for optimal performance.
It’s important to note that clearing the cache using the device settings will not delete any personal data or settings from your Samsung tablet. It only removes the temporary cache files, which have the potential to accumulate and affect performance over time.
If you encounter persistent performance issues or notice that clearing the cache through the device settings does not resolve the problem, you may want to explore alternative troubleshooting options or consider using other cache clearing methods, such as clearing the cache from individual apps or utilizing third-party cache clearing apps.
Now that you’re familiar with the process of clearing the cache using the device settings on your Samsung tablet, you can easily manage and optimize the cache for improved performance. Let’s move on to the next method and discover how to clear the cache using third-party cache clearing apps.
Method 4: Using Third-Party Cache Clearing Apps
If you prefer a more automated and convenient approach to clearing the cache on your Samsung tablet, you can utilize third-party cache clearing apps. These apps are specifically designed to help you clear cache files quickly and efficiently. Here’s how you can use third-party cache clearing apps:
- Open the Play Store on your Samsung tablet.
- In the search bar, type “cache clearing app” or “cache cleaner“.
- Browse through the search results and select a cache clearing app of your choice.
- Tap on the Install button to download and install the app on your device.
- Once the installation is complete, open the cache clearing app.
- Grant the necessary permissions required by the app.
- Within the app, you will find an option to clear the cache. It may be labeled as “Clean Cache“, “Clear Now“, or something similar.
- Tap on the option to start the cache clearing process.
- Wait for the app to scan and clear the cache files from your Samsung tablet.
- Once the cache clearing process is complete, you can exit the app and continue using your device.
Using third-party cache clearing apps can be a convenient way to automate the cache clearing process on your Samsung tablet. These apps are designed to detect and remove cache files from various apps and system processes, helping you optimize storage space and improve overall device performance.
When selecting a cache clearing app, it’s important to choose a reputable app from the Play Store. Look for apps with positive reviews and a high number of downloads to ensure reliability and effectiveness.
Keep in mind that third-party cache clearing apps may offer additional features such as app management, junk file cleaning, and RAM optimization. Take some time to explore the app’s settings and features to personalize your cache clearing preferences and enhance your device’s performance further.
It’s worth noting that while third-party cache clearing apps can be effective in freeing up storage space and improving performance, exercising caution is essential. Be mindful of the permissions you grant to these apps and ensure they come from trusted sources to protect your device’s security and privacy.
In summary, using third-party cache clearing apps provides an easy and automated solution to clear the cache on your Samsung tablet. These apps streamline the process, allowing you to optimize storage space and improve device performance with just a few taps.
Now that you’re familiar with the process of using third-party cache clearing apps on your Samsung tablet, you have another option to efficiently manage and clear the cache. Let’s conclude this guide by summarizing the various methods and their benefits.
Conclusion
Clearing the cache on your Samsung tablet is an essential maintenance task that can significantly improve the performance and functionality of your device. By removing temporary files and freeing up storage space, you can ensure that your tablet operates smoothly and efficiently.
In this guide, we explored four methods to clear the cache on your Samsung tablet:
Method 1: Clearing Cache from Individual Apps: This method allows you to selectively clear the cache of specific apps that may be causing performance issues. It provides a targeted approach to troubleshoot and optimize the performance of individual apps.
Method 2: Clearing Cache from Application Manager: By using the Application Manager, you can conveniently clear the cache of multiple apps simultaneously or individually. This method is ideal for addressing cache-related issues across multiple apps.
Method 3: Clearing Cache Using Device Settings: This method enables you to clear the cache of all apps and system processes using the device settings. It offers a comprehensive way to optimize storage space and enhance overall device performance.
Method 4: Using Third-Party Cache Clearing Apps: Utilizing third-party cache clearing apps automates the cache clearing process and provides an efficient solution to free up storage space and enhance performance. These apps offer additional features to further optimize your device.
Each method provides a unique approach to cache clearing, allowing you to choose the one that best suits your needs and preferences. It’s worth noting that clearing the cache will not delete any personal data or settings from your Samsung tablet.
Regularly clearing the cache on your Samsung tablet is beneficial in improving performance, freeing up storage space, resolving app-related issues, enhancing privacy and security, and prolonging battery life.
By following the methods outlined in this guide, you can easily manage and optimize the cache on your Samsung tablet, ensuring a smooth user experience and maximizing the potential of your device.
Now that you have a comprehensive understanding of the different cache clearing methods, clear out that cache and enjoy the optimal performance of your Samsung tablet!