Why Clearing Cache on Your Tablet is Important
When using a tablet, you may notice that over time, the device starts to become sluggish or experience performance issues. This is often due to the accumulation of cache files on your tablet. Cache files are temporary data that apps and websites store on your device to help speed up loading times and improve user experience. While cache files can be beneficial, they can also cause problems when they become outdated or corrupted.
Clearing the cache on your tablet is a simple yet effective way to improve its performance and resolve various issues. Here’s why it is important:
1. Enhanced Device Performance:
As cache files accumulate, they can gradually consume a significant amount of storage space and slow down your tablet’s overall performance. By clearing the cache, you free up valuable storage space and give your tablet the breathing room it needs to run smoothly. This can result in faster app loading times, smoother browsing, and better overall responsiveness.
2. Free Up Storage Space:
One of the benefits of clearing the cache is the ability to reclaim storage space on your tablet. Over time, cached data from various apps and websites can take up a significant amount of space. By removing these files, you can free up storage and ensure that you have enough room for new apps, photos, videos, and other important files.
3. Resolve App and Browsing Issues:
Cache files can sometimes become corrupted, leading to app crashes, freezes, or compatibility issues. Clearing the cache can help resolve these problems by removing outdated or corrupted data. Additionally, clearing the cache on your browser can fix issues such as slow loading websites, broken links, or issues with loading media content.
Overall, clearing the cache on your tablet is essential for maintaining optimal performance and resolving common issues that may arise over time. By doing so, you can ensure that your tablet runs smoothly, provides a seamless user experience, and allows you to make the most out of its capabilities.
How to Clear Cache on an Android Tablet
If you own an Android tablet and want to clear the cache to optimize its performance, follow these simple steps:
Step 1: Open the Settings app
On your Android tablet, locate the Settings app. You can usually find it by swiping down from the top of the screen and tapping the gear icon in the notification panel or by searching for “Settings” in the app drawer.
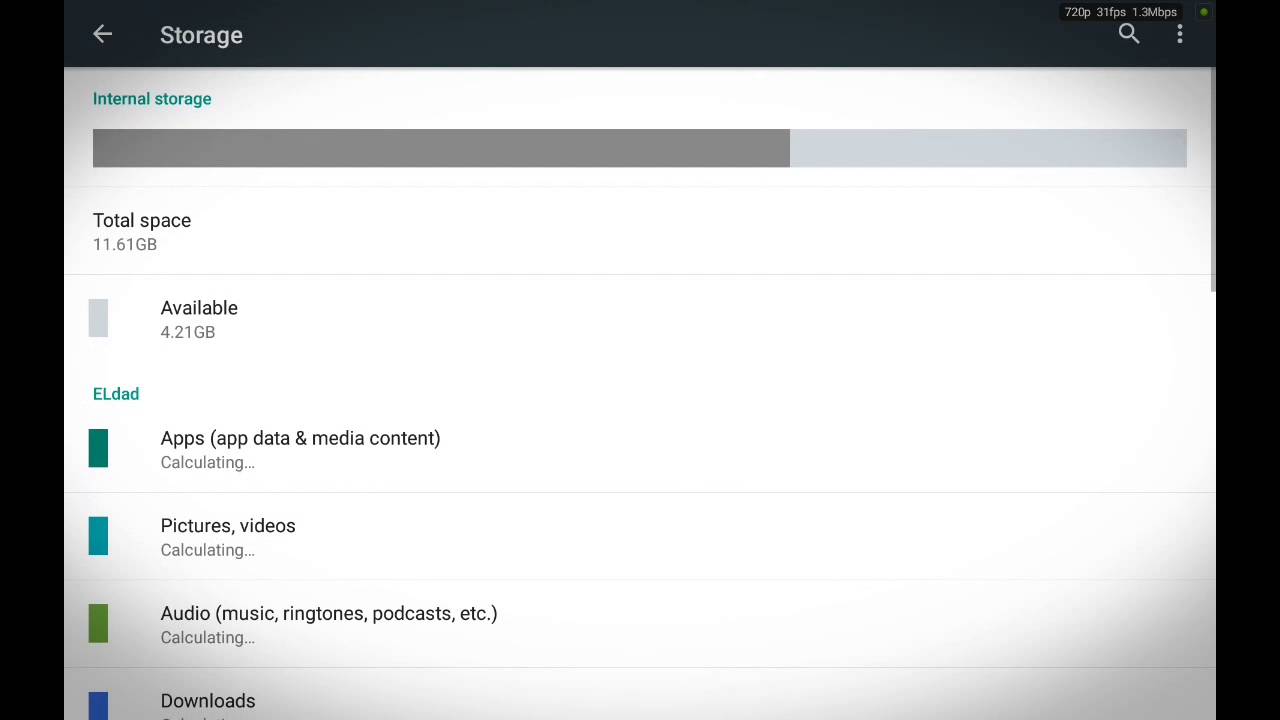
Step 2: Select Storage or Storage & USB
Once you’re in the Settings app, scroll down and look for either “Storage” or “Storage & USB” (depending on the Android version and device). Tap on it to access the storage options.
Step 3: Tap on Cached Data
In the Storage settings, you’ll see a list of different storage categories. Look for “Cached data” and tap on it. This will bring up the cached data management screen.
Step 4: Confirm Clearing the Cache
On the cached data management screen, you’ll see information about the amount of cached data on your tablet. To clear the cache, tap on the “Clear cached data” button or the equivalent option on your device. A confirmation prompt will appear, asking you to confirm your action. Tap “OK” to proceed.
Once you confirm, your Android tablet will clear the cache data for all apps, freeing up storage space and potentially resolving any performance issues caused by outdated or corrupted cache files.
Note that the exact steps and options may vary slightly depending on the Android version and device manufacturer. However, the general process should be similar for most Android tablets.
Step 1: Open the Settings App
Clearing the cache on your Android tablet starts with accessing the Settings app, which is where you’ll find various device settings and configurations. Here’s how to open the Settings app:
1. Swipe down from the top of the tablet’s screen to bring up the notification panel.
2. Look for the gear icon (usually located in the upper right corner) and tap on it. This will open the Settings app directly. If you don’t see the gear icon, you can access the Settings app by tapping the “Settings” option in the notification panel.
3. Alternatively, you can also access the Settings app by locating the app icon in your tablet’s app drawer. The app drawer can usually be found by swiping up from the bottom of the screen or tapping on the square or grid icon on the home screen.
4. Once you tap on the Settings icon, the Settings app will open, giving you access to various categories and options to customize your tablet.
It’s worth noting that the appearance and location of the Settings app icon may vary depending on the Android version and device manufacturer. However, most Android tablets follow a similar layout and design for the Settings app.
By successfully opening the Settings app, you’re now ready to proceed to the next step in clearing the cache on your Android tablet. Remember, the Settings app is a powerhouse of various configuration options, allowing you to personalize your tablet to your liking.
Step 2: Select Storage or Storage & USB
After opening the Settings app on your Android tablet, the next step in clearing the cache is to select the Storage or Storage & USB option. This will allow you to access the storage settings where you can manage your tablet’s storage and clear the cache. Here’s how:
1. Once you’re in the Settings app, scroll down until you find the category labeled “Storage” or “Storage & USB.” This option may appear differently depending on the Android version and device manufacturer.
2. Tap on the “Storage” or “Storage & USB” category to access the storage settings.
3. In the storage settings, you’ll find information about the storage capacity of your tablet, including how much space is being occupied by various types of data.
4. Depending on your Android version and device manufacturer, you may also see additional storage-related options such as storage statistics, SD card settings, or options to format or erase your tablet’s internal storage. However, for the purpose of clearing the cache, the main focus will be on the cached data.
By selecting the Storage or Storage & USB option, you’re one step closer to clearing the cache on your Android tablet. It’s important to note that the exact appearance and name of this option may vary slightly depending on the Android version and device manufacturer, but the general concept remains the same.
Now that you’ve accessed the storage settings, you’re ready to proceed to the next step in clearing the cache on your Android tablet.
Step 3: Tap on Cached Data
Once you’ve accessed the storage settings on your Android tablet, the next step in clearing the cache is to locate and tap on the Cached Data option. This option allows you to manage and clear the cache files stored on your device. Follow these steps to proceed:
1. In the storage settings menu, look for the category labeled “Cached Data.” The location and appearance of this option may vary slightly depending on your Android version and device manufacturer.
2. Tap on the “Cached Data” category to access the cached data management screen.
3. On the cached data management screen, you’ll see information about the amount of cached data stored on your tablet. This includes the total size of the cache files and the individual cache size for each app.
4. Depending on your Android version and device manufacturer, you may also have options to clear cache for individual apps directly from this screen. However, the main focus is to clear the cache for all apps on your tablet.
5. To proceed with clearing the cache, tap on the “Clear cached data” button or the equivalent option on your device. This action will remove all the stored cache files, freeing up storage space and potentially improving your tablet’s performance.
It’s important to note that clearing the cached data will not delete any of your personal data or settings. It only removes temporary files that are no longer needed by your apps or system.
By successfully tapping on the Cached Data option, you’ve completed the third step in clearing the cache on your Android tablet. Now, you’re ready to move on to the final step to finalize the clearing process.
Step 4: Confirm Clearing the Cache
After tapping on the “Clear cached data” option in the previous step, you will now be prompted to confirm the action of clearing the cache on your Android tablet. Follow these simple instructions to finalize the clearing process:
1. Once you tap on the “Clear cached data” button or the equivalent option, a confirmation prompt will appear on your screen.
2. The prompt will typically contain a message informing you about the consequences of clearing the cache, such as the potential loss of temporary files and the need for apps to rebuild their cache. Read the prompt carefully to understand the implications before proceeding.
3. In the confirmation prompt, you will usually be given two options: “OK” or “Cancel.”
4. If you’re certain about clearing the cache and want to proceed, tap on the “OK” button. This will initiate the clearing process, and your tablet will start deleting the cached data from all apps.
5. However, if you decide not to clear the cache or want to reconsider, tap on the “Cancel” button. This will cancel the clearing process and return you to the previous screen without deleting any cache files.
It’s important to note that once you confirm the action, the cache files will be permanently deleted, and you cannot undo this action. However, clearing the cache doesn’t affect your personal data or app preferences; it only removes temporary files stored by the apps.
By successfully confirming the clearing of the cache, you’ve completed the final step in clearing the cache on your Android tablet. Now, your device’s cache data has been cleared, making way for a faster and smoother user experience.
How to Clear Cache on an iPad or iPhone
If you’re using an iPad or iPhone and want to clear the cache to optimize the device’s performance, follow these simple steps:
Step 1: Open the Settings app
On your iPad or iPhone, locate the Settings app. It’s typically represented by a gear icon and can be found on your home screen or within your app drawer. Tap on the Settings app to open it.
Step 2: Scroll down and tap on Safari
In the Settings app, scroll down until you see a list of app names. Look for “Safari” in the list and tap on it. This option allows you to manage various settings related to the Safari web browser on your device.
Step 3: Tap on Clear History and Website Data
Within the Safari settings, scroll down until you find the “Clear History and Website Data” option. It’s usually located towards the bottom of the screen. Tap on it to proceed.
Step 4: Confirm Clearing the Cache
After tapping on “Clear History and Website Data,” a confirmation prompt will appear on your screen, asking you to confirm the action. This prompt informs you that clearing the cache will remove your browsing history, cookies, and other website data. If you’re okay with this, tap on “Clear History and Data” to confirm. Otherwise, tap on “Cancel” to abort the clearing process.
Once you confirm, your iPad or iPhone will clear the cache data stored by the Safari browser, which might result in improved performance and free up storage space.
It’s important to note that clearing the cache in Safari will not affect other apps or delete any personal data from your device. It solely removes browsing-related data stored by the Safari browser.
By following these steps, you can easily clear the cache on your iPad or iPhone and enjoy a faster and more optimized browsing experience.
Step 1: Open the Settings App
To clear the cache on your iPad or iPhone, the first step is to open the Settings app. The Settings app allows you to manage various settings and configurations on your device. Here’s how you can open it:
1. Locate the Settings app on your home screen. It can usually be identified by the gear icon.
2. Tap on the Settings app icon to open it. This will take you to the main settings menu of your iPad or iPhone.
3. Alternatively, you can swipe down on the home screen to access the Spotlight Search and type “Settings” to quickly find and open the app.
Once you have successfully opened the Settings app, you will have access to a wide range of settings and options to customize your device. The Settings app is designed to be intuitive and user-friendly, making it easy to navigate and find the specific settings you need.
It’s worth noting that the appearance and organization of the Settings app may vary slightly depending on your device’s iOS version. However, the general process remains the same across different iOS devices.
Now that you have successfully opened the Settings app, you are ready to proceed to the next step in clearing the cache on your iPad or iPhone.
Step 2: Scroll down and Tap on Safari
After opening the Settings app on your iPad or iPhone, the next step in clearing the cache is to locate and tap on the Safari option. Safari is the default web browser on iOS devices, and accessing its settings will allow you to manage browsing-related configurations, including clearing the cache. Follow these steps to proceed:
1. Inside the Settings app, scroll down until you find the list of app names. Look for “Safari” in the list and tap on it. The Safari option usually appears after “Passwords & Accounts” and before “News.”
2. By tapping on the Safari option, you will access the settings specific to the Safari browser. These settings control various aspects of your browsing experience, including privacy, security, and preferences.
3. Once you’re in the Safari settings, you’ll see a wide range of options that allow you to customize your browsing experience to your liking. These options include Clear History and Website Data, Block Cookies, and more.
4. To clear the cache, tap on the “Clear History and Website Data” option. This option will remove your browsing history, cookies, and other website data stored by Safari.
It’s important to note that clearing the cache in Safari may affect your browsing experience, as it will log you out of websites and potentially remove saved login information. However, it can also improve performance and resolve certain browsing-related issues.
By successfully tapping on the Safari option, you are now ready to proceed to the next step in clearing the cache on your iPad or iPhone.
Step 3: Tap on Clear History and Website Data
After accessing the Safari settings on your iPad or iPhone, the next step in clearing the cache is to tap on the “Clear History and Website Data” option. This action will remove your browsing history, cookies, and other website data stored by the Safari browser. Follow these steps to proceed:
1. Within the Safari settings, scroll down until you locate the “Clear History and Website Data” option. It is usually located towards the bottom of the settings menu.
2. Tap on the “Clear History and Website Data” option. By doing this, you will be prompted with a confirmation message that explains the consequences of clearing your browsing history and data.
3. Read the confirmation message carefully to understand that clearing the history and website data will remove your browsing history, cookies, and cache. If you are okay with this and want to proceed, tap on “Clear History and Data” to confirm.
4. Depending on the amount of data stored and the speed of your device, it may take a few moments to clear the history and website data. Once completed, you will see a notification confirming the successful clearing of the cache.
It’s important to note that clearing the history and website data in Safari will not affect other data or settings on your device. It only removes the browsing-related data stored by the Safari browser.
By successfully tapping on the “Clear History and Website Data” option, you have completed the third step in clearing the cache on your iPad or iPhone. Now, your Safari cache has been cleared, which may result in improved performance and a refreshed browsing experience.
Step 4: Confirm Clearing the Cache
After tapping on the “Clear History and Website Data” option in the previous step, a confirmation prompt will appear on your iPad or iPhone. Confirming this action is important as it will permanently delete your browsing history, cookies, and other website data stored by the Safari browser. Here’s how to proceed:
1. Upon tapping on “Clear History and Website Data,” a confirmation prompt will appear on your device’s screen.
2. The prompt will typically provide a reminder that this action will remove your browsing history, cookies, and other website data. Take a moment to read the confirmation message in order to fully understand the implications before proceeding.
3. In the confirmation prompt, you will usually see two options: “Clear” or “Cancel.”
4. If you are certain about clearing the cache and want to proceed, tap on the “Clear” button. By doing so, Safari will permanently delete all the selected data, freeing up storage space on your device.
5. However, if you change your mind or want to reconsider, tap on the “Cancel” button. This will abort the clearing process and retain your browsing history, cookies, and website data.
It’s important to understand that once you confirm the action of clearing the cache, the selected browsing data will be permanently deleted and cannot be recovered. Therefore, it’s recommended to make sure you have a backup of important data if needed.
By successfully confirming the clearing of the cache, you have completed the final step in clearing the cache on your iPad or iPhone. Safari has now removed your browsing history and data, providing a refreshed start for your browsing experience.
Benefits of Clearing Cache on a Tablet
Clearing the cache on your tablet can bring several significant benefits that contribute to better overall performance and a smoother user experience. Here are some of the key advantages of regularly clearing the cache:
1. Improved Device Performance:
Over time, cache files can accumulate and take up valuable storage space on your tablet. By clearing the cache, you free up this space and allow your device to operate more efficiently. This can result in faster app loading times, smoother multitasking, and improved responsiveness overall.
2. Enhanced Browsing Experience:
Clearing the cache on your tablet’s web browser can lead to a more enjoyable browsing experience. It can help to resolve issues such as slow loading web pages, broken links, or problems with media playback. By starting with a clean cache, your browser can fetch fresh data from websites, resulting in faster and more reliable page loading.
3. More Storage Space:
Cache files can take up a significant amount of storage space on your tablet. By clearing the cache, you can free up this space and make room for new apps, photos, videos, and other important files. This is particularly beneficial if you have limited storage capacity on your tablet and need to optimize every available megabyte.
4. Resolving App Issues:
Clearing the cache can help resolve various app-related issues. Sometimes, outdated or corrupted cache files can cause apps to crash, freeze, or behave unpredictably. By clearing the cache, you remove these potentially problematic files, allowing apps to function smoothly and reducing the likelihood of encountering glitches or errors.
5. Privacy and Security:
Clearing the cache can also have privacy and security benefits. Cache files can contain sensitive information such as login credentials or temporary copies of visited web pages. By clearing the cache, you ensure that this data is no longer accessible, reducing the risk of unauthorized access to your personal information.
By regularly clearing the cache on your tablet, you can enjoy these benefits and keep your device running optimally. It’s recommended to set a periodic schedule to clear the cache, whether manually or by using automated cleaning utilities, to maintain a smooth and efficient tablet experience.
Improved Device Performance
One of the significant benefits of clearing the cache on your tablet is the improvement in its overall performance. As cache files accumulate on your device over time, they can consume a considerable amount of storage space and impact its responsiveness. Here’s how clearing the cache can enhance your tablet’s performance:
Faster App Loading Times:
When you open an app on your tablet, it retrieves various data and resources, including cached files. As the cache accumulates, it can slow down the app loading process. By clearing the cache, you remove the excess files, allowing apps to retrieve the necessary data more quickly. This results in faster app launches and a more seamless user experience.
Smoother Multitasking:
If you often use multiple apps simultaneously on your tablet, clearing the cache can help facilitate smoother multitasking. With a cluttered cache, the operating system may struggle to allocate resources efficiently to different apps, leading to lag and unresponsive behavior. By clearing the cache, you free up resources, enabling your tablet to handle multitasking more efficiently and ensuring a smooth transition between apps.
Optimized System Resources:
Cache files consume a portion of your tablet’s internal storage space. When the cache becomes too large, it competes for resources with other critical system functions. This can lead to a slowdown in performance or even system crashes. By clearing the cache, you liberate valuable system resources, allowing your tablet to operate at its full potential.
Improved Battery Life:
A cluttered cache can indirectly affect your tablet’s battery life. When apps have to retrieve data from a bloated cache, it can increase the work done by the processor and other components, leading to higher power consumption. By clearing the cache and optimizing app performance, you reduce the strain on the battery, resulting in improved battery life for your tablet.
By regularly clearing the cache on your tablet, you can experience improved device performance across various aspects of its operation. Whether it’s faster app loading, smoother multitasking, optimized system resources, or improved battery life, clearing the cache is a simple yet effective way to enhance your tablet’s overall performance.
Free Up Storage Space
Another significant benefit of clearing the cache on your tablet is the ability to free up valuable storage space. As you use various apps and browse the web, cache files accumulate and occupy a portion of your device’s storage. Here’s how clearing the cache helps in freeing up storage space:
Remove Unnecessary Files:
Cache files are temporary data that apps store on your tablet to improve performance. However, over time, these files can become outdated or no longer needed. By clearing the cache, you remove these unnecessary files, freeing up storage space for more important data.
Reclaim Significant Storage:
Cache files can quickly accumulate and occupy a substantial amount of storage on your tablet. This is especially true for apps that cache large amounts of data, such as media-streaming apps or games. By clearing the cache, you can recover a significant amount of storage space, allowing you to store more apps, photos, videos, and other files.
Maximize Available Resources:
Having limited storage space can impact your tablet’s performance and reduce its ability to handle new apps or updates. When the cache consumes a large portion of the storage, it limits the available resources for installing new apps or downloading essential system updates. By clearing the cache, you create more room for these updates and ensure that your tablet can run smoothly with the latest software.
Prevent Storage Warnings:
As the cache accumulates, your tablet may start displaying warnings about low available storage space. These warnings can be disruptive and indicate that you need to take action to free up space. Clearing the cache is an effective method to alleviate these storage warnings and ensure that you have sufficient space to store important files.
By regularly clearing the cache on your tablet, you free up storage space that can be utilized for essential data and files. This not only improves the overall storage capacity but also enables your tablet to operate optimally and efficiently.
Resolve App and Browsing Issues
Clearing the cache on your tablet can help resolve various app and browsing issues that may arise over time. Cache files can become outdated, corrupted, or incompatible, leading to glitches, crashes, and other problems. Here’s how clearing the cache can help resolve these issues:
Fix App Crashes and Freezes:
When cache files become corrupted or outdated, it can cause apps to crash or freeze unexpectedly. By clearing the cache, you remove these problematic files, allowing the app to start fresh. This often resolves issues with app stability and responsiveness, eliminating crashes and improving the overall performance of the app.
Improve App Compatibility:
In some cases, cache files can interfere with app compatibility. If an app is not functioning correctly or experiencing compatibility issues with your tablet’s operating system, clearing the cache may help. By clearing the cache, you ensure that the app retrieves fresh, up-to-date files when it launches, increasing the chances of compatibility and smooth operation.
Resolve Browsing Problems:
Cache files stored by your web browser can sometimes cause browsing issues, such as slow loading times, broken links, or problems with loading media content. By clearing the cache, you remove the stored temporary files, forcing the browser to fetch fresh data from websites. This often resolves these browsing problems and ensures a smoother and more reliable browsing experience.
Refresh Website Data:
When you visit websites, your browser stores certain data, including cookies and cached files. Over time, this stored data can become outdated or cause conflicts when visiting the same websites again. By clearing the cache, you refresh the website data, ensuring that you access the most up-to-date and accurate versions of websites, which can help resolve website-related issues.
Clearing the cache on your tablet is a valuable troubleshooting step that can help resolve app crashes, freezes, compatibility issues, and browsing problems. It provides a fresh start for your apps and browser, allowing them to function properly and enhancing your overall tablet experience.
Conclusion
Clearing the cache on your tablet is an essential maintenance task that can improve device performance, resolve issues, and optimize your overall tablet experience. By following the steps outlined in this guide, you can easily clear the cache on both Android tablets and iPads or iPhones.
Clearing the cache provides several key benefits. Firstly, it enhances device performance by freeing up storage space, allowing for faster app loading times, smoother multitasking, and optimized system resources. It also improves the browsing experience by resolving issues such as slow loading web pages, broken links, and problems with media playback.
Another advantage of clearing the cache is that it allows you to reclaim significant storage space on your tablet. This can be particularly valuable if you have limited storage capacity or regularly encounter low storage warnings.
Moreover, clearing the cache helps to resolve app-related issues, including crashes, freezes, and compatibility problems. It also refreshes the website data stored by your browser, ensuring you access the most up-to-date versions of websites.
Remember, clearing the cache does not impact your personal data or settings. It solely removes temporary files that are no longer needed or have become outdated.
To maintain optimal device performance, it is recommended to periodically clear the cache on your tablet. Whether you choose to do it manually by following the provided steps or utilize automated cleaning utilities, regularly clearing the cache is a simple yet effective way to keep your tablet running smoothly and efficiently.
By taking the time to clear the cache, you can enjoy a faster, more responsive tablet, with improved storage space and a seamless browsing experience. So, go ahead and give your tablet the cleaning it deserves!