Introduction
In today's fast-paced digital world, the ability to share internet connectivity with other devices has become increasingly essential. Whether you're on the go or your primary internet connection is down, turning your Windows 8 computer into a Wi-Fi hotspot can provide a convenient solution. By leveraging your computer's existing internet connection, you can enable other devices, such as smartphones, tablets, and laptops, to connect and access the internet seamlessly.
Setting up your Windows 8 computer as a Wi-Fi hotspot is a straightforward process that can be accomplished with a few simple steps. This guide will walk you through the process, from checking compatibility to troubleshooting common issues. Whether you're a tech-savvy individual or a novice in the realm of network configurations, this step-by-step guide will empower you to transform your Windows 8 computer into a reliable Wi-Fi hotspot.
By the end of this guide, you will have the knowledge and confidence to share your computer's internet connection with other devices, providing flexibility and convenience in various scenarios. Let's dive into the steps required to set up your Windows 8 computer as a Wi-Fi hotspot and unlock the potential of seamless internet connectivity for all your devices.
Step 1: Check Compatibility
Before embarking on the process of setting up your Windows 8 computer as a Wi-Fi hotspot, it is crucial to ensure that your system meets the necessary requirements for this functionality. Checking compatibility will help you determine whether your computer possesses the essential capabilities to serve as a hotspot and share its internet connection with other devices.
Compatibility Criteria
-
Wireless Network Adapter: The first and foremost requirement is a compatible wireless network adapter. Your Windows 8 computer must be equipped with a wireless network adapter that supports the creation of a Wi-Fi hotspot. Most modern laptops and desktops come with built-in Wi-Fi capabilities, but it is essential to verify that the adapter supports the "hosted network" feature, which enables the computer to function as a hotspot.
-
Operating System Version: As the focus is on Windows 8, it's imperative to confirm that your computer is running this specific operating system version. While later Windows versions have native support for hotspot functionality, Windows 8 also offers this feature, albeit with slight variations in the configuration process.
-
Administrative Privileges: To configure the Wi-Fi hotspot, you must have administrative privileges on your Windows 8 computer. Administrative access is necessary to make changes to network settings and enable the hotspot feature.
Verification Process
To confirm the compatibility of your Windows 8 computer for setting up a Wi-Fi hotspot, follow these steps:
-
Check Network Adapter Properties: Access the Device Manager on your computer and navigate to the "Network Adapters" section. Locate your wireless network adapter, right-click on it, and select "Properties." Within the properties window, look for the "Hosted network" or "Virtual Wi-Fi" tab. If this tab is present, it indicates that your network adapter supports the creation of a Wi-Fi hotspot.
-
Run Compatibility Checks: Microsoft provides a command-line tool called "netsh" that allows you to verify whether your network adapter supports the hosted network feature. Open a command prompt with administrative privileges and enter the command "netsh wlan show drivers." This command will display detailed information about your wireless network adapter, including its hosted network support status.
By conducting these checks and ensuring that your Windows 8 computer meets the compatibility criteria, you can proceed with confidence to the next steps of enabling and configuring the Wi-Fi hotspot functionality.
Now that you've confirmed the compatibility of your Windows 8 computer, it's time to move on to the next step of enabling the mobile hotspot feature.
Step 2: Enable Mobile Hotspot
Enabling the mobile hotspot feature on your Windows 8 computer is a pivotal step in transforming it into a Wi-Fi hotspot. By activating this functionality, your computer will broadcast a wireless signal, allowing other devices to connect and access the internet through its existing network connection.
Procedure to Enable Mobile Hotspot
-
Access Network Settings: Begin by accessing the Network and Sharing Center on your Windows 8 computer. You can do this by right-clicking on the network icon in the system tray and selecting "Open Network and Sharing Center."
-
Navigate to Mobile Hotspot Settings: Within the Network and Sharing Center, locate the "Change adapter settings" option. This will display a list of network connections available on your computer. Identify the network connection that provides internet access, such as Wi-Fi or Ethernet.
-
Enable Mobile Hotspot: Right-click on the network connection that serves as the source of internet connectivity and select "Properties." In the properties window, navigate to the "Sharing" tab. Here, you will find the option to "Allow other network users to connect through this computer's internet connection." Check this option to enable the mobile hotspot feature.
-
Configure Sharing Settings: After enabling the sharing option, you may need to select the specific network connection through which the hotspot will be shared. If your computer has multiple network adapters, such as both Wi-Fi and Ethernet, you can choose the appropriate connection for sharing the internet.
-
Save Settings: Once you have configured the sharing settings, save the changes and exit the properties window. Your Windows 8 computer is now set up to function as a mobile hotspot, ready to accommodate connections from other devices.
Verifying Mobile Hotspot Activation
To confirm that the mobile hotspot feature has been successfully enabled, you can check the list of available wireless networks on another device. If the hotspot is active, it should appear in the list of available networks, allowing you to connect by entering the designated network name and password.
By following the aforementioned steps, you have effectively enabled the mobile hotspot feature on your Windows 8 computer, paving the way for seamless internet sharing with other devices. With the hotspot activated, you are now ready to proceed to the next step of configuring the hotspot settings to ensure optimal performance and security.
Step 3: Configure Hotspot Settings
Configuring the hotspot settings on your Windows 8 computer is a crucial aspect of ensuring optimal performance, security, and customizability for the shared Wi-Fi network. By delving into the hotspot settings, you can tailor the network to align with your specific preferences and requirements, thereby enhancing the overall connectivity experience for connected devices.
Accessing Hotspot Settings
After enabling the mobile hotspot feature, accessing the hotspot settings allows you to define essential parameters that govern the network's behavior. Here's how you can access and configure the hotspot settings on your Windows 8 computer:
-
Access Network Settings: Begin by navigating to the Network and Sharing Center, the central hub for managing network-related configurations on your computer.
-
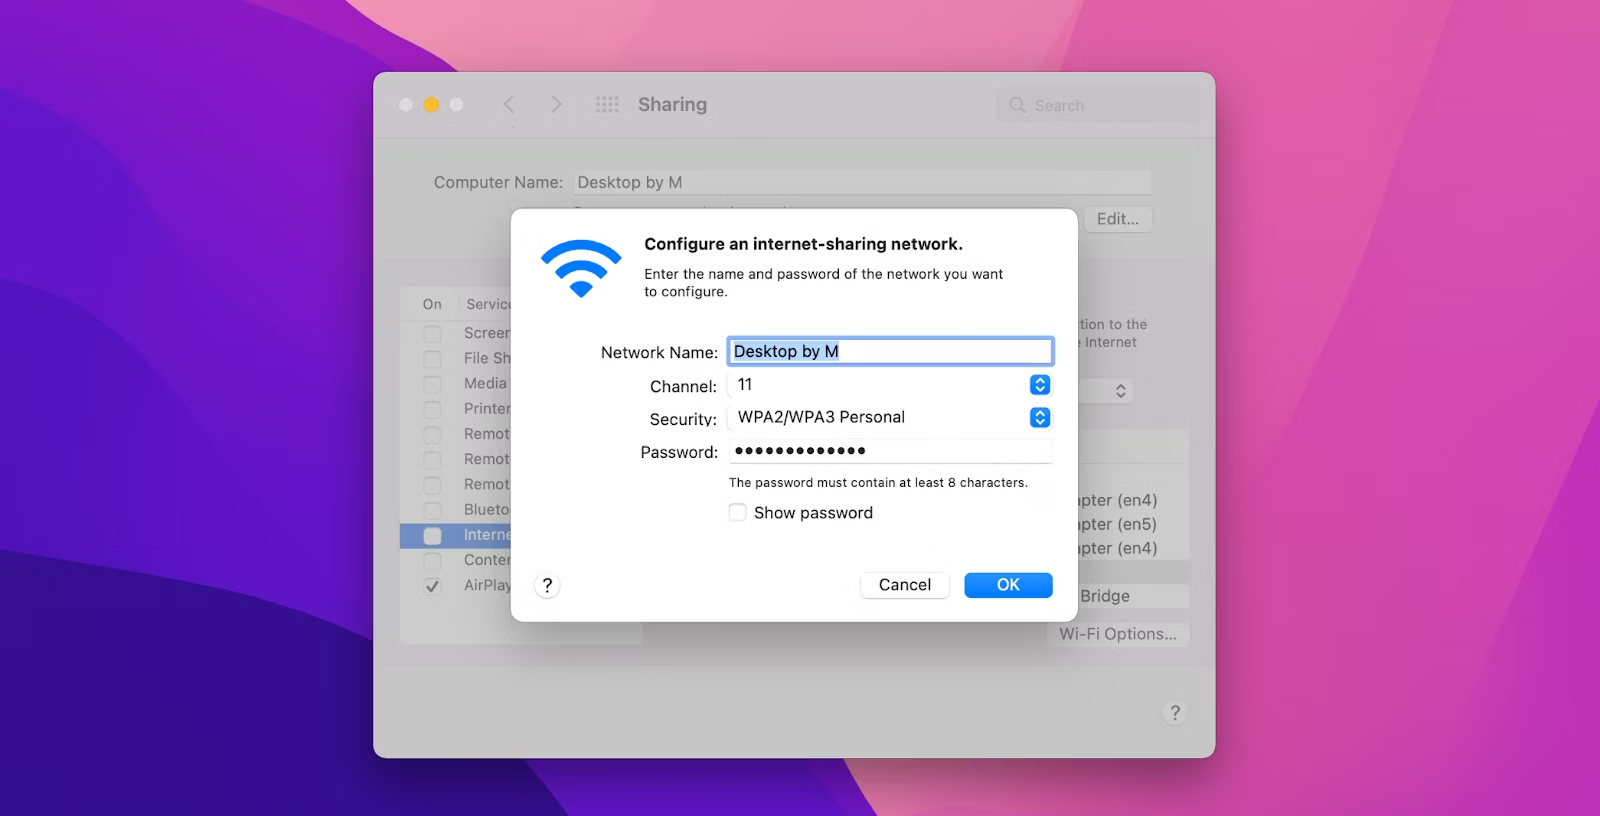
Open Mobile Hotspot Settings: Within the Network and Sharing Center, locate the "Change adapter settings" option. This will display the network connections available on your computer. Look for the newly created "Microsoft Hosted Network Virtual Adapter," which represents the virtual network interface associated with the hotspot functionality.
-
Configure Network Properties: Right-click on the "Microsoft Hosted Network Virtual Adapter" and select "Properties." In the properties window, you can define various aspects of the hotspot, including the network name (SSID) and the security key (password). These parameters are essential for identifying and securing the hotspot, ensuring that only authorized devices can connect.
Customizing Hotspot Parameters
When configuring the hotspot settings, you have the flexibility to customize several parameters according to your preferences. These include:
-
Network Name (SSID): The network name serves as the identifier for your hotspot. You can choose a unique and recognizable name that distinguishes your network from others in the vicinity.
-
Security Key (Password): Establishing a strong and secure password is vital to prevent unauthorized access to your hotspot. By creating a robust password, you can safeguard the network and control access to ensure a secure connection.
-
Connection Mode: Depending on your usage scenario, you may have the option to select the connection mode for the hotspot. This can include choosing between the traditional 2.4GHz frequency band or the faster 5GHz band, if your hardware supports it.
Ensuring Security and Performance
As you configure the hotspot settings, prioritizing security and performance is paramount. By implementing a strong password and choosing an appropriate network name, you can fortify the security of the hotspot, thwarting potential unauthorized access attempts. Additionally, selecting the optimal connection mode can contribute to a more stable and efficient wireless connection for connected devices.
By meticulously configuring the hotspot settings, you can tailor the network to align with your specific requirements, ensuring a seamless and secure internet sharing experience for all connected devices.
Now that you have gained insights into the intricacies of configuring hotspot settings, you are well-equipped to proceed with connecting devices to your newly established Wi-Fi hotspot.
Step 4: Connect Devices to Hotspot
With your Windows 8 computer now functioning as a Wi-Fi hotspot, the next step involves connecting various devices to this newly established network. Whether you have a smartphone, tablet, or another laptop in need of internet access, the process of connecting to the hotspot is relatively straightforward. By enabling seamless connectivity for your devices, you can leverage the shared internet connection and enjoy online access across multiple platforms.
Connecting Mobile Devices
For smartphones and tablets, the process of connecting to the Wi-Fi hotspot is akin to joining any other wireless network. Here's a simplified guide to connecting mobile devices to the hotspot:
- Access Wi-Fi Settings: On your mobile device, navigate to the Wi-Fi settings menu.
- Select Hotspot Network: Scan for available networks and select the network name (SSID) of your Windows 8 computer's hotspot from the list of available networks.
- Enter Security Key: When prompted, enter the security key (password) that you configured for the hotspot. This step is essential to authenticate and secure the connection.
Upon successful entry of the security key, your mobile device will establish a connection to the Wi-Fi hotspot, granting access to the shared internet connection.
Connecting Laptops and Desktops
For laptops and desktop computers, the process of connecting to the Wi-Fi hotspot mirrors the steps for mobile devices. Here's a brief overview of connecting laptops and desktops to the hotspot:
- Access Network Settings: Open the network settings or Wi-Fi menu on your laptop or desktop computer.
- Choose Hotspot Network: Locate the network name (SSID) of your Windows 8 computer's hotspot in the list of available networks.
- Input Security Key: Enter the security key (password) associated with the hotspot to authenticate and establish the connection.
Once the security key is successfully entered, your laptop or desktop computer will be connected to the Wi-Fi hotspot, enabling internet access through the shared network connection.
By following these steps, you can seamlessly connect a diverse array of devices to your Windows 8 computer's Wi-Fi hotspot, providing internet access across your entire digital ecosystem. With devices successfully connected, you can now leverage the shared internet connection for various online activities, from browsing the web to streaming media and staying connected on social platforms.
Now that you have enabled and configured the hotspot settings and successfully connected devices to the network, you are well on your way to harnessing the full potential of your Windows 8 computer as a reliable Wi-Fi hotspot.
Step 5: Troubleshooting
While setting up your Windows 8 computer as a Wi-Fi hotspot is a relatively straightforward process, encountering potential issues or challenges is not uncommon. Troubleshooting these issues effectively can help ensure the seamless operation of the hotspot and uninterrupted internet connectivity for connected devices. Here are some common troubleshooting scenarios and their respective solutions to address any hiccups that may arise:
Issue 1: Inability to Enable Mobile Hotspot
If you encounter difficulties in enabling the mobile hotspot feature on your Windows 8 computer, consider the following steps to troubleshoot this issue:
- Check Compatibility: Revisit the compatibility criteria outlined in Step 1 to ensure that your wireless network adapter supports the hosted network feature. If not, you may need to explore alternative methods or consider using an external Wi-Fi adapter that supports hotspot functionality.
- Restart Network Services: Restarting the network-related services on your computer can sometimes resolve issues related to enabling the hotspot feature. You can do this by accessing the Services application and restarting relevant services such as WLAN AutoConfig and hosted network services.
Issue 2: Connectivity Problems for Connected Devices
If devices connected to the Wi-Fi hotspot experience intermittent connectivity or are unable to access the internet, consider the following troubleshooting steps:
- Check Network Sharing Settings: Verify that the network sharing settings for the hotspot are correctly configured. Ensure that the appropriate network connection is selected for sharing, and review the sharing properties to confirm that the settings align with your intended configuration.
- Restart the Hotspot: Temporarily disabling and re-enabling the mobile hotspot feature on your Windows 8 computer can sometimes resolve connectivity issues for connected devices. This action refreshes the hotspot functionality and may address any underlying issues.
Issue 3: Limited Range or Signal Strength
If you notice that the Wi-Fi hotspot has limited range or exhibits weak signal strength, consider the following troubleshooting measures:
- Optimize Placement: Adjust the physical placement of your Windows 8 computer to optimize the signal propagation. Placing the computer in a central location and minimizing obstructions can enhance the overall coverage and signal strength of the hotspot.
- Check Wireless Adapter Settings: Access the device properties of your wireless network adapter and review the advanced settings related to signal strength and transmission power. Adjusting these settings can potentially improve the range and signal quality of the hotspot.
By addressing these common troubleshooting scenarios and implementing the suggested solutions, you can effectively overcome potential challenges related to setting up and maintaining a Wi-Fi hotspot using your Windows 8 computer. Troubleshooting issues promptly and effectively ensures that the hotspot operates optimally, providing reliable internet connectivity for all connected devices.
Now that you have gained insights into troubleshooting potential issues, you are well-equipped to proactively address any challenges that may arise during the setup and utilization of your Windows 8 computer as a Wi-Fi hotspot.
Conclusion
In conclusion, the process of setting up your Windows 8 computer as a Wi-Fi hotspot offers a myriad of benefits, ranging from enhanced connectivity flexibility to the ability to share internet access seamlessly across multiple devices. By embarking on this journey, you have empowered your computer to serve as a hub for internet connectivity, enabling smartphones, tablets, and other computers to tap into its network and access the digital realm with ease.
Throughout this comprehensive guide, you have navigated through the essential steps required to transform your Windows 8 computer into a reliable Wi-Fi hotspot. From checking compatibility and enabling the mobile hotspot feature to configuring hotspot settings, connecting devices, and troubleshooting potential issues, you have gained a deep understanding of the intricacies involved in this process.
By confirming the compatibility of your computer and delving into the settings to enable and configure the hotspot functionality, you have harnessed the power of technology to expand the reach of your internet connection. The ability to customize network parameters, prioritize security, and troubleshoot potential challenges reflects your newfound proficiency in managing network configurations and ensuring optimal connectivity for all your devices.
As you navigate the digital landscape, armed with the knowledge and capabilities to establish a Wi-Fi hotspot using your Windows 8 computer, you have unlocked a realm of possibilities. Whether you find yourself in a scenario where traditional internet access is unavailable or you simply seek the convenience of sharing your connection with other devices, your computer stands ready to fulfill these needs.
The journey doesn't end here. With your Windows 8 computer now serving as a Wi-Fi hotspot, you have embarked on a path of digital empowerment, where seamless connectivity and accessibility are within your grasp. Embracing the role of a tech-savvy individual capable of configuring and managing network functionalities elevates your digital prowess and positions you as a facilitator of connectivity in an increasingly interconnected world.
In essence, the transformation of your Windows 8 computer into a Wi-Fi hotspot signifies a step towards digital empowerment, enabling you to shape and optimize your digital environment. By leveraging the capabilities of your computer to facilitate internet sharing, you have embraced the ethos of connectivity and positioned yourself at the helm of a network that transcends traditional boundaries.
With your Windows 8 computer now standing as a beacon of connectivity, you are poised to navigate the digital landscape with confidence, knowing that seamless internet access is within reach, courtesy of your adeptness in setting up and managing a Wi-Fi hotspot.
The journey of digital empowerment continues, and the Wi-Fi hotspot functionality of your Windows 8 computer serves as a testament to your ability to harness technology for the betterment of your digital experiences.