Introduction
So you’ve got a lot of photos stored in your Google Drive and you want to download them to your computer? Don’t worry, we’ve got you covered! In this guide, we’ll walk you through the step-by-step process of downloading photos from Google Drive.
Google Drive is a popular cloud storage service that allows users to upload and store various types of files, including photos. It provides a convenient way to backup, access, and share your files from anywhere with an internet connection. However, if you want to have a local copy of your photos or simply want to save them to your computer, downloading the photos is the way to go.
Downloading photos from Google Drive is a straightforward process that can be done in just a few simple steps. Whether you’re using a Windows PC, Mac, or even a mobile device, you’ll be able to download your photos hassle-free.
Throughout this guide, we’ll provide step-by-step instructions and tips to ensure that you can easily download your photos from Google Drive. So, let’s get started and retrieve those precious memories!
Step 1: Login to Google Drive
The first step to download photos from Google Drive is to log in to your Google account and access Google Drive. If you don’t have a Google account, you can easily create one by visiting the Google account creation page.
Once you have your Google account ready, follow these simple steps to log in to Google Drive:
- Open your web browser and visit https://drive.google.com.
- Click on the “Go to Google Drive” button.
- Enter your Google account credentials, including your email address and password.
- Click on the “Next” button.
Once you’ve successfully logged in, you’ll be taken to the main Google Drive interface. Here, you’ll be able to access all of your stored files, including your photos.
It’s worth mentioning that if you’re using a mobile device, you can also download the Google Drive app from the App Store (iOS) or Google Play Store (Android). This will allow you to access your Google Drive directly from your mobile device, making it even more convenient to download your photos on the go.
Now that you’re logged in to Google Drive, let’s move on to the next step and locate the photos you want to download.
Step 2: Locate the Photos in Google Drive
Now that you’re logged in to your Google Drive account, the next step is to locate the photos you want to download. Google Drive allows you to organize your files into folders, making it easier to locate specific photos.
To find your photos in Google Drive, follow these steps:
- On the left side of the screen, you’ll see the navigation panel. Click on the “My Drive” option to expand the folder structure.
- Navigate through the folders to find the folder where your photos are stored. You can click on the folder names to view their contents.
- If you have your photos organized in subfolders, you can also navigate through those folders to find the specific photos you want to download.
In addition to browsing through the folder structure, you can also use the search bar located at the top of the screen to search for specific photos by their file name or keywords. Simply enter the relevant information in the search bar and hit enter to see the search results.
Once you’ve located the folder or specific photos that you want to download, you’re ready to move on to the next step and select the photos for download.
Step 3: Select Photos to Download
With your photos located in Google Drive, it’s time to select the photos you want to download. Google Drive provides various options for selecting multiple photos at once, making it easy to download them in bulk.
To select photos for download, follow these simple steps:
- Open the folder or navigate to the location where your photos are stored in Google Drive.
- To select a single photo, simply click on the photo thumbnail. You will see a checkmark indicating that the photo is selected.
- To select multiple photos at once, hold down the Ctrl key (Windows) or Command key (Mac) on your keyboard and click on the thumbnails of the photos you want to download. Each selected photo will have a checkmark.
- If you want to select all the photos in a folder, click on the checkbox at the top left corner of the folder. This will select all the photos within that folder.
Once you’ve selected the photos you want to download, you’re ready to move on to the next step and start the download process.
It’s worth noting that if you have a large number of photos or if the photos are stored in subfolders, it may be more efficient to create a new folder and move the photos you want to download into that folder. This way, you can easily select all the photos in the new folder for a quicker and smoother download process.
Step 4: Download Photos from Google Drive
Now that you have selected the photos you want to download, it’s time to start the actual download process. Google Drive provides a simple and straightforward way to download your photos to your computer or device.
To download photos from Google Drive, follow these steps:
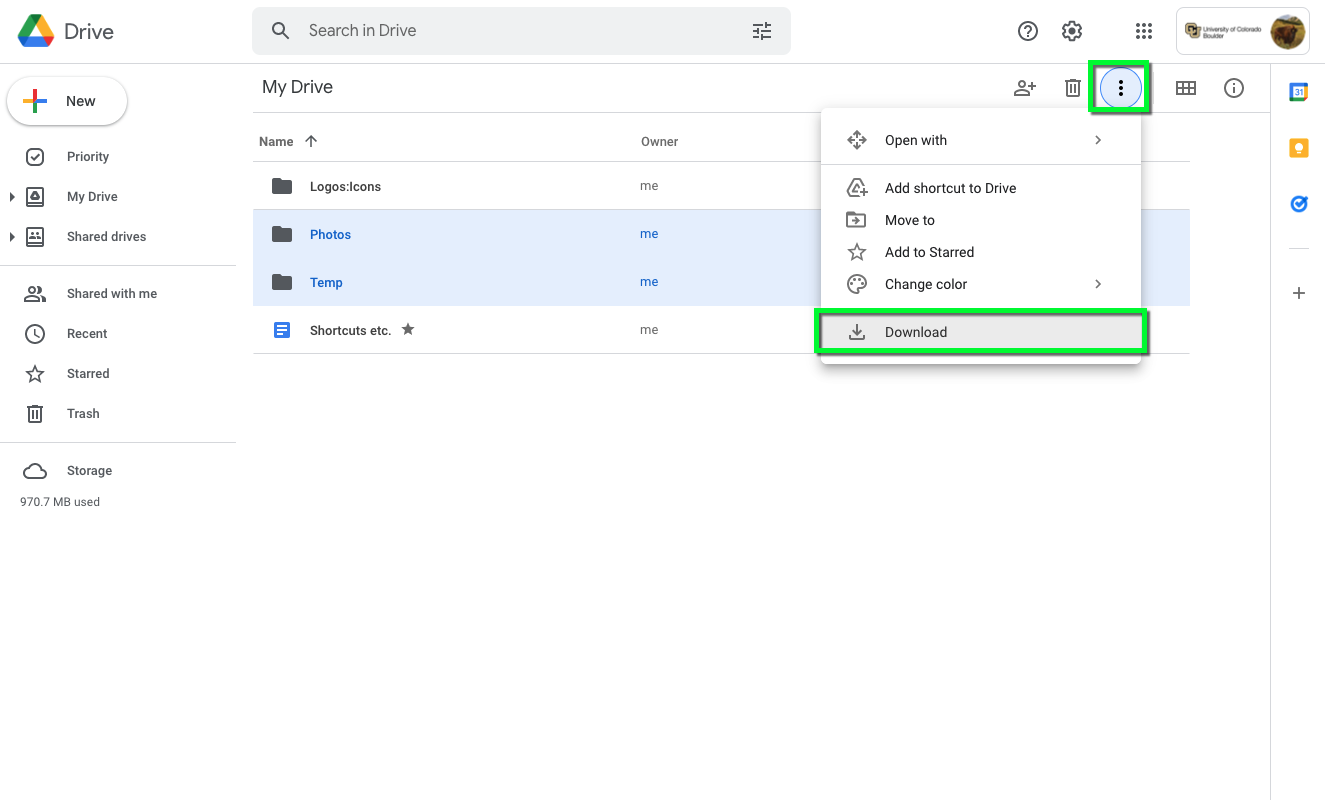
- Right-click on any of the selected photos to open the context menu.
- In the context menu, click on the “Download” option. Alternatively, you can also click on the “More actions” button (three vertical dots) in the toolbar at the top and select “Download” from the dropdown menu.
- A download prompt will appear, asking you to choose the download location on your computer. Select the folder or location where you want to save the downloaded photos.
Google Drive will now process your download request and start downloading the selected photos. The download time will depend on the size and number of photos you’re downloading, as well as your internet connection speed.
Once the download is complete, you will find the downloaded photos in the location you specified. You can now access and use the photos on your computer or device without the need for an internet connection.
It’s important to note that if you’re using the Google Drive app on your mobile device, the process for downloading photos may vary slightly. In most cases, you can open the photo in the Google Drive app and tap on the download icon or option to save it to your device’s photo gallery.
Congratulations! You have successfully downloaded your photos from Google Drive. Now, it’s time to move on to the final step and check the downloaded photos to ensure they are intact and accessible.
Step 5: Check the Downloaded Photos
After downloading the photos from Google Drive, it is important to check them to ensure that they are properly downloaded and accessible. This step helps to verify that there are no issues or missing files in the downloaded photos.
To check the downloaded photos, follow these simple steps:
- Navigate to the location on your computer where you saved the downloaded photos.
- Open the folder containing the downloaded photos.
- Click on each photo to open and view it. Make sure that the photos are clear and not corrupted.
- Compare the downloaded photos with the originals in Google Drive to confirm that all the photos have been successfully downloaded.
If you notice any issues with the downloaded photos, such as missing files, corrupted images, or any other abnormalities, you might need to re-download those photos from Google Drive. Ensure that you have a stable internet connection and follow the download steps mentioned in the previous section.
Once you have confirmed that all the downloaded photos are intact and accessible, you can safely delete the photos from Google Drive if you no longer need them stored there. Remember, deleting photos from Google Drive does not delete them from your computer; it only removes them from your Google Drive storage.
It is also a good practice to backup your downloaded photos to an external storage device or a separate cloud storage service to ensure their safety and prevent any potential data loss.
You have now successfully downloaded and checked the photos from Google Drive. You can now enjoy the convenience of having your photos readily accessible on your computer or device, without the need for an internet connection or accessing them through Google Drive.
That’s it! You have completed all the steps to download photos from Google Drive and ensure their accessibility. Now you can easily enjoy and share your favorite memories captured in those photos.