Introduction
Welcome to this guide on how to download a photo from Google Drive. Google Drive is a popular cloud storage service that allows you to store and access your files from anywhere with an internet connection. With the vast amount of photos and other files that can be stored in Google Drive, knowing how to download a specific photo can come in handy.
Whether you want to share a photo with someone, use it for a project, or simply want to have a local copy of the photo on your device, downloading a photo from Google Drive is a straightforward process. In this guide, we will take you through the step-by-step process to access, locate, select, and ultimately download a photo from your Google Drive.
Before we dive into the steps, it’s important to note that you will need to have a Google account to access Google Drive. If you don’t have one, you can easily create one for free. Once you have your Google account set up, you can follow along with this guide to download your desired photo.
Now, let’s get started with the first step of the process: accessing Google Drive.
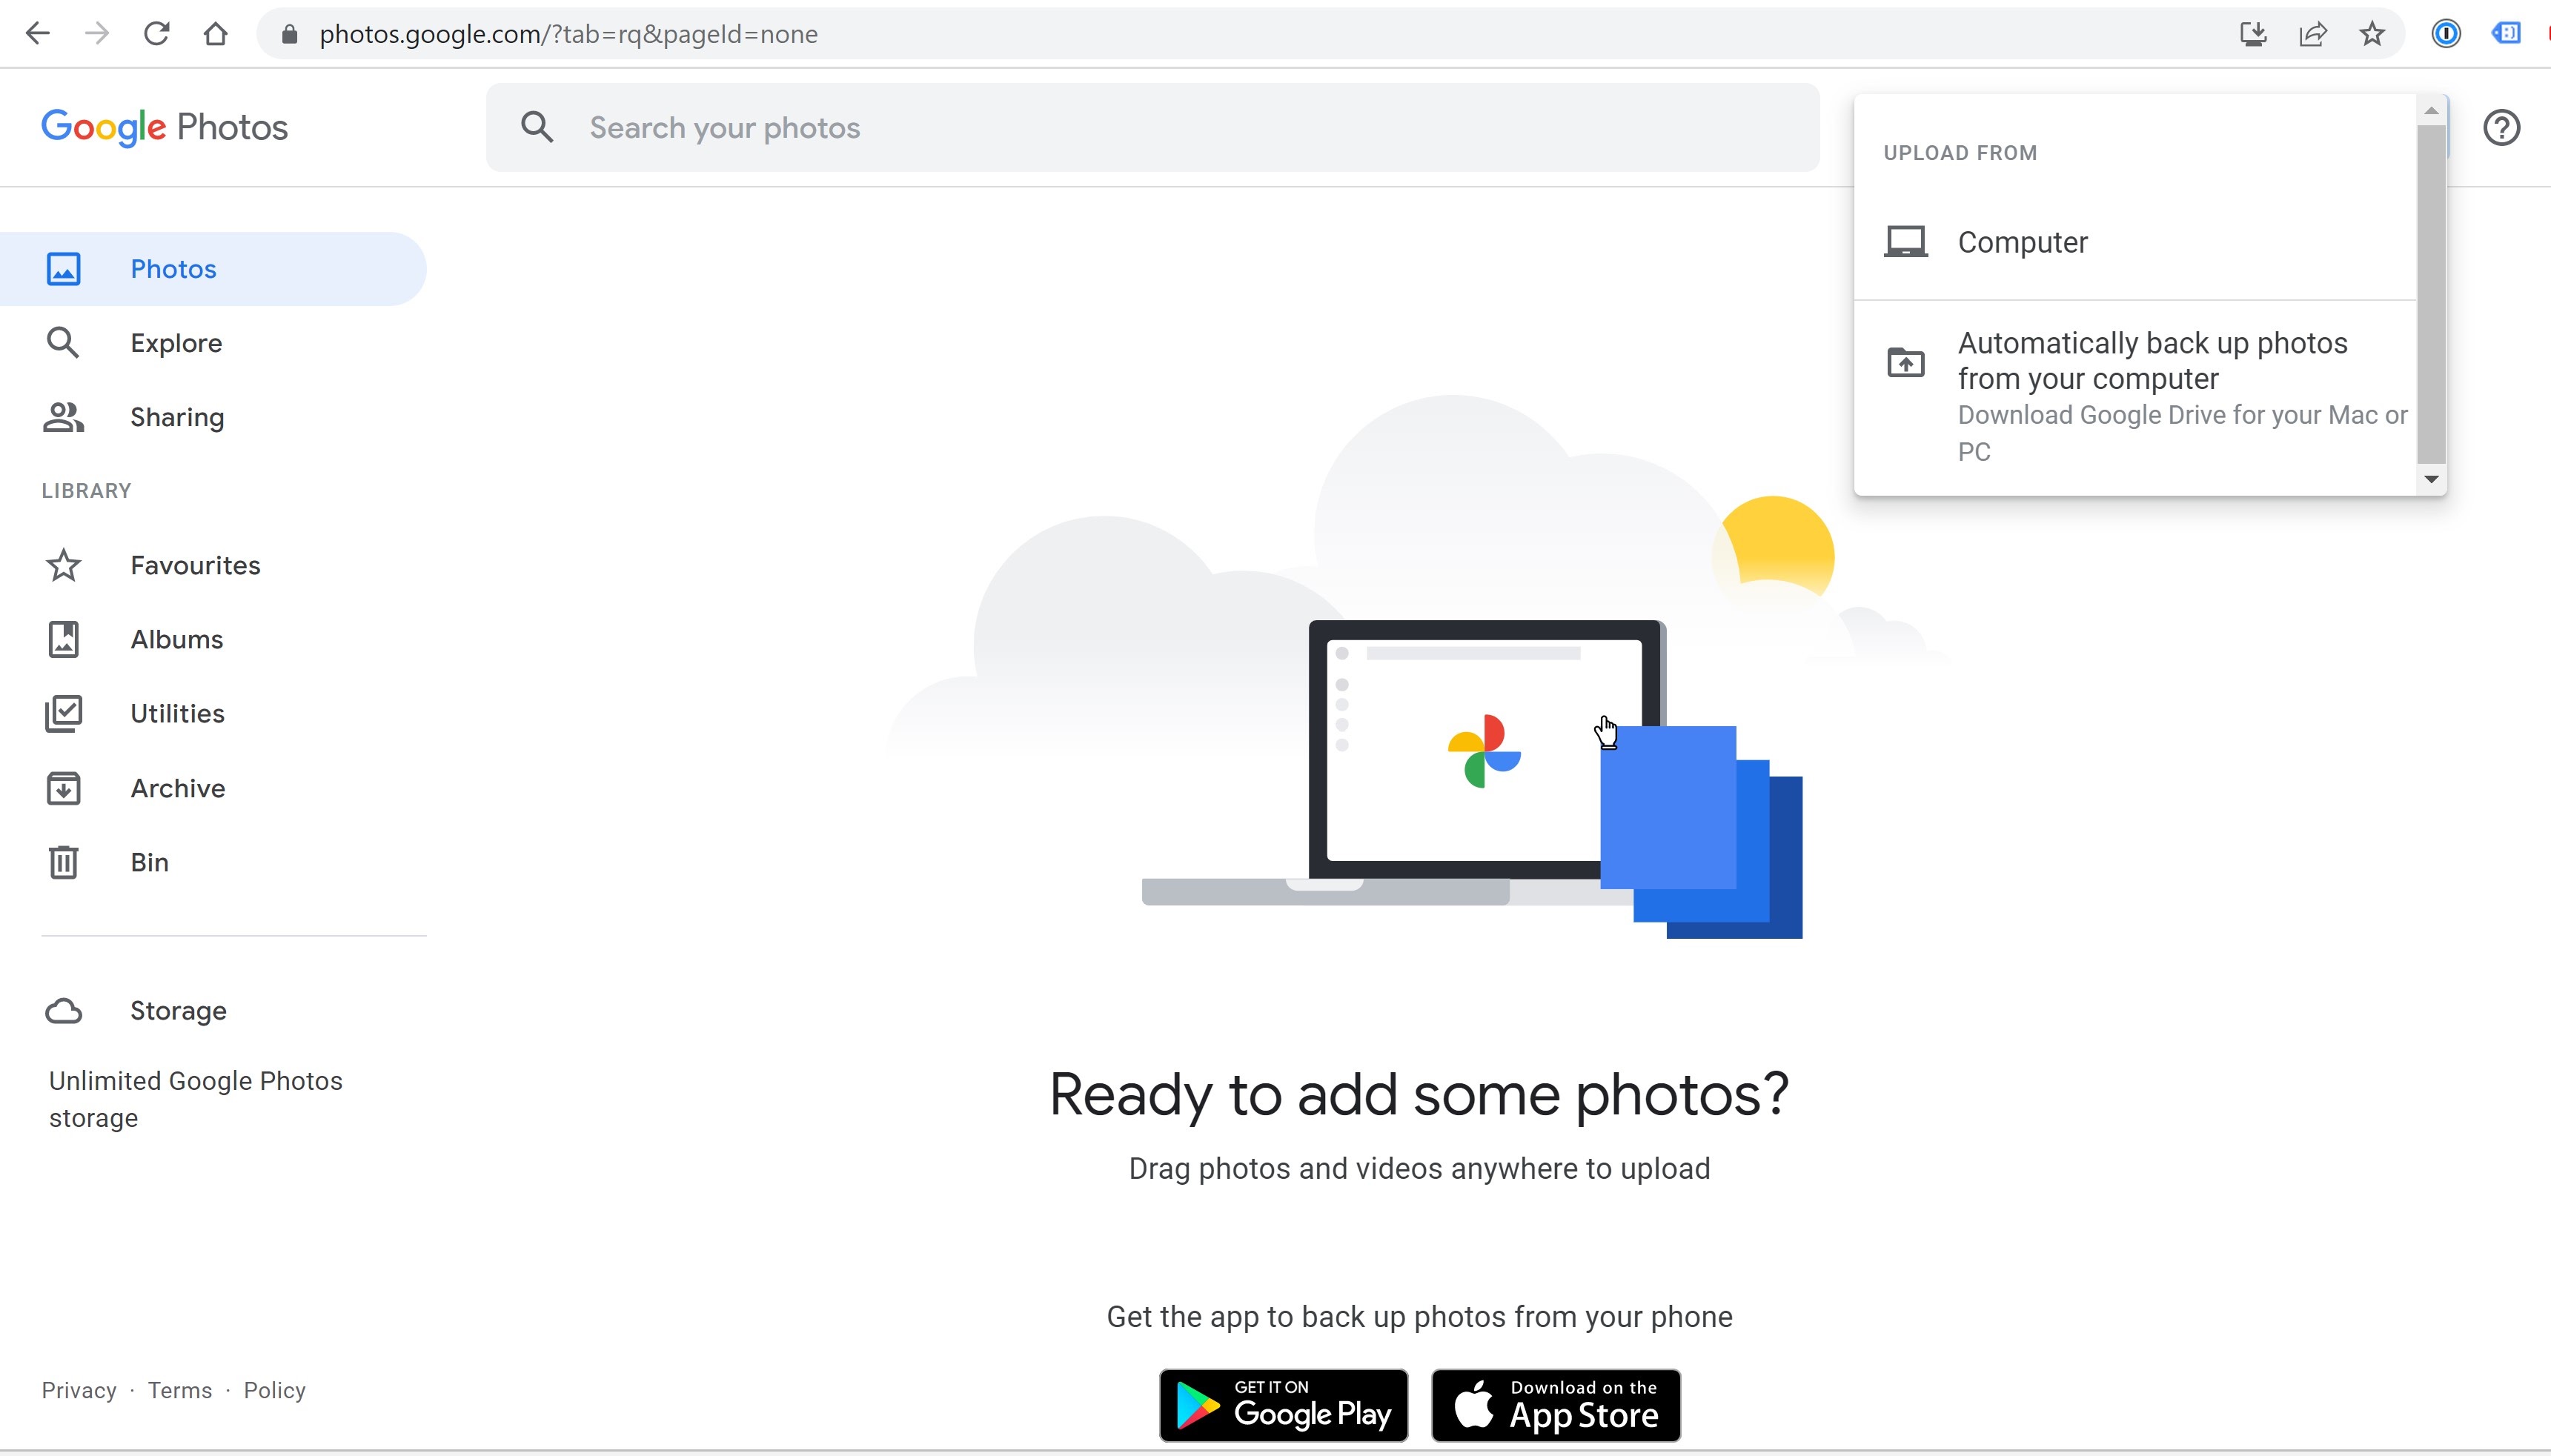
Step 1: Access Google Drive
The first step in downloading a photo from Google Drive is to access your Google Drive account. Here’s how you can do it:
- Open your web browser and go to https://drive.google.com.
- If you’re not already signed in, enter your Google account email and password to sign in. If you’re already signed in to your Google account, you will be directed to the main Google Drive page.
- Once you’re signed in, you will see a list of your files and folders in Google Drive. If you have a lot of files, you can use the search bar at the top to quickly find the photo you’re looking for by entering keywords or the file name.
Once you have successfully accessed your Google Drive account, you are ready to move on to the next step, which is locating the photo you want to download. Let’s proceed to Step 2.
Step 2: Locate the Photo
After accessing your Google Drive account, the next step is to locate the specific photo you want to download. Here’s how you can do it:
- Take a look at the list of files and folders in your Google Drive. If you have organized your photos into specific folders, navigate to the appropriate folder by clicking on it.
- If you don’t remember the exact folder where the photo is located, you can use the search bar at the top to search for the photo based on its name or any relevant keywords. Simply type in the information and press Enter to see the search results.
- Scan through the search results or folder contents until you find the photo you want to download. You can identify photos by their thumbnail images or file names.
If you have a lot of photos or if your search results are extensive, you may need to use filters or additional search criteria to narrow down the results and locate the specific photo more easily. You can filter by file type, date modified, and other metadata.
Once you have located the photo you want to download, you are ready to move on to the next step, which is selecting the photo. Let’s continue to Step 3.
Step 3: Select the Photo
Now that you have located the specific photo you want to download from Google Drive, the next step is to select it. Here’s how you can do it:
- If you are viewing the photo within a specific folder or search results, hover your mouse over the photo thumbnail. A circle will appear in the top left corner of the thumbnail.
- Click on the circle to select the photo. The circle will be filled with a checkmark to indicate that the photo is selected.
- If you want to select multiple photos, you can click on the circles of each photo you want to include in your selection. The checkmarks will appear on all the selected photos.
In addition to selecting photos individually, you can also use the selective selecting options available in the Google Drive toolbar. These options allow you to select all photos in a folder, deselect photos, or even select photos based on certain file criteria.
Once you have selected the photo(s) you want to download, it’s time to proceed to the final step of the process: downloading the photo(s) to your device. Let’s move on to Step 4.
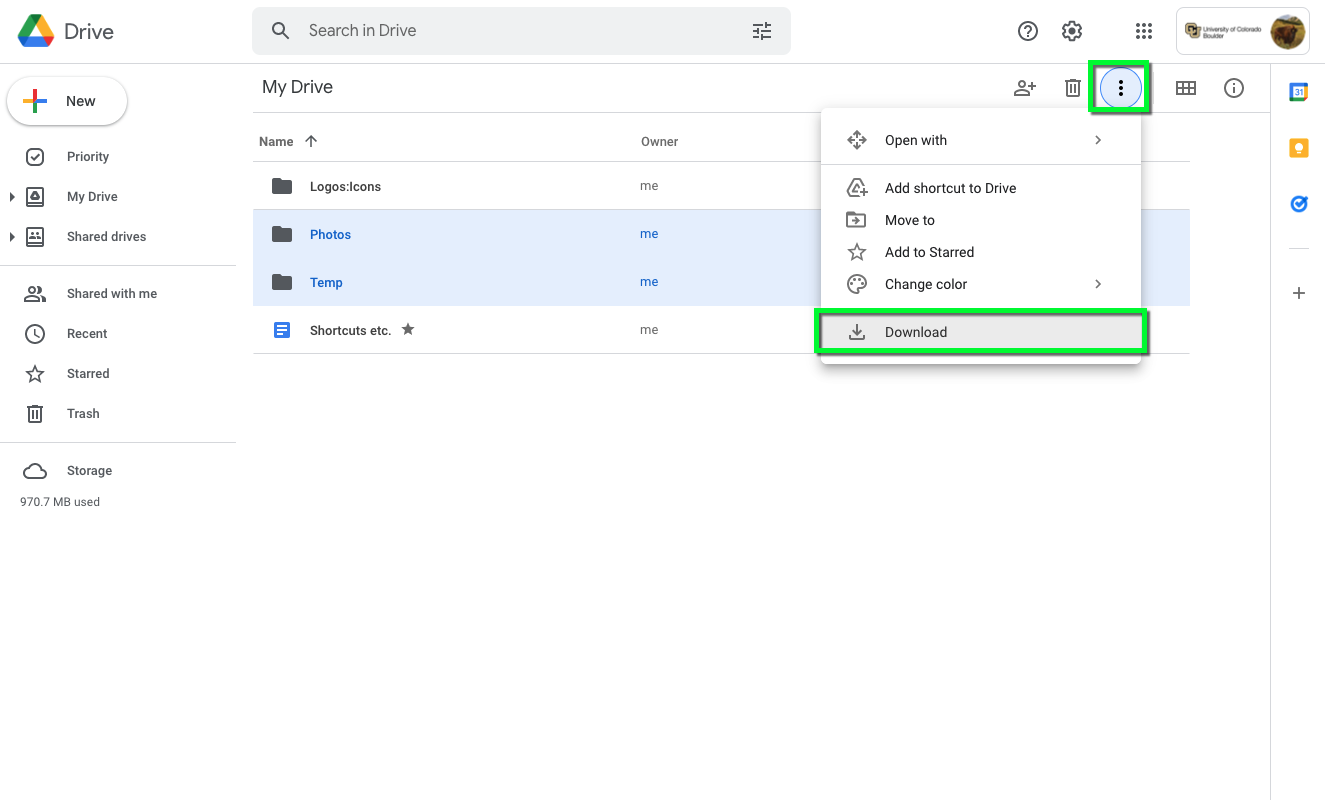
Step 4: Download the Photo
After selecting the photo(s) you want to download from Google Drive, it’s time to download them to your device. Here’s how you can do it:
- Once you have selected the photo(s), you will see a toolbar at the top of the Google Drive page with various options. Click on the “More actions” button (represented by three vertical dots) to open a dropdown menu.
- From the dropdown menu, select the “Download” option. Alternatively, you can right-click on the selected photo(s) and choose the “Download” option from the context menu.
- Depending on your browser settings, a window may pop up asking you to choose the location on your device where you want to save the downloaded photo(s). Select the appropriate location and click “Save” or “OK”.
- The file(s) will now begin downloading to your selected location. The download progress will be displayed, and once it’s complete, you will have a local copy of the photo(s) on your device for offline access.
It’s important to note that the time it takes to download the photo(s) will depend on factors such as file size, internet connection speed, and the number of photos being downloaded.
With that, you have successfully downloaded the photo(s) from Google Drive to your device! You can now access and use the photo(s) as needed.
On a final note, remember to properly organize and manage your downloaded photos to keep your storage space organized and easily accessible. Consider using folders or naming conventions to maintain a structured file system.
Conclusion
Congratulations! You have successfully learned how to download a photo from Google Drive. With the step-by-step guide provided in this article, you can access your Google Drive account, locate the specific photo you want to download, select the photo, and finally download it to your device.
Downloading photos from Google Drive can be useful in various situations, such as sharing photos with others, using them for projects, or simply creating a backup on your device. By following the steps outlined in this guide, you can easily retrieve your desired photo(s) from your Google Drive.
Remember, Google Drive offers a convenient and secure way to store and access your files, including photos, from anywhere with an internet connection. It’s always a good idea to regularly back up your files and keep them organized within your Google Drive account for easy retrieval.
Having a local copy of the photo(s) on your device gives you the flexibility to use them offline, edit them, or incorporate them into various projects. So, the next time you need to download a photo from Google Drive, simply refer back to this guide for a quick and hassle-free process.
Thank you for reading, and we hope this guide has been helpful to you. Enjoy downloading your photos from Google Drive!