Introduction
Google Photos is a powerful and user-friendly platform for managing and storing your photos and videos. It offers a convenient way to organize your memories into albums. While Google Photos provides easy access to view and share these albums, you may find yourself wanting to download a specific album to your computer for offline access or to make backups.
In this article, we will guide you through the process of downloading a Google Photos album to your computer. Whether you want to preserve the album for sentimental value, share it with others who may not have access to Google Photos, or simply have a backup for safekeeping, downloading the album allows you to have full control over your pictures and videos.
Although Google Photos provides an option to download individual photos within an album, this can be time-consuming if the album contains a large number of items. By downloading the entire album, you can save time and effort.
Whether you’re using a Windows PC, Mac, or Linux machine, the steps to download a Google Photos album remain relatively consistent. So, let’s dive into the simple process of downloading your favorite Google Photos album to your computer.
Step 1: Open Google Photos on your computer
The first step to downloading a Google Photos album to your computer is to open Google Photos in your preferred web browser. You can access Google Photos by typing “photos.google.com” in the address bar of your browser or by searching for “Google Photos” in your favorite search engine and clicking on the appropriate link in the search results.
Once you have opened Google Photos, you will need to log in to your Google account. If you already have a Google account, simply enter your email address and password in the appropriate fields. If you don’t have an account, you can create one by clicking on the “Create account” or “Sign up” button on the login screen and following the prompts to set up your account.
After successfully logging in or creating your account, you will be taken to the Google Photos main page, where you can view and manage your photos and albums. Take a moment to familiarize yourself with the layout and options available to you on this page.
Note that Google Photos also offers a desktop application that you can download and install on your computer for easier access to your photos and albums. If you prefer to use the desktop app, make sure you have it installed before proceeding.
Now that you have successfully opened Google Photos on your computer, you are ready to move on to the next step, which is selecting the album you want to download.
Step 2: Select the album you want to download
Once you have opened Google Photos on your computer, you need to locate and select the specific album that you want to download. Google Photos organizes your albums in a grid-like view, making it easy to browse and find the one you’re looking for.
To start, look for the “Albums” tab on the left-hand side of the Google Photos page. Click on it to expand the albums view. This will display all the albums you have created or those that have been shared with you. Scroll through the list to find the album you want to download.
If you have a large number of albums or are having trouble locating the specific album, you can use the search bar located at the top of the screen. Simply type in the name or a keyword related to the album, and Google Photos will filter the results for you.
Once you have located the desired album, click on it to open it. This will take you to the album view, where you can see all the photos and videos contained within it.
Take a moment to explore the album view and appreciate the memories captured in the photos and videos. You can click on individual items to view them in a larger size and read any captions or descriptions associated with them.
Now that you have selected the album you want to download, it’s time to move on to the next step and access the album settings.
Step 3: Open the album settings
Once you have selected the Google Photos album you want to download, the next step is to open the album settings. The album settings provide you with various options to customize and manage the album.
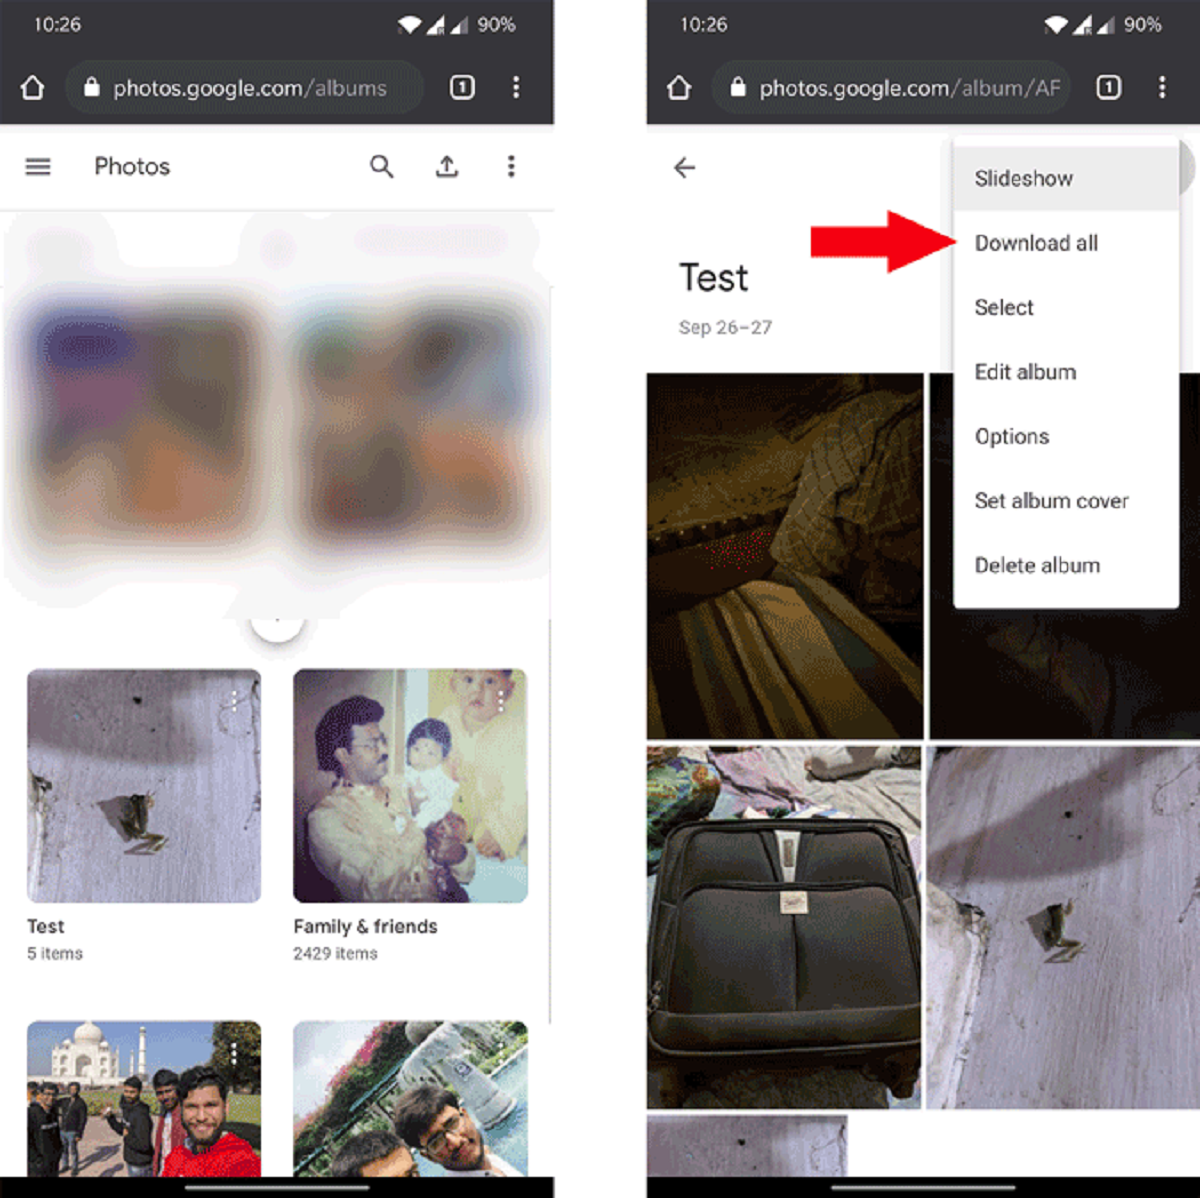
To access the album settings, look for the three-dot menu icon located in the upper-right corner of the album view. Click on this icon to reveal a drop-down menu of options for the selected album.
In the drop-down menu, you will find several options, including “Add to album,” “Remove from album,” and “Rename album.” However, the option we are interested in for downloading the album is “Album settings.” Click on “Album settings” to proceed.
Opening the album settings will take you to a new page where you can configure various aspects of the album. Here, you can change the album title, add or remove contributors, and adjust visibility settings.
However, the most important option for our purpose is the ability to download the entire album. Look for the option labeled “Download all” or something similar. This option allows you to download all the photos and videos within the album in a single action.
Now that you have opened the album settings, and found the option to download the entire album, you are ready to move on to the next step, which is actually initiating the download process.
Step 4: Select “Download all”
After opening the album settings and accessing the options for the selected Google Photos album, the next step is to select the “Download all” option. This allows you to initiate the download process for the entire album, including all the photos and videos it contains.
Scroll through the album settings page until you find the option labeled “Download all” or something similar. This option is typically located towards the bottom of the settings page, beneath other customization options.
Once you locate the “Download all” option, click on it to initiate the download process. Depending on the size of the album and your internet connection speed, it may take some time for the download to complete. Be patient and do not interrupt the process to ensure that all the items in the album are successfully downloaded.
It’s worth noting that the “Download all” option may also be accompanied by additional options, such as choosing the file format for the downloaded content or setting a specific download location. If such options are available, you can customize them according to your preferences before proceeding with the download.
With the “Download all” option selected, you are now ready to choose where to save the album on your computer. Proceed to the next step to learn how to select the desired download location.
Step 5: Choose where to save the album on your computer
Once you have initiated the download process for the Google Photos album by selecting the “Download all” option, the next step is to choose where to save the album on your computer. This allows you to specify the location where the downloaded album will be stored.
After clicking on the “Download all” option, your browser will prompt you to choose the destination folder where you want to save the album. The exact wording of the prompt may vary depending on your browser and operating system.
Typically, you will see a pop-up window that allows you to browse and navigate your computer’s file system to choose the desired folder. You can select an existing folder or create a new one specifically for the downloaded album.
Take a moment to consider the organization and storage options that work best for you. You might want to create a dedicated folder for all your downloaded Google Photos albums or place them in a specific location that is easy to access and backup.
Once you have chosen the destination folder, click on the “Save” or “OK” button to confirm your selection. Your browser will then initiate the download process, and the album will start downloading to the specified location on your computer.
Remember, the time it takes to download the entire album will depend on factors such as the size of the album and your internet connection speed. During the download process, it’s important not to close the browser or interrupt the downloading to ensure a successful and complete download.
With the destination folder chosen, you are now one step closer to having the Google Photos album saved on your computer. The next step is to wait for the download to complete before accessing the downloaded album.
Step 6: Wait for the download to complete
After selecting the destination folder to save the Google Photos album on your computer, the next step is to patiently wait for the download to complete. This may take some time depending on the size of the album and the speed of your internet connection.
While the album is downloading, it’s important not to interrupt the process. Avoid closing the browser or navigating away from the download page. Doing so may result in an incomplete download or potential loss of data.
You can monitor the download progress by looking at the download status provided by your browser. This may be displayed as a progress bar, a percentage indicator, or a download speed estimation. This will give you an idea of how much longer you need to wait until the download is finished.
If you have a slower internet connection or a particularly large album, it may take some time for the download to complete. You can take this opportunity to grab a cup of coffee, catch up on other tasks, or simply relax while waiting for the album to be saved on your computer.
Once the download is complete, your browser will notify you that the album has finished downloading. At this point, you can move on to the final step, which involves accessing and enjoying the downloaded album on your computer.
With patience and anticipation, the download process will soon be over, and you will have the complete Google Photos album saved on your computer for easy access and offline enjoyment. Proceed to the next step to learn how to access your downloaded album.
Step 7: Access your downloaded album
Once the Google Photos album has finished downloading to your computer, it’s time to access and enjoy the downloaded content. By following this final step, you will be able to view, organize, and share the album without needing an internet connection.
Open the file explorer or finder on your computer and navigate to the destination folder where you chose to save the downloaded album. Look for the folder with the name of the Google Photos album or the specified folder you created to store the album.
Click on the folder to open it and you will see all the photos and videos from the album stored within. You can now browse through the content, view them in larger size or open them with photo viewing applications on your computer.
Take a moment to explore the downloaded album and appreciate the convenience of having it readily accessible on your computer. You can reorder the photos, rename them, or organize them into subfolders within the downloaded album folder.
Additionally, you can copy the downloaded album to external storage devices such as USB drives or external hard drives to create backups for extra protection and peace of mind. This ensures that you always have a copy of your precious memories even if something happens to your computer.
Moreover, you can easily share the downloaded album with friends and family by simply copying the entire folder or selecting specific photos and videos to share via email, messaging apps, or cloud storage platforms.
With your downloaded Google Photos album now accessible on your computer, you have the freedom to enjoy and manage your memories at your own convenience. You can view them anytime, even without an internet connection, and have full control over how you organize and share them.
Congratulations! You have successfully followed all the steps to download and access a Google Photos album on your computer. Keep this process in mind whenever you want to save a special collection of photos and videos from your Google Photos account for offline use.
Conclusion
Downloading a Google Photos album to your computer is a straightforward process that allows you to have offline access to your cherished memories. By following the steps outlined in this guide, you can easily save an entire album, including all the photos and videos it contains, to a designated folder on your computer.
Opening Google Photos on your computer and selecting the desired album is the first step. Then, accessing the album settings and choosing the “Download all” option initiates the download process. Selecting the destination folder where you want to save the album ensures it is stored in a convenient location on your computer.
Waiting for the download to complete may require some patience, especially if the album is large or your internet connection is slow. However, once the download is finished, you can access the downloaded album through your computer’s file explorer or finder.
With the album now accessible on your computer, you have the flexibility to view, organize, and share the photos and videos at your convenience. You can enjoy them offline, reorder them, create backups, and easily share them with friends and family.
Remember to keep your downloaded albums organized and backed up to ensure their safety in case of any computer issues. Regularly saving your precious memories in offline storage devices or cloud storage platforms will provide you with peace of mind.
Now that you have mastered the process of downloading Google Photos albums to your computer, you can preserve and enjoy your memories offline. Whether you want to create backups, share albums with loved ones, or simply have easy access to your photos and videos, downloading Google Photos albums is an invaluable tool for taking control of your digital memories.