Introduction
Welcome to the world of Google Photos, where you can store, organize, and share your precious memories in one convenient location. Whether you’re a professional photographer, an avid traveler, or simply someone who loves capturing life’s beautiful moments, Google Photos is the perfect platform for you.
In this article, we will guide you through the process of accessing your Google Photos account and provide tips and tricks on how to make the most out of its features. Whether you prefer to use a web browser on your computer or the Google Photos app on your mobile device, we’ve got you covered.
With Google Photos, you can effortlessly upload and manage your photos, organize them into albums, edit and enhance them with powerful tools, and easily share them with your friends and family. Whether you’re looking to preserve your memories for personal enjoyment or showcase your creativity to a wider audience, Google Photos offers a range of features to help you achieve your goals.
If you’re new to Google Photos, don’t worry – we’ll walk you through the process step by step. And if you’re already familiar with Google Photos, we’ll share some insider tips and tricks to help you get the most out of your experience.
So, grab your camera, smartphone, or tablet, and let’s dive into the wonderful world of Google Photos. Whether you’re a photography enthusiast, a family historian, or simply someone who loves capturing precious moments, Google Photos has something for everyone. Let’s get started!
Logging in to Your Google Account
Before you can access your Google Photos, you’ll need to log in to your Google account. Here’s how:
1. Open your preferred web browser and go to the Google homepage.
2. Click on the “Sign in” button in the top right corner of the page.
3. Enter your Google account email address or phone number in the field provided.
4. Next, enter your password. Make sure to enter it correctly, as passwords are case-sensitive.
5. Once you’ve entered your login details, click on the “Next” button to proceed.
If you have two-step verification enabled for your Google account, you may be prompted to enter a verification code sent to your registered mobile device or email address. Simply follow the instructions provided to complete the login process.
If you’re using a shared or public device, ensure that you log out of your Google account after you’re finished to protect your privacy and security.
If you prefer to access your Google Photos on your mobile device, you can sign in to your Google account using the Google Photos app. Here’s how:
1. Install the Google Photos app from the App Store (for iOS) or the Google Play Store (for Android).
2. Open the app and tap on the “Sign in” button.
3. Enter your Google account email address or phone number.
4. Enter your password and tap on the “Next” button.
5. If prompted, follow the additional steps to complete the login process.
Once you’ve successfully logged in to your Google account, you’re ready to start exploring and accessing your Google Photos.
Remember to keep your login credentials secure and avoid sharing them with anyone. By keeping your Google account information safe, you can ensure the privacy and security of your photos and personal data.
Accessing Google Photos on a Web Browser
Once you’ve logged in to your Google account, accessing Google Photos on a web browser is a breeze. Follow these steps:
1. Open your preferred web browser and make sure you’re still logged in to your Google account.
2. In the address bar, type “photos.google.com” and hit Enter. The Google Photos homepage will load.
3. On the Google Photos homepage, you’ll see all your uploaded photos displayed in a clean, organized layout. You can scroll down to view more photos or use the search bar at the top to quickly find specific images.
4. To view a photo in full size, simply click on it. You can navigate through your photos using the arrow keys on your keyboard or by clicking on the arrows in the upper-left corner of the screen.
5. On the left side of the screen, you’ll find various options to navigate through your photos. These include “Photos” (which shows all your photos in chronological order), “Albums” (where you can access and organize your photo albums), “Shared” (to view photos shared with you by others), and “Trash” (where deleted photos are stored temporarily).
6. To create a new album, click on the “+” icon next to the “Albums” section and follow the prompts. You can then add photos to your album by selecting them and clicking on the “Add to” button.
7. If you want to upload new photos, click on the cloud icon with the up arrow on the top right corner of the screen. You can choose individual photos or entire folders to upload. Google Photos will automatically organize your new uploads by date.
8. To share your photos with others, simply select the photos you want to share, click on the share icon, and enter the email addresses or names of the recipients. You can also generate a shareable link that you can copy and send via email, messaging apps, or social media.
9. Google Photos also offers powerful editing tools to enhance your photos. Click on a photo, and then click on the editing tools icon (pencil) to access features like cropping, adjusting brightness and contrast, applying filters, and more.
10. Finally, to manage your account settings, click on your account avatar on the top right corner of the screen, then select “Settings” from the dropdown menu. From here, you can adjust privacy settings, storage options, and other preferences.
Accessing Google Photos on a web browser provides a comprehensive and intuitive experience, allowing you to easily organize, edit, and share your photos in a user-friendly interface.
Now that you know how to access Google Photos on a web browser, let’s explore the features and options available to you on the Google Photos mobile app.
Using the Google Photos App on Your Mobile Device
If you prefer to access your Google Photos on the go, the Google Photos app is the perfect companion for your mobile device. Here’s how to get started:
1. Open the Google Photos app on your smartphone or tablet. Make sure you’re signed in to your Google account.
2. The app will automatically sync with your Google Photos account, and you’ll see all your uploaded photos displayed in the app’s interface.
3. Swipe up and down to browse through your photos. You can also use the search bar at the top of the screen to find specific images.
4. To view a photo in full size, simply tap on it. Swipe left or right to navigate through your photos.
5. At the bottom of the screen, you’ll find several icons for different sections of the app. “Photos” displays all your photos, “Albums” lets you access and organize your photo albums, “For You” provides personalized suggestions and creations, and “Sharing” allows you to view and manage shared albums and photos.
6. To create a new album in the app, tap on the “+” icon in the Albums section and follow the prompts. You can then add photos by selecting them and tapping on the “Add” button.
7. Uploading new photos is seamless with the app. Simply tap on the cloud icon with the up arrow at the top right corner of the screen. Choose the photos or folders you want to upload from your device, and Google Photos will automatically organize them by date.
8. Sharing your photos is easy. Select the photos you want to share, tap on the share icon, and enter the email addresses or names of the recipients. You can also generate a shareable link that you can copy and send via other messaging apps or social media.
9. The Google Photos app offers a wide range of editing tools to enhance your photos. Tap on a photo, then tap on the editing tools icon (pencil) to access features like cropping, adjusting brightness and contrast, applying filters, and more.
10. To manage your account settings, tap on your account avatar at the top right corner of the screen. From there, you can access settings for backups, storage, and notifications, as well as manage your account and privacy preferences.
The Google Photos app provides a user-friendly and convenient way to access and manage your photos on the go. With its powerful features and seamless integration with your Google account, it’s the perfect companion for capturing, organizing, and sharing your precious memories.
Now that you know how to use the Google Photos app, let’s explore how you can upload and manage your photos on Google Photos.
Uploading and Managing Photos on Google Photos
Uploading and managing your photos on Google Photos is a straightforward process. Whether you want to upload new photos or organize your existing collection, Google Photos offers convenient tools to help you stay organized and in control. Here’s how:
1. Uploading Photos:
– On Web Browser: To upload photos on a web browser, click on the cloud icon with an up arrow on the top right corner of the screen. Choose the photos or folders you want to upload from your computer, and Google Photos will automatically organize them by date.
– On Mobile App: To upload photos using the Google Photos app, tap on the cloud icon with an up arrow on the top right corner of the screen. Select the photos or folders from your device’s gallery, and Google Photos will automatically upload and organize them for you.
2. Organizing Photos:
– Creating Albums: To keep your photos organized, you can create albums. In both the web browser and app, select the photos you want to include in the album, then click on the “Add to” or “Create Album” option. Give your album a name and choose if it should be public or private.
– Adding Photos to Albums: Once you have created albums, you can add photos to them. Simply select the photos, click on the “Add to” option, and choose the album you want to add them to.
– Searching and Sorting: Google Photos incorporates powerful search capabilities. You can search for specific people, objects, or locations in your photos using keywords. The app can also automatically group similar photos for easy browsing.
3. Managing Photos:
– Deleting Photos: If you want to remove unwanted photos from your collection, select them and click on the trash bin icon. Deleted photos are moved to the “Trash” section, where they stay for 60 days before being permanently deleted. You can also choose to empty the trash if you don’t intend to recover any deleted photos.
– Archiving Photos: If you have photos that you want to keep but don’t want them to appear in your main library, you can archive them. Simply select the photos and click on the three-dot menu, then choose “Archive.” Archived photos are still accessible but are tucked away in a separate section.
– Recovering Photos: If you accidentally deleted a photo or want to retrieve an archived image, you can do so within the “Trash” or “Archive” sections. Select the photo and click on the restore button to bring it back to your main library.
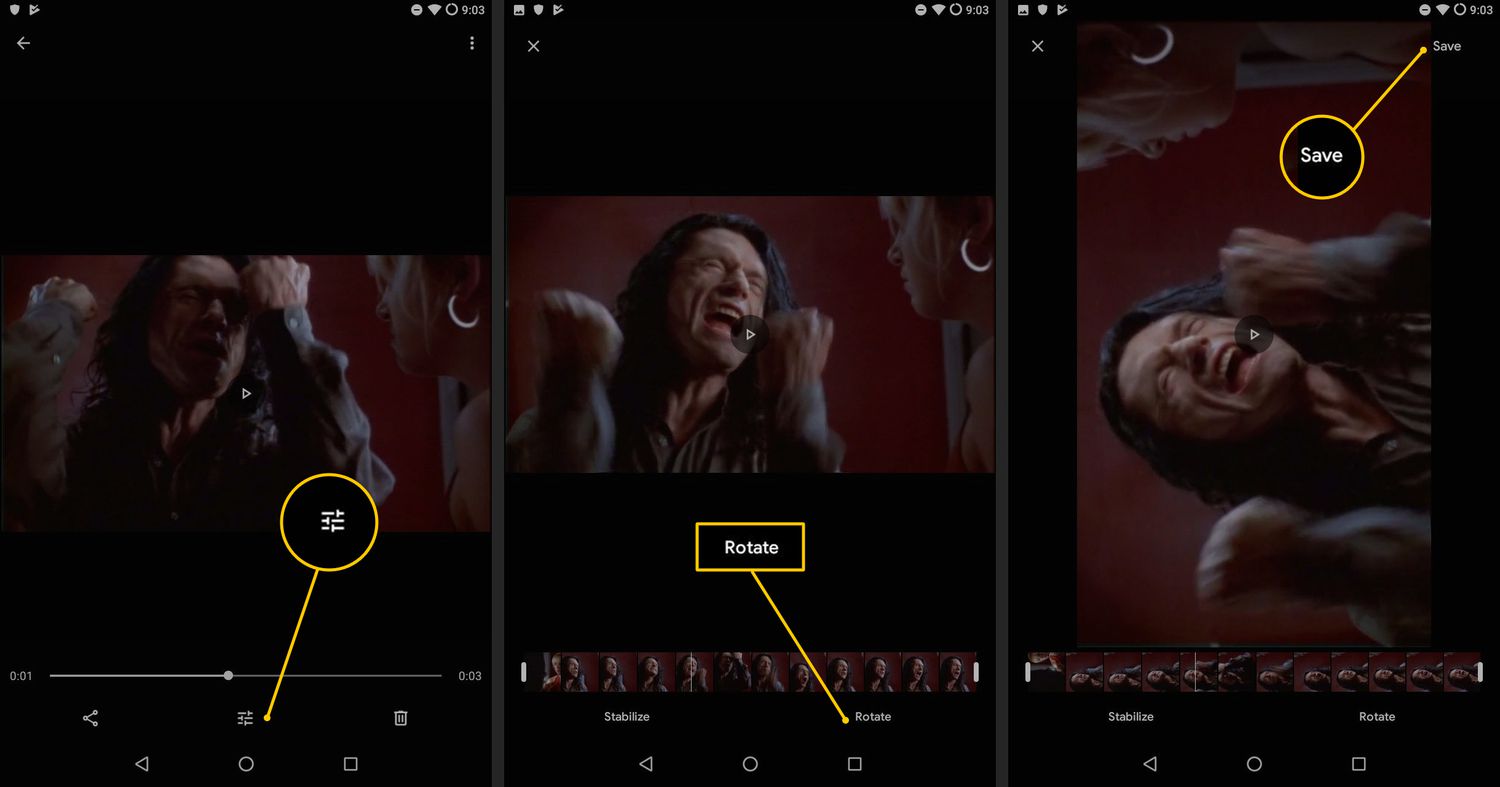
– Editing Photos: Google Photos provides a range of editing tools to enhance your photos. Select a photo, click on the editing tools icon (pencil), and explore features like crop, rotate, filters, adjustments, and more.
By leveraging the uploading and managing features of Google Photos, you can keep your photo collection organized, searchable, and easily accessible, allowing you to relive your cherished memories whenever you desire.
Now, let’s explore how to organize and sort your photos on Google Photos.
Organizing and Sorting Photos on Google Photos
With Google Photos, you have the power to organize and sort your photo collection in a way that suits your needs. Whether you want to group photos into albums, add tags, or take advantage of Google’s powerful search capabilities, organizing and sorting your photos has never been easier. Here’s how:
1. Creating Albums:
– On Web Browser: To create an album on a web browser, select the photos you want to include in the album, then click on the “Add to” or “Create album” option. Give your album a name and choose whether it should be public or private. You can add more photos to the album later by selecting them and clicking on “Add to” or “Add to album.”
– On Mobile App: To create an album using the Google Photos app, select the photos you want to include, tap on the three-dot menu, and choose “Add to album.” Follow the prompts to create a new album or add the selected photos to an existing album.
2. Adding Tags and Descriptions:
– In both the web browser and app, you can add tags or descriptions to your photos to make them easily searchable. Select a photo, click on the three-dot menu, and choose “Edit.” You can then add relevant tags or descriptions in the appropriate fields. This way, you can quickly find specific photos by searching for keywords related to the tags or descriptions.
3. Utilizing Google’s Search Capabilities:
– Google Photos uses advanced algorithms to recognize people, objects, and locations in your photos. To take advantage of this feature, simply enter relevant keywords in the search bar. For example, you can search for “beach” to find all your beach photos or search for a specific person’s name to view all photos with that person. This powerful search capability makes it easy to locate specific photos among your vast collection.
4. Sorting Photos:
– Google Photos offers various sorting options to help you find photos based on specific criteria. In the web browser, click on the “Sort” icon at the top right corner of the screen. You can choose to sort by date (newest first or oldest first), by title (A-Z or Z-A), or by the recently added order. In the app, tap on the three-line menu, go to “Settings,” and under “Library,” choose the sorting option that suits you.
5. Collaborating on Albums:
– Google Photos allows you to collaborate on albums with others. Simply create an album and add the email addresses or names of the people you want to invite. They can then contribute their own photos to the shared album, making it a collaborative and interactive experience.
By leveraging the organizing and sorting features of Google Photos, you can easily locate and showcase your photos in a way that reflects your preferences. Whether you prefer to create albums, add tags, use search, or sort your photos, Google Photos empowers you to stay organized and find your favorite memories with ease.
Now, let’s dive into the editing and enhancing capabilities of Google Photos.
Editing and Enhancing Photos on Google Photos
Google Photos offers a wide array of powerful editing tools that allow you to enhance and transform your photos with just a few clicks. Whether you need to make minor adjustments or unleash your creativity with advanced edits, Google Photos has got you covered. Here’s how you can edit and enhance your photos:
1. Basic Editing Tools:
– Open a photo in Google Photos and click on the editing tools icon (pencil) to access the basic editing options. Here, you can crop, rotate, and straighten your photos to improve composition and perspective. You can also adjust exposure, contrast, saturation, and warmth to enhance the overall look of your image.
2. Filters:
– Google Photos offers a variety of filters that can instantly transform the mood and aesthetic of your photos. Simply apply a filter by selecting it from the available options. You can then adjust the intensity of the filter to achieve the desired effect.
3. Advanced Editing Tools:
– For more intricate edits, click on the editing tools icon (pencil) and select “More” to access advanced editing options. Here, you can fine-tune the lighting and color of your photos with sliders for highlights, shadows, whites, blacks, and more. You can also apply selective adjustments to specific areas of the photo using the brush or radial tools.
4. Portrait Mode:
– If you have a photo with a person or object in the foreground and a blurred background, Google Photos allows you to adjust the background blur intensity. Simply open the photo, click on the editing tools icon (pencil), and select “Portrait.” You can then use the slider to control the amount of background blur to achieve the desired effect.
5. Auto Enhance:
– If you prefer a quick and automated approach, Google Photos offers an “Auto” option that intelligently enhances your photos with a single click. This feature applies adjustments to improve lighting, color, and overall image quality.
6. Undo and Revert:
– If you’re not satisfied with the edits you’ve made, don’t worry. Google Photos allows you to easily revert to the original version of the photo or undo specific edits. Simply click on the three-dot menu and choose the appropriate option to revert or undo your changes.
7. Saving and Sharing:
– After you’ve edited and enhanced your photo to your liking, simply click on the save or done button to apply the changes. You can then choose to share the photo directly from Google Photos to your favorite social media platforms, send it via email, or generate a shareable link to easily distribute it.
With Google Photos’ extensive editing tools and features, you have the ability to take your photos to the next level. From basic adjustments to advanced edits, you can bring out the best in your images and create stunning visuals that truly capture the essence of your memories.
Now, let’s explore how you can share and collaborate on Google Photos.
Sharing and Collaborating on Google Photos
Google Photos makes it easy to share your favorite photos and albums with others. Whether you want to collaborate on a project, share memories with friends and family, or showcase your photography skills to a wider audience, Google Photos offers a range of sharing and collaboration options. Here’s how:
1. Sharing Individual Photos:
– Open the photo you want to share in Google Photos, click on the share icon, and select the desired sharing method. You can choose to send the photo via email, messaging apps, social media platforms, or generate a shareable link that you can copy and distribute.
2. Sharing Albums:
– To share an entire album, open the album in Google Photos, click on the share icon, and choose how you want to share it. Similar to individual photos, you can share albums via email, messaging apps, social media, or by generating a shareable link.
3. Collaborating on Albums:
– Google Photos allows you to collaborate on albums with others, making it perfect for group projects or sharing memories with multiple contributors. To collaborate on an album, open the album, click on the share icon, and add the email addresses or names of the people you want to invite. They will then be able to contribute their own photos to the shared album, making it a collaborative and interactive experience.
4. Shared Libraries:
– With Google Photos, you can also set up shared libraries, which allows you to automatically share photos with specific individuals. You can choose to share all your photos or only selected ones, and the recipients will be able to view and save the shared photos to their own Google Photos library.
5. Commenting and Reactions:
– When you share photos or albums with others, Google Photos offers commenting and reacting capabilities. This enables recipients to leave comments and reactions on the shared photos, providing an interactive and engaging experience that encourages conversation and connection.
6. Privacy and Control:
– Google Photos gives you control over the privacy and visibility of your shared photos. You can choose to share photos publicly, limit access to certain individuals, or keep them private to yourself. You also have the option to revoke access or remove shared photos at any time.
Sharing and collaborating on Google Photos allows you to connect with others, celebrate memories together, and showcase your photos to a wider audience. Whether it’s sharing individual photos, collaborating on albums, or setting up shared libraries, Google Photos provides an intuitive and seamless sharing experience.
Now that you know how to share and collaborate on Google Photos, let’s explore how to archive and delete photos.
Archiving and Deleting Photos on Google Photos
With Google Photos, you have the flexibility to archive and delete photos, allowing you to declutter your library and keep your collection organized. Whether you want to temporarily hide photos from your main view or permanently remove them, Google Photos offers straightforward options to archive and delete photos. Here’s how:
1. Archiving Photos:
– Archiving photos in Google Photos is a great way to temporarily remove them from your main view without deleting them permanently. To archive a photo, select it and click on the three-dot menu. From the dropdown menu, choose “Archive.” The archived photo will be moved to a separate “Archive” section within Google Photos, where it can still be accessed if needed.
2. Viewing Archived Photos:
– To view your archived photos, click on the sidebar menu and select “Archive.” Here, you’ll find all the photos you’ve archived. You can browse through them, restore them to your main library, or permanently delete them if desired.
3. Restoring Archived Photos:
– If you want to bring back an archived photo to your main library, simply select it and click on the restore button. The photo will be moved back to its original location within Google Photos and will once again appear in your regular view.
4. Deleting Photos:
– If you want to permanently delete a photo from your Google Photos library, you have two options:
– Option 1: Select the photo(s) you want to delete and click on the trash bin icon. The photo will be moved to the “Trash” folder, where it will stay for 60 days before being automatically deleted. You can access the “Trash” folder by clicking on the sidebar menu and selecting “Trash.” From there, you can choose to permanently delete the photo(s) immediately or restore them back to your library.
– Option 2: Open the photo you want to delete and click on the three-dot menu. Choose “Delete from library,” and the photo will be immediately and permanently deleted, bypassing the “Trash” folder. Exercise caution when using this option, as there is no way to recover a photo deleted in this manner.
5. Emptying the Trash:
– To permanently delete all photos in the “Trash” folder, click on the three-dot menu within the “Trash” section and choose “Empty trash.” This action will permanently remove all photos in the “Trash” folder, freeing up storage space.
By utilizing the archiving and deleting features of Google Photos, you can keep your photo library organized and clutter-free. Archiving allows you to temporarily hide photos from your main view, while deleting permanently removes them. With these options, you have full control over the management of your photos.
Now, let’s explore some common troubleshooting issues you may encounter while using Google Photos.
Troubleshooting Common Issues with Google Photos
While Google Photos is a powerful and user-friendly platform, you may encounter a few common issues from time to time. Luckily, most of these issues can be resolved with a few simple troubleshooting steps. Here are some troubleshooting tips for common issues you may encounter with Google Photos:
1. Syncing Issues:
– If you’re experiencing problems with syncing your photos across devices, ensure that you are connected to a stable internet connection. Check if the photos you want to sync are backed up properly in your Google Photos settings. Restarting your device or signing out and back into your Google account can also help resolve syncing issues.
2. Storage Space:
– If you receive notifications that your storage space is full, consider deleting unnecessary photos, videos, or files. You can access your storage settings in Google Photos to see a breakdown of your storage usage and manage it accordingly.
3. Troublesome Uploads:
– If you encounter issues while uploading photos, ensure that you have a reliable internet connection. Check if you have sufficient storage space available in your Google account. You can also try uploading the photos using the Google Photos app instead of the web browser or vice versa.
4. Missing Photos:
– If you’re unable to find specific photos in your Google Photos library, ensure that you’re searching for the correct keywords or tags. Double-check if the photos have been accidentally deleted or moved to the “Archive” or “Trash” folders. If you have multiple Google accounts, make sure you’re signed in with the correct account.
5. Editing Issues:
– If you encounter difficulties while editing photos, ensure that you’re using an updated version of the Google Photos app or web browser. Try clearing your cache and restarting the app or browser. If a specific editing feature is not working, make sure it’s supported on your device or browser.
6. Sharing Problems:
– If you experience issues while sharing photos or albums, check your internet connection and ensure that you’re signed in to the correct Google account. Verify that you have the necessary permissions to share with the intended recipients. If sharing via a link, confirm that the link hasn’t expired or been revoked.
7. Slow Performance or Crashes:
– If Google Photos is running slowly or continuously crashing, make sure you have the latest version of the app or web browser. Restarting your device or clearing cache may improve performance. If the issue persists, try uninstalling and reinstalling the app or using a different web browser.
If the troubleshooting tips provided above don’t resolve your issue, you may consider reaching out to Google Photos support for further assistance. They can provide specific guidance based on your situation and help resolve any persistent problems you’re experiencing.
Google Photos is continually improving its platform, and any issues you encounter are likely to be resolved through software updates and enhancements. By familiarizing yourself with troubleshooting techniques and staying updated with the latest version, you can ensure a smooth and enjoyable experience while using Google Photos.
Now that we’ve covered some common troubleshooting issues, let’s wrap up our guide to Google Photos.
Conclusion
Google Photos is a powerful and versatile platform that offers a multitude of features to help you store, organize, and share your precious memories. Whether you’re a professional photographer, a travel enthusiast, or someone who simply loves capturing special moments, Google Photos has something to offer everyone.
In this guide, we’ve covered the essentials of accessing Google Photos, whether it’s through a web browser or the mobile app. We’ve explored how to upload and manage your photos, including creating albums, adding tags, and utilizing Google’s search capabilities.
We’ve also delved into the editing and enhancing features of Google Photos, empowering you to make your photos truly shine. From basic adjustments to advanced edits, filters, and even portrait mode adjustments, Google Photos provides an array of tools to take your photos to new heights.
Additionally, we highlighted the convenience of sharing and collaborating on Google Photos. Whether you’re sharing individual photos, collaborating on albums, or utilizing shared libraries, Google Photos makes it easy to connect with others and relive memories together.
We also discussed how you can efficiently manage your photo collection by archiving or deleting photos. These options provide flexibility, allowing you to temporarily hide photos or permanently remove them, keeping your library organized and clutter-free.
And of course, we didn’t forget to address common troubleshooting issues with Google Photos. By following the provided troubleshooting tips and keeping your app and devices up to date, you can quickly resolve any issues that may arise.
Overall, Google Photos offers a seamless and user-friendly experience for storing, organizing, editing, and sharing your photos. With its powerful features and intuitive interface, it’s no wonder why millions of users choose Google Photos as their go-to platform for preserving their cherished memories.
Now that you’re equipped with the knowledge and tools to make the most out of Google Photos, it’s time to unleash your creativity, connect with loved ones, and relive your most cherished memories. So grab your camera, start snapping photos, and let Google Photos be your companion in preserving and showcasing your unique visual journey.