Introduction
Welcome to the exciting world of Battle.net! Whether you’re a passionate gamer or a casual player, Battle.net provides a platform for you to access a wide range of games developed by Blizzard Entertainment. However, sometimes the download speed can be a bit slow, and waiting for your favorite games to download can feel like an eternity.
Fortunately, there are several techniques you can employ to speed up your game downloads on Battle.net. In this article, we will explore a variety of tips and tricks that can help you optimize your download speed so that you can get into the action faster.
Before we dive into the details, it’s important to note that your download speed can be influenced by various factors, such as your internet connection, computer specifications, and the overall network traffic. While these tips won’t magically transform your download speed to lightning-fast levels, they can certainly help significantly improve the time it takes to download games on Battle.net.
So, if you’re ready to boost your download speed and start enjoying your games without the long wait times, let’s get started with our top tips and tricks!
Check Your Internet Connection
The first and most crucial step in improving your download speed on Battle.net is to ensure that you have a stable and reliable internet connection. Even a minor issue with your connection can significantly impact your download speed. Here are some steps you can take to check your internet connection:
- Restart Your Router: Sometimes, simply restarting your router can resolve connectivity issues. Turn off the router, wait for a few seconds, and then turn it back on. This can refresh the connection and help improve your download speed.
- Connect via Ethernet: If you’re using a Wi-Fi connection, consider switching to an Ethernet cable if possible. Wired connections tend to be more stable and offer faster speeds compared to wireless connections, especially if you’re far away from the router or experiencing interference.
- Run Speed Tests: Conducting speed tests using online tools can give you a clearer picture of your internet speed. These tests measure your download and upload speeds, as well as ping or latency. If the results are lower than your usual speeds, contact your internet service provider (ISP) to investigate and resolve any issues.
- Limit Network Usage: If you have multiple devices connected to your network, they may be consuming bandwidth and affecting your download speed. Consider temporarily disabling or limiting the usage on other devices to prioritize the download speed for your Battle.net client.
By ensuring that your internet connection is stable and optimized, you pave the way for smoother and faster downloads on Battle.net. Now that we’ve covered checking your internet connection, let’s move on to the next step: closing unnecessary programs and background processes.
Close Unnecessary Programs and Background Processes
When downloading games on Battle.net, having unnecessary programs and background processes running on your computer can hog system resources and slow down your download speed. Closing these programs and processes can help optimize your computer’s performance and improve your download speed. Follow these steps to close unnecessary programs and processes:
- Close Resource-Intensive Programs: Identify any resource-intensive programs, such as video editing software or graphics-intensive games, and close them before initiating your Battle.net download. These programs consume valuable system resources and can negatively impact your download speed.
- Disable Startup Programs: Some programs automatically launch when you start your computer, consuming resources in the background. Disabling unnecessary startup programs can free up resources and improve your system’s performance. To disable startup programs, access the Task Manager (Ctrl+Shift+Esc), navigate to the “Startup” tab, and disable any programs that you don’t need to run at startup.
- End Background Processes: Many processes run in the background, even if you’re not actively using certain programs. Some of these processes can hog system resources and affect your download speed. To end background processes, open the Task Manager and navigate to the “Processes” tab. Identify processes that are not essential and end them by right-clicking and selecting “End Task.”
- Disable System Maintenance Tasks: System maintenance tasks, such as Windows updates or antivirus scans, can occur in the background and affect your download speed. Temporarily disable these tasks or schedule them for a later time when you’re not actively downloading games on Battle.net.
By closing unnecessary programs and ending background processes, you can free up system resources and ensure that your computer is dedicated to the Battle.net download process. This can lead to faster download speeds and a more seamless gaming experience. Now that we’ve covered closing unnecessary programs and background processes, let’s move on to the next step: clearing Battle.net cache.
Clear Battle.net Cache
Over time, Battle.net accumulates cache files, which can affect its performance and potentially lower your download speed. Clearing the cache can help optimize the Battle.net client and improve your download experience. Follow these steps to clear the Battle.net cache:
- Exit Battle.net: Make sure to close the Battle.net client completely before proceeding.
- Navigate to Cache Folder: Open File Explorer (Windows Explorer) and paste the following file path in the address bar:
%ProgramData%\Battle.net. This will take you to the Battle.net cache folder. - Delete Cache Files: Once you’re inside the Battle.net cache folder, select all the files and folders within it and delete them. Note that you may need administrator permissions to delete these files.
By clearing the Battle.net cache, you remove any unnecessary files that may be slowing down the client’s performance. This allows Battle.net to start fresh and potentially improve your download speed. Now that we’ve covered clearing the Battle.net cache, let’s move on to the next step: adjusting the download rate.
Adjust Download Rate
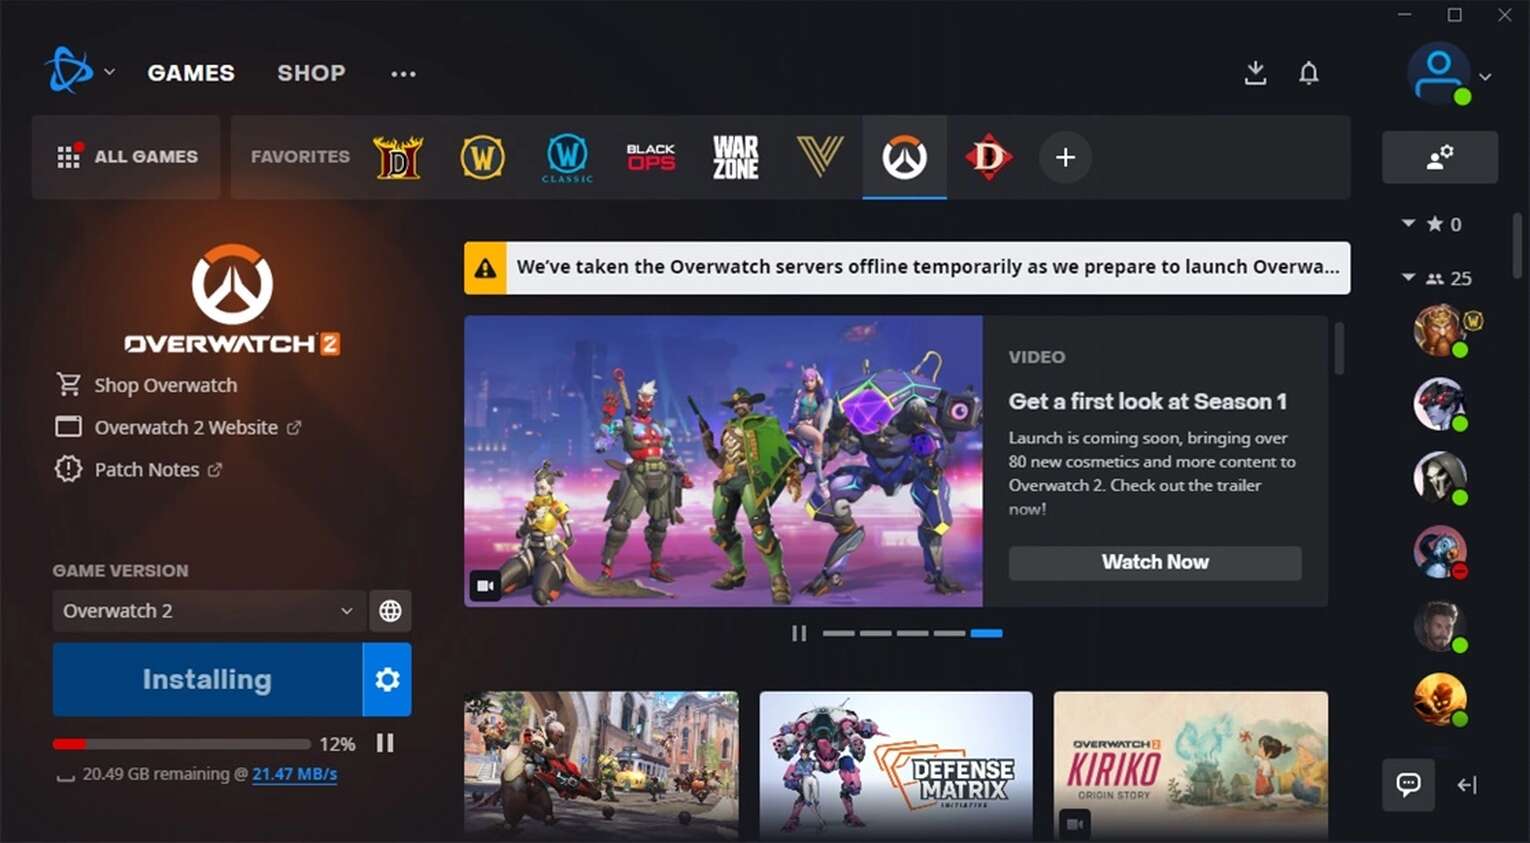
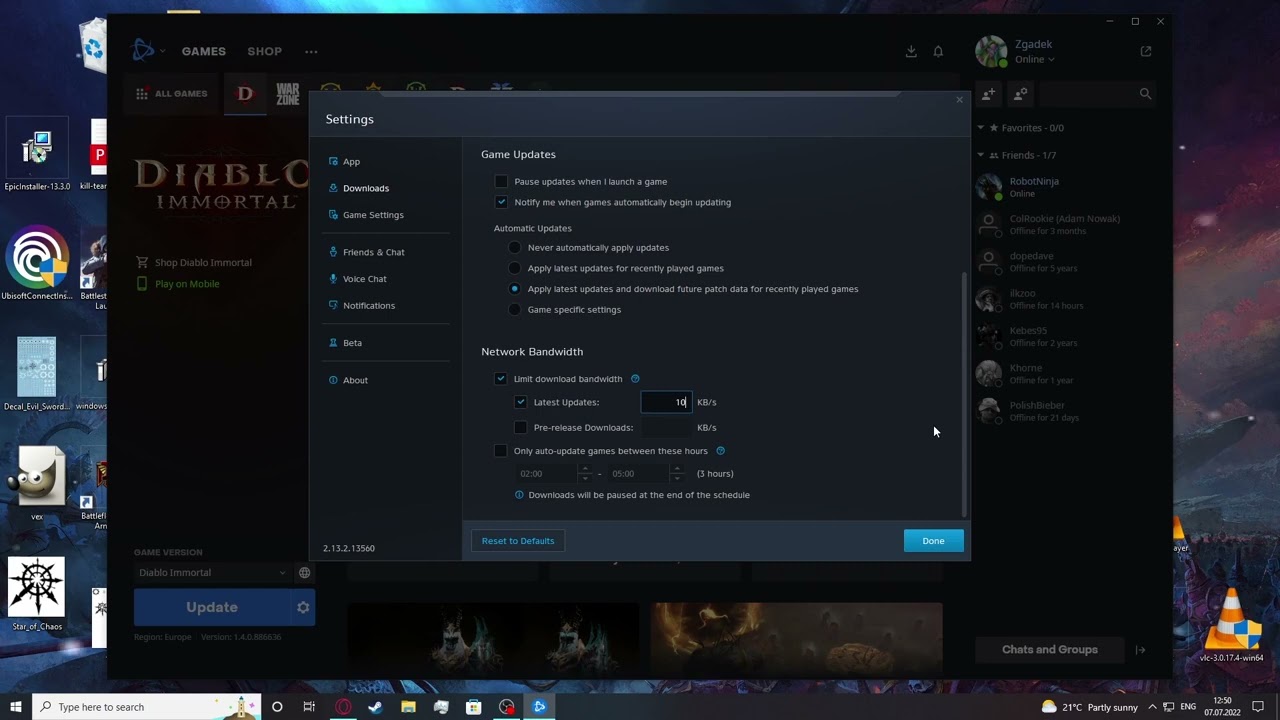
If you’re experiencing slow download speeds on Battle.net, adjusting the download rate settings can potentially improve your download speed. Battle.net allows you to customize the download rate to suit your preferences and internet connection capabilities. Follow these steps to adjust the download rate:
- Launch Battle.net: Open the Battle.net client on your computer.
- Access Settings: Click on the “Battle.net” menu located on the top-left corner of the client and select “Settings.”
- Navigate to Game Install/Update: In the settings menu, click on the “Game Install/Update” tab.
- Adjust Download Rate: Under the “Download Rate” section, use the slider or input a specific download rate that suits your internet connection. You can adjust it to a higher rate for faster downloads or a lower rate if you want to conserve bandwidth for other activities.
- Click Apply: After adjusting the download rate, click “Done” to save your changes.
By adjusting the download rate, you can fine-tune Battle.net to utilize your internet connection’s capabilities effectively. This can potentially result in faster download speeds and a more efficient download process. Now that we’ve covered adjusting the download rate, let’s move on to the next step: disabling peer-to-peer downloads.
Disable Peer-to-Peer Downloads
In addition to the default download method, Battle.net utilizes peer-to-peer (P2P) technology to distribute game updates and downloads. While P2P downloads can be beneficial in certain cases, they can also impact download speeds, especially if you have a slow or unreliable internet connection. Disabling P2P downloads can potentially improve your download speed. Follow these steps to disable peer-to-peer downloads:
- Launch Battle.net: Open the Battle.net client on your computer.
- Access Settings: Click on the “Battle.net” menu located on the top-left corner of the client and select “Settings.”
- Navigate to Game Install/Update: In the settings menu, click on the “Game Install/Update” tab.
- Disable Peer-to-Peer: Under the “Peer-to-Peer” section, toggle off the option that says “Allow Peer-to-Peer Transfer.”
- Click Apply: After disabling peer-to-peer downloads, click “Done” to save your changes.
By disabling peer-to-peer downloads, you rely solely on the Battle.net servers to download game updates and files. This may help improve your download speed, especially if you have a slow or congested network. Now that we’ve covered disabling peer-to-peer downloads, let’s move on to the next step: changing the region.
Change Region
If you’re experiencing slow download speeds on Battle.net, changing your region can potentially improve the download speed by accessing different server locations. Battle.net allows you to switch regions, and selecting a region closer to your location or one with less network congestion can lead to faster download speeds. Follow these steps to change your region:
- Launch Battle.net: Open the Battle.net client on your computer.
- Access Settings: Click on the “Battle.net” menu located on the top-left corner of the client and select “Settings.”
- Navigate to Game Install/Update: In the settings menu, click on the “Game Install/Update” tab.
- Change Region: Under the “Region” section, select a different region from the drop-down menu.
- Click Apply: After changing the region, click “Done” to save your changes.
By changing the region, you’re connecting to Battle.net servers that are geographically closer or less congested, potentially resulting in faster download speeds. It’s important to note that changing regions may not always lead to significant speed improvements, as it also depends on the specific server conditions and network traffic at the time. Now that we’ve covered changing the region, let’s move on to the next step: using an Ethernet connection instead of Wi-Fi.
Use Ethernet Connection Instead of Wi-Fi
If you’re experiencing slow download speeds on Battle.net, one of the factors that can affect your internet performance is the type of connection you’re using. While Wi-Fi is convenient, it can sometimes be less stable and slower compared to an Ethernet connection. Switching to an Ethernet connection can potentially improve your download speed. Here’s how you can do it:
- Locate Your Ethernet Port: Find the Ethernet port on your computer or laptop. It is usually located on the back or side of the device and looks like a slightly larger version of a phone jack.
- Connect the Ethernet Cable: Take one end of the Ethernet cable and insert it into the Ethernet port on your computer. Then, connect the other end to your router or modem.
- Disable Wi-Fi: To ensure that your computer uses the Ethernet connection and not Wi-Fi, you may need to disable the Wi-Fi on your device. This can usually be done through the network settings on your computer.
- Restart Battle.net: After connecting to the Ethernet, restart the Battle.net client to ensure that it recognizes and utilizes the faster and more stable connection.
By using an Ethernet connection instead of Wi-Fi, you eliminate potential interruptions and interferences that can occur with wireless connections. This can result in improved download speeds on Battle.net. However, it’s important to note that this option may not be available for every device or in every situation. Now that we’ve covered using an Ethernet connection, let’s move on to the next step: temporarily disabling your firewall and antivirus software.
Disable Firewall and Antivirus Temporarily
Firewall and antivirus software play a crucial role in protecting your computer from threats, but sometimes they can interfere with the download process and slow down your download speeds on Battle.net. Temporarily disabling these security measures can help improve your download speed. Here’s how you can do it:
- Open Firewall Settings: Go to the Control Panel on your computer and search for “Firewall.” Click on the “Windows Defender Firewall” option.
- Turn Off Firewall: In the Windows Defender Firewall settings, click on “Turn Windows Defender Firewall on or off.” Select both the “Turn off Windows Defender Firewall” options for private and public networks. Click “OK” to save the changes.
- Disable Antivirus Software: Locate your antivirus software icon in the system tray or taskbar. Right-click on the icon and look for an option to temporarily disable or turn off the antivirus protection. Follow the prompts to disable it.
- Restart Battle.net: After disabling the firewall and antivirus software, restart the Battle.net client to ensure that any changes take effect.
By temporarily disabling the firewall and antivirus software, you reduce the likelihood of these security measures interrupting the download process. However, it’s important to remember that this exposes your computer to potential risks, so make sure to re-enable your firewall and antivirus software once the download is complete.
Now that we’ve covered disabling the firewall and antivirus software, let’s move on to the next step: upgrading your internet plan.
Upgrade Your Internet Plan
If you’ve tried all the previous steps and you’re still experiencing slow download speeds on Battle.net, it might be worth considering upgrading your internet plan. A faster internet connection can significantly improve your download speed and overall gaming experience. Here are some factors to consider when upgrading your internet plan:
- Check Available Internet Speeds: Contact your internet service provider to inquire about the available internet plans in your area and the maximum download speeds they offer. Compare different plans to determine which one best suits your needs.
- Consider Higher Bandwidth: Bandwidth determines the amount of data that can be transmitted within a specific period. Look for internet plans that offer higher bandwidth, as this can support faster download speeds and accommodate multiple devices simultaneously.
- Assess Upload Speeds: While download speeds are important, don’t overlook the upload speeds. If you plan on streaming or participating in online gaming, a higher upload speed can provide a smoother experience.
- Ask About Data Caps: Some internet plans may have data caps, meaning there’s a limit to how much data you can download or upload each month. Consider plans with higher or unlimited data allowances to avoid restrictions on your gaming and downloads.
- Check for Fiber Optic or Cable Internet: Fiber optic and cable internet connections are known to provide faster and more stable speeds compared to DSL or satellite connections. If available in your area, consider upgrading to a fiber optic or cable internet plan.
Upgrading your internet plan can be a worthwhile investment if you’re serious about improving your download speeds on Battle.net. However, it’s essential to consider your budget and weigh the cost against the potential benefits. Now that we’ve covered upgrading your internet plan, let’s conclude our discussion.
Conclusion
Improving the download speed on Battle.net is essential for getting into the game faster and minimizing wait times. By following the tips and techniques discussed in this article, you can optimize your download speed and enhance your overall gaming experience. Here’s a quick recap of the steps we covered:
- Check your internet connection to ensure it’s stable and reliable.
- Close unnecessary programs and background processes to free up system resources.
- Clear the Battle.net cache to improve client performance.
- Adjust the download rate in Battle.net settings to optimize your connection.
- Disable peer-to-peer downloads to bypass potential slowdowns.
- Consider changing your region for access to different server locations.
- Use an Ethernet connection instead of Wi-Fi for a more stable connection.
- Temporarily disable your firewall and antivirus software to eliminate potential interruptions.
- Upgrade your internet plan to access faster speeds and higher bandwidth.
Keep in mind that the effectiveness of these steps can vary depending on your specific internet connection, computer specifications, and network conditions. It’s always recommended to consult with your internet service provider and consider professional advice if you continue to experience persistent download speed issues.
Now that you’re armed with these techniques, go ahead and apply them to speed up your game downloads on Battle.net. Enjoy the world of gaming without long wait times, and may your gaming adventures be filled with excitement and enjoyment!