Introduction
Are you tired of waiting for ages for Overwatch to load? Do you experience lag and stuttering during gameplay? If so, it might be time to consider moving Overwatch to a solid-state drive (SSD). With faster read and write speeds, SSDs can significantly improve the performance of your favorite game.
Overwatch is a highly popular team-based first-person shooter game developed by Blizzard Entertainment. It features intense multiplayer matches with stunning graphics and fast-paced action. However, running the game on a traditional hard disk drive (HDD) can sometimes result in long load times and decreased performance.
In this guide, we will walk you through the steps to move Overwatch to a solid-state drive, boosting its performance and reducing load times. We will also provide tips to ensure compatibility and help you choose the right SSD for your needs. So, grab your gear and let’s dive into the world of faster gaming!
Step 1: Ensure Compatibility
Before diving into the process of moving Overwatch to an SSD, it’s important to ensure compatibility between your system and the new drive. Start by checking if your computer supports SSD installation. Most modern computers have a SATA interface, which is compatible with SSDs. However, it’s always a good idea to double-check the specifications of your system or consult the manufacturer’s website.
Next, consider the storage capacity of the SSD. Overwatch requires a significant amount of storage space, so make sure the new drive can accommodate the game’s size along with any additional future updates. A general rule of thumb is to have at least double the amount of free space available on the SSD compared to the current size of the game.
It’s also crucial to determine the type of SSD that will work best for your system. There are two main types of SSDs: SATA and NVMe. SATA SSDs connect via the traditional SATA cables, while NVMe SSDs use the M.2 slot on the motherboard. NVMe SSDs offer faster speeds, but they require a compatible motherboard with an M.2 slot. Ensure that your motherboard supports NVMe before purchasing one.
Lastly, check the power supply of your system. SSDs consume less power than traditional HDDs, but it’s important to make sure your power supply unit (PSU) can handle the additional power requirements. Upgrading your PSU might be necessary if you’re also planning to add other components or peripherals to your system.
By ensuring compatibility between your system and the SSD, you’ll be ready to move forward with the process of improving your Overwatch gaming experience. Let’s move on to the next step, where we’ll guide you in choosing the right SSD for your needs.
Step 2: Choose the Right SSD
Choosing the right SSD for your Overwatch gaming needs is crucial to ensure optimal performance and longevity. With a wide variety of options available in the market, it’s important to consider some key factors before making a purchase.
The first consideration is the storage capacity of the SSD. Overwatch is constantly evolving with updates and additional content, so it’s recommended to choose an SSD with ample space to accommodate the game along with any future updates. A storage capacity of at least 500GB is recommended to provide enough room for the game and other applications.
Next, consider the speed and performance of the SSD. Look for SSDs with high read and write speeds, as this will significantly reduce load times and improve overall game performance. While SATA SSDs offer a significant speed boost over traditional HDDs, NVMe SSDs provide even faster speeds due to their advanced technology. If your system supports NVMe, opting for an NVMe SSD can further enhance your gaming experience.
Reliability is another important factor to consider when choosing an SSD. Look for reputable brands that have a track record of producing reliable and durable SSDs. Reading customer reviews and checking reliability ratings can provide valuable insights into the quality and longevity of a particular SSD model.
Lastly, take budget into consideration. SSDs come in a range of prices, so it’s important to find a balance between performance, storage capacity, and cost. Determine your budget and seek SSD options that meet your requirements without breaking the bank. Remember, investing in a quality SSD can significantly improve your gaming experience and is a worthwhile investment in the long run.
Once you have considered these factors and have selected the right SSD for your system, you are ready to proceed to the next step: preparing your SSD for the Overwatch installation.
Step 3: Prepare Your SSD
Before you can begin moving Overwatch to your SSD, it’s important to properly prepare the drive for installation. Here are the necessary steps to get your SSD ready:
- Connect the SSD: If you have a desktop computer, locate an available SATA data port on your motherboard and connect one end of a SATA cable to it. Connect the other end of the cable to your SSD. If you have an NVMe SSD, insert it into the M.2 slot on your motherboard.
- Power Connection: If you are using a SATA SSD, connect the SATA power cable from your power supply unit (PSU) to the SSD. NVMe SSDs don’t require a separate power connection.
- Boot Priority: Access your system’s BIOS or UEFI settings by pressing the designated key during startup (usually Del, F2, or F12). Set the boot priority to ensure that your computer will boot from the new SSD. Save the changes and exit the BIOS/UEFI settings.
- Format the SSD: Once your computer boots up, open the Disk Management tool in Windows by searching for “disk management” in the Start menu. Locate your SSD in the list of drives, and if necessary, format it to prepare it for Overwatch installation. Follow the on-screen prompts to format the drive to the desired file system (usually NTFS).
- Assign a Drive Letter: Right-click on the formatted SSD and select “Change Drive Letter and Paths”. Choose an available drive letter to assign to the SSD. This will allow your computer to recognize the drive.
- Verify SSD Status: To ensure that your SSD is functioning properly, you can use SSD health monitoring software to check its health and performance. This will help identify any potential issues before moving forward with the installation.
By following these steps, you have successfully prepared your SSD for Overwatch installation. The next step will guide you through backing up your Overwatch data to ensure that no progress or game settings are lost during the transition.
Step 4: Back Up Your Overwatch Data
Before proceeding with the installation of Overwatch on your new SSD, it’s crucial to back up your game data to ensure that no progress or game settings are lost during the transition. Here’s how to back up your Overwatch data:
- Locate Overwatch Game Folder: Open the File Explorer on your computer and navigate to the folder where Overwatch is currently installed. By default, the folder is located in the “Program Files (x86)” directory for 64-bit systems or the “Program Files” directory for 32-bit systems. Find the “Overwatch” folder within the designated directory.
- Create Backup Folder: Create a new folder on your external storage device, such as an external hard drive or USB flash drive. Name the folder something easily identifiable, like “Overwatch Backup” to avoid confusion.
- Copy Game Files: Select all the files and folders within the Overwatch game folder, right-click, and choose “Copy”. Navigate to the backup folder you created on your external storage device, right-click inside the folder, and choose “Paste” to transfer all the game files.
- Backup Game Settings: Overwatch has various in-game settings, including key bindings, graphics settings, and custom configurations. To back up these settings, navigate to the “Documents” folder on your computer and locate the “Overwatch” folder. Copy this folder to the backup location, preserving your game settings.
By following these steps, you have successfully backed up your Overwatch game data and settings. This ensures that you can restore your progress and preferences once the game is installed on your new SSD. With your data safely backed up, it’s time to proceed to the next step: uninstalling Overwatch from its current location.
Step 5: Uninstall Overwatch from Current Location
Now that you have backed up your Overwatch game data and settings, it’s time to uninstall the game from its current location on your computer. Here’s how to do it:
- Open Control Panel: Go to the Start menu and search for “Control Panel”. Open the Control Panel application.
- Select “Uninstall a Program”: In the Control Panel, click on the “Uninstall a program” option under the “Programs” category. This will display a list of all the installed programs on your computer.
- Locate Overwatch: Scroll through the list of installed programs and find “Overwatch”. Click on it to highlight it.
- Click “Uninstall”: With Overwatch selected, click on the “Uninstall” button either on the top menu or by right-clicking on Overwatch and selecting “Uninstall”.
- Follow the Uninstall Wizard: The uninstallation process for Overwatch will begin, and you will be guided through an uninstall wizard. Follow the prompts to complete the uninstallation. Ensure that you select the option to delete any remaining files or folders associated with Overwatch.
- Reboot Your Computer: Once the uninstallation process is complete, restart your computer to ensure that any remaining Overwatch files or settings are fully removed.
By following these steps, you have successfully uninstalled Overwatch from its current location on your computer. The game is now ready to be installed on your new SSD. Proceed to the next step to learn how to install Overwatch on your SSD and enjoy improved performance.
Step 6: Install Overwatch on New SSD
With your Overwatch game data backed up and the game uninstalled from its previous location, it’s time to install Overwatch on your new SSD. Follow these steps to get the game up and running:
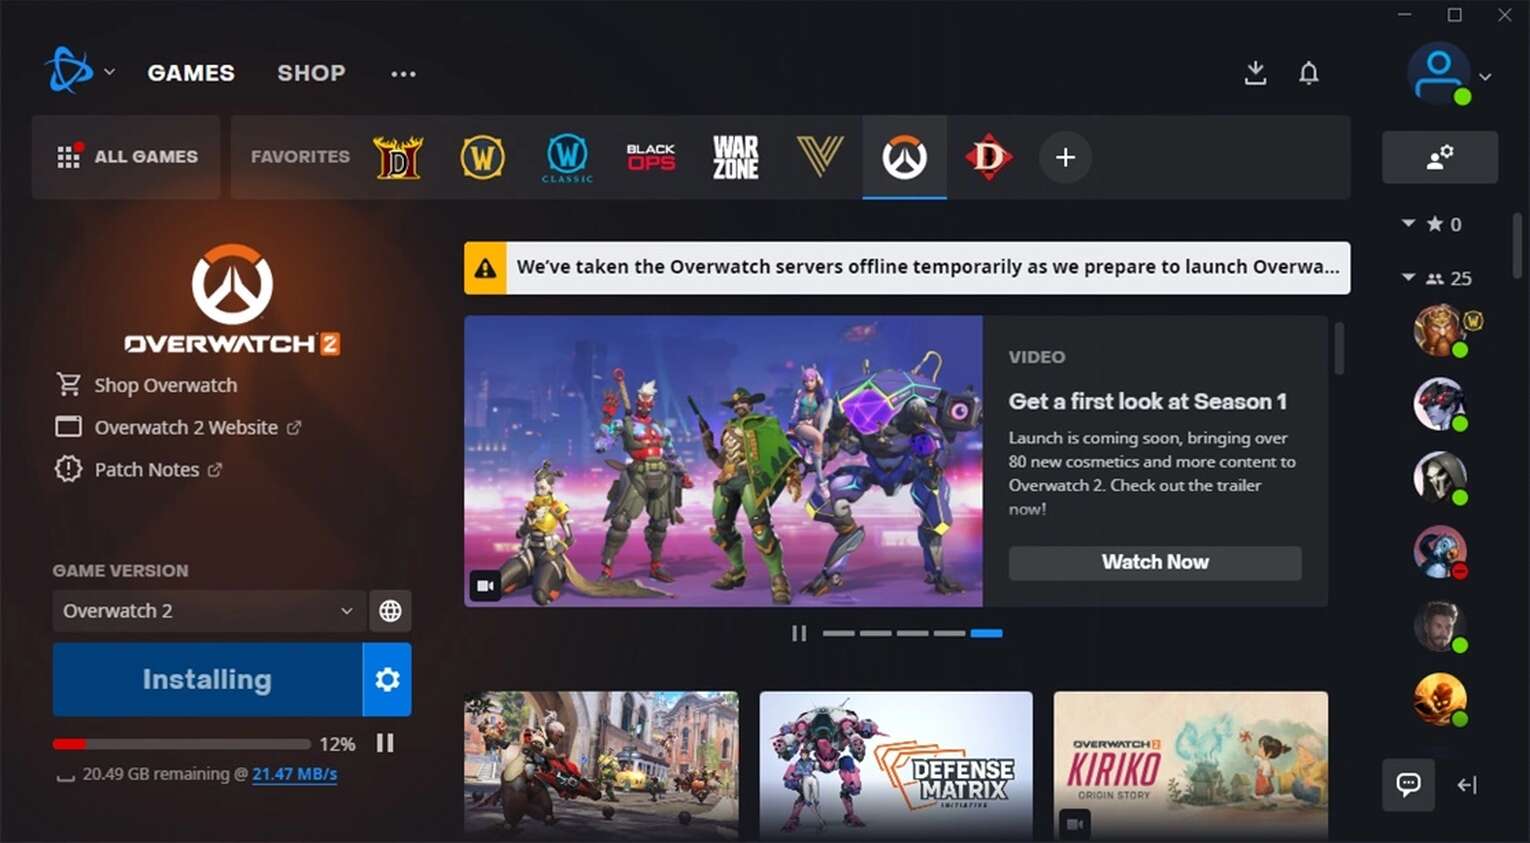
- Open the Blizzard Battle.net App: Launch the Blizzard Battle.net app on your computer. If you don’t have it installed, visit the Blizzard website and download it.
- Sign In to Your Blizzard Account: Enter your Blizzard account credentials to log in to the app.
- Navigate to Overwatch: In the Blizzard Battle.net app, click on the “Games” tab at the top of the window. Then, locate and select “Overwatch” from the list of available games.
- Click “Install”: On the Overwatch game page, click on the “Install” button. The app will prompt you to choose an installation directory.
- Choose the New SSD: Browse to find and select the new SSD drive where you want to install Overwatch. Click “Select Folder” or “OK” to confirm the installation directory.
- Begin Installation: Once you have selected the new SSD as the installation directory, click the “Install” button to start the installation process. The Blizzard Battle.net app will begin downloading and installing Overwatch on the new SSD.
- Wait for Installation: Allow the app some time to download and install Overwatch on your new SSD. The installation time will vary depending on the speed of your internet connection and the performance of your new SSD.
- Launch Overwatch: Once the installation is complete, click on the “Play” button in the Blizzard Battle.net app to launch Overwatch from your new SSD. Enjoy the improved loading times and performance!
By following these steps, you have successfully installed Overwatch on your new SSD. The game is now ready for you to jump back into the action. In the next step, we will guide you through updating Overwatch and your graphics drivers to ensure optimal performance.
Step 7: Update Overwatch and Drivers
Once you have installed Overwatch on your new SSD, it’s important to update both the game and your graphics drivers to ensure optimal performance. Follow these steps to keep everything up to date:
- Launch the Blizzard Battle.net App: Open the Blizzard Battle.net app on your computer.
- Check for Overwatch Updates: In the Blizzard Battle.net app, click on the “Games” tab at the top of the window. Look for the “Overwatch” icon and check if an update is available. If an update is available, click on the “Update” button to download and install the latest version of the game.
- Update Graphics Drivers: Visit the website of your graphics card manufacturer (such as NVIDIA or AMD) to download and install the latest graphics drivers for your system. Keeping your graphics drivers up to date can greatly improve the performance and stability of Overwatch.
- Restart Your Computer: After installing the game update and graphics driver update, it’s recommended to restart your computer. This will ensure that all changes take effect and any necessary system updates are applied.
Regularly updating Overwatch and your graphics drivers is essential for maintaining optimal performance and compatibility with the latest game features and enhancements. These updates often include bug fixes, performance improvements, and new features that can enhance your gaming experience.
Now that you have updated Overwatch and your graphics drivers, you’re all set to experience the game at its best on your new SSD. In the final step, we’ll test the game and enjoy the improved performance.
Step 8: Test and Enjoy Improved Performance
With Overwatch installed on your new SSD and all updates in place, it’s time to test the game and revel in the improved performance and faster loading times. Follow these steps to ensure everything is running smoothly:
- Launch Overwatch: Open the Blizzard Battle.net app and click on the “Play” button to launch Overwatch from your new SSD.
- Monitor Performance: Pay attention to the performance of the game as you navigate through menus and enter matches. Notice the improvement in loading times, smoother gameplay, and reduced lag, thanks to the SSD’s faster read and write speeds.
- Adjust Settings if Needed: Take the opportunity to fine-tune your graphics and gameplay settings in Overwatch. With improved performance, you may be able to raise certain graphical settings for enhanced visuals without sacrificing frame rates.
- Enjoy Gaming: Now that Overwatch is running smoothly on your new SSD, immerse yourself in the thrilling action and competitive matches this popular game has to offer. Experience faster load times, quicker map transitions, and improved responsiveness, all contributing to a more enjoyable gaming experience.
Remember to periodically update Overwatch and your graphics drivers to stay up to date with the latest features and optimizations. This will ensure that you continue to enjoy the benefits of improved performance on your SSD.
Congratulations! By completing these steps, you have successfully moved Overwatch to a solid-state drive, unlocking the full potential of the game and enhancing your gaming experience. So gather your friends, hop into the game, and have a blast playing Overwatch with improved speed and performance!
Conclusion
Moving Overwatch to a solid-state drive (SSD) is a game-changing decision that can greatly enhance your gaming experience. By ensuring compatibility, choosing the right SSD, preparing it properly, backing up your game data, uninstalling Overwatch, installing it on the new SSD, updating the game and graphics drivers, and finally, testing and enjoying the improved performance, you have taken the necessary steps to optimize your gameplay.
With an SSD, you can say goodbye to long loading times and hello to faster map transitions, improved frame rates, and reduced lag. The faster read and write speeds of an SSD result in snappier gameplay, allowing you to react quickly and stay ahead of the competition in intense matches. Additionally, the improved performance of Overwatch on an SSD can enhance the visual experience, making the vibrant maps and character models come to life.
Remember to regularly update Overwatch and your graphics drivers to ensure you are benefiting from the latest features and optimizations. Additionally, consider other ways to optimize your gaming setup, such as upgrading your graphics card or increasing your RAM, to further improve performance and stay competitive in the world of Overwatch.
So, strap on your gear, assemble your team, and dive back into the world of Overwatch with the confidence of improved performance on your SSD. Enjoy the thrilling action, immersive gameplay, and the smoothness that comes with an optimized gaming experience. Get ready to dominate the battlefield and rise up the ranks in this epic team-based first-person shooter.