Introduction
Welcome to this helpful guide on how to download a picture on a Chromebook. With the increasing popularity of Chromebooks as versatile and user-friendly devices, knowing how to save and manage images is essential for many users. Whether you need to download a picture for a project, personal use, or simply to share with others, this guide will provide you with step-by-step instructions to make the process simple and efficient.
A Chromebook is a laptop or tablet that runs on Chrome OS, a lightweight operating system developed by Google. One of the key features of Chromebooks is their seamless integration with cloud-based storage, such as Google Drive, which makes it easy to access and save files across multiple devices. However, downloading and managing pictures on a Chromebook might differ slightly from traditional computers, so it’s helpful to follow the steps outlined in this guide to ensure a smooth experience.
Whether you’re a student, professional, or casual user, being able to download and organize pictures on your Chromebook can enhance your productivity and creativity. From downloading images from websites to saving pictures from search engines, we’ll cover all the necessary steps to help you navigate this process with ease. Let’s dive in!
Finding the Picture You Want to Download
Before you can download a picture on your Chromebook, you first need to find the image you’re looking for. Fortunately, there are multiple ways to accomplish this, depending on your specific needs and preferences. Let’s explore some common methods:
- Browsing websites: If you have a particular website in mind that hosts the image you want to download, open your Chrome browser and navigate to the site. Once you’ve reached the desired webpage, locate the picture you want and right-click on it. A contextual menu will appear, giving you the option to “Save image as” or “Download image“. Click on the appropriate option, choose a destination folder to save the image, and click “Save”.
- Using search engines: If you don’t have a specific website in mind, you can use search engines like Google to find the picture you want. Open a new tab in your Chrome browser and go to your preferred search engine. Enter relevant keywords related to the image you’re looking for in the search bar, and press “Enter” or click on the search button. Browse through the search results and find the picture you want to download. Right-click on the image and select “Save image as” or “Download image”. Choose a destination folder to save the image and click “Save”.
- Searching Google Drive: If you have previously uploaded pictures to your Google Drive account and want to download them to your Chromebook, you can easily access and download them within your drive. Open a new tab in your Chrome browser and go to Google Drive (drive.google.com). Sign in to your Google account if you haven’t already. Locate the picture you want to download and right-click on it. From the contextual menu, select “Download”. The picture will be saved to your Chromebook’s default downloads folder.
By utilizing these methods, you can easily find the picture you want to download on your Chromebook. Whether you’re navigating websites, searching through search engines, or accessing your Google Drive, you’ll have no trouble locating the images you need. Now that you’ve found the picture, let’s proceed to the next step and learn how to download it.
Downloading a Picture from a Website
Downloading a picture from a website on your Chromebook is a straightforward process. Once you’ve found the desired image, you can save it to your device with just a few simple steps.
- Right-click on the image: On your Chromebook, navigate to the webpage that contains the picture you want to download. Once you’ve located the image, perform a right-click on it. This will bring up a contextual menu with various options.
- Select “Save image as” or “Download image”: In the contextual menu, you’ll see the options to “Save image as” or “Download image.” Click on the appropriate option. This will initiate the download process.
- Choose a destination folder: After selecting “Save image as” or “Download image,” a new window will appear, allowing you to choose the location where you want to save the picture. You can select an existing folder or create a new one by clicking on the “New folder” button. It’s recommended to choose a location that is easy to remember and access later on.
- Click “Save”: Once you’ve chosen the destination folder, click on the “Save” button to begin downloading the picture. The image will be saved to the specified location on your Chromebook.
It’s worth noting that the exact wording and appearance of the options in the contextual menu might vary slightly depending on the website and browser you are using. However, the general process remains the same across different websites and browsers.
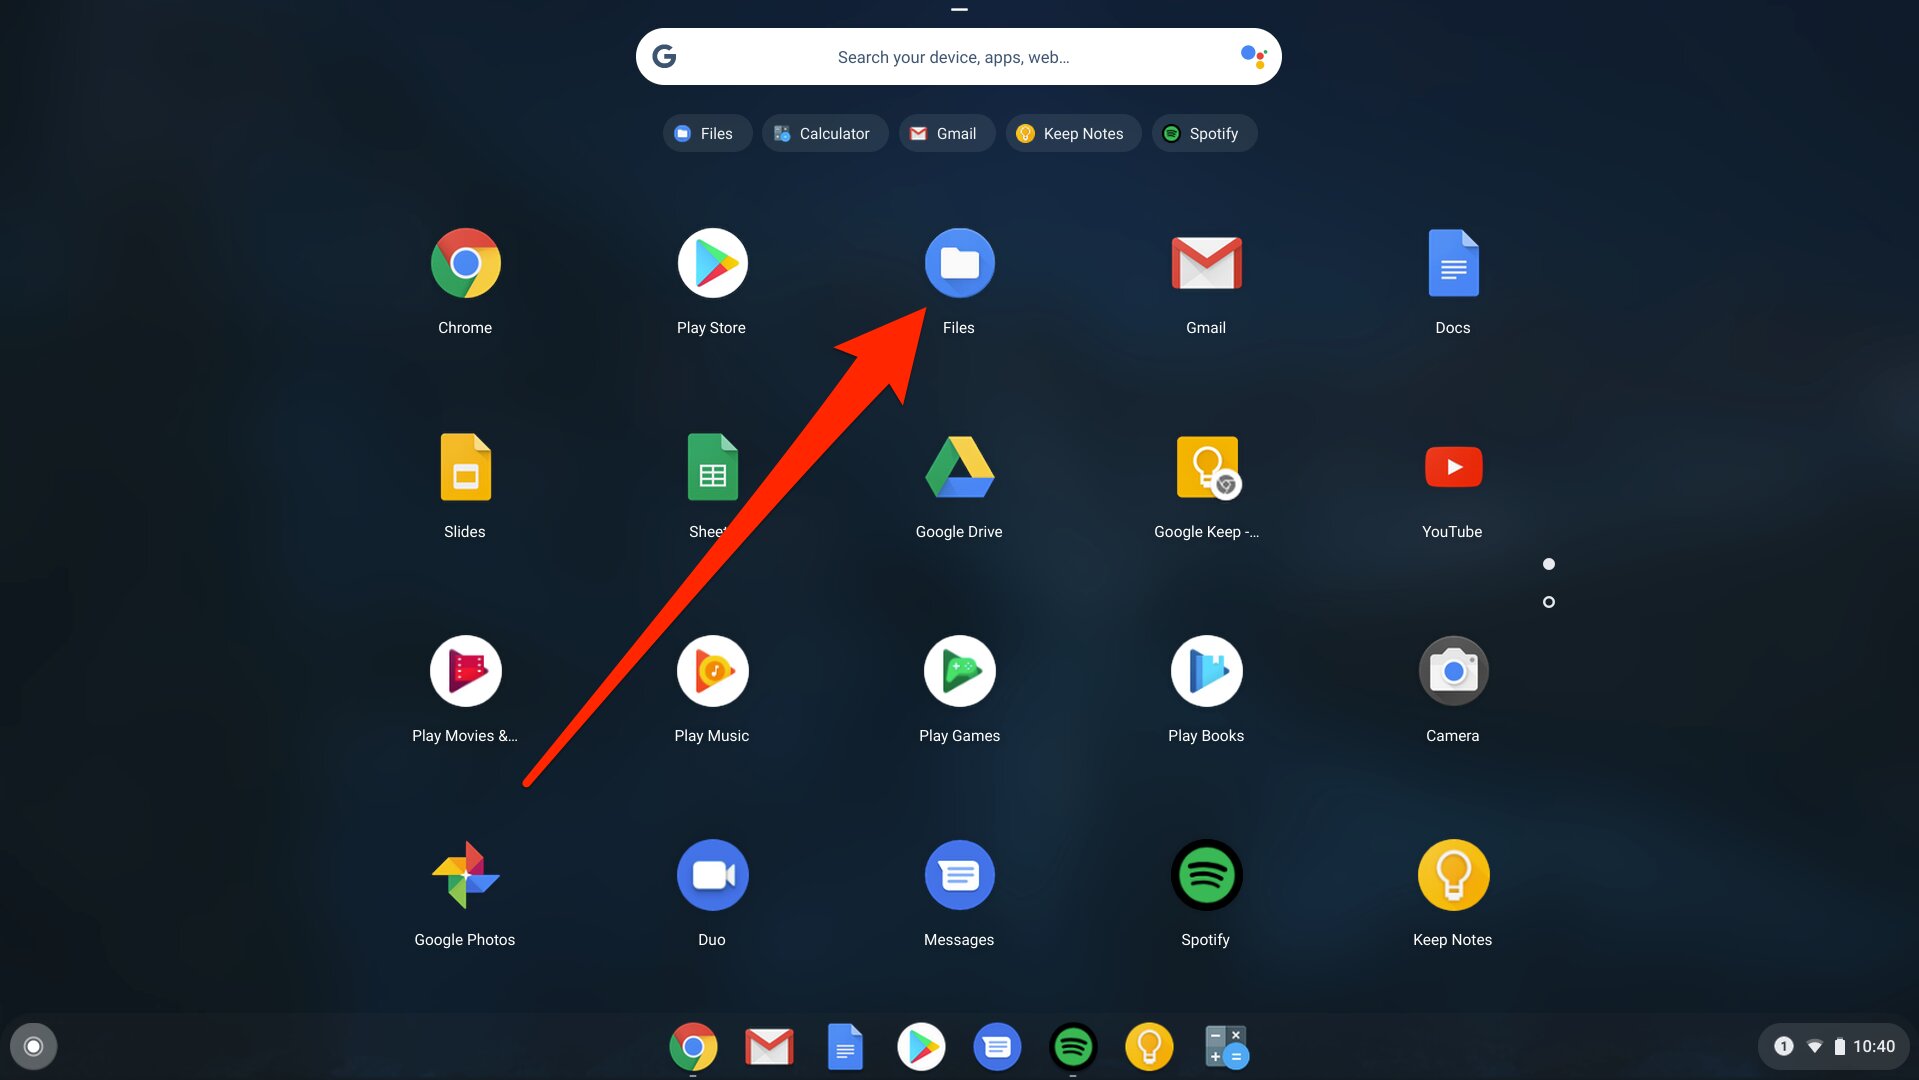
After downloading the picture, you can access it by opening the “Files” app on your Chromebook. From there, navigate to the folder where you saved the image, and you’ll be able to view and manage it as needed.
Downloading pictures from websites is a convenient way to gather visual content for various purposes, such as presentations, projects, or personal use. By following these simple steps, you can easily save any picture you come across while browsing the web on your Chromebook.
Saving an Image from a Search Engine
If you’re using a search engine like Google to find the image you want to save on your Chromebook, the process of saving the image is slightly different from downloading it directly from a website. However, it’s still a simple and quick process. Let’s go through the steps:
- Conduct a search: Open your Chrome browser and navigate to your preferred search engine. Enter relevant keywords related to the image you want to save in the search bar, and press “Enter” or click on the search button.
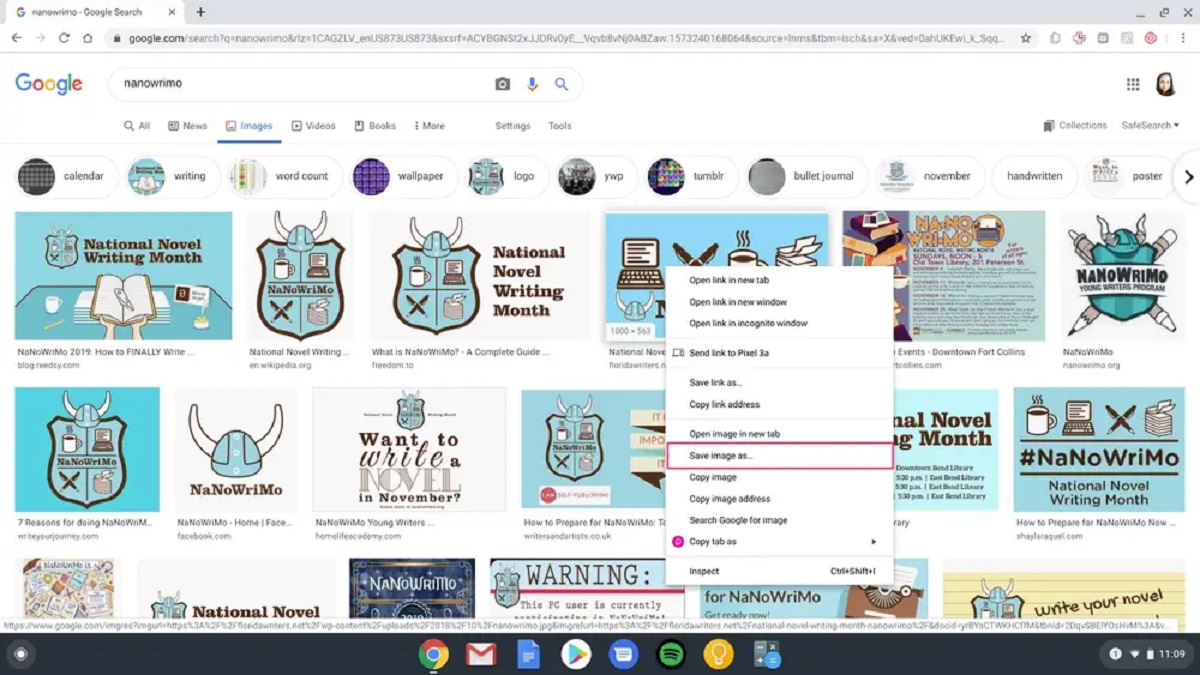
- Find the image: Browse through the search results until you find the picture you want to save. Search engines often display a mix of image search results, website links, and other related content. Look for the image specifically and click on it.
- View the full-size image: Clicking on the image from the search results will usually show a preview or thumbnail version. To save the full-size image, right-click on the preview or thumbnail and select “Open image in new tab” or “Open image in new window.” This will open the image in a new tab or window.
- Save the image: Once the full-size image is displayed in a new tab or window, right-click on it. In the contextual menu that appears, choose “Save image as” or “Download image.”
- Select a destination folder: After selecting “Save image as” or “Download image,” a pop-up window will appear, allowing you to choose the location where you want to save the picture. Browse through your folders or create a new one, if needed.
- Click “Save”: Once you’ve selected the destination folder, click on the “Save” button to save the image to your Chromebook.
After saving the image, you can access it by opening the “Files” app on your Chromebook. From there, navigate to the folder where you saved the image, and you’ll be able to view and manage it as you wish.
Saving images from a search engine allows you to quickly gather visual content from the web and store it for later use. By following these steps, you can efficiently save any image you find during your search engine inquiries on your Chromebook.
Downloading Images from Google Drive
Google Drive is a popular cloud storage service that allows you to save and access files from anywhere, including your Chromebook. If you have previously uploaded pictures to your Google Drive account and want to download them to your Chromebook, the process is straightforward. Let’s explore the steps:
- Open Google Drive: Open a new tab in your Chrome browser and go to Google Drive (drive.google.com). Sign in to your Google account if you haven’t already.
- Locate the image: Once you’re logged into Google Drive, navigate to the folder where the image you want to download is located. You can click on folders to open them and browse through your files until you find the desired image.
- Right-click on the image: When you’ve located the image, perform a right-click on it. A contextual menu will appear with various options.
- Select “Download”: From the contextual menu, select “Download.” This will initiate the download process, and the image will be saved to your Chromebook’s default downloads folder.
Once the download is complete, you can access the image by opening the “Files” app on your Chromebook. From there, navigate to the default downloads folder, where the image will be stored. You can then view, manage, and use the downloaded image as needed.
Downloading images from Google Drive is a convenient way to access your previously uploaded pictures on your Chromebook. Whether you’re retrieving images for a presentation, project, or personal use, following these simple steps will ensure a seamless downloading experience.
Managing and Organizing Downloaded Pictures
Once you’ve successfully downloaded pictures to your Chromebook, it’s important to properly manage and organize them for easy access and efficient workflow. Here are some tips to help you effectively manage your downloaded pictures:
- Use folders: Create dedicated folders for different categories or projects to keep your downloaded pictures organized. For example, you can have folders for work, personal, or specific projects. This will make it easier to locate and retrieve images when you need them.
- Rename files: Consider renaming your downloaded picture files to give them descriptive and meaningful names. This can be especially helpful if you have multiple images with similar names or if you want to quickly identify the content of a specific image.
- Backup your pictures: It’s vital to regularly back up your downloaded pictures to prevent data loss. Consider using cloud storage services, external hard drives, or other backup solutions to ensure the safety of your valuable image files.
- Tag and categorize: Some applications and photo management software allow you to add tags, keywords, or metadata to your pictures. Utilize these features to further organize and categorize your downloaded images based on themes, locations, or other relevant criteria.
- Delete unnecessary files: Periodically go through your downloaded pictures and delete any images that are no longer needed or duplicates. This will help free up storage space and keep your picture library tidy.
- Edit and enhance: If desired, you can use photo editing software or online tools to edit and enhance your downloaded pictures. Adjust brightness, crop, apply filters, or make any necessary modifications to optimize the appearance of your images.
- Share and collaborate: If you need to share your downloaded pictures with others or collaborate on a project, consider using cloud-based collaboration tools or sharing options offered by platforms like Google Drive or other file-sharing services.
By employing these management techniques, you can maintain a well-organized and easily accessible library of downloaded pictures on your Chromebook. Whether you’re a professional working with visual content, a student organizing study materials, or simply a photography enthusiast, effective management and organization of your downloaded pictures are crucial for a seamless and efficient workflow.
Conclusion
Congratulations! You have now learned how to download and manage pictures on your Chromebook. Whether you’re downloading images from websites, saving pictures from search engines, or retrieving images from Google Drive, these step-by-step instructions will help you navigate the process with ease.
Remember, finding the picture you want to download is the first step. Whether you’re browsing websites, using search engines, or exploring your Google Drive, knowing how to locate the desired images is essential. From there, the process of downloading the picture involves a few simple clicks and choosing a destination folder.
Once you have downloaded your pictures, it’s important to manage and organize them effectively. Creating folders, renaming files, tagging images, and regularly backing up your picture library will help you stay organized and ensure the safety of your valuable files.
By following these guidelines, you can optimize your Chromebook experience and enhance your productivity and creativity. Whether you’re a student, professional, or casual user, downloading and managing pictures on your Chromebook will enable you to gather visual content for various purposes and seamlessly incorporate them into your projects and daily life.
So, go ahead and start exploring the world of downloading and managing pictures on your Chromebook. Enjoy the convenience, flexibility, and versatility that Chromebooks offer when it comes to dealing with visual content. Happy downloading!