Introduction
With its unique features, Snapchat has become one of the most popular social media platforms in recent years. From sharing photos and videos to engaging with friends through stories and filters, Snapchat offers a fun and interactive way to stay connected. While it is primarily designed for mobile devices, many users may wonder if it’s possible to download and use Snapchat on a Chromebook.
In this guide, we will walk you through the steps to download and use Snapchat on your Chromebook. Whether you have a new Chromebook or an older model, we will provide you with simple instructions to get the Snapchat app up and running. So, let’s dive in and discover how you can enjoy Snapchat on your Chromebook.
Please note that not all Chromebooks have the capability to run Android apps, which includes Snapchat. Before proceeding, it’s important to check if your Chromebook supports Android apps. If not, you may need to explore alternative methods to use Snapchat on your device.
Next, we’ll show you how to enable the Google Play Store on your Chromebook so you can access and download Snapchat directly. This process may slightly differ depending on your Chromebook’s model and operating system, but we will cover the general steps to guide you through the setup process.
Step 1: Check for Android App Support
Before you can download Snapchat on your Chromebook, it’s important to determine if your device supports Android apps. Not all Chromebooks are equipped with this feature, so it’s crucial to check first. Here are the steps to check for Android app support on your Chromebook:
- Start by clicking on the time in the bottom right corner of your Chromebook’s screen. This will open the system menu.
- Select the gear icon to access the “Settings” menu.
- In the “Settings” menu, scroll down and click on “Apps.”
- Under the “Google Play Store” section, you will find an option labeled “Enable Google Play Store on your Chromebook.” Click on this option.
- A window will appear with a message informing you that “Chrome OS uses the Google Play Store to provide additional functionality and security features on your Chromebook.” Click on the “Get Started” button to proceed.
- Next, you will see a terms of service agreement. Read through it and click on the “Agree” button if you accept the terms.
- Once you’ve agreed to the terms, your Chromebook will automatically download and install the necessary files to enable Android app support. This process may take a few minutes, so be patient.
- After the installation is complete, you will see a notification confirming that the Google Play Store is now enabled on your Chromebook.
Once you have successfully enabled Android app support on your Chromebook, you can proceed to the next step, which involves downloading Snapchat from the Google Play Store. If you encounter any issues during the process or if your Chromebook does not support Android apps, you may need to consider alternative methods to use Snapchat on your device.
Step 2: Enable Google Play Store on Your Chromebook
Now that you have confirmed that your Chromebook supports Android apps, it’s time to enable the Google Play Store. Enabling the Play Store will allow you to download and install Snapchat on your Chromebook. Here’s how you can enable the Google Play Store:
- Click on the time in the bottom right corner of your Chromebook’s screen to open the system menu.
- Select the gear icon to access the “Settings” menu.
- In the “Settings” menu, scroll down and click on “Apps.”
- Now, click on “Google Play Store.”
- Under the “Google Play Store” section, click on the “Manage Google Play Store” button.
- A window will appear with an option to “Turn on” the Google Play Store. Click on the button to enable it.
- You will be asked to confirm your action. Click on “Turn on” to proceed.
Once you have successfully enabled the Google Play Store, your Chromebook will download and install the necessary files to make the Play Store accessible. This process may take a few minutes, so be patient and ensure that you have a stable internet connection.
After the installation is complete, you will see the Play Store icon in your app launcher. Click on the icon to open the Play Store and proceed to the next step, where we will guide you through downloading Snapchat.
If you encounter any difficulties enabling the Play Store or if the option is not available on your Chromebook, it may be due to your Chromebook’s model or the version of Chrome OS you are running. In such cases, it’s recommended to check for system updates or consult the manufacturer’s documentation for further assistance.
Step 3: Downloading Snapchat from the Google Play Store
Now that you have enabled the Google Play Store on your Chromebook, you can proceed with downloading Snapchat. Here’s how you can download the app:
- Click on the Play Store icon in your app launcher. This will open the Google Play Store.
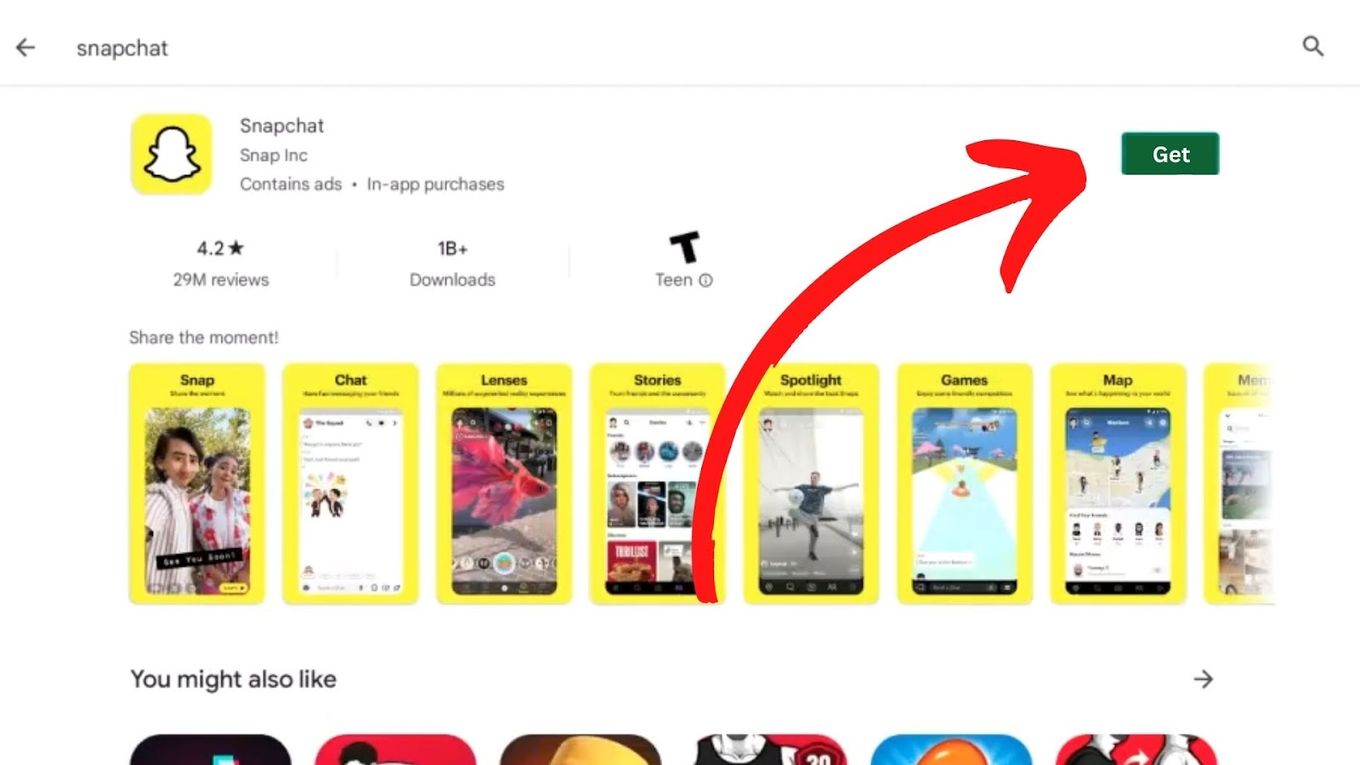
- In the search bar at the top of the screen, type “Snapchat” and hit Enter.
- The search results will display various apps related to Snapchat. Look for the official Snapchat app, which is developed by Snap Inc.
- Click on the Snapchat app to open its page.
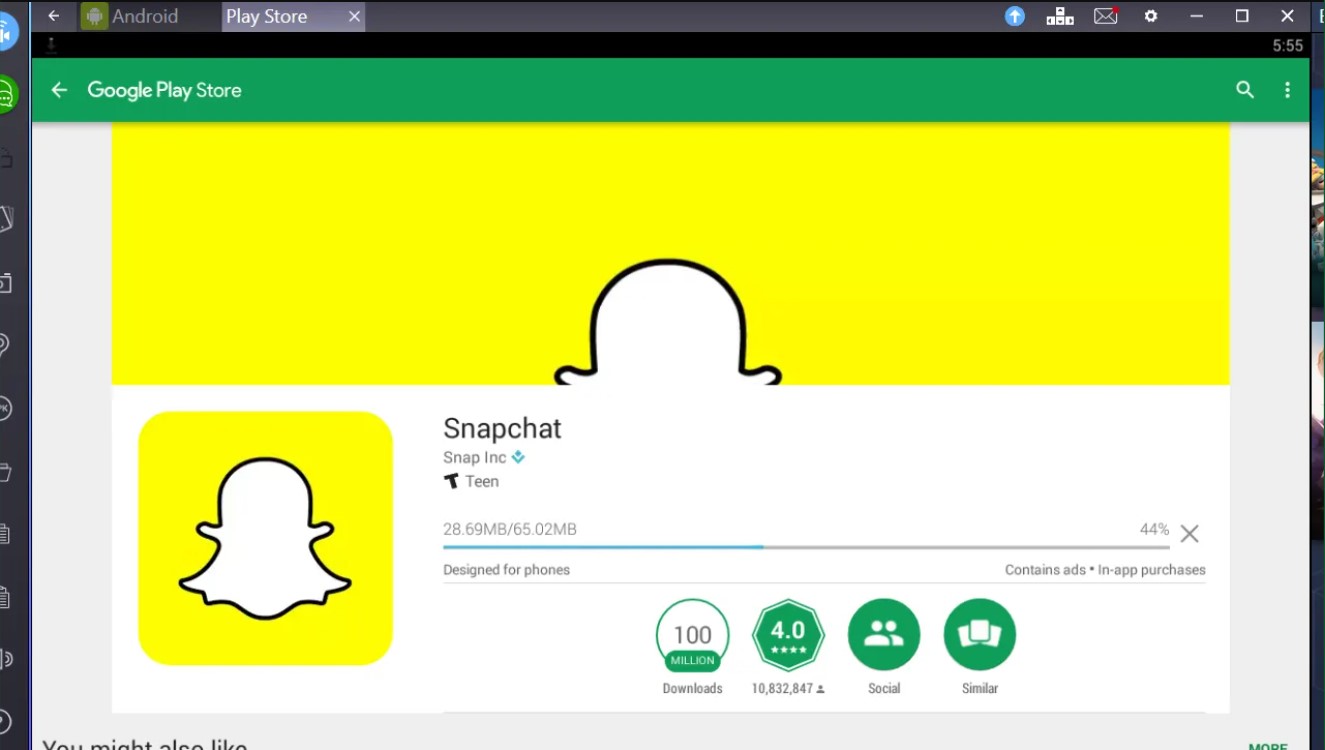
- On the app’s page, click on the “Install” button to begin the download and installation process.
- Once the download is complete, you will see the “Open” button. Click on it to launch Snapchat on your Chromebook.
After launching Snapchat, you may be prompted to sign in or create a new account. If you already have a Snapchat account, enter your login credentials and proceed to the next step. If you don’t have an account, you can create one by following the on-screen instructions.
It’s important to note that Snapchat may require certain permissions to function properly on your Chromebook. During the installation process, you may be asked to grant permissions related to camera access, microphone access, and storage permissions. Make sure to review and accept these permissions to ensure a smooth Snapchat experience.
With Snapchat successfully installed on your Chromebook, you are now ready to set it up and start using the app. In the next step, we will guide you through the process of signing in and setting up Snapchat on your Chromebook.
Step 4: Signing in and Setting Up Snapchat
Now that you have downloaded Snapchat on your Chromebook, it’s time to sign in or create a new account and complete the setup process. Follow these steps to get started:
- Open the Snapchat app on your Chromebook by clicking on its icon in the app launcher.
- If you already have a Snapchat account, enter your username and password in the provided fields and click on the “Sign In” button.
- If you don’t have a Snapchat account, click on the “Sign Up” button to create a new account. Follow the on-screen instructions to complete the signup process, including entering your personal information and choosing a username and password.
- After signing in or creating a new account, you will be prompted to set up your profile. You can add a profile picture, update your display name, and customize other settings according to your preferences.
- Once your profile is set up, you can start exploring and using the various features of Snapchat on your Chromebook.
As you dive into Snapchat, you will discover a wide range of features, including taking and sending snaps, creating stories, adding filters and lenses, and engaging with your friends through chat and video calls. Take some time to familiarize yourself with the different options available within the app.
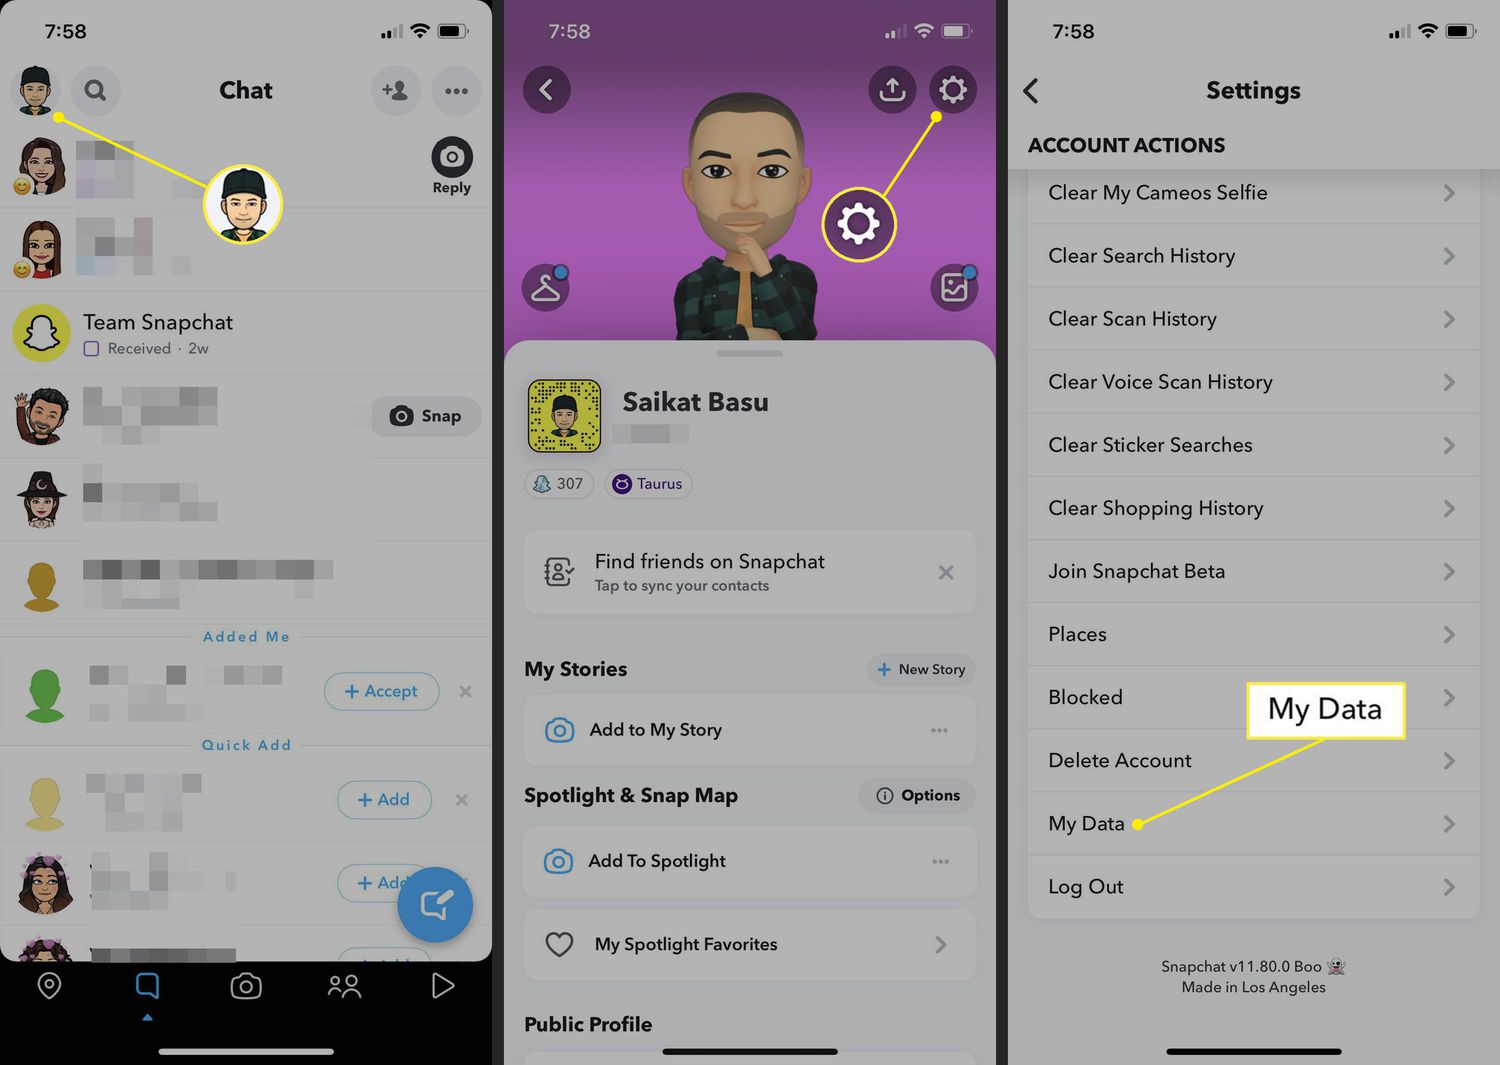
Additionally, you can customize your Snapchat experience by adjusting settings such as privacy preferences, notification preferences, and account security. These settings can help you personalize your Snapchat usage and ensure a safe and enjoyable experience on your Chromebook.
Now that you have successfully signed in and set up Snapchat on your Chromebook, you can start using the app to connect with friends, share memorable snapshots, and stay updated with the latest stories and trends. Enjoy your time on Snapchat!
Step 5: Using Snapchat on Your Chromebook
Now that you have set up Snapchat on your Chromebook, let’s explore some of the key features and functions that you can enjoy while using the app:
- Taking and Sending Snaps: Use the camera on your Chromebook to capture photos or record videos. Add filters, stickers, captions, and drawings to personalize your snaps. Once you’re satisfied, select the recipients and send your snaps.
- Creating Stories: Share your daily moments by creating Stories. These consist of a series of snaps that your friends can view for 24 hours. Be creative and engage your audience with your snaps.
- Filters and Lenses: Add fun filters and lenses to your snaps. Swipe right or left to access a variety of filters and lenses that can transform your appearance or enhance your photos.
- Chat and Video Calls: Connect with your friends through chat messages or video calls. Use emojis, stickers, and Bitmojis to add a personalized touch to your conversations.
- Discover and Explore: Swipe left to access the Discover page, where you can explore various content, including news, entertainment, and original shows. Discover new accounts, follow influencers, and stay up to date with the latest trends.
- Privacy and Security: Take advantage of Snapchat’s privacy settings to control who can contact you or view your snaps. Customize your settings to ensure your privacy and security while using the app.
As you use Snapchat on your Chromebook, take the time to explore and experiment with the different features and functions. Discover new filters, create unique stories, and interact with your friends in creative ways.
Remember to be mindful of the content you share and respect the privacy of others. Snapchat is all about having fun and staying connected, so make the most of this platform and enjoy your experience on your Chromebook.
Conclusion
Congratulations! You have successfully downloaded and set up Snapchat on your Chromebook. By following the steps outlined in this guide, you have gained access to all the features and functionalities that Snapchat has to offer on your Chromebook.
With Snapchat, you can now easily connect with friends, share memorable moments through snaps and stories, and explore the latest trends through the Discover page. Whether you’re taking selfies, adding fun filters, or engaging in chat conversations, Snapchat offers a vibrant and interactive social media experience.
Remember to regularly update the Snapchat app on your Chromebook to ensure you have the latest features and improvements. Additionally, make use of the privacy and security settings to customize your Snapchat experience and protect your personal information.
While Snapchat is primarily designed for mobile devices, the ability to use it on your Chromebook expands the possibilities and allows for a seamless Snapchat experience on a larger screen. Whether you’re using a new Chromebook with official Android app support or an older model with alternative methods, you can now enjoy all that Snapchat has to offer.
So, go ahead and start snapping, sharing, and staying connected with your friends on Snapchat. Have fun exploring the different features and creating unique content that reflects your personal style. Snapchat is all about capturing and sharing moments in a creative and engaging way, so go ahead and make the most of it on your Chromebook!