Introduction
Welcome to our guide on how to connect a Blackweb soundbar to your TV. Soundbars have become increasingly popular due to their ability to enhance the audio experience while watching movies, TV shows, or playing games. The Blackweb soundbar is a top choice for many users, thanks to its sleek design and impressive sound quality.
Connecting your Blackweb soundbar to your TV is a straightforward process that can greatly improve your overall entertainment setup. By following the steps outlined in this guide, you’ll be able to enjoy a heightened audio experience in no time.
Whether you have a smart TV, a traditional flat-screen TV, or even a projector, the Blackweb soundbar can be easily connected using various methods. In this guide, we will walk you through the steps for connecting your Blackweb soundbar to your TV using HDMI, optical cable, and RCA cable.
Before we begin, it’s important to note that the availability of connection options may vary depending on the model of your TV and soundbar. Please refer to the user manuals of your specific devices for accurate instructions.
Now, let’s dive into the different methods of connecting your Blackweb soundbar to your TV and start enjoying an immersive audio experience.
Step 1: Prepare the Soundbar and TV
Before you begin connecting your Blackweb soundbar to your TV, it’s important to prepare both devices for the setup process. Follow these steps to ensure a smooth and successful connection:
- Read the Manuals: Familiarize yourself with the user manuals of both the Blackweb soundbar and your TV. These manuals will provide specific instructions and guidelines that are tailored to your particular models.
- Choose an Ideal Location: Find a suitable location for your soundbar and TV setup. Ensure that there is enough space and that the location allows for optimal audio projection.
- Power Off: Before making any connections, turn off both your soundbar and TV. This will prevent any electrical damage and ensure a safe setup process.
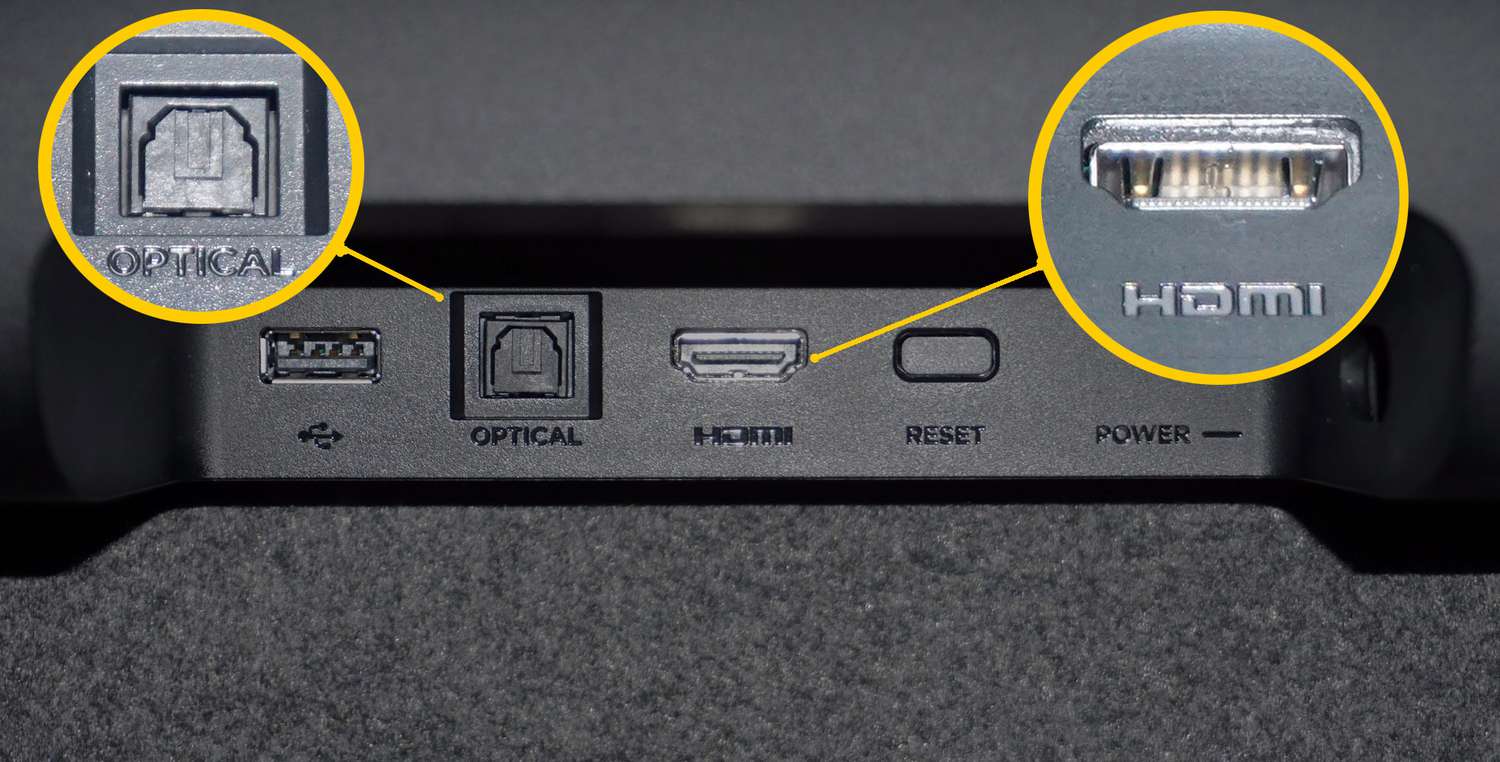
- Inspect Ports: Take a moment to inspect the ports on both your soundbar and TV. Identify the available ports such as HDMI, optical, and RCA ports. This will help you determine which connection method will work best for your setup.
- Gather Cables: Make sure you have the necessary cables to connect your soundbar to your TV. Depending on the available ports and the connection method you choose, you may need HDMI cables, optical cables, or RCA cables. If these cables are not included with your soundbar, ensure you have them on hand before proceeding.
- Remove Packaging: Remove any protective packaging or covers from the soundbar and TV. This will allow for easier access to the ports and ensure that there are no obstructions during the setup process.
By following these preparatory steps, you will be well-equipped to proceed with the connection process. Once you have completed these preparations, you can move on to the next step of connecting your Blackweb soundbar to your TV.
Step 2: Connect the Soundbar to the TV via HDMI
Connecting your Blackweb soundbar to your TV using an HDMI cable is a simple and effective way to ensure high-quality audio transmission. Follow these steps to establish the HDMI connection:
- Locate HDMI Ports: Identify the HDMI ports on both your soundbar and TV. These ports are typically labeled as “HDMI In” or “HDMI ARC. Make sure you have an available HDMI port on both devices.
- Connect HDMI Cable: Take one end of the HDMI cable and insert it into the HDMI output port on the back of your soundbar. Then, connect the other end to an HDMI input port on your TV. Ensure that the cable is securely plugged into both devices.
- Select HDMI Input: On your TV’s remote control, navigate to the input/source selection menu. Choose the HDMI input that corresponds to the port where you connected the soundbar. This will allow the TV to recognize the soundbar as the audio source.
- Configure Soundbar Settings: Power on your soundbar and access its settings menu. Depending on your soundbar model, you may need to use the remote control or physical buttons on the device to navigate the menu. Adjust the soundbar settings to match your preferred audio settings, such as volume levels and sound modes.
- Test the Connection: Play audio from your TV to test the connection. You should now hear the audio coming through the soundbar. Adjust the volume as needed on both the TV and soundbar to achieve the desired audio level.
Connecting your Blackweb soundbar to your TV via HDMI offers a convenient and high-quality audio solution. Ensure that both devices are compatible with HDMI connections and that you have the necessary HDMI cables on hand. Once the HDMI connection is established, you can move on to the next step of configuring the soundbar settings on your TV.
Step 3: Connect the Soundbar to the TV via Optical Cable
If your TV and Blackweb soundbar have optical ports, you can use an optical cable to establish a connection for audio transmission. Follow these steps to connect your soundbar to your TV using an optical cable:
- Locate Optical Ports: Find the optical ports on both your soundbar and TV. These ports are often marked as “Optical” or “Digital Audio Out”. Ensure that you have an available optical port on both devices.
- Insert Optical Cable: Take one end of the optical cable and plug it into the optical output port on the back of your TV. Then, plug the other end of the cable into the optical input port on your soundbar. Make sure the cable is securely connected to both devices.
- Select Optical Input: Using your TV’s remote control, access the input/source selection menu. Choose the optical input that corresponds to the port where you connected the soundbar. This will direct the audio output of your TV to the soundbar.
- Configure Soundbar Settings: Power on your soundbar and access its settings menu. Depending on your model, you may need to use the soundbar’s remote control or physical buttons to navigate the settings. Adjust the soundbar settings to match your audio preferences, such as volume levels and sound modes.
- Test the Connection: Play audio from your TV to test the connection. The sound should now be transmitted through the soundbar. Adjust the volume settings on both the TV and soundbar to achieve the desired audio level.
Connecting your Blackweb soundbar to your TV via an optical cable is a reliable method for audio transmission. Remember to check the compatibility of your devices and ensure that you have an available optical port on both the TV and soundbar. Once the connection is established, you can proceed to adjust the soundbar settings on your TV for optimal audio performance.
Step 4: Connect the Soundbar to the TV via RCA Cable
If your TV and Blackweb soundbar have RCA ports, you can use an RCA cable to establish a connection for audio transmission. Here are the steps to connect your soundbar to your TV using an RCA cable:
- Identify RCA Ports: Locate the RCA ports on both your soundbar and TV. The RCA ports are usually color-coded, with red and white indicating the audio channels. Ensure that you have available RCA ports on both devices.
- Plug In the RCA Cable: Take one end of the RCA cable and connect the red and white plugs to the corresponding RCA output ports on the back of your TV. Then, plug the other end of the cable into the RCA input ports on your soundbar.
- Select RCA Input: Using your TV’s remote control, access the input/source selection menu. Choose the RCA input that corresponds to the ports where you connected the soundbar. This will direct the audio output from your TV to the soundbar.
- Configure Soundbar Settings: Power on your soundbar and navigate to its settings menu. Use the soundbar’s remote control or physical buttons to adjust the settings according to your preferences, such as volume levels and audio modes.
- Test the Connection: Play audio from your TV to test the connection. The sound should now be transmitted through the soundbar. Adjust the volume settings on both the TV and soundbar to achieve the desired audio level.
Connecting your Blackweb soundbar to your TV using an RCA cable is a viable option if both devices have RCA ports. Double-check the compatibility and availability of RCA ports on your devices before proceeding. Once the connection is established, you can fine-tune the soundbar settings on your TV to optimize the audio output.
Step 5: Adjust the Soundbar Settings on the TV
Once you have successfully connected your Blackweb soundbar to your TV using the preferred method, it’s time to adjust the soundbar settings on your TV for an optimal audio experience. Follow these steps to configure the soundbar settings:
- Access TV Settings: Using your TV’s remote control, navigate to the settings menu. This menu is usually represented by a gear or a similar icon. Consult your TV’s user manual if you’re unsure about accessing the settings.
- Audio Settings: Within the settings menu, locate the audio or sound options. This category may vary depending on your TV model. Look for settings related to audio output, external speakers, or soundbar configuration.
- Select Soundbar: In the audio settings, choose the soundbar as the designated audio output device. This will ensure that the TV sends audio signals to the soundbar for playback.
- Adjust Sound Settings: Explore the available sound settings to customize the audio output according to your preferences. These settings may include equalizer adjustments, sound modes, or surround sound options. Experiment with different settings to enhance your listening experience.
- Test and Fine-Tune: Play various types of audio content, such as movies, music, or TV shows, to test the soundbar settings. Adjust the volume levels, bass, treble, and other sound options to achieve the desired audio quality.
By adjusting the soundbar settings on your TV, you can optimize the audio output and tailor it to your liking. Experiment with different settings to find the perfect balance for your preferred audio experience.
Note: The exact method for adjusting soundbar settings on your TV may vary depending on the brand and model. Consult the user manual of your TV or refer to the manufacturer’s support website for detailed instructions.
Conclusion
Connecting your Blackweb soundbar to your TV is a straightforward process that can greatly enhance your audio experience while watching your favorite movies, TV shows, or playing games. In this guide, we have explored the steps to connect your soundbar to your TV using HDMI, optical cable, and RCA cable.
Before embarking on the connection process, it’s important to prepare both the soundbar and TV by reading the user manuals, choosing an ideal location, and gathering the necessary cables. Once prepared, you can proceed to connect the soundbar to the TV using your preferred method.
Through the use of an HDMI cable, you can achieve high-quality audio transmission in a convenient manner. For those with optical ports on their devices, using an optical cable provides a reliable solution for audio connectivity. Additionally, the RCA cable connection method is suitable for those who have RCA ports available on their TV and soundbar.
Once the connection is established, adjusting the soundbar settings on your TV allows you to fine-tune the audio output and customize it according to your preferences. Experiment with different settings to find the ideal audio quality for an immersive experience.
Remember to consult the user manuals of your specific TV and soundbar models for accurate and detailed instructions. Additionally, if you encounter any issues during the connection process, don’t hesitate to reach out to the manufacturer’s support for further assistance.
By following this guide and carefully connecting your Blackweb soundbar to your TV, you will elevate your entertainment setup and enjoy a heightened audio experience for all your viewing needs.