Introduction
When it comes to managing your finances, having access to your transaction history is essential. Whether you need it for personal record-keeping or for tax purposes, obtaining your Venmo statement can provide valuable insights into your financial activities. Venmo, a popular digital payment service, allows its users to send and receive money conveniently.
In this article, we will guide you through the process of getting your Venmo statement. By following these simple steps, you can access and download your transaction history with ease. Whether you’re a frequent Venmo user or just need your statement for a specific period, this guide will help you navigate the platform and obtain the information you need.
Before we dive into the steps, it’s worth noting that Venmo statements are available for download in a digital format. This means you can easily save the statement to your device or print it out for physical record-keeping. Additionally, the statement provides a comprehensive overview of your transactions, including details like date, time, recipient, and amount.
Now, let’s get started on retrieving your Venmo statement so you can have a clear picture of your financial activities.
Step 1: Log into your Venmo account
The first step to obtaining your Venmo statement is to log into your Venmo account on the website or mobile app. Ensure that you have your login credentials handy, including your username or email address and your password.
If you’re accessing Venmo through the website, open your preferred web browser and visit the official Venmo website. On the homepage, you’ll find the option to log in. Click on it, and you will be redirected to the login page.
If you’re using the mobile app, open the Venmo app on your smartphone or tablet. You will be prompted to enter your login credentials directly on the app’s interface.
Once you have entered your username or email address and password, click on the “Log In” button to proceed. Venmo will then authenticate your credentials and grant you access to your account.
It’s crucial to ensure that you are logging into your legitimate Venmo account. Always double-check the website URL or the app’s authenticity to avoid falling victim to phishing attempts or fraudulent activities.
Once you have successfully logged into your Venmo account, you are ready to proceed to the next step of retrieving your Venmo statement.
Step 2: Navigate to your Account tab
After logging into your Venmo account, you’ll need to navigate to the Account tab, where you can access various settings and options related to your account.
If you’re using the Venmo website, look for the “Account” tab at the top right corner of the screen. Click on it, and a dropdown menu will appear with different options.
If you’re using the mobile app, tap on the menu icon (usually represented by three horizontal lines) located at the top left or top right corner of the screen, depending on your device. This will open the side menu, where you can find the “Account” option.
Once you’ve located the “Account” tab, click on it to proceed to the next step.
Navigating to the Account tab will give you access to various settings and options related to your Venmo account. This is where you can manage your profile information, linked bank accounts, privacy settings, and much more.
It’s important to note that Venmo’s user interface may vary slightly between the website and the mobile app. However, the general flow and options will remain the same, so you won’t have any trouble finding the Account tab regardless of the platform you’re using.
Now that you’ve successfully reached the Account tab, let’s move on to the next step in retrieving your Venmo statement.
Step 3: Access your settings
Once you’re on the Account tab, you’ll need to access your settings to proceed with retrieving your Venmo statement. The settings section contains various options that allow you to customize your Venmo experience and manage your account preferences.
To access your settings, look for the “Settings” or “Preferences” option within the Account tab. On the Venmo website, this option is usually located on the left-hand side menu. If you’re using the mobile app, you may find it in the dropdown menu or as a separate tab.
Click on the “Settings” or “Preferences” option to continue.
Upon accessing the settings, you will see a range of options that allow you to personalize your Venmo account. This includes changing your profile information, privacy settings, notification preferences, and more.
It’s important to explore the various settings and familiarize yourself with the options. This will not only help you retrieve your Venmo statement but also enable you to customize your account according to your preferences.
Remember that the settings section may differ slightly between the website and the mobile app. However, the overall structure and options will be similar, ensuring a consistent experience across platforms.
Now that you’ve accessed your settings, let’s move on to the next step in obtaining your Venmo statement.
Step 4: Select the Statement option
Once you’re in the settings section of your Venmo account, it’s time to locate and select the option that allows you to generate your statement. This option will typically be labeled as “Statement” or “Download Statement.”
In the settings menu, scroll down or navigate through the tabs until you find the “Statement” option. It may be located within a subsection related to your transaction history or financial records.
Click on the “Statement” option to proceed.
By selecting the Statement option, you’re indicating to Venmo that you want to access your transaction history in the form of a statement. This will allow you to view and download a record of your financial activities within a specific date range.
It’s worth noting that not all payment platforms offer the ability to generate statements, making Venmo a convenient choice for those who require detailed transaction records.
If you’re having trouble locating the Statement option within the settings menu, refer to Venmo’s help documentation or contact their customer support for assistance. They will be able to guide you to the right location within the interface.
Now that you’ve selected the Statement option, let’s proceed to the next step to specify the desired date range for your Venmo statement.
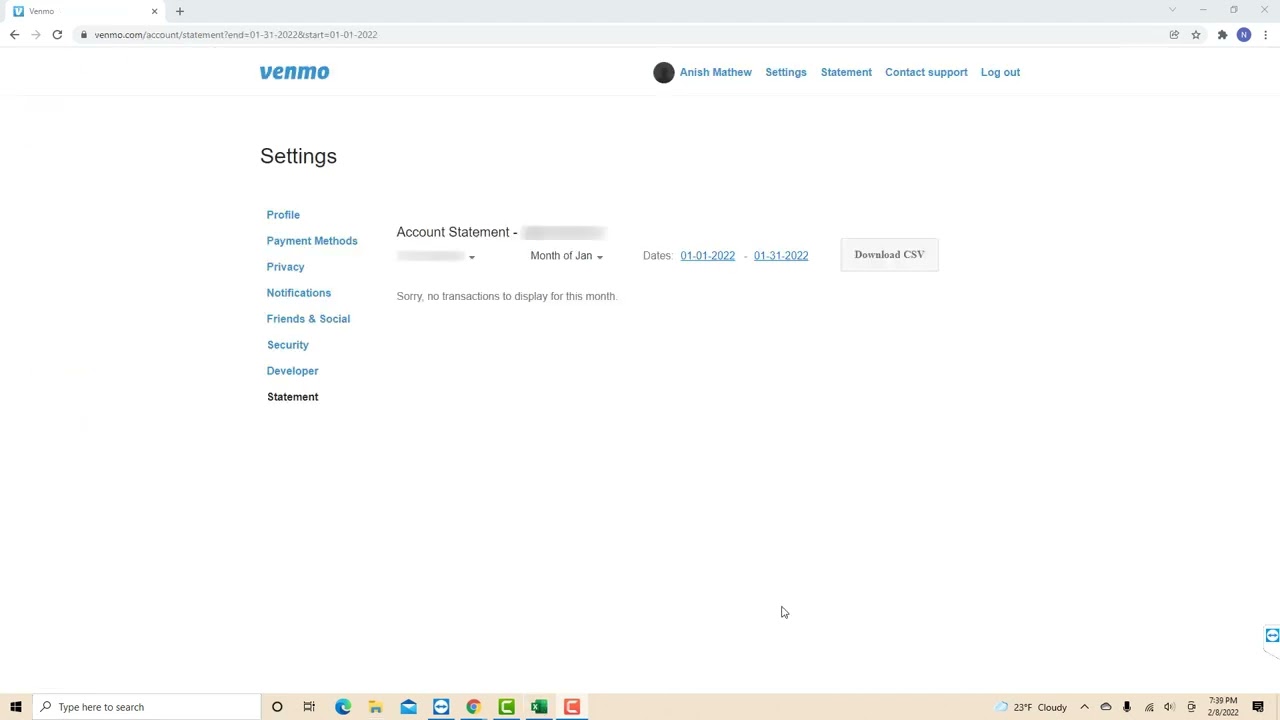
Step 5: Choose the desired date range
After selecting the Statement option, you will need to specify the date range for which you want to generate the Venmo statement. This allows you to customize the statement according to your needs, whether you want to view transactions for a specific month, quarter, or year.
Once you’re on the Statement page, look for the date range options or filters. These may be presented in the form of drop-down menus, calendar selectors, or manual entry fields.
Choose the desired start and end dates for the statement by selecting them from the available options or entering them manually. Ensure that you select a period that covers the transactions you wish to include in your statement.
If you’re unsure about the exact dates, consider selecting a broader range to ensure you capture all the transactions you need. You can always filter and sort the statement later if necessary.
Additionally, some platforms may provide additional filters or options to customize the statement further. This may include sorting transactions by category, payment type, or recipient. Take advantage of these options to refine your statement as per your requirements.
Remember, the flexibility to choose the date range is a convenience offered by Venmo to help you analyze your transactions effectively.
Now that you’ve selected the desired date range for your statement, let’s move on to the final step and retrieve your Venmo statement.
Step 6: Download or print your Venmo statement
After specifying the desired date range for your Venmo statement, it’s time to download or print the statement to have a physical or digital copy of your transaction history. Venmo provides multiple options for accessing your statement.
If you prefer to download the statement, look for a “Download” or “Export” button on the Statement page. Click on it, and Venmo will generate a downloadable file, usually in PDF or CSV format. Save the file to your preferred location on your device.
If you want to print the statement, look for a “Print” option on the Statement page. Click on it, and the statement will be sent to your printer for a physical copy. Ensure that your printer is connected and properly set up before proceeding.
Once the statement is downloaded or printed, you can review it for accuracy and completeness. Check that all relevant transactions within your specified date range are included and that the details of each transaction are correct.
It’s advisable to store your Venmo statements in a secure location, whether it’s a designated folder on your computer or a physical file. This will ensure that you have easy access to your financial records and can refer to them whenever necessary, such as during tax season or for auditing purposes.
If you want to generate statements for multiple date ranges or require older statements, you can repeat the process outlined in the previous steps, specifying different date ranges as needed.
Now that you’ve successfully downloaded or printed your Venmo statement, you have a comprehensive record of your financial activities on the platform.
Conclusion
Obtaining your Venmo statement is a straightforward process that allows you to access and analyze your transaction history on the platform. By following the six simple steps outlined in this guide, you can log into your Venmo account, navigate to the Account tab, access your settings, select the Statement option, choose the desired date range, and download or print your Venmo statement.
Having access to your Venmo statement provides valuable insights into your financial activities. It allows you to monitor your spending habits, track payments made and received, and keep accurate records. This can be especially useful for personal record-keeping, tax purposes, or even reconciling your financial transactions.
Remember to store your Venmo statements securely in a designated location, ensuring that you have easy access when needed. Additionally, periodically generating statements for different date ranges will allow you to maintain an up-to-date record of your financial activities on the platform.
Venmo’s commitment to providing detailed transaction histories and the ability to generate statements reinforces its position as a leading digital payment service. By regularly accessing and reviewing your Venmo statements, you can stay on top of your finances and make informed decisions.
So, the next time you need to access your Venmo statement, simply follow the steps outlined in this guide, and you’ll have your transaction history at your fingertips.