Introduction
Adding a prepaid card to Venmo can be a convenient way to manage your finances and make digital payments. Whether you want to use your prepaid card for online purchases or split bills with friends, Venmo offers a seamless platform to handle your transactions. By linking your prepaid card to Venmo, you’ll have access to a wide range of payment options and the ability to send and receive money with ease.
Venmo is a popular mobile payment service that allows users to transfer funds to friends, family, and even merchants. It’s widely known for its social media-style feed, which lets you see and interact with your friends’ transactions. With Venmo, you can split bills, pay for goods and services, and even request money from others. Adding a prepaid card to your Venmo account gives you the flexibility to use your funds in a variety of ways.
In this guide, we’ll walk you through the steps to add a prepaid card to Venmo, from downloading the app to verifying your card. Whether you’ve recently acquired a prepaid card or you’ve been wanting to use your existing one with Venmo, this guide will help you get started. So without further ado, let’s dive in and learn how to add a prepaid card to Venmo!
Step 1: Download and Install the Venmo App
The first step in adding a prepaid card to Venmo is to download and install the Venmo app on your mobile device. Venmo is available for both iOS and Android devices, making it accessible to a wide range of users. Follow these simple steps to get started:
- Open the App Store or Google Play Store on your mobile device.
- Search for “Venmo” in the search bar.
- Look for the official Venmo app, which is developed by PayPal, Inc.
- Tap on the “Install” or “Get” button to begin the download and installation process.
- Once the Venmo app is downloaded and installed on your device, tap on the app icon to open it.
By downloading and installing the Venmo app, you’ll have access to all the features and functionalities it offers, including the ability to add and manage payment methods such as your prepaid card.
It’s important to note that Venmo is designed for personal use and only available to users who are at least 18 years old. If you’re under 18, you may consider asking a parent or guardian for assistance in adding a prepaid card to Venmo.
Now that you have successfully downloaded and installed the Venmo app, you’re ready to move on to the next step: signing in to your Venmo account.
Step 2: Open the Venmo App and Sign In
Once you have downloaded and installed the Venmo app on your mobile device, the next step is to open the app and sign in to your Venmo account. If you don’t already have a Venmo account, you will need to create one by providing some basic information and linking it to your preferred payment method. Here’s how to sign in to your Venmo account:
- Locate the Venmo app on your device and tap on the app icon to open it.
- On the login screen, enter your Venmo username or the email address associated with your account.
- Next, enter your Venmo password. If you forget your password, you can tap on the “Forgot?” link to reset it.
- Once you’ve entered your login information, tap on the “Sign In” or “Log In” button to proceed.
If you have enabled biometric authentication, such as Face ID or fingerprint recognition, you may be prompted to use it for a quicker and more secure login experience.
If you are a new user and don’t have a Venmo account yet, you have the option to sign up by tapping on the “Sign Up” or “Create Account” button. Follow the on-screen instructions to create your Venmo account and provide the necessary information, such as your name, email address, and phone number.
By signing in to your Venmo account, you will be able to access all the features and functionalities of the app, including the ability to add a prepaid card as a payment method. Now that you’re signed in, let’s move on to the next step: accessing the menu and navigating to the settings.
Step 3: Access the Menu and Tap on “Settings”
After signing in to your Venmo account, the next step is to access the menu and navigate to the settings. The settings menu is where you will find the option to add a prepaid card as a payment method. Here’s how you can access the menu and tap on “Settings”:
- Once you are logged in to the Venmo app, you will be on the home screen. Look for the three horizontal lines or the ☰ icon in the top left corner of the app.
- Tap on the menu icon to open the side menu.
- In the side menu, scroll down until you find the “Settings” option. It is usually located towards the bottom of the menu.
- Tap on “Settings” to proceed.
By tapping on “Settings,” you will be directed to a new screen where you can customize various aspects of your Venmo account. It’s important to familiarize yourself with the settings menu, as it allows you to manage your account preferences, privacy settings, and payment methods.
Keep in mind that the layout and organization of the settings menu may vary slightly depending on the version of the Venmo app you are using. However, the option to add a payment method, including a prepaid card, should be available in the settings menu of any version.
Now that you have accessed the settings menu, you are ready to move on to the next step: selecting “Payment Methods.”
Step 4: Select “Payment Methods” in the Settings Menu
Once you have accessed the settings menu in the Venmo app, the next step is to select “Payment Methods.” This is where you will find the option to add a prepaid card and manage your payment settings. Follow these steps to select “Payment Methods” in the settings menu:
- On the settings screen, look for the section that is labeled “Payment Methods” or “Payment Settings.” This is where you will find the option to manage your payment methods.
- Tap on the “Payment Methods” or “Payment Settings” option to proceed.
By selecting “Payment Methods,” you will be taken to a new screen where you can view and manage the payment methods linked to your Venmo account. This is where you will add your prepaid card as a payment option.
It’s important to note that if you have already added a payment method, such as a bank account or a credit card, it will be displayed on this screen. You have the option to add, remove, or make changes to your existing payment methods.
Now that you have selected “Payment Methods” in the settings menu, you’re ready to move on to the next step: tapping on “Add Bank or Card” to add your prepaid card.
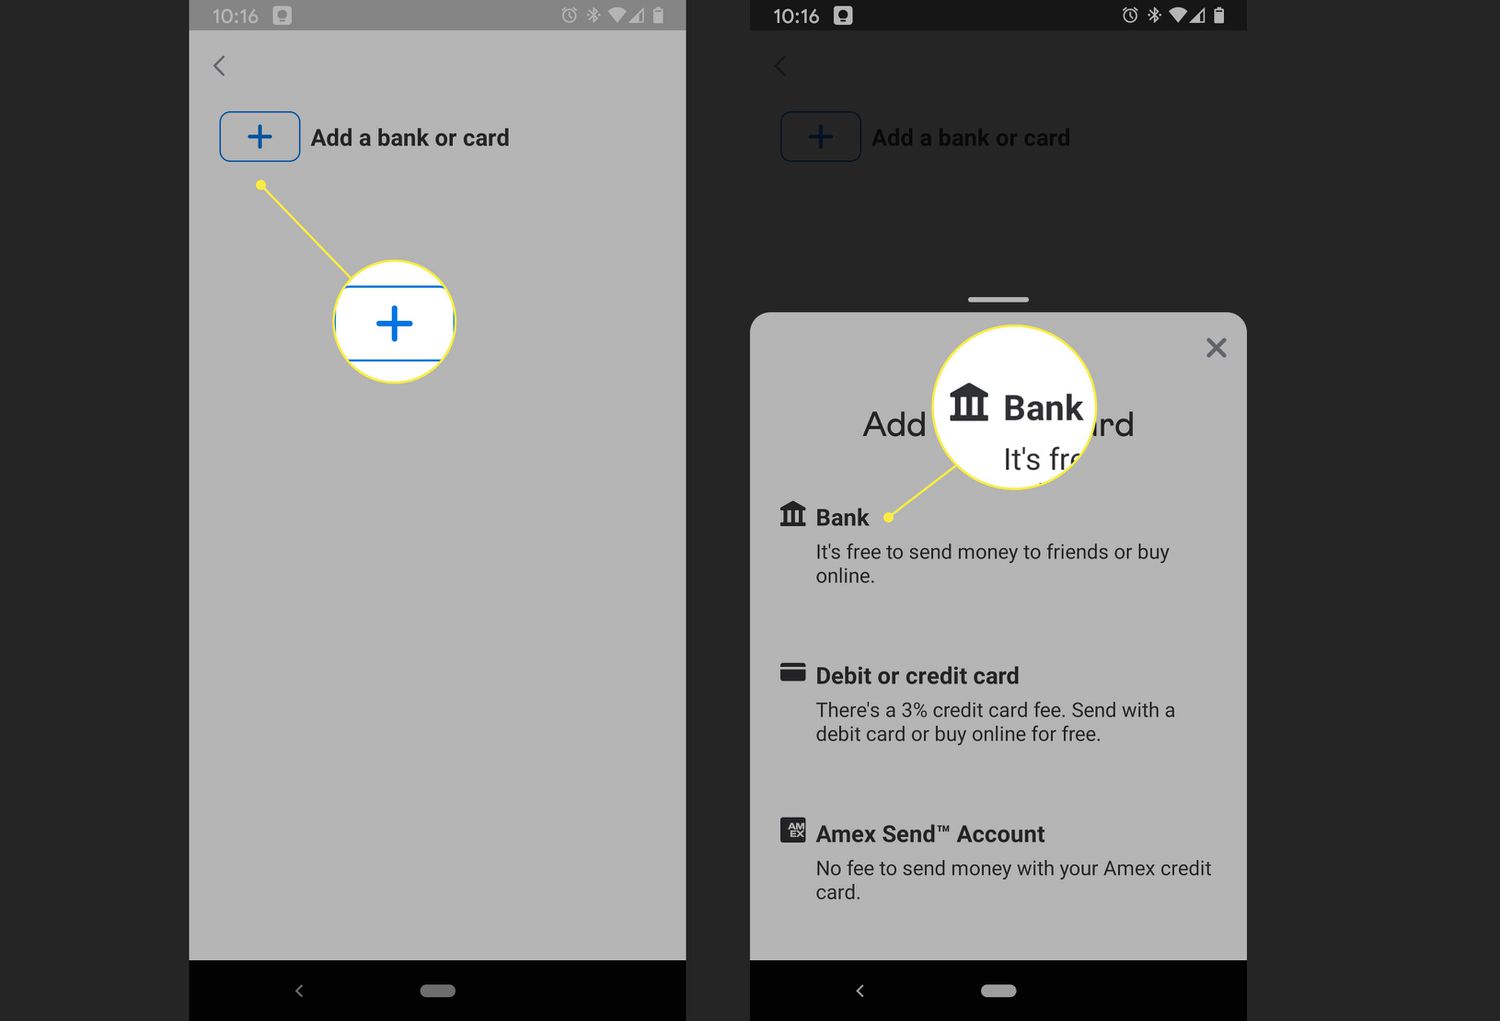
Step 5: Tap on “Add Bank or Card”
Once you have accessed the payment methods section in the settings menu of the Venmo app, the next step is to tap on the option that says “Add Bank or Card.” This will allow you to add your prepaid card as a payment method. Follow these steps to add your prepaid card:
- On the payment methods screen, look for the “Add Bank or Card” button or option. This is usually located at the top or bottom of the screen.
- Tap on the “Add Bank or Card” option to proceed.
By tapping on “Add Bank or Card,” you will be presented with a new screen where you can enter the details of your prepaid card. This screen is where you will provide the necessary information to link your prepaid card to your Venmo account.
It’s important to note that Venmo accepts both bank accounts and cards as payment methods. Since you want to add a prepaid card, you will need to choose the appropriate option when prompted. Make sure to select the “Credit or Debit Card” option to proceed with adding your prepaid card.
Now that you have tapped on “Add Bank or Card,” you’re ready to move on to the next step: entering the details of your prepaid card.
Step 6: Choose the “Credit or Debit Card” Option
After tapping on “Add Bank or Card” in the payment methods section of the Venmo app, the next step is to choose the “Credit or Debit Card” option. This selection is necessary to indicate that you are adding a prepaid card as your payment method. Here’s how you can choose the “Credit or Debit Card” option:
- On the “Add Bank or Card” screen, you will be presented with different options, such as “Bank Account” or “Credit or Debit Card.” Since you want to add a prepaid card, select the “Credit or Debit Card” option.
- Tap on the “Credit or Debit Card” option to proceed.
By choosing the “Credit or Debit Card” option, you are indicating to Venmo that you want to link a prepaid card to your account. This step is crucial, as it ensures that the correct type of card is added and facilitates a smooth and seamless setup process for your prepaid card.
It’s worth noting that if you have a physical card in your possession, it is usually labeled as either a credit or debit card. Choose the option that matches the label on your prepaid card. If you are unsure, refer to the documentation or information provided by the issuer of your prepaid card.
Now that you have selected the “Credit or Debit Card” option, you’re ready to move on to the next step: entering the details of your prepaid card.
Step 7: Enter the Details of Your Prepaid Card
After choosing the “Credit or Debit Card” option in the Venmo app, the next step is to enter the details of your prepaid card. This will involve providing the necessary information to link your prepaid card to your Venmo account securely. Here’s how you can enter the details of your prepaid card:
- On the “Add Bank or Card” screen, you will be presented with a form to fill out with your card details.
- Start by entering the 16-digit card number. This can usually be found on the front of your prepaid card.
- Next, enter the expiration date of your prepaid card. This is typically located next to the card number.
- Then, provide the CVV (Card Verification Value) code. The CVV is a three-digit or four-digit security code found on the back of your card, usually near the signature panel.
- Finally, enter the billing ZIP code associated with your prepaid card. This is the ZIP code linked to your card’s billing address.
Make sure to double-check the accuracy of the information you entered before proceeding. Any errors or incorrect information may result in the inability to link your prepaid card to your Venmo account.
It’s essential to keep in mind that Venmo takes privacy and security seriously. Your card information is encrypted and securely stored to protect your financial data. You can have peace of mind knowing that your prepaid card details are safeguarded during the setup process.
Now that you have entered the details of your prepaid card, you’re ready to move on to the next step: verifying your prepaid card.
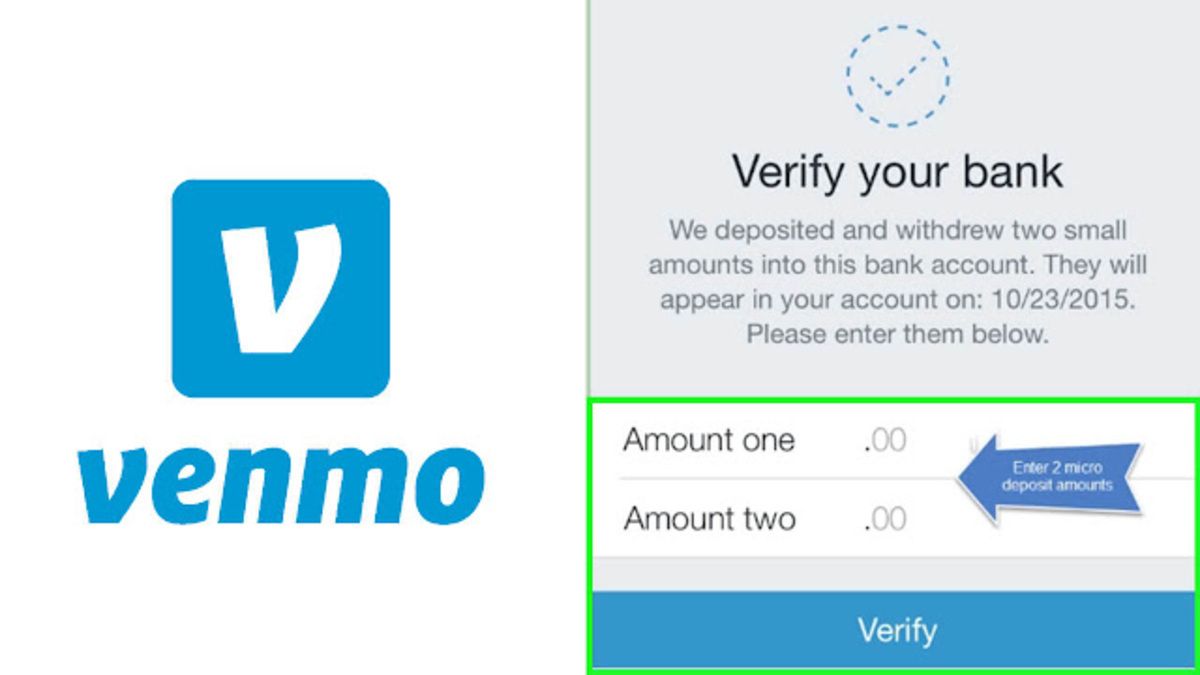
Step 8: Verify Your Prepaid Card
After entering the details of your prepaid card in the Venmo app, the next step is to verify your card. Verification is an important security measure that ensures the ownership and validity of the prepaid card linked to your Venmo account. Follow these steps to verify your prepaid card:
- Once you have entered your prepaid card details, tap on the “Next” or “Continue” button to proceed.
- Depending on the card issuer, you may be prompted to verify your card in different ways. Venmo typically verifies prepaid cards by making a small authorization charge to your card.
- Check your prepaid card statement or online banking account for the authorization charge from Venmo.
- Once you locate the charge, note the amount and return to the Venmo app.
- In the Venmo app, tap on the “Verify” or “Confirm” button and enter the exact amount of the authorization charge.
By entering the correct authorization charge amount, you are verifying that you have access to the prepaid card and confirming your ownership. This step helps prevent unauthorized usage and ensures the security of your Venmo transactions.
If you do not see a verification charge on your prepaid card statement or have any issues with the verification process, it is recommended to contact the card issuer or Venmo support for further assistance.
Now that you have successfully verified your prepaid card, you’re ready to move on to the final step: adding money to your Venmo account using your prepaid card.
Step 9: Add Money to Your Venmo Account Using Your Prepaid Card
After successfully verifying your prepaid card in the Venmo app, the final step is to add money to your Venmo account using your prepaid card. This will allow you to have funds available for making payments or transferring money to others. Follow these steps to add money to your Venmo account:
- Open the Venmo app and navigate to the home screen.
- Tap on the “☰” or menu icon to access the main menu.
- In the main menu, select “Manage Balance” or “Add Money.”
- Choose the option to add money from the prepaid card you just linked to your Venmo account.
- Enter the amount of money you want to add to your Venmo account.
- Review the transaction details and tap on the “Confirm” or “Add Money” button to proceed.
Once the transaction is completed, the funds will be added to your Venmo account balance, which you can then use to make payments, send money to others, or even withdraw to your bank account if needed.
It is worth noting that there may be fees associated with adding money to your Venmo account using a prepaid card, so it is advised to review the fees and terms provided by Venmo beforehand.
Congratulations! You have successfully added a prepaid card to your Venmo account and learned how to add money to your account using your prepaid card. You can now enjoy the convenience and flexibility of Venmo for making digital payments and managing your finances.
Conclusion
Adding a prepaid card to your Venmo account can enhance your digital payment experience and provide you with more convenience and flexibility. By following the simple steps outlined in this guide, you can easily link your prepaid card to your Venmo account and start using it for various transactions.
We began by downloading and installing the Venmo app on your mobile device. Then, we walked through the process of signing in to your Venmo account and accessing the settings menu. From there, we selected “Payment Methods” and tapped on “Add Bank or Card” to add your prepaid card.
Next, we chose the “Credit or Debit Card” option to indicate that we were adding a prepaid card. We entered the details of the prepaid card, ensuring accuracy and precision. Afterward, we verified the card by confirming the authorization charge amount.
Finally, we discussed the importance of adding money to your Venmo account using your prepaid card, enabling you to make hassle-free payments, send money to others, and manage your finances effectively.
Now that you have successfully added your prepaid card to Venmo, you can enjoy the convenience of digital transactions and the ease of managing your finances through the app.
Remember to keep track of your transactions and regularly review your account activity for security purposes. If you encounter any issues or have questions, don’t hesitate to reach out to Venmo support for assistance.
With your prepaid card linked to Venmo, you can confidently navigate the world of digital payments and enjoy the benefits of a seamless and secure payment experience.