Introduction
Welcome to our guide on how to update your AirPods! AirPods are a popular and convenient wireless earphone option, loved by Apple users for their seamless integration and excellent sound quality. Just like any other tech product, AirPods receive periodic firmware updates to introduce new features, improve performance, and fix bugs.
Updating the firmware on your AirPods is essential to ensure you are always benefiting from the latest enhancements and optimizations. In this guide, we will walk you through the step-by-step process of updating your AirPods, whether you’re using an iPhone, iPad, Mac, or Windows PC. By staying up to date with the latest firmware version, you can enjoy the best possible audio experience and take advantage of any new features or improvements Apple has released.
It’s important to note that updating your AirPods requires a stable internet connection and a compatible device. Additionally, make sure your AirPods are charged or connected to a power source before proceeding with the update to avoid any interruptions or potential issues.
In the following sections, we will guide you through the process, providing detailed instructions for each platform. Whether you’re an Apple enthusiast or a Windows user, we’ve got you covered. Let’s get started and ensure your AirPods are running on the latest firmware!
Step 1: Check the Current Firmware Version
Before diving into the update process, it’s important to confirm the current firmware version of your AirPods. This will help you determine if an update is necessary and provide a baseline for comparison.
To check the firmware version of your AirPods, follow these steps:
- Make sure your AirPods are connected to your device. You can do this by opening the case next to your iPhone or by going to the Bluetooth settings on your device.
- On your iPhone, open the Settings app.
- Scroll down and tap on “General”.
- Tap on “About”.
- Scroll down and tap on “AirPods”.
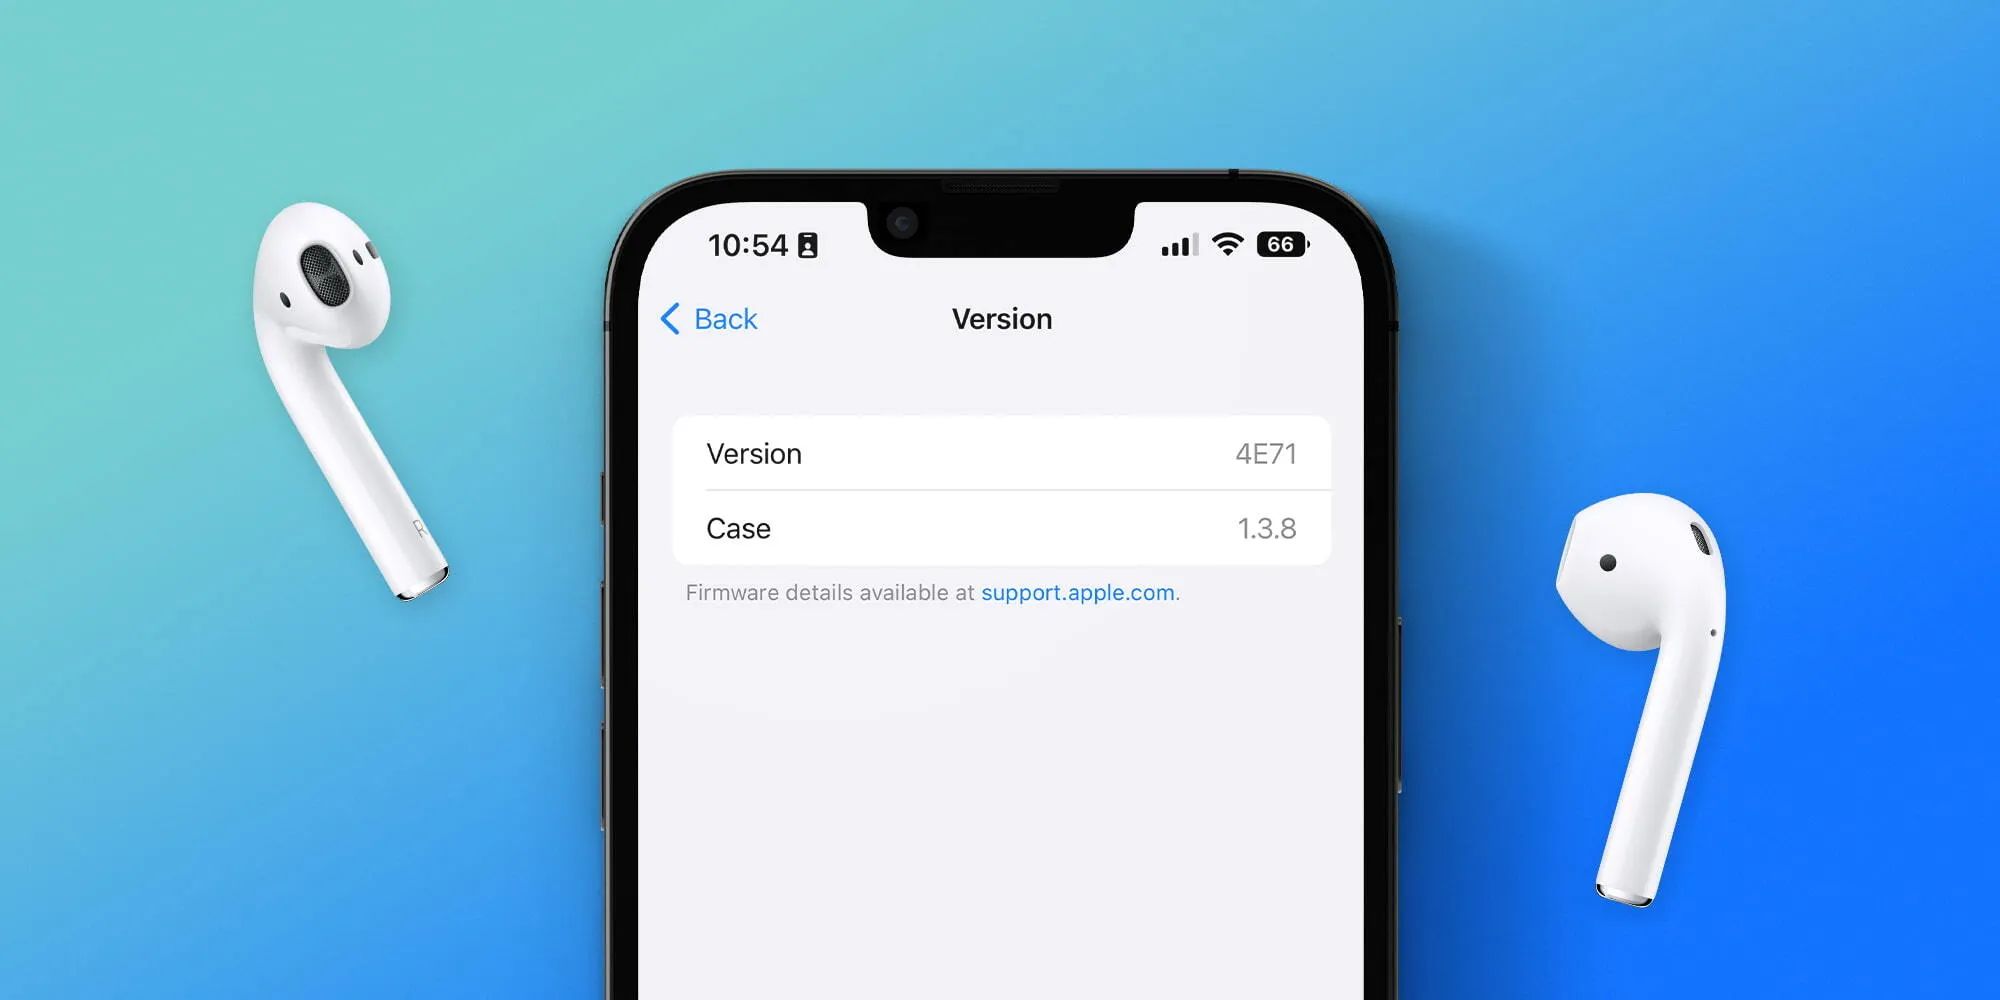
- You will see the firmware version listed next to “Firmware Version”. Take note of this version number.
Once you have noted the current firmware version, you can proceed to the next step to check if an update is available and learn how to install it.
It’s worth mentioning that periodically checking for updates is a good habit to ensure you’re enjoying the latest features and improvements. Apple regularly releases firmware updates for AirPods to address performance issues, enhance connectivity, and introduce new functionalities.
Step 2: Connect Your AirPods to Your Device
Before proceeding with the firmware update, ensure that your AirPods are properly connected to your device. This step is crucial as the update process relies on a stable connection between your AirPods and your device.
Here’s how you can connect your AirPods to your device:
- Open the charging case of your AirPods and make sure the AirPods are in the case.
- On your iPhone or iPad, go to the home screen and swipe down from the top-right corner to open the Control Center. If you’re using a Mac, click on the Bluetooth icon in the menu bar.
- In the Control Center (iPhone or iPad) or the Bluetooth menu (Mac), make sure that Bluetooth is enabled. If it’s not, tap on the Bluetooth icon to turn it on.
- On your device, you should see your AirPods listed as an available device under the Bluetooth settings. Tap on your AirPods to connect them to your device. If prompted, confirm the pairing.
- Once connected, you will see a confirmation message or a checkmark next to your AirPods in the Bluetooth settings.
With your AirPods successfully connected to your device, you’re now ready to proceed with the firmware update. In the following steps, we will guide you through the specific instructions for updating the firmware on different platforms, including iPhones, Macs, and Windows PCs.
Note that it’s recommended to keep your AirPods charged or connected to a power source during the update to ensure a smooth and uninterrupted process. Let’s move on to the next step and update your AirPods firmware!
Step 3: Update the Firmware Using an iPhone or iPad
If you own an iPhone or iPad, updating the firmware of your AirPods is a straightforward process. Apple provides a seamless integration between its devices, making updates quick and hassle-free.
Here’s how you can update the firmware on your AirPods using an iPhone or iPad:
- Ensure that your AirPods are connected to your iPhone or iPad. Refer to the previous step to connect your AirPods if they are not already connected.
- Make sure your device is connected to a stable Wi-Fi network.
- Go to the home screen on your iPhone or iPad and open the Settings app.
- Scroll down and tap on “General”.
- Scroll down again and tap on “Software Update”.
- If an update for your AirPods is available, you will see it listed here. Tap on “Download and Install” to begin the update process.
- Follow the on-screen instructions to complete the update. It may take a few minutes for the update to install, so be patient.
- Once the update is finished, your AirPods will automatically reconnect to your device.
- Confirm the update by checking the firmware version of your AirPods. Follow the steps outlined in Step 1 to confirm the updated firmware version.
That’s it! Your AirPods’ firmware is now up to date. Updating your AirPods ensures you have the latest features, bug fixes, and performance enhancements provided by Apple. Remember to periodically check for firmware updates to stay on top of any improvements or new functionalities released by Apple.
Next, we will guide you through the process of updating the firmware on your AirPods using a Mac. Let’s dive in!
Step 4: Update the Firmware Using a Mac
If you prefer using your Mac to update the firmware of your AirPods, Apple has made it easy to do so. By following a few simple steps, you can ensure that your AirPods are running on the latest firmware version.
Here’s how you can update the firmware on your AirPods using a Mac:
- Ensure that your AirPods are connected to your Mac. Refer to Step 2 if they are not already connected.
- Make sure your Mac is connected to the internet.
- Click on the Apple menu in the top-left corner of your screen and select “System Preferences”.
- In the System Preferences window, click on “Software Update”.
- If an update for your AirPods is available, you will see it listed here. Click on “Update Now” to initiate the update process.
- Follow the on-screen instructions and wait for the update to complete. This process may take a few minutes.
- Once the update is finished, your AirPods will automatically reconnect to your Mac.
- Confirm the update by checking the firmware version of your AirPods. Refer to Step 1 for instructions on how to check the firmware version.
That’s it! Your AirPods are now updated to the latest firmware version. By keeping your AirPods updated, you’ll have access to the latest features, performance improvements, and bug fixes introduced by Apple.
Next, we’ll walk you through the process of updating the firmware using a Windows PC. Keep reading to learn more!
Step 5: Update the Firmware Using a Windows PC
If you own a Windows PC and want to update the firmware of your AirPods, don’t worry – Apple has provided a way for Windows users to keep their AirPods up to date as well.
Here’s how you can update the firmware on your AirPods using a Windows PC:
- Ensure that your AirPods are connected to your Windows PC. Refer to Step 2 if they are not already connected.
- Open a web browser on your Windows PC and visit the official Apple Support website.
- Search for “AirPods firmware update”, and you will find a support article with instructions for updating AirPods firmware.
- Follow the instructions provided in the support article to download and install the necessary software for updating the firmware on Windows.
- Once the software is installed, open it and follow the on-screen instructions to initiate the firmware update.
- Wait for the update process to complete. This may take a few minutes.
- Once the update is finished, your AirPods will automatically reconnect to your Windows PC.
- Confirm the update by checking the firmware version of your AirPods. Refer to Step 1 for instructions on how to check the firmware version.
Congratulations! Your AirPods firmware is now updated to the latest version using your Windows PC. It’s essential to keep your AirPods updated to enjoy the new features, performance enhancements, and bug fixes provided by Apple.
If you encounter any issues during the update process, make sure to consult the Apple Support website or reach out to Apple Support for further assistance.
Next, we will provide some troubleshooting tips that can help resolve common issues that may arise during the update or while using your updated AirPods. Keep reading!
Step 6: Troubleshooting Tips
While updating the firmware of your AirPods is generally a smooth process, there can be instances where you encounter issues or face difficulties. In this section, we will provide you with some troubleshooting tips to help you overcome common problems and ensure a successful firmware update.
Here are some troubleshooting tips to consider:
- Make sure your AirPods are fully charged or connected to a power source before starting the update. This ensures that the update process is not interrupted due to low battery.
- If the firmware update process gets stuck or takes longer than expected, try restarting your iPhone, iPad, Mac, or Windows PC and attempt the update again.
- Ensure that your iPhone, iPad, Mac, or Windows PC has a stable internet connection throughout the update process. A weak or unstable internet connection can cause issues during the update.
- If your AirPods fail to connect to your device after the update, try forgetting the AirPods from your device’s Bluetooth settings and then reconnecting them.
- If you continue to experience connectivity issues or encounter problems with your updated AirPods, consider resetting your AirPods to factory settings. Refer to the Apple Support website for instructions on how to reset your AirPods.
- Should none of the above troubleshooting tips resolve your issues, reach out to Apple Support for further assistance. They can provide personalized guidance and help you troubleshoot any specific problems you may be facing.
Remember, it’s important to follow the instructions provided by Apple and ensure that your devices are compatible with the firmware update process. Keeping your AirPods updated allows you to enjoy the optimal performance and functionality offered by Apple.
Now that you have successfully updated your AirPods and have troubleshooting tips to resolve any potential issues, you can fully enjoy all the benefits of the latest firmware update. We hope this guide has been helpful in guiding you through the update process.
Enjoy your updated AirPods and happy listening!
Conclusion
Updating the firmware of your AirPods is crucial to ensure you have the best possible audio experience and take advantage of the latest features and performance improvements offered by Apple. Throughout this guide, we have walked you through the step-by-step process of updating your AirPods using various devices, including iPhones, iPads, Macs, and Windows PCs.
By following the instructions provided in this guide, you can easily check the current firmware version of your AirPods and update it to the latest version available. Keeping your AirPods firmware up to date helps enhance connectivity, resolve potential bugs, and introduce new functionalities provided by Apple.
Remember to regularly check for firmware updates for your AirPods to ensure you’re always enjoying the best possible audio experience. Updates often bring valuable improvements and optimizations that can significantly enhance your overall user experience.
In addition to updating your AirPods, we have provided troubleshooting tips to help you overcome any issues that may arise during the update process. If you encounter any difficulties, such as stuck updates or connectivity problems, following the troubleshooting steps mentioned can help resolve those issues.
We hope this guide has been helpful in guiding you through the process of updating your AirPods firmware. Now, you can enjoy your updated AirPods and make the most of their impressive features and sound quality. If you have any further questions or require additional assistance, feel free to reach out to the Apple Support team for personalized guidance.
Thank you for reading, and happy listening with your updated AirPods!