Introduction
Welcome to this guide on how to turn on DJI FPV Goggles! If you’re new to FPV (First Person View) flying or have just acquired a pair of DJI FPV Goggles, you may be wondering how to power them on and get started. Look no further, as we provide you with a step-by-step tutorial on unleashing the immersive world of FPV.
DJI FPV Goggles offer a front-row seat to the thrilling experience of drone flight. With their high-resolution screens and low-latency transmission, these goggles allow you to see through the eyes of your drone in real-time, giving you an unparalleled perspective and control over your aerial maneuvers.
In this guide, we’ll cover all the necessary steps to get your DJI FPV Goggles up and running. From unpacking and charging to pairing with your drone and adjusting settings, we’ve got you covered. So, without further ado, let’s dive in and learn how to turn on DJI FPV Goggles.
Step 1: Unpacking and Charging the FPV Goggles
Before you can power on your DJI FPV Goggles, you need to take them out of the box and ensure they are adequately charged. Here’s what you need to do:
- Unpack the FPV Goggles carefully from the box, being mindful of any protective coverings or accessories included.
- Inspect the goggles for any physical damage or defects. If you notice any, contact DJI support for assistance.
- Locate the power cable and connect it to the charging port on the goggles. The charging port is usually found on the side or bottom of the goggles.
- Plug the other end of the power cable into a suitable power source, such as a wall socket or a USB charger. Make sure to use the provided cable and charger to ensure safe and optimal charging.
- Once connected, the charging indicator on the goggles should light up, indicating that the charging process has begun. Allow the FPV Goggles to charge fully before proceeding to the next step. The charging time may vary depending on the current battery level.
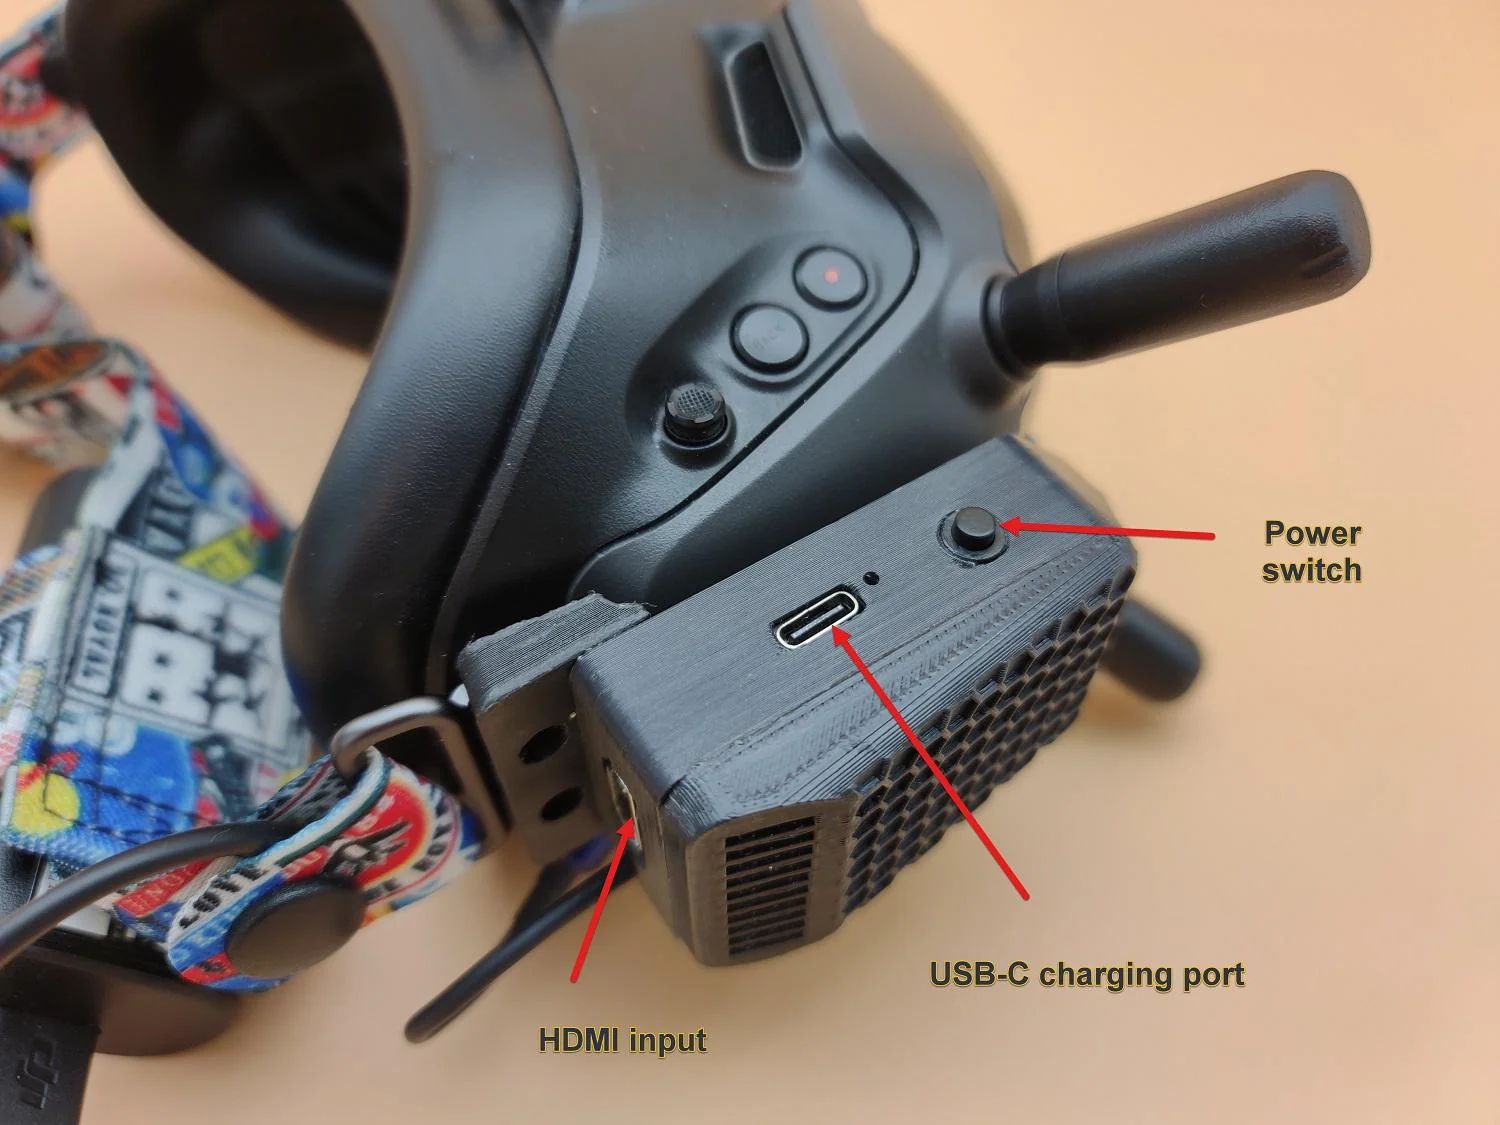
While waiting for the FPV Goggles to charge, you can take this time to familiarize yourself with the different buttons and ports on the goggles. This will come in handy when navigating through the menus and adjusting settings later on.
Once the FPV Goggles are fully charged, you are now ready to power them on and start your FPV adventure!
Step 2: Powering On the FPV Goggles
Now that your DJI FPV Goggles are charged, it’s time to power them on and prepare for an immersive flight experience. Follow these steps:
- Locate the power button on the FPV Goggles. It is typically located on the top or side of the device.
- Press and hold the power button for a few seconds until the goggles power on. Be patient, as it may take a moment for the screens to light up and the DJI logo to appear.
- Once the DJI logo is displayed, the FPV Goggles have successfully powered on. You will now be greeted with the main menu on the screens.
- Tweak the position and angle of the FPV Goggles on your head to ensure a comfortable fit. Adjust the headband and the eye cups as needed to achieve the best viewing experience.
It’s important to note that the initial power-on for the FPV Goggles may require a firmware update. If prompted, follow the on-screen instructions to update the firmware to the latest version. Firmware updates are crucial to ensure optimal performance and compatibility with your DJI drone.
Once the FPV Goggles are powered on and properly adjusted, you are now ready to dive into the world of FPV flying. Prepare your DJI drone and get ready to experience the thrill of seeing the world from a whole new perspective!
Step 3: Updating Firmware (if necessary)
Before you proceed with pairing the FPV Goggles with your DJI drone, it’s essential to ensure that the firmware of the goggles is up to date. Firmware updates provide performance improvements, bug fixes, and new features that enhance your flying experience. Follow these steps to update the firmware:
- Connect the FPV Goggles to your computer using the provided USB cable.
- Visit the DJI website or open the DJI Assistant 2 software on your computer.
- Download and install the latest version of the DJI Assistant 2 software if you haven’t already.
- Launch the DJI Assistant 2 software and log in with your DJI account.
- Follow the on-screen instructions to connect the FPV Goggles to the DJI Assistant 2 software.
- If a firmware update is available for the FPV Goggles, you will be prompted to download and install it. Click on the appropriate options to initiate the update process.
- Ensure that the FPV Goggles remain connected and powered on during the firmware update. Do not disconnect or turn off the goggles until the update is complete.
- Once the firmware update is finished, the FPV Goggles will automatically restart. You can then disconnect them from the computer.
It’s crucial to keep your DJI FPV Goggles updated with the latest firmware to access the latest features and improvements. Regularly checking for firmware updates and installing them ensures optimal performance and compatibility with your DJI drone.
Now that you have updated the firmware of your FPV Goggles (if necessary), you are ready to move on to the next step of pairing them with your DJI drone.
Step 4: Pairing the FPV Goggles with your DJI Drone
Pairing your DJI FPV Goggles with your DJI drone is an essential step to establish a wireless connection and experience the real-time FPV view. Follow the instructions below to successfully pair your goggles with your drone:
- Turn on your DJI drone and ensure that it is in pairing mode. Refer to your drone’s user manual for instructions on how to enter pairing mode.
- Press the power button on the FPV Goggles and wait for them to fully boot up.
- On the main menu of the goggles, select “Settings,” usually represented by a gear icon.
- In the settings menu, select “Drones” or “Drone Pairing” to initiate the pairing process.
- Within the drone pairing menu, the FPV Goggles will search for available drones. Select your DJI drone from the list of available options.
- Follow the on-screen instructions to complete the pairing process. This may involve confirming a pairing request on both the goggles and the drone.
- Once the pairing is successful, the FPV Goggles will establish a wireless connection with your DJI drone. You will now be able to view the live video feed from your drone on the goggles.
- Ensure that the FPV Goggles and the drone remain within range of each other for a stable connection.
It’s important to note that the pairing process may vary slightly depending on the DJI drone model you are using. Always refer to your drone’s user manual for specific instructions on how to pair it with the FPV Goggles.
Once the FPV Goggles are successfully paired with your DJI drone, you are ready to take to the skies and experience the thrilling world of FPV flying!
Step 5: Adjusting Settings on the FPV Goggles
After pairing your DJI FPV Goggles with your drone, you may want to customize and adjust various settings to suit your preferences and flying style. Here are some common settings you can adjust on the FPV Goggles:
- Brightness and Contrast: Depending on the lighting conditions, you can modify the brightness and contrast settings of the goggles to optimize the visual experience.
- Channel and Frequency: If you encounter signal interference or want to switch to a different frequency, you can access the channel and frequency settings to manually select the best one for your location.
- FPV Mode: You can switch between different FPV modes, such as “Cinematic” or “Sport,” to adjust the display settings according to your flying style and the type of footage you want to capture.
- Head Tracking: If your DJI drone supports head tracking, you can enable this feature on the goggles. Head tracking allows you to control the camera movement of the drone by simply moving your head.
- Audio Settings: You can adjust the volume and audio settings on the FPV Goggles, including enabling or disabling audio notifications and alerts from the drone.
To access and adjust these settings on your FPV Goggles, follow these steps:
- While wearing the goggles, press the menu button, typically represented by an icon with three horizontal lines.
- Navigate through the menu using the touchpad or buttons on the goggles and find the “Settings” option.
- Within the settings menu, explore the available options and select the desired setting you wish to adjust.
- Make the necessary adjustments and save the changes.
It’s important to familiarize yourself with the available settings on your specific model of FPV Goggles. Refer to the user manual or online resources for detailed information on the settings available for your particular model.
By adjusting the settings on your DJI FPV Goggles, you can optimize your flying experience and capture stunning aerial footage that aligns with your unique preferences and requirements.
Step 6: Testing the FPV Goggles
Once you have adjusted the settings on your DJI FPV Goggles, it’s time to put them to the test and experience the exhilaration of FPV flying. Follow these steps to ensure a successful test flight:
- Ensure that the FPV Goggles are securely and comfortably positioned on your head.
- Power on your DJI drone and make sure it is in a safe and open flying area.
- Confirm that the FPV Goggles are successfully connected to the drone’s live video feed.
- Take a moment to familiarize yourself with the controls and flight modes available on your DJI drone.
- Gently move the control sticks to hover the drone in mid-air and get a feel for the FPV view through the goggles.
- Gradually explore the flight capabilities of the drone, testing its maneuverability and responsiveness while enjoying the immersive cockpit-like experience provided by the FPV Goggles.
- Pay attention to the video quality, latency, and overall performance of the FPV feed. Adjust the settings on the goggles if necessary to optimize the experience.
During the test flight, it’s crucial to maintain situational awareness and fly responsibly. Always adhere to local laws and regulations regarding drone flight, respect privacy, and prioritize safety.
As you gain more experience with FPV flying, you can experiment with different flight modes, capture stunning aerial footage, and even explore more advanced features like obstacle avoidance (if available on your drone). The possibilities are endless!
Take your time to practice and hone your skills using the FPV Goggles. As you grow more comfortable with the immersive experience, you will unlock new levels of excitement and creativity in your aerial adventures.
Conclusion
Congratulations! You have successfully learned how to turn on DJI FPV Goggles and embark on an incredible journey into the world of FPV flying. By following the steps in this guide, you have unpacked and charged the goggles, powered them on, updated the firmware (if necessary), paired them with your DJI drone, adjusted the settings, and tested them during a thrilling flight.
The DJI FPV Goggles offer a truly immersive and exhilarating experience, allowing you to see through the eyes of your drone in real-time. With high-resolution screens, low-latency transmission, and customizable settings, you can enjoy a personalized and breathtaking FPV flight experience unlike any other.
Remember to always prioritize safety while using the FPV Goggles. Familiarize yourself with the flight regulations in your area, practice in open spaces, and exercise caution to avoid accidents or any disturbances to others.
Whether you’re a beginner venturing into the world of FPV or a seasoned pilot looking to upgrade your equipment, the DJI FPV Goggles are a fantastic choice. So go ahead, explore new perspectives, capture stunning footage, and let your creativity soar with the DJI FPV Goggles!