Introduction
Welcome to the world of smart TVs! If you are the proud owner of a new smart TV and a Dish receiver, you’re in for an immersive entertainment experience. By setting up your Dish receiver to work with your smart TV, you can access a wide range of streaming services, apps, and on-demand content directly from your television. In this article, we will guide you through the process of setting up your smart TV with Dish, step by step.
With a smart TV, you can enjoy the best of both worlds – cable and internet-based content – all from the comfort of your living room. Whether you want to catch up on your favorite TV shows, stream movies or sports events, or browse through online videos, a smart TV can handle it all. And by integrating your Dish receiver with your smart TV, you can seamlessly switch between your favorite cable channels and online services.
Before we dive into the setup process, it’s essential to check if your TV has the necessary smart capabilities. Most modern televisions come with built-in smart features, allowing you to connect to the internet and access a variety of streaming services. If your TV doesn’t have these features, don’t worry! You can still enjoy a smart TV experience by using external devices like streaming sticks or set-top boxes.
Once you’ve confirmed that your TV is a smart TV, the next step is to connect it to the internet. This connection is crucial as it allows your TV to stream content and access online services. Depending on your TV model, you can connect it to the internet through Wi-Fi or an Ethernet cable. Make sure you have a stable internet connection before proceeding with the setup.
After establishing an internet connection, the next step is to connect your Dish receiver to your smart TV. This connection enables you to view cable channels and enjoy your Dish subscription on the smart TV interface. Depending on your TV’s input options, you can connect the receiver using HDMI, component, or composite cables.
Once the physical connections are in place, it’s time to set up the Dish programming on your smart TV. This involves configuring the input source, scanning for channels, and ensuring that the channel lineup matches your Dish subscription. Follow the on-screen instructions and refer to the user manual for your specific TV and Dish receiver model.
Lastly, you’ll need to activate and configure the smart features on your Dish receiver. This step allows you to access apps, streaming services, and other online content available through your Dish subscription. Make sure to follow the activation process provided by Dish and customize the settings according to your preferences.
Now that you have an overview of the setup process, let’s dive deeper into each step and guide you through the intricacies of connecting your smart TV with Dish.
Step 1: Check your TV’s smart capabilities
The first step in setting up your smart TV with Dish is to determine if your television has built-in smart capabilities. Most newer TVs come equipped with smart features, allowing you to access a variety of online streaming services and apps directly from the TV’s interface. These smart features enhance your entertainment experience by providing a seamless integration of traditional cable programming and online content.
To check if your TV has smart capabilities, you can refer to the product specifications or user manual that came with your television. Look for terms such as “smart TV,” “internet-enabled,” or “Wi-Fi compatible.” Alternatively, you can also look for specific branding like “LG Smart TV,” “Samsung Smart Hub,” or “Sony Android TV,” depending on the manufacturer.
If you’re unable to find the information in the manual or product specifications, you can visually inspect the TV itself. Smart TVs often have dedicated buttons or logos on the remote control or the TV itself that indicate the presence of smart features. Look for buttons labeled “Smart Hub,” “Home,” or icons that resemble a globe or Wi-Fi signal.
In some cases, older TV models may not have built-in smart capabilities. However, this doesn’t mean you can’t enjoy a smart TV experience. There are external devices available, such as streaming media players like Roku, Amazon Fire TV Stick, or Apple TV, which can be connected to your TV and provide smart functionality. These devices connect to your TV via HDMI and offer access to numerous streaming services and apps.
Once you have confirmed that your TV has smart capabilities, it’s essential to familiarize yourself with the available features. Take the time to explore the pre-installed apps, settings options, and user interface of your smart TV. This will help you better understand how to navigate and access the various features and content available on your smart TV.
Keep in mind that the available smart features and apps may differ depending on the brand and model of your TV. Some popular apps that are commonly found on smart TVs include Netflix, YouTube, Hulu, Amazon Prime Video, and various streaming music services. It’s also worth noting if your TV supports popular streaming services or if it has its own app store for downloading additional apps.
By checking your TV’s smart capabilities and familiarizing yourself with its features, you’ll be well-prepared to proceed with the setup process. In the next step, we will guide you on how to connect your smart TV to the internet, enabling you to access a vast array of online content and services.
Step 2: Connect your Smart TV to the Internet
Connecting your smart TV to the internet is an essential step in setting up a smart TV with Dish. This connection allows you to stream online content, access apps, and make the most of your smart TV’s features. Fortunately, most modern smart TVs offer multiple options for connecting to the internet.
One common method is to connect your TV to your home Wi-Fi network. To do this, navigate to the TV’s settings menu and look for the network or Wi-Fi settings. Select your network from the available list of networks and enter the password if prompted. Once connected, your TV will have access to the internet, allowing you to browse the web, stream content, and download apps.
If connecting via Wi-Fi is not an option, you can also use an Ethernet cable to establish a wired connection. Simply connect one end of the Ethernet cable to your TV’s Ethernet port and the other end to your router or modem. This method provides a more stable and reliable internet connection, which is especially beneficial when streaming high-quality video content.
When setting up your smart TV’s internet connection, it’s important to ensure that your router or modem is functioning properly. Make sure that the internet connection is active and that other devices in your home can successfully connect to the internet. If you encounter any issues, try restarting your router or contacting your internet service provider for assistance.
Once your smart TV is connected to the internet, it’s a good idea to test the connection by launching a streaming app or accessing a website. This will help verify that your TV is successfully accessing online content and that the internet connection is stable.
Additionally, some smart TVs offer advanced internet features, such as wireless screen mirroring or content sharing with other devices. These features allow you to stream videos, display photos, or play music directly from your smartphone, tablet, or computer to your smart TV. If you’re interested in utilizing these features, consult your TV’s user manual for instructions on how to set them up.
Connecting your smart TV to the internet opens up a world of entertainment possibilities. You can now enjoy streaming services, browse the web, access online apps, and take advantage of the various features that make your TV a truly smart device. With a stable internet connection, you’re one step closer to fully integrating your Dish receiver with your smart TV. The next step will guide you through connecting your Dish receiver to your smart TV, allowing you to enjoy cable channels and your Dish subscription alongside online content.
Step 3: Connect your Dish receiver to your Smart TV
Now that your smart TV is connected to the internet, it’s time to connect your Dish receiver to your TV. This will enable you to view cable channels and access your Dish subscription through the smart TV’s interface. Connecting the Dish receiver to your TV is a straightforward process, and there are a few different options depending on your TV’s input capabilities.
The most common method is to use an HDMI cable. HDMI (High-Definition Multimedia Interface) provides both high-quality video and audio in a single cable. To connect your Dish receiver to your smart TV using HDMI, locate the HDMI output port on the back of the receiver and the HDMI input port on your TV. Insert one end of the HDMI cable into the output port of the receiver and the other end into the input port on your TV. Remember to take note of the HDMI port number on your TV, as you will need to select the corresponding input source when using the smart TV.
If your TV doesn’t have an HDMI input, you can use component cables or composite cables. Component cables are color-coded and typically have three video connections (red, green, and blue) along with separate red and white audio connections. Composite cables, on the other hand, use a single yellow video connection along with red and white audio connections. Connect the corresponding cables from the Dish receiver to the matching inputs on your TV.
Once the physical connections are in place, power on both your Dish receiver and your smart TV. Use your TV remote to change the input source to the one connected to your Dish receiver. This will allow your TV to recognize the Dish receiver and display the cable channels and Dish programming.
During the initial setup, your smart TV may prompt you to select the video input source and perform a scan for available channels. Follow the on-screen instructions to complete these steps and ensure that your TV recognizes the Dish receiver as the source for cable programming.
If you encounter any issues with the connection or are not able to view the cable channels, double-check the physical connections and make sure they are secure. You can also consult the user manual for your specific TV model and Dish receiver for troubleshooting tips and guidance.
By successfully connecting your Dish receiver to your smart TV, you have now integrated your Dish subscription into the smart TV’s interface. This means you can easily switch between cable channels and online content without the need to change inputs or switch remotes. In the next step, we will walk you through the process of setting up the Dish programming on your smart TV, ensuring that you have access to your desired channel lineup.
Step 4: Set up the Dish programming on your Smart TV
Once your Dish receiver is successfully connected to your smart TV, it’s time to set up the Dish programming on your TV. This involves configuring the input source, scanning for channels, and ensuring that your channel lineup matches your Dish subscription.
Start by navigating to the settings menu on your smart TV. Look for the option to set up the input source or input selection. Here, you can select the input source corresponding to the Dish receiver (HDMI, component, or composite) that you connected in the previous step.
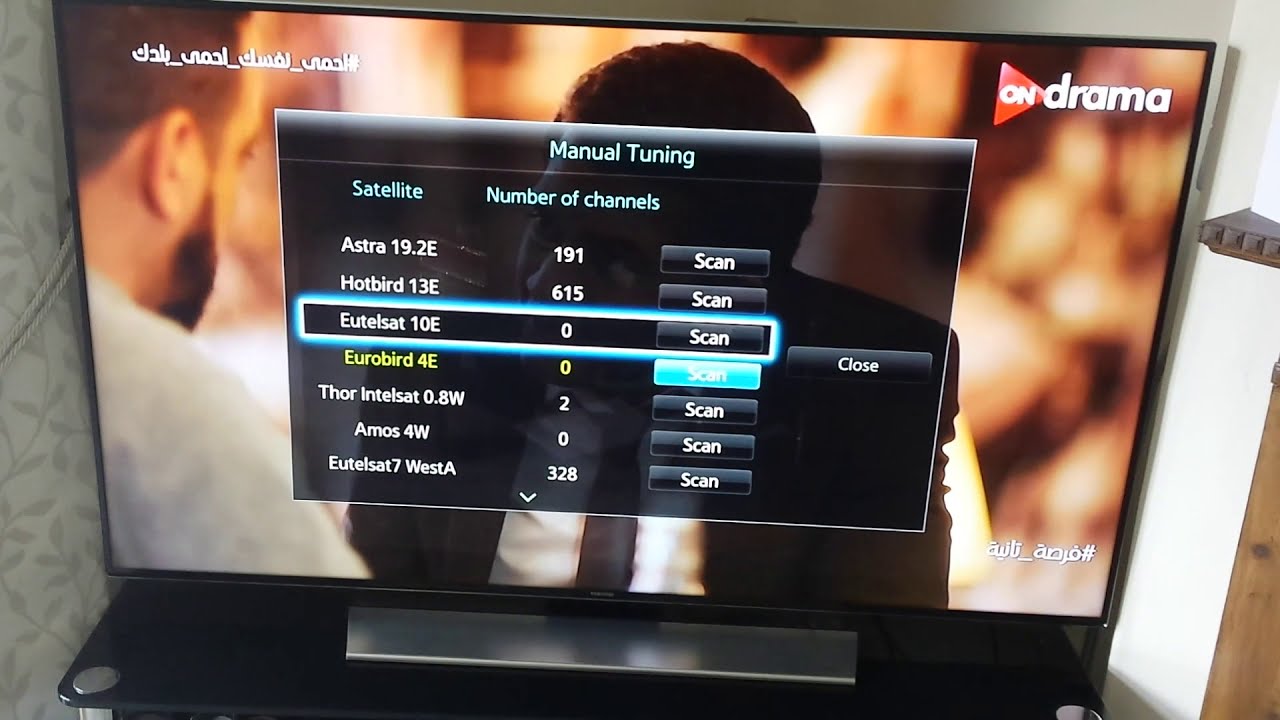
Once the input source is set, perform a channel scan on your smart TV. This scan will automatically detect the available channels and program them into your smart TV’s channel lineup. The steps to perform a channel scan may vary depending on your TV model, so consult the user manual or on-screen instructions for guidance.
During the channel scan, make sure to select the appropriate source or input that corresponds to your Dish receiver. This will ensure that the scan captures the channels from the Dish receiver and includes them in your smart TV’s channel lineup.
After the channel scan is complete, you should see the Dish programming integrated into your smart TV’s channel list. Use your TV remote to navigate through the channel lineup and confirm that you can access your desired channels.
If you notice any missing channels or if the channel lineup doesn’t match your Dish subscription, it’s possible that the scan didn’t include all the available channels. In such cases, you may need to perform a manual channel add or simply re-scan the channels to ensure a comprehensive channel lineup.
Keep in mind that the channel options and organization may differ between your Dish receiver and your smart TV’s interface. However, once set up, you can conveniently switch between cable channels and other smart TV features using the TV’s remote control.
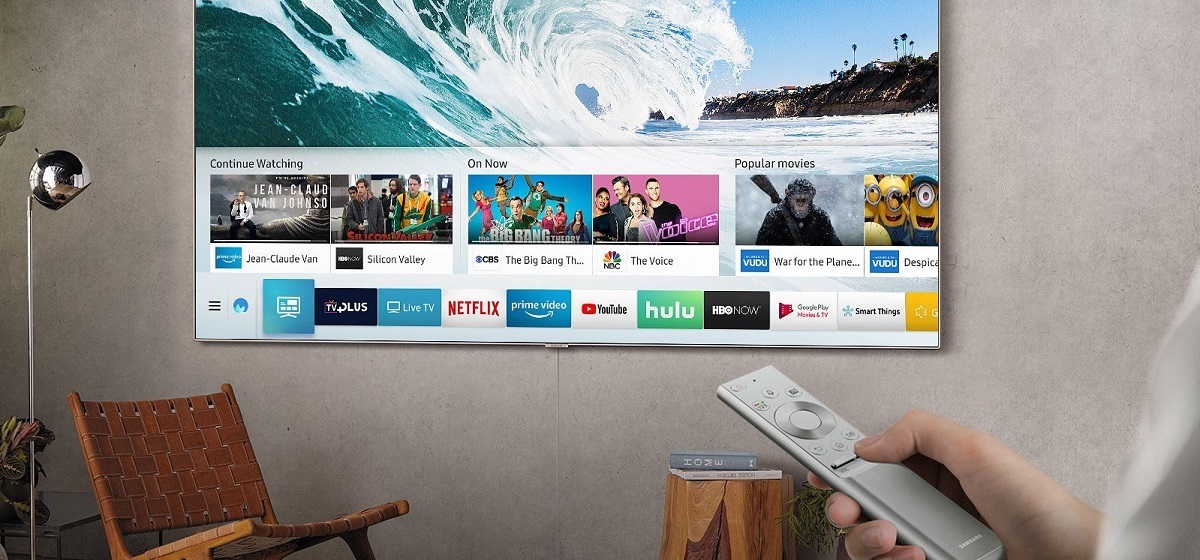
In addition to the cable channels, your smart TV may also have access to various streaming apps and services. Take the time to explore the smart TV’s app store or app menu to discover the available options. You can download additional apps or sign in to existing streaming accounts to further expand your entertainment choices.
By setting up the Dish programming on your smart TV, you have successfully integrated your cable channels into the smart TV interface. This makes it easier than ever to access both cable programming and online content from a single device.
In the next step, we will guide you through the process of activating and configuring the smart features on your Dish receiver, enabling you to access apps, streaming services, and other online content available through your Dish subscription.
Step 5: Activate and Configure Smart Features on your Dish Receiver
Now that your Dish receiver is connected to your smart TV and the cable channels are set up, it’s time to activate and configure the smart features available on your Dish receiver. By doing so, you’ll be able to access a variety of apps, streaming services, and other online content that comes with your Dish subscription.
The process of activating the smart features on your Dish receiver may vary depending on the model and the specific capabilities of your receiver. However, most Dish receivers offer an on-screen setup wizard that will guide you through the activation process.
To begin, navigate to the menu or settings on your Dish receiver using the remote control. Look for the option that allows you to activate or enable the smart features. Follow the on-screen prompts to complete the activation process.
During the activation, you may be prompted to enter your Dish account information or create a new account if you haven’t done so already. This information will verify your account and allow you to access the smart features associated with your Dish subscription.
Once you have activated the smart features, you can begin configuring the settings according to your preferences. In the settings menu of the Dish receiver, you may find options to customize the display resolution, audio output, closed captions, parental controls, and more.
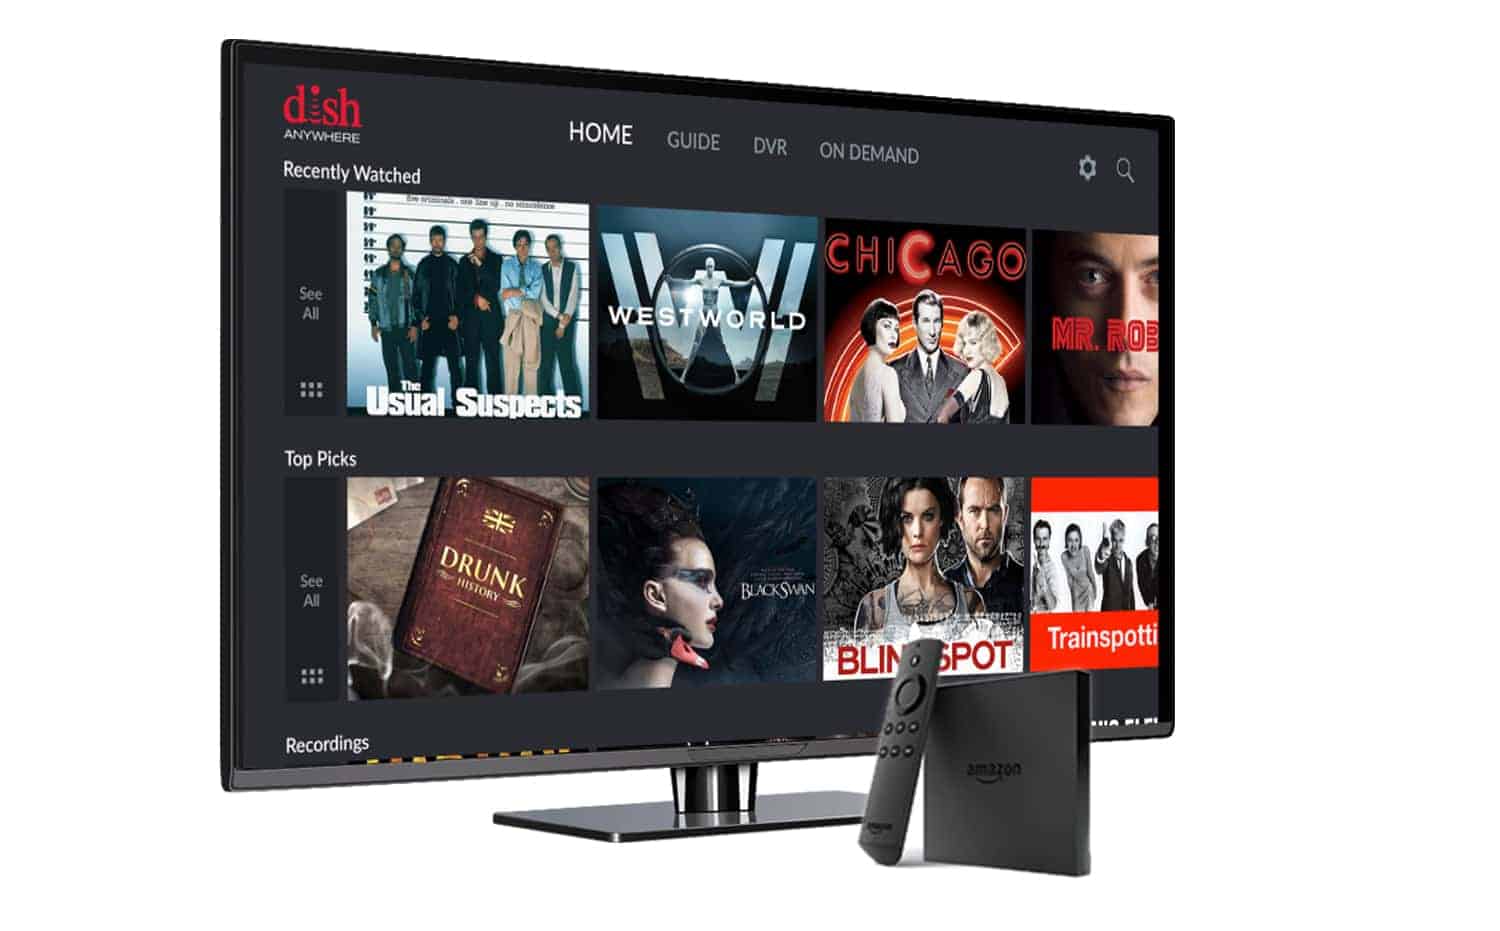
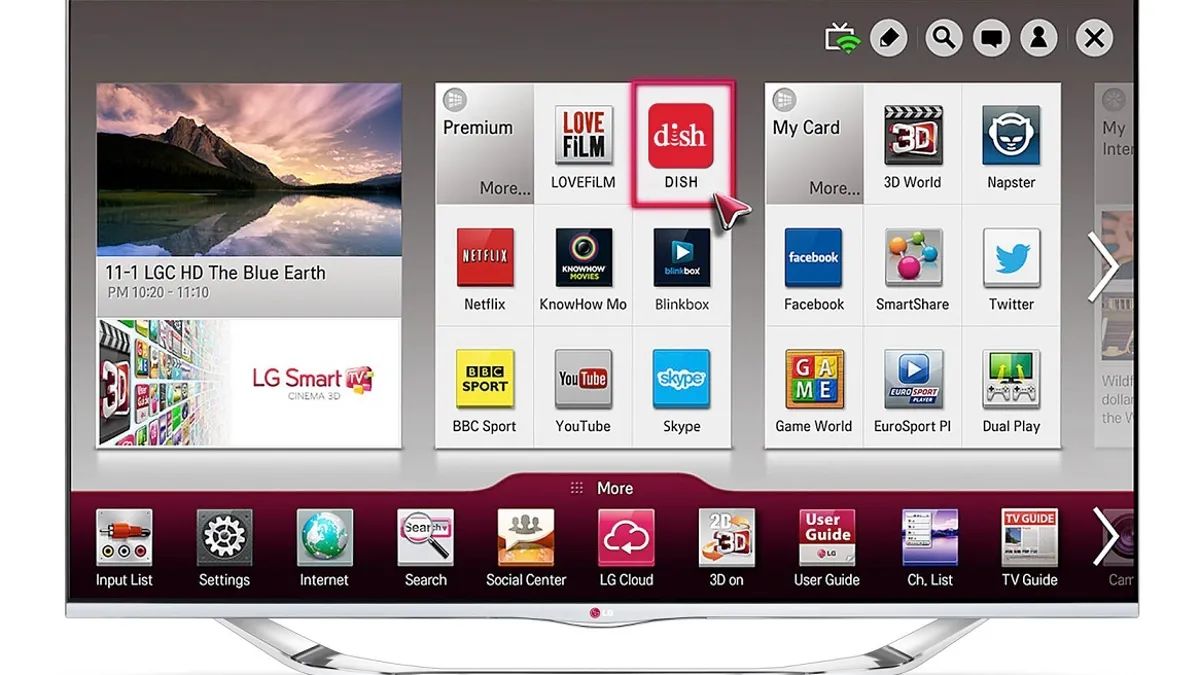
Additionally, explore the available apps and streaming services on your Dish receiver. Depending on the model and the features provided, you may find popular streaming apps such as Netflix, Hulu, YouTube, or Amazon Prime Video. Accessing these services will require signing in with your respective account information or creating new accounts if you don’t have them already.
Take advantage of the settings and customization options to enhance your smart TV experience through the Dish receiver. Adjust the audio and video settings to your liking, set up parental controls to manage content access for different viewers, and explore any additional features offered by your specific model.
It’s worth noting that Dish continually updates their receivers with new features and enhancements. As a result, it’s important to check for software updates periodically to ensure that you have the latest features and improvements available.
By activating and configuring the smart features on your Dish receiver, you have unlocked a world of additional content and functionality. You can now enjoy access to a variety of apps, streaming services, and other online content directly from your smart TV interface, all while still being able to switch seamlessly to your Dish cable channels.
With your smart TV fully connected to your Dish receiver and the smart features set up, you can now enjoy the best of both worlds in one convenient setup. Sit back, relax, and experience the countless entertainment opportunities that await you.
Conclusion
Setting up your smart TV with Dish opens up a whole new world of entertainment possibilities. Through the integration of your Dish receiver and your smart TV, you can seamlessly switch between cable channels and online content, accessing a vast array of streaming services, apps, and on-demand programming.
In this guide, we’ve walked you through the step-by-step process of setting up your smart TV with Dish. We began by checking if your TV has smart capabilities and ensuring a stable internet connection. We then connected your Dish receiver to your smart TV using HDMI, component, or composite cables. Next, we set up the Dish programming on your smart TV, scanning for channels and ensuring a comprehensive lineup.
Finally, we activated and configured the smart features on your Dish receiver, granting you access to additional apps, streaming services, and online content. With the smart features enabled, you can customize settings, sign in to your favorite streaming accounts, and explore the various features offered by your specific Dish receiver model.
By following these steps, you have created a powerful entertainment hub that combines the convenience of cable channels with the versatility and flexibility of a smart TV. Whether you want to stream movies and shows, browse the web, or enjoy your favorite cable programming, your smart TV with Dish has you covered.
Remember to periodically check for software updates for both your smart TV and Dish receiver to ensure that you have access to the latest features and improvements. Additionally, if you encounter any technical issues or have questions, refer to the user manuals provided by your TV and Dish receiver or contact their respective customer support.
Now that you have successfully set up your smart TV with Dish, it’s time to sit back, relax, and enjoy the world of entertainment at your fingertips. Grab the remote, start exploring, and immerse yourself in a truly interactive and captivating viewing experience.