Introduction
Welcome to this step-by-step guide on how to set up email in QuickBooks. Email integration is essential for sending invoices, receipts, and other important documents directly from your QuickBooks account. By setting up email in QuickBooks, you can streamline your communication process and ensure that your clients receive their invoices and other documents promptly.
Many business owners find it daunting to navigate the various settings and options when it comes to integrating email with QuickBooks. However, with the right guidance, the process can be straightforward and hassle-free.
In this guide, we will walk you through the necessary steps to set up and configure email in QuickBooks, enabling you to send and receive emails seamlessly. Whether you already have an existing email account or need to create a new one specifically for QuickBooks, we will cover everything you need to know.
Setting up email in QuickBooks not only saves time but also improves efficiency by eliminating the need to switch between different platforms for sending and receiving invoices. With email integration, you can customize your email templates, add your logo and company information, and send professional-looking documents directly from QuickBooks.
Furthermore, being able to track your email history within QuickBooks allows you to have a centralized location for all your communication with clients and makes it easier to follow up on outstanding invoices or inquiries.
So, if you’re ready to streamline your communication process and unlock the full potential of QuickBooks, let’s get started with setting up your email integration.
Step 1: Navigate to the Email Settings
The first step in setting up email in QuickBooks is to navigate to the email settings within the software. Follow the instructions below to access the email settings:
- Open QuickBooks on your computer and log in to your account.
- Click on ‘Edit’ in the top menu bar and select ‘Preferences’ from the drop-down menu. This will open the QuickBooks Preferences window.
- In the left-hand navigation pane of the Preferences window, click on ‘Send Forms’ to access the email settings.
Once you have reached the Send Forms section, you are ready to configure your email provider and enter your email account details.
Note: If you haven’t already set up an email account in QuickBooks, you will need to choose an email provider and create an account before proceeding. For example, you can use popular email providers such as Gmail, Yahoo, or Outlook, or you can set up a custom SMTP email server.
Navigating to the email settings is an essential first step in the process, as it allows you to access and configure the necessary options for email integration in QuickBooks. By following the next steps, including choosing your email provider and entering your account details, you can seamlessly send invoices, receipts, and other communications directly from your QuickBooks account.
Step 2: Set Up Email Provider
After navigating to the email settings in QuickBooks, the next step is to set up your email provider. Follow the instructions below to configure your email provider:
- In the Send Forms section of the QuickBooks Preferences window, select the ‘My Preferences’ tab.
- Click on the ‘Add’ button to add a new email provider.
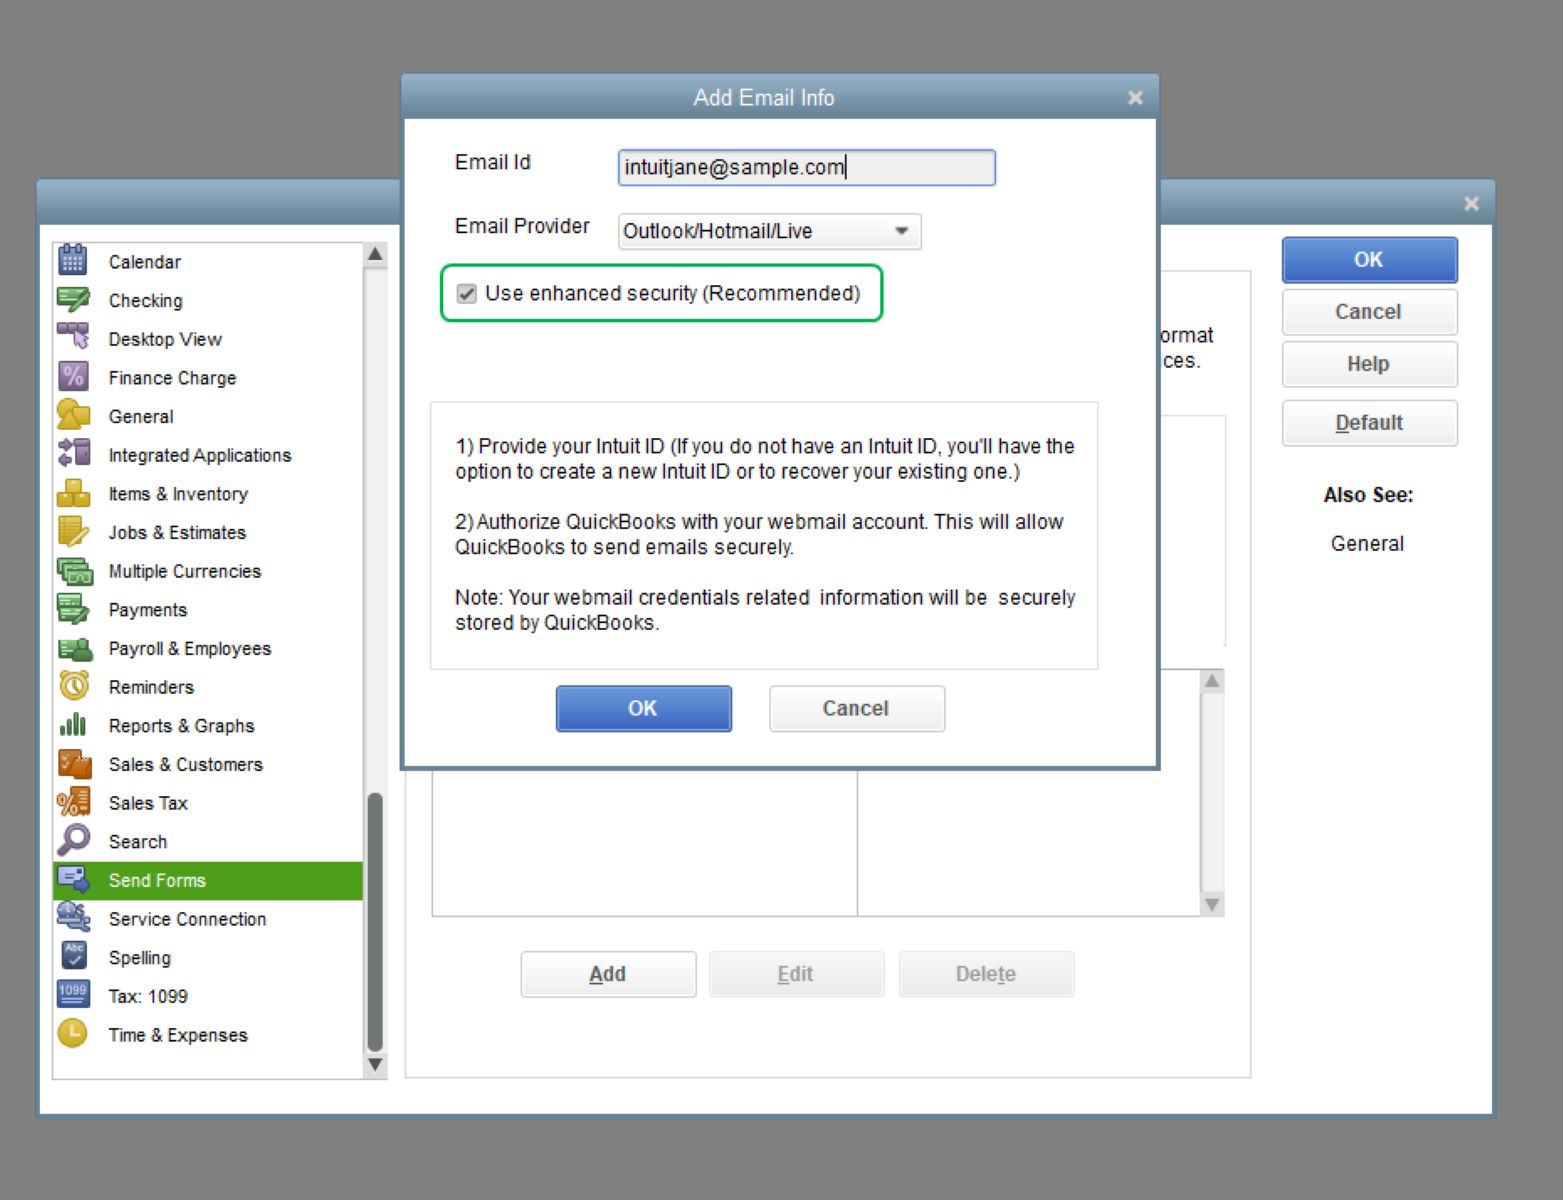
- A window will appear with a list of supported email providers. Choose the provider that corresponds to your email account or select ‘Other’ if your provider is not listed.
- If you selected ‘Other’, QuickBooks will prompt you to enter your email provider’s server settings manually. Consult your email provider’s documentation or support team for the correct server settings.
- For supported email providers, QuickBooks will prompt you to enter your email address and password for authentication purposes. Enter the required information and click ‘OK’ to proceed.
By setting up your email provider in QuickBooks, you establish a direct connection between QuickBooks and your email account. This connection allows QuickBooks to send emails on your behalf and ensures that your emails are properly authenticated and delivered to the intended recipient.
If you have multiple email accounts or want to configure additional email providers, you can repeat the steps above to add and set up multiple email providers in QuickBooks.
Configuring your email provider is a crucial step in the process of setting up email in QuickBooks. Once you have successfully added and configured your email provider, you are now ready to enter your email account details in the next step.
Step 3: Enter Your Email Address
After setting up your email provider in QuickBooks, the next step is to enter your email address. Follow the instructions below to enter your email address:
- In the Send Forms section of the QuickBooks Preferences window, ensure that the ‘My Preferences’ tab is selected.
- Click on the ‘Edit’ button next to your email provider in the list of email providers.
- A window will appear where you can enter your email address. Type in your full email address (e.g., example@example.com).
- Click ‘OK’ to save your email address.
Entering your email address is necessary for QuickBooks to identify and authenticate your email account. With your email address properly configured, QuickBooks will be able to send emails using your specified email provider seamlessly.
It is important to ensure that you enter your email address correctly to avoid any email delivery issues. Double-check that there are no typos or missing characters in your email address before saving the changes.
If you have multiple email accounts or want to use a different email address for specific types of communication (e.g., invoices, receipts), you can repeat the steps above to add and enter additional email addresses in QuickBooks.
By entering your email address in QuickBooks, you are one step closer to fully integrating email into your workflow and being able to send professional-looking communications directly from your QuickBooks account.
Step 4: Enter Your Email Server Details
Once you have entered your email address in QuickBooks, the next step is to enter your email server details. Follow the instructions below to configure your email server settings:
- In the Send Forms section of the QuickBooks Preferences window, ensure that the ‘My Preferences’ tab is selected.
- Click on the ‘Edit’ button next to your email provider in the list of email providers.
- A window will appear where you can enter your email server details. The required information includes your incoming and outgoing email server addresses, usernames, and passwords.
- Consult your email provider’s documentation or support team to obtain the correct email server information.
- Enter the necessary server details in the provided fields.
- Click ‘OK’ to save your email server settings.
Entering your email server details is crucial for QuickBooks to establish a connection with your email provider’s servers. By providing the correct server information, QuickBooks will be able to send and receive emails through your email account seamlessly.
Make sure to double-check that you have entered the server details accurately, including any port numbers or security settings required by your email provider. Incorrect server settings may result in email delivery failures or other connectivity issues.
If you are unsure about your email server details, reach out to your email provider’s support team for assistance. They will be able to guide you through the process of obtaining the necessary server information.
Once you have successfully entered your email server details in QuickBooks, you are now ready to proceed to the next step and choose the appropriate email security setting.
Step 5: Choose the Appropriate Email Security Setting
After entering your email server details in QuickBooks, the next step is to choose the appropriate email security setting. Follow the instructions below to configure your email security:
- In the Send Forms section of the QuickBooks Preferences window, ensure that the ‘My Preferences’ tab is selected.
- Click on the ‘Edit’ button next to your email provider in the list of email providers.
- A window will appear with various settings options, including email security.
- Choose the appropriate email security option based on your email provider’s recommendations and your preference for security.
- Typically, you have the options to either use SSL/TLS or to let QuickBooks manage the security settings automatically.
- Review the additional settings in this window, such as the default email template and the email message format, and make any desired changes.
- Click ‘OK’ to save your email security settings.
Choosing the appropriate email security setting is crucial to ensure the confidentiality and integrity of your email communications. SSL/TLS (Secure Sockets Layer/Transport Layer Security) is a widely adopted encryption protocol that helps protect the privacy of your email content while in transit.
By enabling SSL/TLS, QuickBooks will encrypt your email communications with your email provider, making it more secure. It is generally recommended to utilize SSL/TLS whenever possible to protect sensitive information in your emails.
Alternatively, you can choose to let QuickBooks manage the email security settings automatically. In this case, QuickBooks will use the default security settings recommended by your email provider.
Consider your specific security requirements and the recommendations of your email provider when selecting the appropriate email security setting in QuickBooks. If you are unsure about which option to choose, reach out to your email provider’s support team for guidance.
Once you have chosen and configured the appropriate email security setting, you are now ready to proceed to the final step and test your email settings in QuickBooks.
Step 6: Test Your Email Settings
After configuring your email settings in QuickBooks, it is essential to test them to ensure that everything is working correctly. Follow the instructions below to test your email settings:
- In the Send Forms section of the QuickBooks Preferences window, ensure that the ‘My Preferences’ tab is selected.
- Click on the ‘Test’ button next to your email provider in the list of email providers.
- QuickBooks will prompt you to enter an email address to send a test email.
- Enter an email address where you would like to receive the test email.
- Click ‘Send Test’ to initiate the test email.
- Check your inbox or the designated email address to verify if you have received the test email.
Testing your email settings allows you to verify that QuickBooks can successfully send emails using your configured email provider. It also ensures that emails are being delivered to the intended recipients without any issues.
If you receive the test email in your inbox, congratulations! Your email settings are working correctly, and you can now confidently use QuickBooks to send invoices, receipts, and other communications.
However, if you do not receive the test email or encounter any errors during the testing process, double-check your email settings, including the email address, server details, and security settings. Ensure that they are accurately entered and configured.
If you continue to experience issues with your email settings, verify that your email provider supports the specific configuration you are using with QuickBooks. Contact your email provider’s support team for assistance and troubleshooting.
By thoroughly testing your email settings, you can ensure that your email integration in QuickBooks is working seamlessly, allowing you to send and receive emails efficiently and effectively.
Conclusion
Congratulations! You have successfully set up email in QuickBooks. By following the step-by-step guide outlined in this article, you have configured your email provider, entered your email address and server details, selected the appropriate email security setting, and tested your email settings. Now, you are ready to streamline your communication process and send professional-looking emails directly from your QuickBooks account.
Integrating email with QuickBooks offers numerous benefits, including time savings, improved efficiency, and better organization of your communication with clients. With email integration, you can customize your email templates, add your logo and company information, and track your email history within QuickBooks.
Remember to double-check your email settings periodically to ensure they remain updated and accurate. If you encounter any issues or changes in your email provider’s settings, revisit the relevant sections in QuickBooks to make the necessary adjustments.
Should you require further assistance or encounter any difficulties during the email setup process, do not hesitate to reach out to QuickBooks support or consult the documentation provided by your email provider.
By effectively using email in QuickBooks, you can enhance your business communication, improve customer relations, and simplify your invoice and receipt generation process. Enjoy the benefits of seamless email integration and optimize your workflow with QuickBooks!