Introduction
Welcome to the world of QuickBooks Online, a powerful accounting software that allows businesses to efficiently manage their financial transactions. Whether you are a small business owner or a freelance professional, QuickBooks Online provides a user-friendly interface and robust features to simplify your bookkeeping process.
In this guide, we will walk you through the steps of adding a transaction in QuickBooks Online. Transactions can include invoices, expenses, sales receipts, bills, and more. By accurately recording your financial activities, you can maintain accurate financial records and gain valuable insights into the financial health of your business.
With its intuitive design and seamless integration with your bank accounts, QuickBooks Online makes it easy to keep track of all your income and expenses. Whether you need to add a transaction for a sale, an expense, or even a transfer between accounts, QuickBooks Online has the tools you need to streamline the process.
By following the steps outlined in this guide, you will be able to confidently add transactions in QuickBooks Online and ensure that your financial records are up to date and accurate. So, let’s dive in and learn how to add a transaction in QuickBooks Online.
Step 1: Open QuickBooks Online
To begin adding a transaction in QuickBooks Online, you will first need to open the software and sign in to your account. Here’s how:
- Launch your preferred web browser on your computer.
- Visit the QuickBooks Online website (https://www.quickbooks.intuit.com/).
- Click on the “Sign In” button located in the top right corner of the homepage.
- Enter your QuickBooks Online username and password in the provided fields.
- Click on the “Sign In” button to access your QuickBooks Online account.
Once you have successfully logged in, you will be directed to the QuickBooks Online dashboard, which serves as the central hub for managing your financial activities. From here, you can navigate to different sections of the software to perform various tasks, including adding transactions.
Before moving on to the next step, it’s important to ensure that you have the necessary permissions to perform transaction-related activities. If you don’t have the required access, reach out to your QuickBooks Online administrator or the person responsible for managing user permissions within your organization.
Now that you have successfully opened QuickBooks Online and logged into your account, you are ready to proceed to the next step to begin adding your transaction.
Step 2: Navigate to Transactions
Once you have logged into your QuickBooks Online account, the next step is to navigate to the Transactions section. This is where you will be able to add, view, and manage all your financial transactions. Here’s how to do it:
- From the QuickBooks Online dashboard, locate the left-hand navigation menu.
- Scroll down and look for the “Transactions” tab. Click on it to expand the sub-menu.
- You will see various transaction types listed, such as Sales, Expenses, and Banking.
- Depending on the type of transaction you want to add, click on the corresponding option in the sub-menu. For example, if you want to add a sales transaction, click on the “Sales” option.
By clicking on the relevant transaction type, you will be directed to the respective transaction section where you can begin entering the details of your transaction.
It’s important to note that QuickBooks Online offers a variety of transaction types to suit different financial activities. Some common transaction types include invoices, sales receipts, bills, expenses, and deposits. Each transaction type serves a specific purpose and has its own unique fields and settings.
By organizing transactions into different categories, QuickBooks Online allows you to easily track and analyze your financial data. It also ensures that you record transactions accurately, making it easier to generate reports, reconcile accounts, and prepare taxes.
Now that you have successfully navigated to the Transactions section of QuickBooks Online, it’s time to move on to the next step and start adding the necessary details for your transaction.
Step 3: Select the Transaction Type
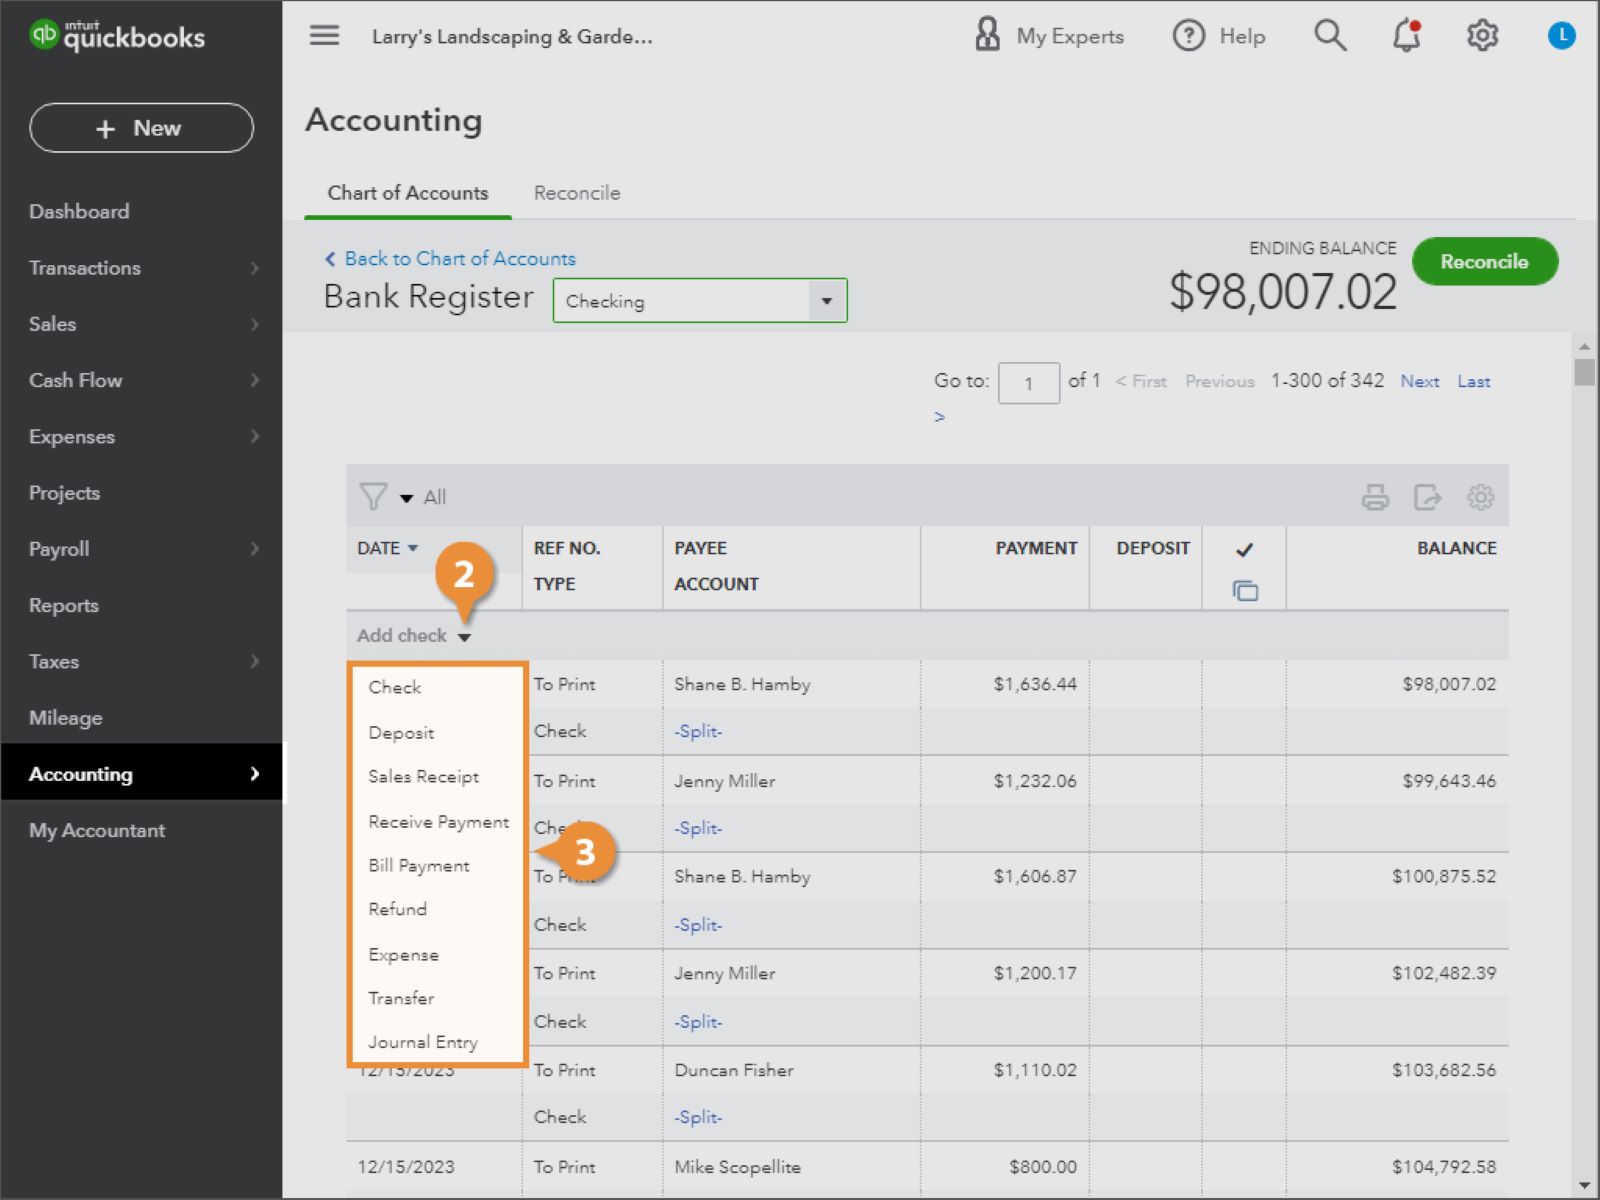
After navigating to the Transactions section in QuickBooks Online, the next step is to select the specific transaction type you want to add. QuickBooks Online offers a range of transaction types to accommodate different financial activities. Here’s how to select the transaction type:
- Under the Transactions section, locate and click on the appropriate transaction type based on the nature of your financial activity. For instance, if you want to add an expense transaction, click on the “Expenses” option.
- After clicking on the transaction type, QuickBooks Online will open a new window or screen where you can enter the details for that specific transaction type.
- Make sure to review the available options and fields specific to the selected transaction type. This allows you to customize the transaction and provide accurate information for your records.
The transaction types available in QuickBooks Online may vary, depending on the subscription plan you have and the features enabled by your administrator. Some common transaction types include invoices, sales receipts, bills, expenses, and deposits.
By selecting the appropriate transaction type, you ensure that QuickBooks Online captures the relevant information required for accurate record-keeping and financial reporting.
It’s important to note that each transaction type may have unique fields or options based on the specific requirements of that transaction. For instance, while adding an expense transaction, you may be asked to provide the vendor name, transaction date, account details, and more.
Now that you have selected the transaction type, you are ready to move on to the next step and enter the necessary transaction details in QuickBooks Online.
Step 4: Enter the Transaction Details
With the transaction type selected in QuickBooks Online, it’s time to enter the specific details for the transaction. This step allows you to provide accurate information and record the financial activity in your books. Here’s how to enter the transaction details:
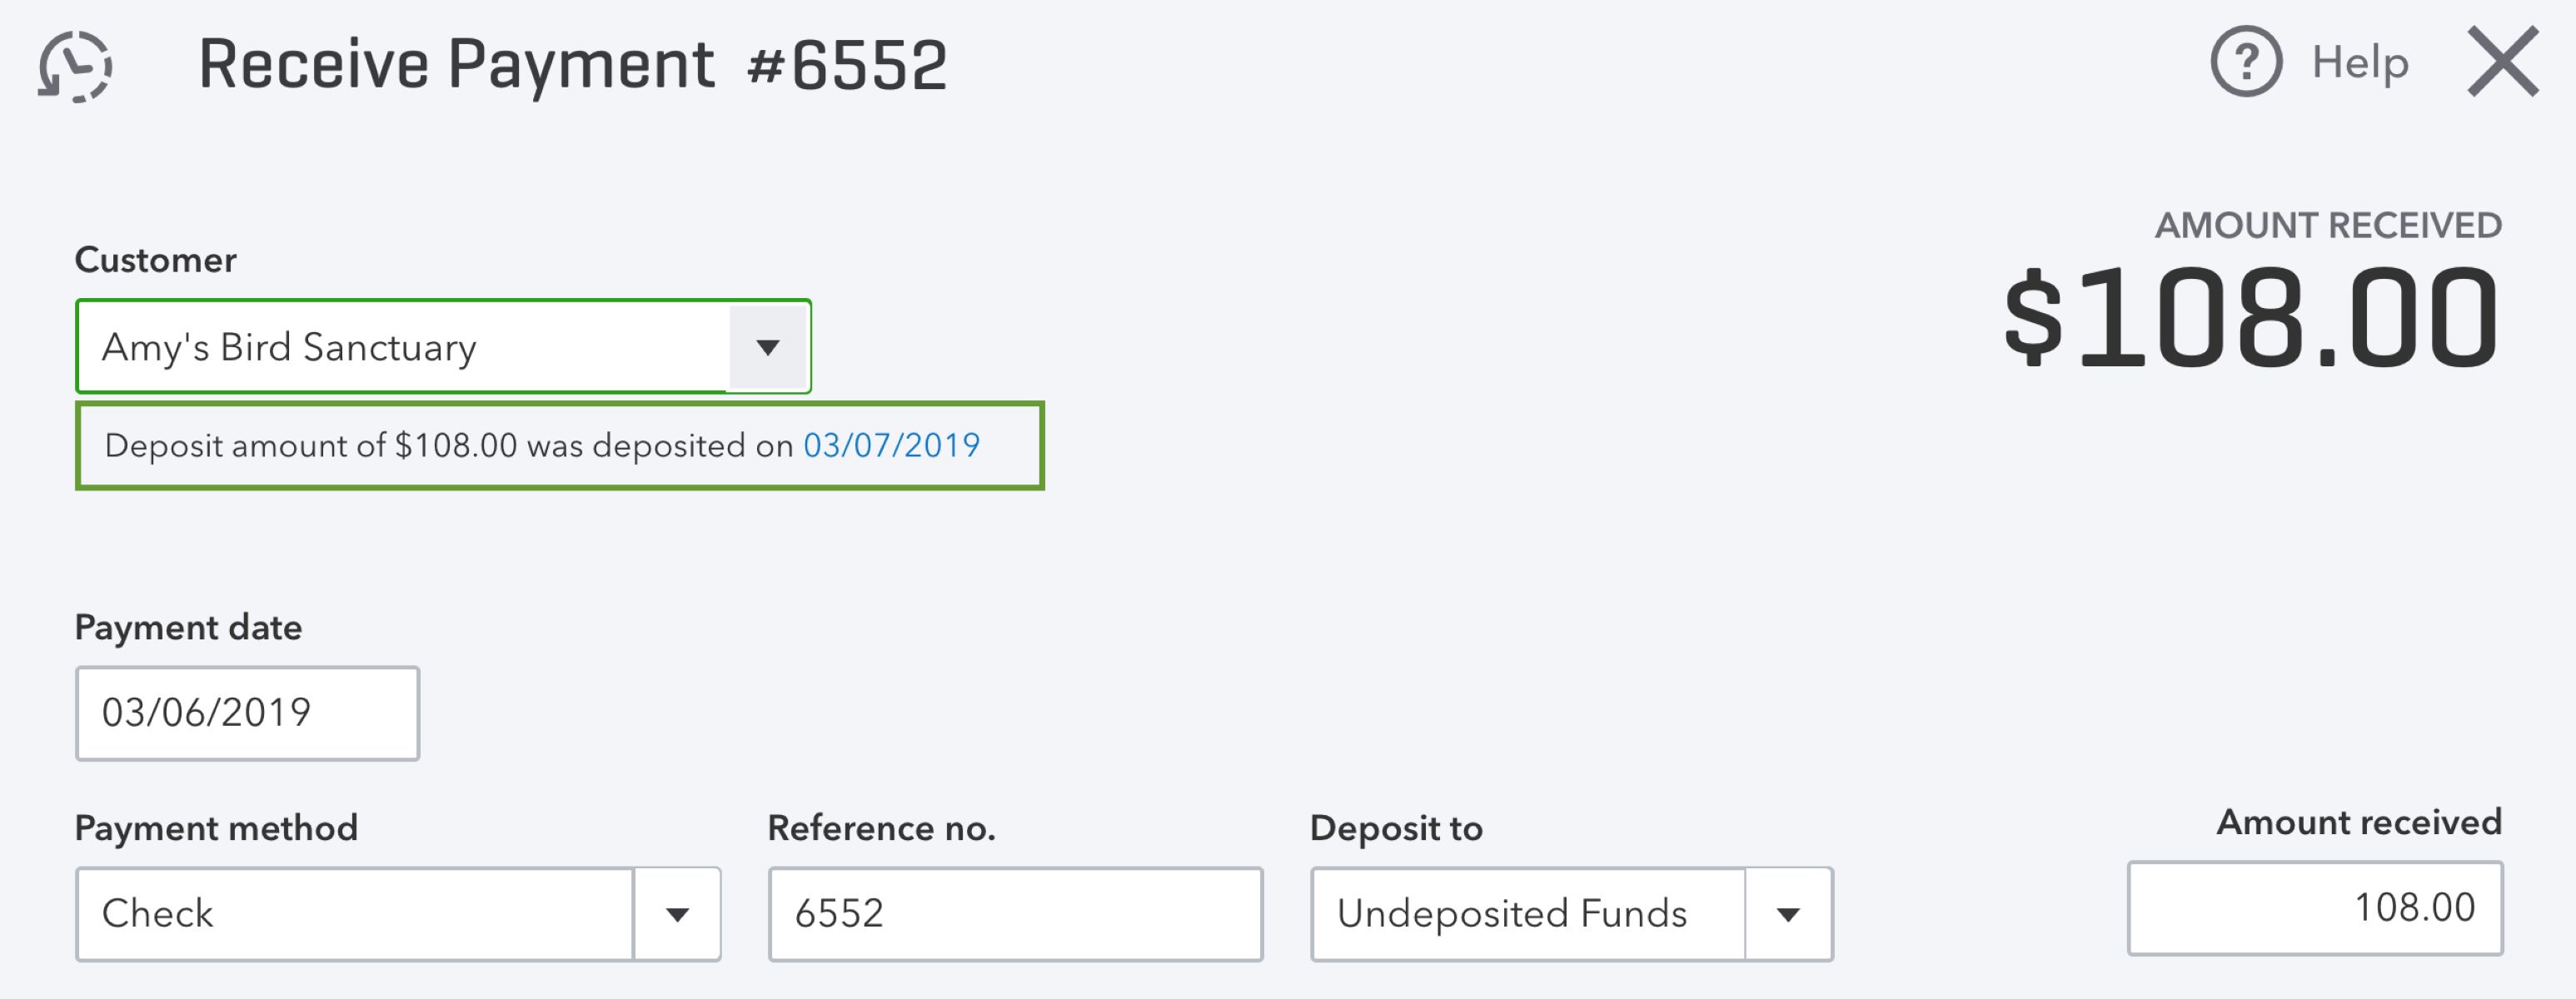
- In the transaction window that opens after selecting the transaction type, begin by filling out the required fields. These fields may include the date of the transaction, customer/vendor name, account details, amount, and any additional relevant information.
- Ensure that you enter the information accurately and double-check for any errors before proceeding. Attention to detail at this stage helps maintain accurate financial records, which is crucial for proper bookkeeping.
- In addition to the required fields, you may also find optional fields or custom fields that allow you to provide more specific details related to the transaction. Take advantage of these fields to add any relevant information that will help in better categorizing or analyzing the transaction.
Depending on the transaction type selected, you may encounter additional options or settings specific to that type. For example, if you are entering an invoice, you may have options to track sales tax, assign payment terms, or set the invoice to be recurring.
QuickBooks Online also provides features such as auto-fill and memorized transactions to simplify the process of entering repetitive transactions or transactions with similar details. These features save time and reduce the chances of errors.
It’s important to note that the transaction details entered in QuickBooks Online should align with the supporting documentation, such as receipts, invoices, or bills. This ensures accuracy and makes it easier to reconcile accounts and prepare financial statements.
Once you have entered all the necessary transaction details, proceed to the next step to add line items, if applicable, to further specify the items or services involved in the transaction.
Step 5: Add Line Items
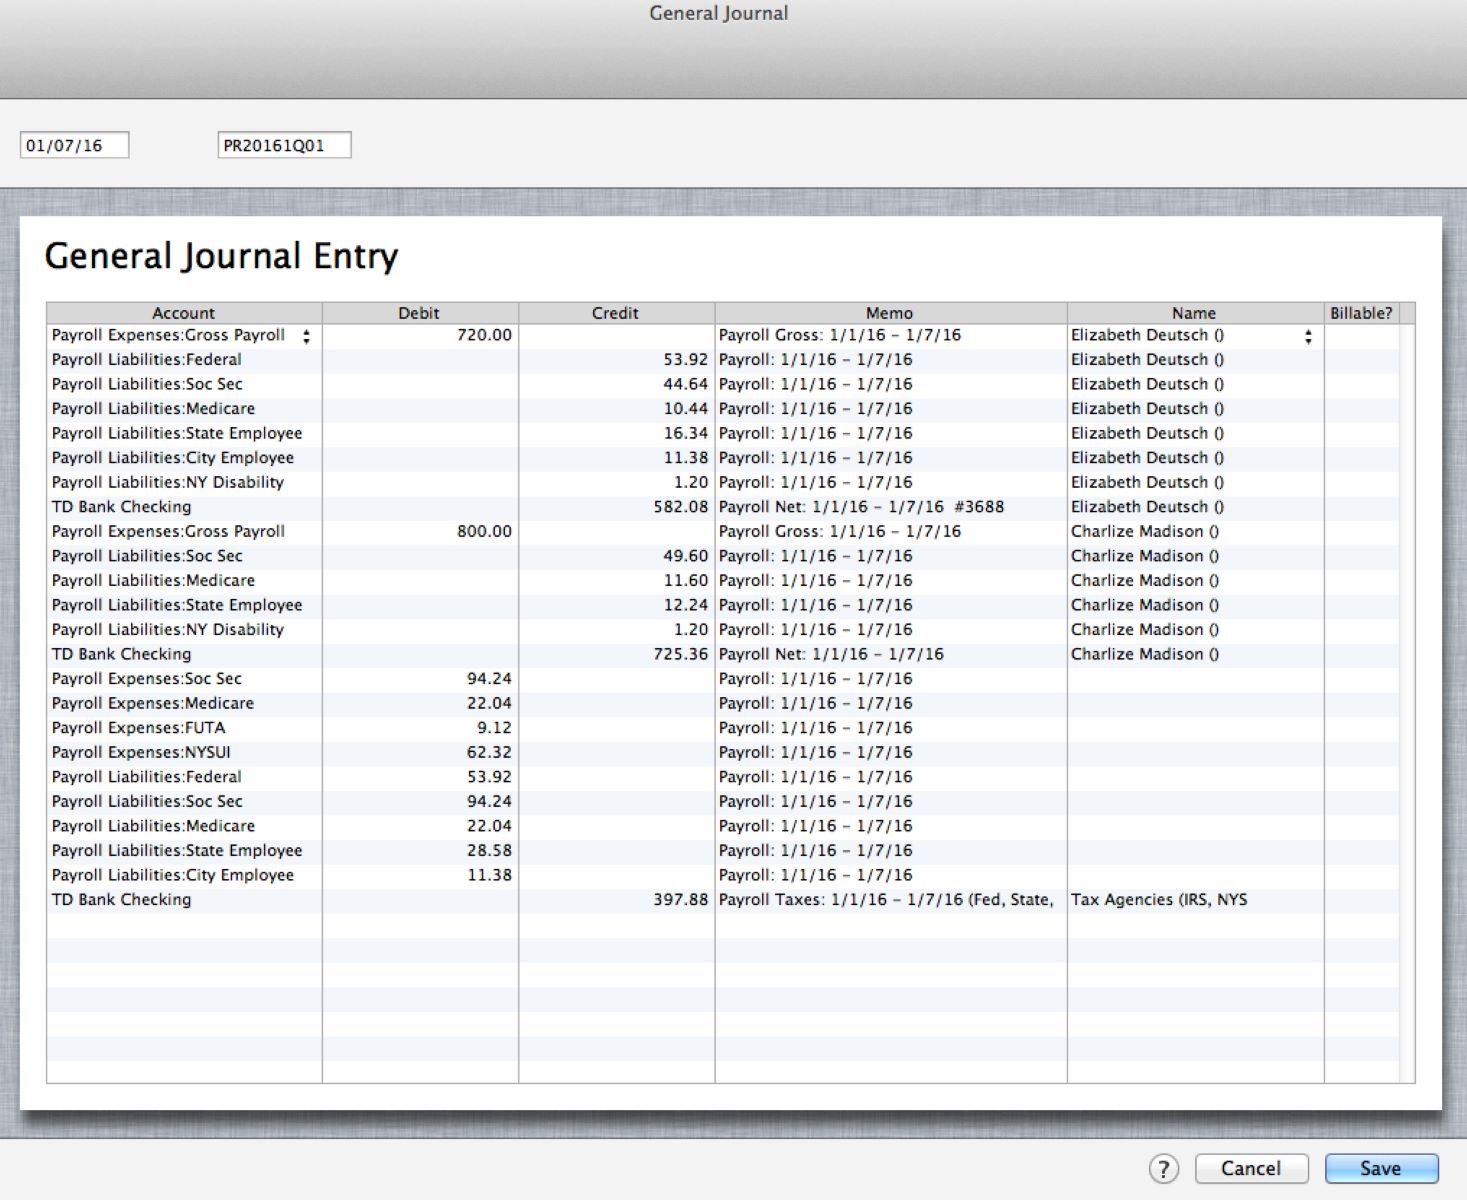
In QuickBooks Online, line items are used to provide a detailed breakdown of the items or services involved in a transaction. This step allows you to add line items to the transaction, specifying what was bought or sold, along with their quantities and prices. Here’s how to add line items:
- In the transaction window, locate the section where you can add line items. This section may be labeled as “Line Items,” “Product/Service,” or something similar, depending on the transaction type.
- For each item or service you want to include as a line item, enter the relevant details. This typically includes the item name, description, quantity, rate, and any other necessary information.
- If you have a long list of line items or multiple products/services to add, you can use the “Add More” or “+” button to include additional rows for each item.
- Double-check the line items to ensure accuracy, such as correct quantities, rates, and descriptions. Make any necessary adjustments or corrections if needed.
Adding line items provides more granularity to your transactions and enhances the accuracy of your financial records. Line items help you track individual items sold or purchased, making it easier to analyze sales by product/service or maintain inventory records.
QuickBooks Online also allows you to track inventory quantities and costs for your products. By using the inventory tracking feature, you can easily monitor stock levels and receive alerts when it’s time to reorder.
Remember, the line items you add should align with the supporting documentation, such as invoices or purchase orders. This ensures consistency between your financial records and the actual goods or services exchanged.
Once you have added all the line item details, you are ready to proceed to the next step to save the transaction with the entered information.
Step 6: Save the Transaction
After entering all the necessary transaction details and adding line items, it’s time to save the transaction in QuickBooks Online. Saving the transaction ensures that the entered information is securely stored and can be accessed for future reference. Here’s how to save the transaction:
- Review the transaction details and line items to ensure accuracy and completeness. Double-check for any errors or missing information before proceeding.
- If there are any optional fields or settings that you want to customize for the transaction, make the necessary adjustments at this stage.
- Click on the “Save” or “Save and Close” button, which is typically located at the bottom or top-right corner of the transaction window.
- QuickBooks Online will now save the transaction and generate a transaction number for future reference. This transaction number is unique to each transaction and can be used to search for or identify the transaction in the future.
Upon saving the transaction, QuickBooks Online will include it in the appropriate account registers and update your financial records accordingly. This ensures that the transaction is properly recorded and can be accurately reflected in reports, financial statements, and when reconciling accounts.
It’s crucial to save transactions promptly and regularly to maintain up-to-date and accurate financial records. This not only helps in tracking your business’s financial health but also ensures compliance with tax regulations and allows for smooth financial analysis and decision-making.
After saving the transaction, you may choose to proceed with reviewing and editing the transaction, applying it to other accounts, adding any attachments or notes, marking it as reconciled, or printing/emailing the transaction as needed. These additional steps provide further functionality and customization options within QuickBooks Online.
With the transaction now saved, you have successfully completed this step. Let’s move on to the next step to review and edit the transaction, if necessary.
Step 7: Review and Edit the Transaction
After saving the transaction in QuickBooks Online, it’s important to review the entered information and ensure its accuracy. This step allows you to catch any errors or discrepancies and make necessary edits before finalizing the transaction. Here’s how to review and edit the transaction:
- Locate and open the saved transaction in QuickBooks Online. You can access it through the transaction list, account registers, or by performing a search using the transaction number or relevant details.
- Thoroughly review all the details of the transaction, including the transaction date, customer/vendor name, account details, line items, and any additional fields or settings that were entered. Ensure that everything is correct and complete.
- If you identify any errors, discrepancies, or missing information, make the necessary edits directly within the transaction window. You can update fields, modify line item details, change accounts, or adjust any other relevant information as needed.
- After making the edits, double-check all the modifications to ensure they are accurate. Take the time to verify the changes and cross-reference them with any supporting documentation, such as invoices or bills.
Reviewing and editing transactions is an important part of maintaining accurate financial records. It allows you to catch and rectify errors or omissions, ensuring that your transactions reflect the actual financial activities of your business.
QuickBooks Online provides a user-friendly interface that makes it easy to review and edit transaction details. The ability to modify transactions provides flexibility and adaptability as your business needs evolve.
Remember to save the transaction again after making any edits to update the changes in your financial records. This ensures that the transaction accurately reflects the updated information.
By thoroughly reviewing and editing transactions, you can maintain the integrity of your financial data and improve the overall reliability of your records. Once you are satisfied with the accuracy of the transaction, it’s time to move on to the next steps, such as applying the transaction to an account or adding attachments or notes (if applicable).
Step 8: Apply the Transaction to an Account
After reviewing and editing the transaction details in QuickBooks Online, the next step is to apply the transaction to the appropriate accounts. This step ensures that the financial impact of the transaction is accurately reflected in your accounts and financial reports. Here’s how to apply the transaction to an account:
- Within the transaction window, locate the section or field where you can select the account(s) to which the transaction should be applied. This section may vary depending on the transaction type and the accounts you have set up in QuickBooks Online.
- Select the relevant account(s) by either typing in the account name or choosing from a list of accounts. Depending on the transaction type, you may need to allocate the amount to multiple accounts or select a specific income or expense category.
- Double-check the account allocations to ensure they are accurate and aligned with the nature of the transaction. Verify that the amounts assigned to each account reflect the appropriate financial impact.
Applying the transaction to the correct accounts ensures that your financial records accurately reflect the flow of funds within your business. It helps track income, expenses, liabilities, and other financial activities, giving you a comprehensive overview of your business’s financial health.
QuickBooks Online allows you to customize your chart of accounts to match your business structure and financial reporting needs. This flexibility allows you to accurately allocate transactions to the specific accounts that align with your business operations.
By applying the transaction to the appropriate accounts, you maintain accuracy in your financial reporting, making it easier to generate financial statements, analyze income and expenses, and track the performance of your business.
Once you have applied the transaction to the relevant accounts, you can proceed to the optional steps of adding attachments or notes, marking the transaction as reconciled, and eventually printing or emailing the transaction if needed.
Step 9: Add Attachments or Notes (Optional)
In QuickBooks Online, you have the option to add attachments or notes to your transactions. This step allows you to provide additional information, supporting documentation, or any specific instructions related to the transaction. Here’s how to add attachments or notes to a transaction:
- Within the transaction window, look for the option or section where you can add attachments or notes. This may be labeled as “Attachments,” “Add Attachment,” or “Notes,” depending on the transaction type and the layout of QuickBooks Online.
- To add attachments, you can typically click on the “Attach File” or similar button. This allows you to upload and associate relevant documents such as receipts, contracts, or invoices to the transaction.
- If you want to add notes or comments, locate the section provided for entering text. You can type in any additional information or details that you wish to include with the transaction.
- For each attachment or note, make sure to provide a concise and descriptive label or description. This helps in quickly identifying and referencing the attached files or notes in the future.
Adding attachments or notes to your transactions can be particularly useful for providing additional context, explanations, or references related to the transaction. It enhances the clarity and completeness of your financial records, making it easier to recall the details of each transaction and resolve any queries or discrepancies down the line.
QuickBooks Online allows you to attach various file formats, such as PDFs, images, or documents, to the transactions. This means you can maintain a digital trail of supporting documents, eliminating the need for physical storage or manual retrieval.
Add any applicable attachments or notes to transactions that require additional documentation or supplementary explanations. This can be particularly helpful for invoices, bills, or any transactions involving complex or unique circumstances.
By leveraging this optional step in QuickBooks Online, you maintain a thorough and well-documented record of your financial transactions, promoting transparency, accountability, and efficient financial management.
Once you have added any desired attachments or notes, you can proceed to the next step of marking the transaction as reconciled (optional) or directly move on to printing or emailing the transaction, if necessary.
Step 10: Mark the Transaction as Reconciled (Optional)
In QuickBooks Online, you have the option to mark transactions as reconciled. This step is particularly useful if you want to keep track of transactions that have been reviewed and matched with your bank or credit card statements during the reconciliation process. Here’s how to mark a transaction as reconciled:
- Within the transaction window, locate the checkbox or field that allows you to mark the transaction as reconciled. This field is often labeled as “Reconcile” or “Cleared.”
- Check the box or select the appropriate option to indicate that the transaction has been reconciled with your bank or credit card statement.
- Save the transaction to apply the reconciled status.
Marking transactions as reconciled serves as a visual indicator to differentiate them from unreconciled transactions. It helps you monitor and track the progress of your reconciliation process and easily identify which transactions have been reviewed and matched with your bank records.
The reconciliation feature in QuickBooks Online allows you to compare your recorded transactions with the transactions listed on your bank statement. By marking transactions as reconciled, you can ensure the accuracy and completeness of your financial records.
It’s important to note that marking a transaction as reconciled in QuickBooks Online does not affect the actual financial transactions or alter any account balances. It is simply a way to keep track of the reconciliation process and provide a clear indication of its completion.
Take advantage of this optional step to streamline your reconciliation process and maintain an organized record of reconciled transactions in QuickBooks Online. Once you have marked the transaction as reconciled (if applicable), you can proceed to the final steps of printing or emailing the transaction, bringing it to completion.
Step 11: Print or Email the Transaction
Once you have completed the necessary steps of adding, reviewing, and finalizing the transaction in QuickBooks Online, the final step is to print or email the transaction. This step allows you to share the transaction with others or create physical copies for your records. Here’s how to print or email the transaction:
- In the transaction window, locate the options to print or email the transaction. These options are typically available at the top or bottom of the transaction window.
- If you choose to print the transaction, click on the “Print” or “Print Transaction” button. A print preview window will appear, allowing you to customize the printing settings, such as the number of copies, page orientation, or paper size. Once you have adjusted the settings, select the printer and click on the “Print” button.
- If you prefer to email the transaction, click on the “Email” or “Email Transaction” button. QuickBooks Online will open a new email window or prompt you to select a recipient from your contacts. Enter the recipient’s email address, add a subject and message, and click on the “Send” button to email the transaction.
Printing or emailing the transaction allows you to share the details of the transaction with others, such as customers, vendors, or your accountant. It provides a physical or digital record of the transaction, making it easier to maintain a comprehensive audit trail and communication history.
QuickBooks Online provides the flexibility to customize and personalize the printed or emailed transactions by incorporating your company logo, adjusting fonts, or including additional information in the email body.
Ensure that you have the necessary permissions and access rights to print or email transactions, as these features may be restricted based on user roles and permissions set in QuickBooks Online.
By printing or emailing the transaction, you complete the final step in adding a transaction in QuickBooks Online. This step allows you to securely store and distribute the transaction information, helping you maintain proper documentation and facilitate communication with relevant parties.
Conclusion
Adding a transaction in QuickBooks Online is a straightforward process that allows you to accurately record your financial activities and maintain organized financial records. By following the steps outlined in this guide, you can confidently navigate QuickBooks Online and enter transactions with ease.
Starting with opening your QuickBooks Online account and navigating to the Transactions section, you can select the appropriate transaction type and enter the necessary details. Adding line items provides further detail and granularity to your transactions, while saving the transaction ensures the information is securely stored and reflected in your financial records.
Reviewing and editing the transaction helps maintain accuracy, and attaching any relevant files or adding notes provides additional context. Marking the transaction as reconciled (if applicable) and printing or emailing the transaction complete the process, allowing for proper documentation and communication.
Throughout the process, it is important to maintain attention to detail and ensure the accuracy of the entered information. This enables you to generate accurate financial reports, make informed business decisions, and comply with tax requirements.
QuickBooks Online streamlines the accounting process for businesses of all sizes, providing a user-friendly platform to manage financial transactions effectively. By leveraging its features and following these steps, you can optimize your bookkeeping and ensure the integrity of your financial records.
Take the time to familiarize yourself with the various transaction types and features available in QuickBooks Online. This will enable you to maximize the software’s potential and customize it to suit your specific business needs.
Remember, accurate and up-to-date financial records are crucial for the success and growth of your business. By utilizing the tools and methods outlined in this guide, you can confidently add transactions in QuickBooks Online and maintain a solid foundation for your financial management.