Introduction
Welcome to the world of QuickBooks, where managing your books and staying on top of your finances has never been easier. As a business owner, it’s crucial to ensure that your financial records are accurate and up-to-date. This is where the process of closing books in QuickBooks comes into play.
Closing books in QuickBooks is a necessary step to finalize your financial records for a specific period, typically at the end of an accounting cycle, such as a month, quarter, or year. It involves completing various tasks to ensure the accuracy and integrity of your financial data. By closing your books, you can lock down the transactions for that period and start fresh with the new accounting period.
But why is it so important to close books in QuickBooks? Closing the books provides several benefits for business owners:
- Accuracy: By thoroughly reviewing and reconciling your accounts, you can identify and correct any errors or discrepancies, ensuring the accuracy of your financial statements.
- Financial Analysis: Closing books allows you to review the performance of your business for that accounting period, assess profitability, and make informed decisions based on accurate financial data.
- Compliance: Closing the books helps you stay compliant with accounting regulations and legal requirements, such as tax reporting.
- Organizational Efficiency: By closing your books, you can start the new accounting period with a clean slate, making it easier to track financial transactions and stay organized.
Now that you understand the importance of closing books in QuickBooks, let’s explore the step-by-step process to properly close your books and ensure the integrity of your financial records.
What is Closing Books in QuickBooks?
Closing books in QuickBooks refers to the process of finalizing your financial records for a specific accounting period. It involves completing a series of tasks to ensure the accuracy and integrity of your financial data. When you close the books, you essentially mark the end of one accounting period and prepare your QuickBooks file for the next period.
During the closing process, QuickBooks performs several essential functions:
- Recording Final Transactions: QuickBooks records the final transactions of the accounting period, ensuring that all financial activities are accurately reflected in the financial statements.
- Calculating Final Balances: QuickBooks calculates and updates the final balances of your income, expense, asset, liability, and equity accounts.
- Preparing Financial Reports: QuickBooks generates various financial reports, such as the Income Statement, Balance Sheet, and Cash Flow Statement, based on the finalized data.
- Enabling Period-Specific Reporting: Closing the books makes it easier to view and analyze financial data for a specific period without the inclusion of subsequent transactions.
- Creating a Clean Slate: By closing your books, you start the new accounting period with zero balances in your income and expense accounts.
It’s important to note that closing the books in QuickBooks does not delete any of your financial data. Instead, it helps you organize and finalize your records, making it easier to manage and analyze your business’s financial information.
When you close your books in QuickBooks, the system creates an automatic closing entry that transfers net income or loss to the retained earnings account. This helps maintain the accuracy of your financial statements and ensures that your balance sheet reflects your business’s current financial position.
Now that you have a clear understanding of what closing books in QuickBooks entails, let’s delve into the step-by-step process to successfully close your books and maintain accurate financial records.
Why is it Important to Close Books?
Closing books in QuickBooks is a critical step in maintaining accurate financial records and ensuring the smooth operation of your business. Let’s explore some of the key reasons why closing books is important:
- Accuracy of Financial Statements: Closing books allows you to review and reconcile your accounts, ensuring the accuracy of your financial statements. By identifying and correcting any errors or discrepancies, you can present a clear and reliable picture of your business’s financial health.
- Monitoring Business Performance: When you close the books, you gain insights into your business’s performance during the accounting period. You can analyze your income and expenses, assess profitability, and make informed decisions based on accurate financial data.
- Legal and Regulatory Compliance: Closing books helps you stay compliant with accounting regulations and legal requirements. It ensures that your financial records are in order, making tax reporting and audits smoother processes. It also demonstrates your commitment to financial transparency and accountability.
- Enhanced Financial Analysis: Closing the books allows you to compare and analyze financial data across different accounting periods. This enables you to identify trends, track the success of your business initiatives, and make strategic decisions based on historical performance.
- Organizational Efficiency: By closing your books, you start the new accounting period with a clean slate. This helps you stay organized and maintain clear financial records throughout the year. It also simplifies the tracking of transactions and the preparation of financial reports.
- Facilitates Year-End Closing: Closing your books on a regular basis makes year-end closing smoother and less overwhelming. By staying on top of your financial records throughout the year, you can avoid the stress and challenges that often accompany the year-end closing process.
By recognizing the importance of closing books in QuickBooks, you can ensure the accuracy, integrity, and compliance of your financial records. It provides you with a solid foundation for making informed decisions, tracking your business performance, and maintaining a healthy financial position.
Now that we understand the significance of closing books, let’s dive into the step-by-step process of closing books in QuickBooks.
Step 1: Reconcile All Accounts
Before closing the books in QuickBooks, it’s crucial to reconcile all your accounts to ensure that they accurately reflect your business’s financial position. Reconciliation involves comparing your account balances in QuickBooks with your bank statements or other external records to identify any discrepancies.
Here’s how to reconcile your accounts in QuickBooks:
- Gather Supporting Documents: Collect all the necessary bank statements, credit card statements, and other relevant financial documents for the accounting period you’re reconciling.
- Access the Reconciliation Tool: In QuickBooks, navigate to the Banking menu and select Reconcile. Choose the appropriate account you want to reconcile from the drop-down menu.
- Verify Opening Balance: Ensure that the opening balance in QuickBooks matches the starting balance on your bank statement for the accounting period.
- Enter Statement End Date: Enter the end date of the statement period for your bank account or credit card statement.
- Compare Transactions: Compare each transaction listed on your bank statement with those recorded in QuickBooks. Ensure that the dates, amounts, and descriptions match.
- Mark Transactions as Cleared: As you confirm that transactions on your bank statement match those in QuickBooks, mark them as cleared.
- Reconcile Discrepancies: If you identify any discrepancies, investigate and resolve them by correcting errors or reaching out to your bank or credit card provider for clarification.
- Complete Reconciliation: Once all transactions are cleared and discrepancies are resolved, click the Finish Reconciliation button to complete the process.
By reconciling your accounts, you ensure that the balances in QuickBooks align with your actual bank balances, reducing the risk of errors and discrepancies in your financial records.
Once you’ve successfully reconciled all your accounts, you’re ready to move on to the next step in closing your books: reviewing and correcting any errors.
Step 2: Review and Correct Any Errors
After reconciling your accounts, the next step in closing books in QuickBooks is to review your financial records and correct any errors you may come across. This is a crucial step to ensure the accuracy and integrity of your financial data.
Here’s how to review and correct errors in QuickBooks:
- Review Income and Expense Accounts: Go through your income and expense accounts to verify that all transactions are correctly categorized. Ensure that there are no duplicate entries or missing transactions.
- Check Asset and Liability Accounts: Review your asset and liability accounts to ensure that balances are accurate. Confirm that any outstanding loans or deposits are properly recorded.
- Verify Vendor and Customer Balances: Verify that the balances owed to vendors and by customers are accurate. Make sure that there are no discrepancies or unpaid bills.
- Investigate Any Discrepancies: If you notice any discrepancies or inconsistencies in your financial records, investigate the causes. This may involve reaching out to vendors, customers, or your financial team to resolve any outstanding issues.
- Make Corrective Entries: Use the journal entry feature in QuickBooks to make any necessary corrections. Ensure that you document the reason for the entry and include any supporting information.
- Reconcile Again (If Required): If the corrections made impact previously reconciled accounts, you may need to repeat the reconciliation process to ensure that your financial records are accurate.
By reviewing your financial records in detail and correcting any errors, you can maintain the integrity of your financial data and ensure that your books accurately reflect your business’s financial position.
Once you’ve reviewed and corrected any errors, you can proceed to the next step: adjusting journal entries.
Step 3: Adjust Journal Entries
In the process of closing books in QuickBooks, adjusting journal entries play a crucial role in ensuring the accuracy and completeness of your financial records. Adjustments are necessary to account for any transactions or events that may have occurred but were not captured in real-time.
Here’s how to adjust journal entries in QuickBooks:
- Identify Adjusting Entries: Review your financial records and identify any transactions or events that require adjustments. This could include accruals, prepayments, depreciation, or any other items that need to be recognized.
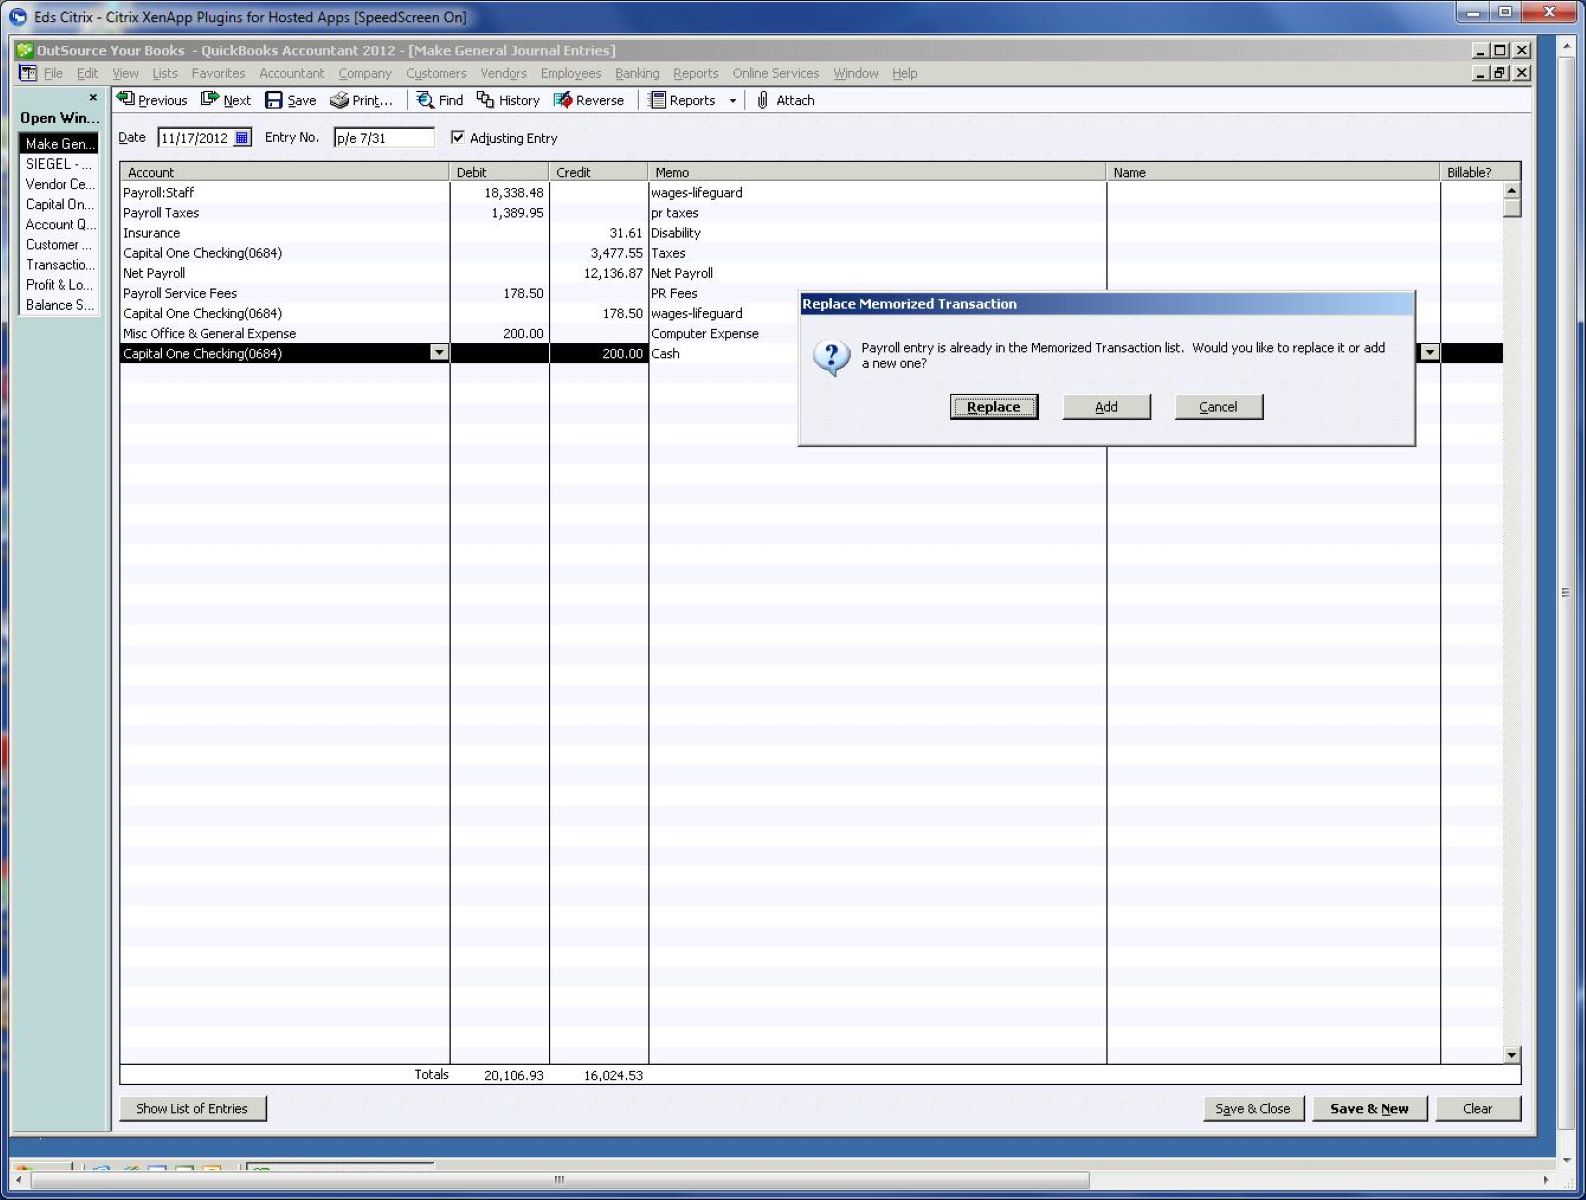
- Create Journal Entry: Access the Make General Journal Entries screen in QuickBooks and enter the appropriate date for the adjustment. Specify the accounts involved and the amounts for each entry.
- Provide Explanation: Include a brief description or explanation of the adjustment to document why it is necessary. This will aid in future reference and understanding.
- Verify Reconciliation Impact: If the adjustment affects a previously reconciled account, ensure that you verify and update your reconciled balances accordingly.
- Double-Check Accuracy: Review the journal entry details to ensure accuracy and completeness. Make any necessary corrections or adjustments before finalizing the entry.
- Save and Record Entry: Save the adjusted journal entry in QuickBooks to officially record the adjustment. This ensures that your financial records are updated to reflect the appropriate adjustments.
Adjusting journal entries are vital to provide an accurate and realistic depiction of your business’s financial position. By making these adjustments as part of the closing process, you can ensure that your financial statements are complete and reflect the true financial health of your business.
Now that you’ve adjusted journal entries, it’s time to move onto the next step: creating a backup of your data to safeguard your financial records.
Step 4: Make Backup of Your Data
Making a backup of your data is an essential step when closing books in QuickBooks. A backup ensures that your financial records are protected and can be easily restored in case of data loss, corruption, or other unforeseen circumstances.
Here’s how to make a backup of your QuickBooks data:
- Access the Backup Function: In QuickBooks, navigate to the File menu and select Create Backup.
- Choose Backup Location: Select the location where you want to save your backup file. It’s recommended to store backups on external devices such as an external hard drive, cloud storage, or a remote server.
- Customize Backup Options: QuickBooks provides various backup options. You can choose to backup essential data only or include the attachments, transaction logs, and other related files. Select the options that best suit your needs.
- Set Backup Schedule: Consider setting up a regular backup schedule to automate the process. This ensures that your data is consistently backed up without the need for manual intervention.
- Review and Confirm Backup Settings: Double-check your backup settings to ensure they align with your preferences and requirements. Verify the destination folder and file name for the backup.
- Initiate Backup: Click the Backup button to start the backup process. QuickBooks will generate a backup file containing all your financial data and settings.
- Verify Backup Completion: Once the backup is complete, verify that the file has been successfully created in the specified location. Periodically check your backups to ensure they are complete and accessible.
Creating regular backups is crucial as it protects your financial records from potential data loss, system failures, or security breaches. It gives you peace of mind knowing that you can always restore your data to a previous state, preserving the integrity of your financial records.
Now that you have successfully created a backup of your QuickBooks data, you are ready to proceed to the final step: closing the books.
Step 5: Close the Books
The final step in closing books in QuickBooks is to officially close the books for the accounting period. This step involves performing a few key actions to finalize your financial records and start fresh for the next accounting period.
Here’s how to close the books in QuickBooks:
- Create a Backup: Before proceeding with the closing process, it’s crucial to create a backup as a safety measure to protect your data.
- Generate Financial Reports: Run and review the necessary financial reports, such as the Income Statement and Balance Sheet, for the accounting period you are closing. Ensure that they accurately reflect your financial performance and position.
- Check for Transactions: Ensure that there are no pending transactions or outstanding items that need to be recorded for the accounting period. It’s essential to account for all transactions before closing the books.
- Verify Retained Earnings: Review the retained earnings account and verify that it reflects the correct balance. It should include the net income or loss for the accounting period.
- Create a Closing Entry: In QuickBooks, create a closing entry to transfer the net income or loss from the income and expense accounts to the retained earnings account. This ensures that the income and expense accounts start fresh with zero balances for the next accounting period.
- Record Closing Entry: Save and record the closing entry in QuickBooks to permanently update the account balances. This marks the end of the accounting period and finalizes your financial records.
- Lock Transactions: To prevent accidental changes or modifications to the closed books, consider setting a closing date password. This restricts access to the closed accounting period, ensuring the integrity of your financial records.
By following these steps, you successfully close the books in QuickBooks and transition to the next accounting period. Your financial records are now complete and ready for analysis, reporting, and decision-making.
Remember, closing the books is not a reversible process. Therefore, it’s important to double-check all the steps and ensure that your financial data is accurate and up to date before proceeding with the closing process.
Congratulations! You have successfully closed the books in QuickBooks and are ready to start fresh with a new accounting period.
Conclusion
Closing the books in QuickBooks is a vital process for any business owner or bookkeeper. It ensures the accuracy, integrity, and completeness of your financial records for a specific accounting period. By following the step-by-step process outlined in this guide, you can confidently close your books and start fresh for the next accounting period.
We began by understanding the importance of closing books in QuickBooks, which includes maintaining accurate financial statements, monitoring business performance, complying with regulations, and promoting organizational efficiency. We then explored the crucial steps involved in closing books:
- Reconciling all accounts to ensure accuracy
- Reviewing and correcting any errors that may be present
- Adjusting journal entries to account for missed transactions or events
- Making a backup of your data to safeguard against potential loss or corruption
- Finally, officially closing the books and updating account balances
By following these steps diligently, you can have confidence in the accuracy and completeness of your financial records. Closing the books in QuickBooks allows you to analyze your business’s financial performance, make informed decisions, and stay compliant with legal and regulatory requirements.
Remember, the process of closing books should be performed regularly at the end of each accounting period, such as a month, quarter, or year. This ensures that your financial records stay up to date and provides a solid foundation for efficient year-end closing.
As you close your books, always keep in mind the importance of data security. Regularly back up your QuickBooks data to ensure that your financial information is safe and readily accessible in case of any unforeseen events.
Closing the books in QuickBooks is not just a routine task – it is a critical part of managing your business’s financial health. By dedicating time and attention to the closing process, you can maintain accurate records, make informed decisions, and drive your business towards continued success.