Introduction
Memorized transactions in QuickBooks are a powerful feature that allows you to automate recurring transactions, such as invoices, bills, and checks. However, there may come a time when you no longer need a particular memorized transaction and want to delete it from your list.
By removing unnecessary memorized transactions, you can keep your QuickBooks file clean and organized, ensuring that only relevant and active transactions are maintained. Deleting memorized transactions is a straightforward process that can be done within QuickBooks with just a few simple steps.
In this article, we will guide you through the process of deleting a memorized transaction in QuickBooks, whether you need to delete a single transaction or multiple transactions. By following these steps, you can effectively manage your memorized transactions and streamline your accounting workflow.
Before we begin, please note that deleting a memorized transaction cannot be undone. Make sure to double-check and confirm the deletion before proceeding. Additionally, it is recommended to create a backup of your QuickBooks file before making any changes to ensure the safety of your data.
Accessing the Memorized Transactions List
To delete a memorized transaction in QuickBooks, you first need to access the Memorized Transactions List. Here’s how:
- Launch QuickBooks and open your company file.
- From the top menu, click on the “Lists” menu and select “Memorized Transactions” from the dropdown list. Alternatively, you can press “Ctrl+T” on your keyboard as a shortcut to access the Memorized Transactions List.
Once you click on “Memorized Transactions,” a new window will open, displaying a list of all the memorized transactions in your QuickBooks file. This list contains details such as the transaction name, type, and frequency.
If you have a long list of memorized transactions and want to find a specific transaction, you can use the search bar at the top of the window. Simply enter the transaction name or a keyword related to the transaction you wish to delete, and QuickBooks will filter the list accordingly.
Now that you have accessed the Memorized Transactions List, you are ready to proceed to the next step, which is selecting the memorized transaction you want to delete. In the following section, we will walk you through the process of selecting a single memorized transaction for deletion.
Selecting the Memorized Transaction to Delete
Once you have accessed the Memorized Transactions List in QuickBooks, the next step is to select the specific memorized transaction that you want to delete. Here’s how:
- Scroll through the list of memorized transactions or use the search bar to locate the transaction you wish to delete.
- Once you have found the desired transaction, click on it to highlight it. You will notice that the selected transaction is displayed in blue or has a checkmark next to it, indicating that it is selected.
If you want to delete multiple memorized transactions, hold down the “Ctrl” key on your keyboard while clicking on each transaction you wish to delete. This allows you to select multiple transactions at once.
Alternatively, if you want to select all memorized transactions in the list, you can click on the “Edit” menu and choose “Select All”. This will highlight all the transactions, and you can proceed with deleting them.
Make sure to review your selection and verify that you have chosen the correct memorized transaction(s) for deletion. Take a moment to ensure that you are not accidentally selecting any transactions that you still need or want to keep.
After selecting the memorized transaction(s) you want to delete, you are ready to move on to the next step, which involves deleting a single memorized transaction. This process will be covered in the following section.
Deleting a Single Memorized Transaction
Deleting a single memorized transaction in QuickBooks is a simple process. Once you have selected the specific transaction you wish to delete, follow the steps below:
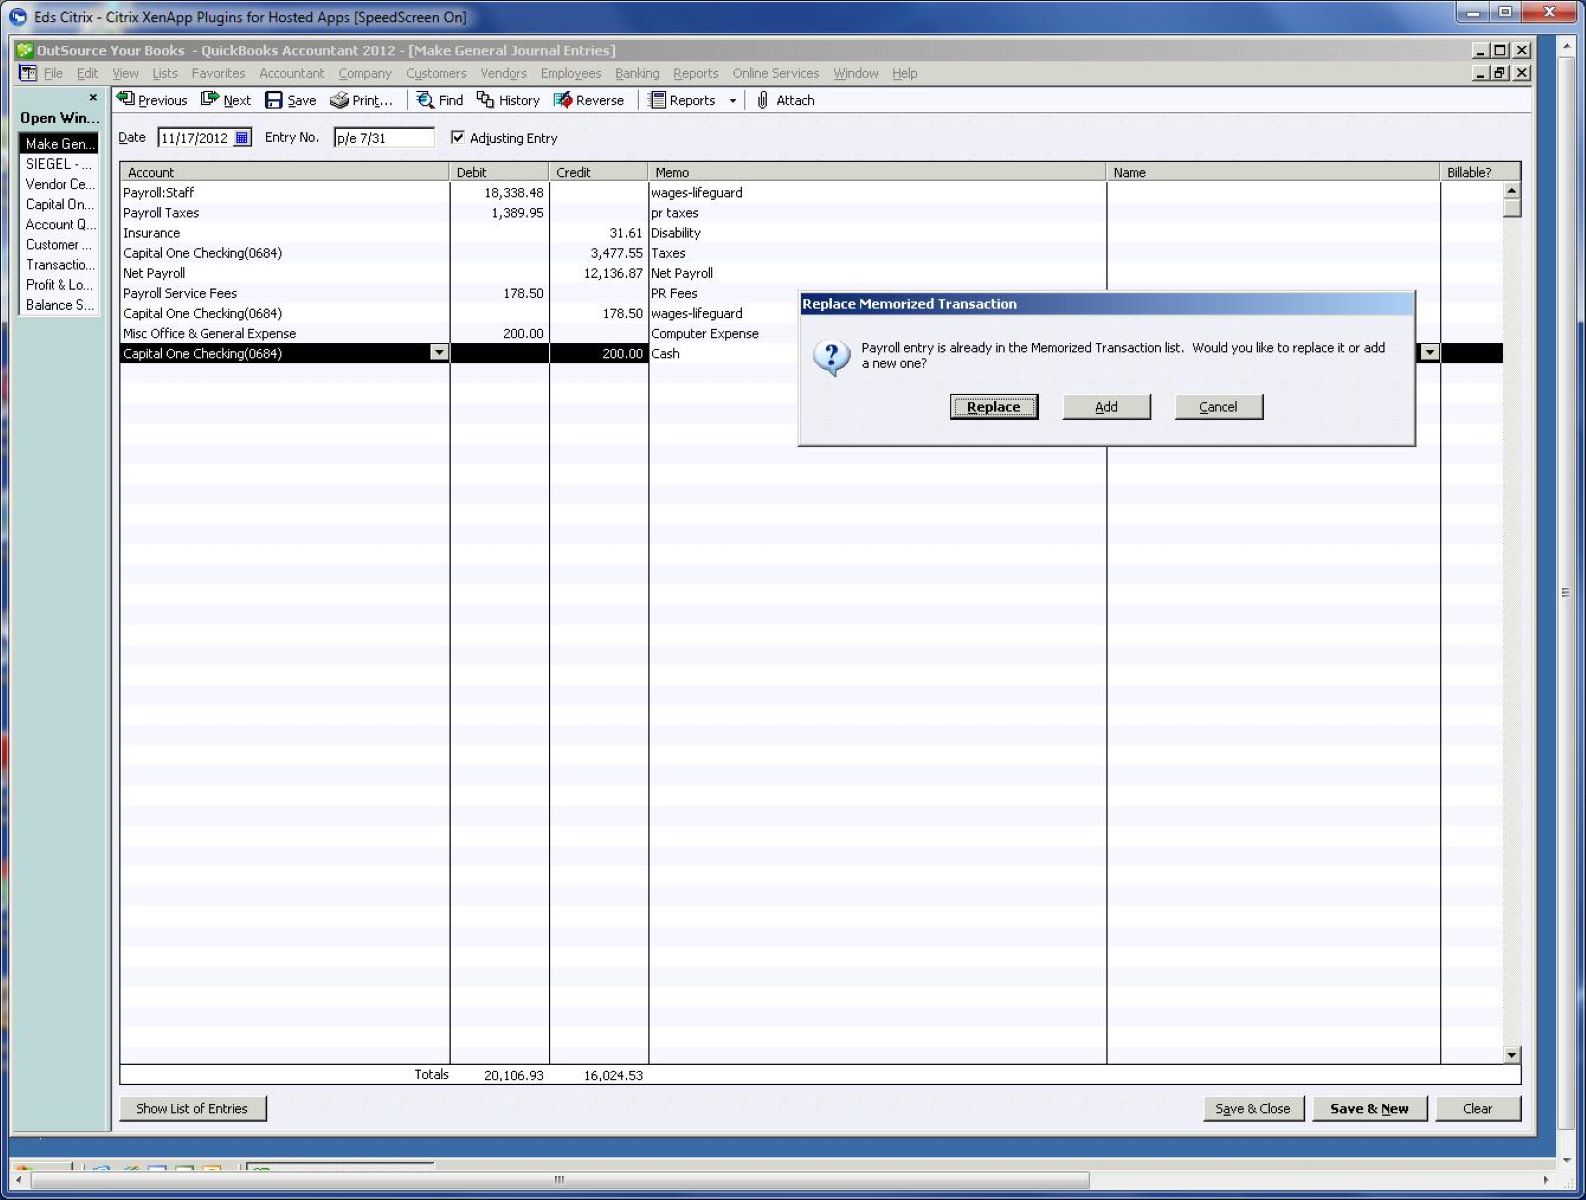
- With the desired memorized transaction selected, click on the “Edit” menu and choose “Delete Memorized Transaction” from the dropdown list. Alternatively, you can also right-click on the selected transaction and choose “Delete Memorized Transaction”.
- A confirmation window will appear, asking if you are sure you want to delete the transaction. Review the transaction details once again to ensure it is the correct one, as this action cannot be undone.
- If you are certain that you want to proceed with the deletion, click on the “OK” button to confirm.
QuickBooks will then remove the selected memorized transaction from your list, permanently deleting it from your file. The transaction will no longer appear in your Memorized Transactions List, and it will not be included in any future transactions.
It’s important to note that the deletion of a memorized transaction does not affect any existing transactions that were created based on that memorized template. Only the specific memorized transaction itself is deleted.
This process allows you to eliminate any unnecessary or outdated memorized transactions, ensuring that your list remains accurate and relevant to your current accounting needs.
Now that you have learned how to delete a single memorized transaction, let’s move on to the next section, which explains how to delete multiple memorized transactions simultaneously.
Deleting Multiple Memorized Transactions
If you have several memorized transactions that you want to delete at once, QuickBooks provides an efficient way to do so. Follow the steps below to delete multiple memorized transactions:
- Select the first transaction you want to delete by clicking on it or using the Ctrl key to select multiple transactions.
- Hold down the Shift key on your keyboard and click on the last transaction in the list that you want to delete. This will select all the transactions between the first and last transactions.
- With the multiple transactions selected, click on the “Edit” menu and choose “Delete Memorized Transactions” from the dropdown list. Alternatively, right-click on any of the selected transactions and choose “Delete Memorized Transactions”.
- A confirmation window will appear, displaying the number of selected transactions and asking if you are sure you want to delete them. Double-check that the correct transactions are selected for deletion.
- If you are certain that you want to proceed with the deletion, click on the “Delete” button to confirm.
QuickBooks will remove all the selected memorized transactions from your list in one go. This streamlined process saves you time and effort when you need to delete multiple transactions simultaneously.
Remember, just like deleting a single memorized transaction, the deletion of multiple transactions cannot be undone. Make sure to review your selection and ensure that you are deleting the correct transactions.
By deleting unnecessary or outdated memorized transactions, you can keep your Memorized Transactions List organized and relevant to your current accounting needs.
Now that you know how to delete both single and multiple memorized transactions, we can move on to the next section, which covers the final step of confirming the deletion.
Confirming the Deletion
After you have deleted the memorized transaction(s) in QuickBooks, it is important to confirm that the deletion was successful. Here’s what you should do:
- Close the Memorized Transactions List window by clicking on the “Close” button.
- Open the list again by clicking on the “Lists” menu and selecting “Memorized Transactions” or using the Ctrl+T keyboard shortcut.
The previously deleted transaction(s) should no longer appear in the list. If they are still visible, go back to the previous steps and make sure you followed the deletion process correctly.
It is worth noting that the deleted transactions will no longer be available for use in any new or recurring transactions. The deletion action ensures that you can maintain an accurate and clutter-free Memorized Transactions List in QuickBooks.
By regularly reviewing and deleting unnecessary memorized transactions, you can streamline your accounting workflow and prevent any confusion or errors that may arise from outdated or irrelevant transactions.
Make sure to follow proper backup practices for your QuickBooks file to safeguard your data. This way, if you accidentally delete a memorized transaction or need to retrieve one in the future, you can restore a previous backup and recover the deleted transaction(s).
With the deletion process complete and the confirmation of successful deletion, you have effectively managed your memorized transactions and optimized your QuickBooks file. Congratulations!
Remember to regularly review your memorized transactions and delete any that are no longer needed to keep your accounting system organized and efficient.
Thank you for following this guide on how to delete memorized transactions in QuickBooks. We hope this information has been useful and helpful in streamlining your accounting processes.
Conclusion
In conclusion, the ability to delete memorized transactions in QuickBooks is an essential feature that allows you to maintain a clean and organized accounting system. By following the simple steps outlined in this guide, you can easily delete both single and multiple memorized transactions.
Remember to access the Memorized Transactions List to locate the transactions you want to delete. Take care in selecting the correct transaction(s) to avoid accidental deletions. QuickBooks provides the option to delete a single memorized transaction or multiple transactions at once, depending on your needs.
Always double-check your selection before confirming the deletion, as the process cannot be undone. Additionally, it is advisable to create regular backups of your QuickBooks file to protect your data.
By regularly reviewing and deleting unnecessary memorized transactions, you can keep your list clean and updated. This helps ensure that only relevant and active transactions are maintained, improving the efficiency of your accounting workflow.
We hope that this guide has provided you with a clear understanding of how to delete memorized transactions in QuickBooks. Implementing these steps will help you effectively manage your memorized transactions and maintain a well-organized accounting system.
If you have any further questions or need additional assistance, consult the QuickBooks Help Center or reach out to the QuickBooks support team for guidance. They are always ready to assist you with any concerns you may have.
Thank you for reading this article, and we wish you success in managing your memorized transactions in QuickBooks!